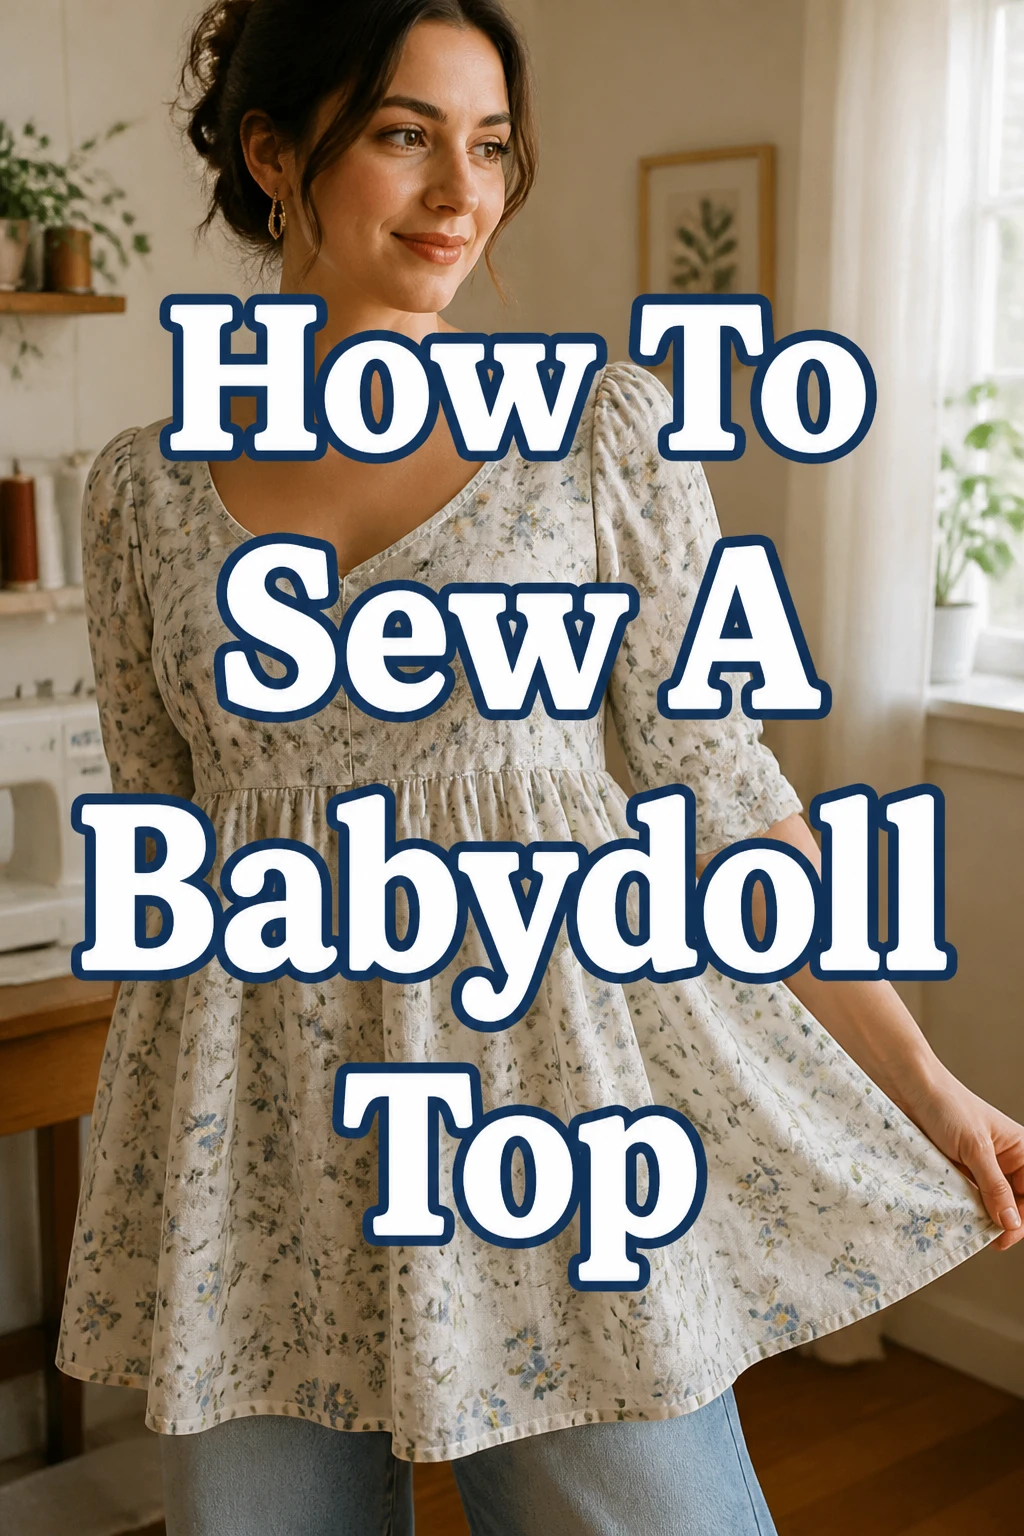
How To Sew A Babydoll Top

Beginner-friendly templates, step-by-step guides,
and weekly project ideas in your inbox.
There’s a unique joy in wearing something you’ve created with your own hands, especially a garment as charming as a babydoll top.
I remember the satisfaction of stitching my first one, realizing how a simple pattern could transform into a beloved wardrobe staple.
This guide draws from years of practical sewing experience to walk you through every step, ensuring your project is both successful and enjoyable.
Quick Overview
Creating a babydoll top allows you to customize your wardrobe with a comfortable and stylish piece. This project involves basic garment construction techniques, perfect for expanding your sewing skills. By the end, you’ll have a beautiful, handmade top ready to wear.
- Time needed: 4-7 hours (depending on experience and detail)
- Difficulty: Intermediate
- What you’ll need: Fabric, a babydoll top pattern, matching thread, sewing machine, fabric shears, pins, iron, measuring tape, seam ripper.
Step-by-Step Instructions
Step 1: Gather Your Materials and Prepare Your Fabric
Before you begin cutting, ensure you have everything laid out and ready. This initial preparation saves time and prevents interruptions later on.
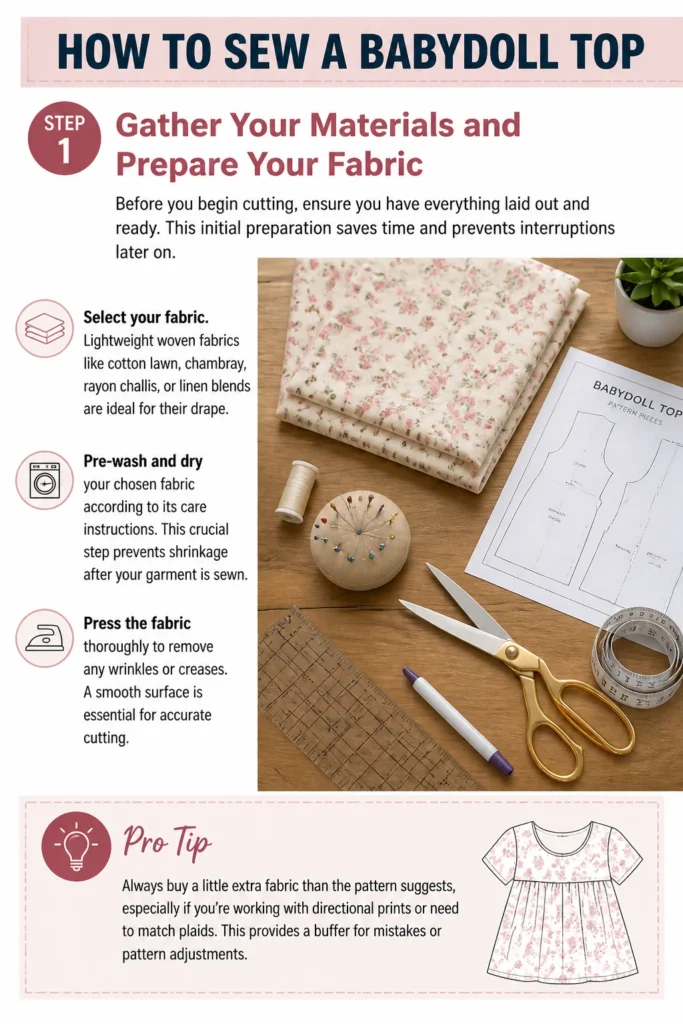
- Select your fabric. Lightweight woven fabrics like cotton lawn, chambray, rayon challis, or linen blends are ideal for their drape.
- Pre-wash and dry your chosen fabric according to its care instructions. This crucial step prevents shrinkage after your garment is sewn.
- Press the fabric thoroughly to remove any wrinkles or creases. A smooth surface is essential for accurate cutting.
Pro Tip: Always buy a little extra fabric than the pattern suggests, especially if you’re working with directional prints or need to match plaids. This provides a buffer for mistakes or pattern adjustments.
Step 2: Cut Out Your Pattern Pieces
Accuracy in this step directly impacts the fit and finish of your babydoll top. Take your time and use sharp tools.
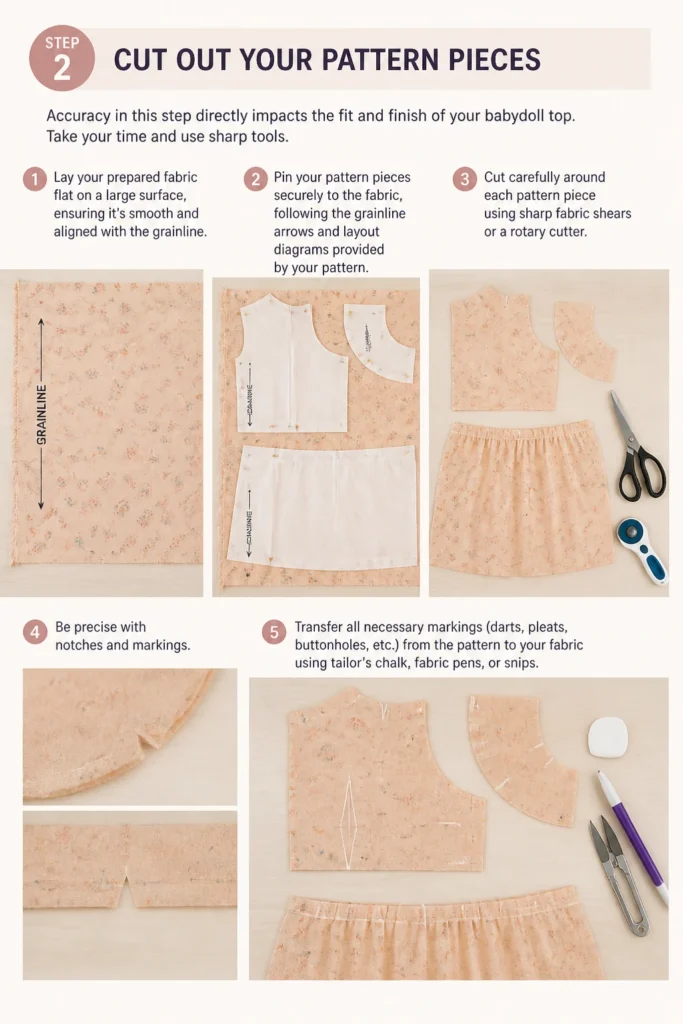
- Lay your prepared fabric flat on a large surface, ensuring it’s smooth and aligned with the grainline.
- Pin your pattern pieces securely to the fabric, following the grainline arrows and layout diagrams provided by your pattern.
- Cut carefully around each pattern piece using sharp fabric shears or a rotary cutter. Be precise with notches and markings.
- Transfer all necessary markings (darts, pleats, buttonholes, etc.) from the pattern to your fabric using tailor’s chalk, fabric pens, or snips.
Step 3: Construct the Bodice
The bodice forms the fitted upper part of your babydoll top. This usually involves sewing darts and shoulder seams.
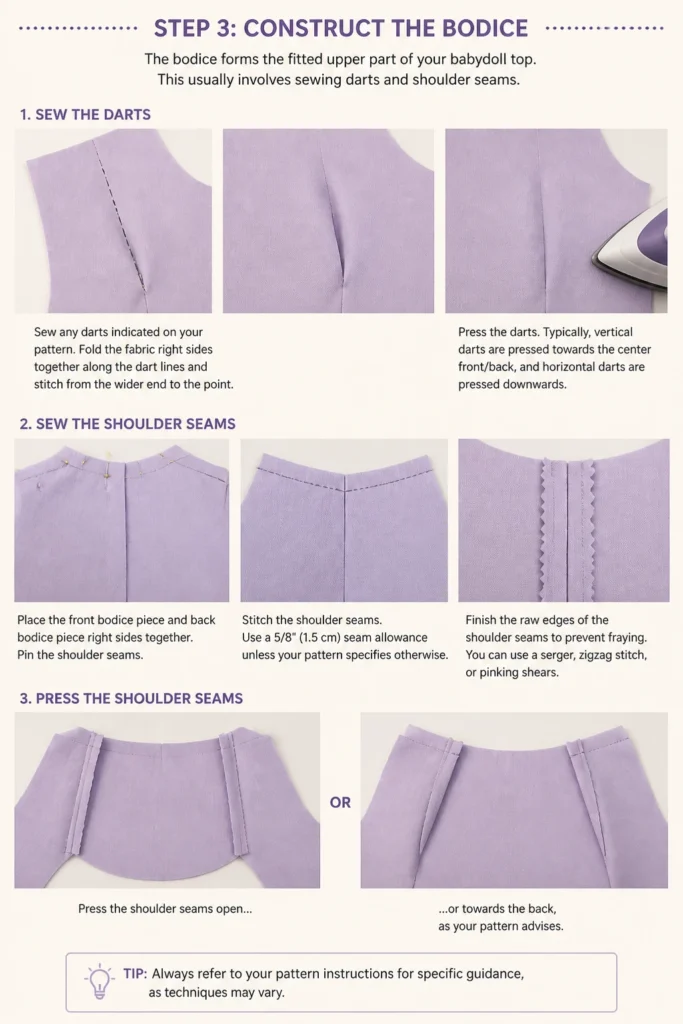
- Sew any darts indicated on your pattern. Fold the fabric right sides together along the dart lines and stitch from the wider end to the point.
- Press the darts. Typically, vertical darts are pressed towards the center front/back, and horizontal darts are pressed downwards.
- Place the front bodice piece and back bodice piece right sides together.
- Pin and stitch the shoulder seams. Use a 5/8″ (1.5 cm) seam allowance unless your pattern specifies otherwise.
- Finish the raw edges of the shoulder seams to prevent fraying. You can use a serger, zigzag stitch, or pinking shears.
- Press the shoulder seams open or towards the back, as your pattern advises.
Step 4: Prepare and Gather the Skirt/Ruffle Section
The signature element of a babydoll top is its gathered skirt. This adds volume and a playful silhouette.
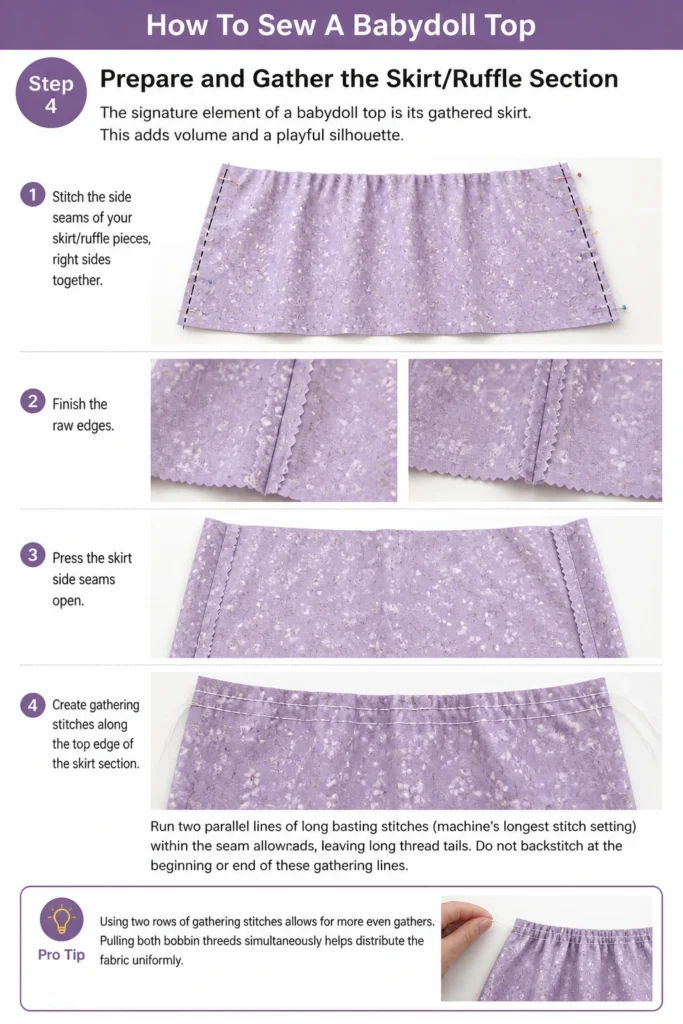
- Stitch the side seams of your skirt/ruffle pieces, right sides together. Finish the raw edges.
- Press the skirt side seams open.
- Create gathering stitches along the top edge of the skirt section. Run two parallel lines of long basting stitches (machine’s longest stitch setting) within the seam allowance, leaving long thread tails.
- Do not backstitch at the beginning or end of these gathering lines.
Pro Tip: Using two rows of gathering stitches allows for more even gathers. Pulling both bobbin threads simultaneously helps distribute the fabric uniformly.
Step 5: Attach the Bodice to the Skirt
This step brings the two main sections of your top together. Careful pinning ensures even distribution of gathers.
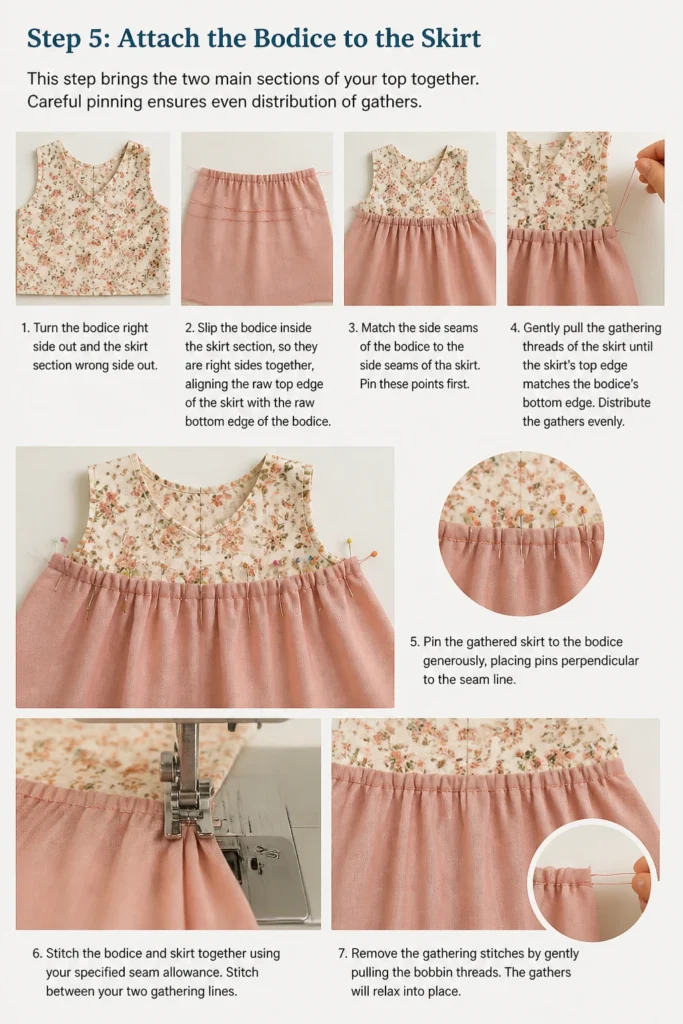
- Turn the bodice right side out and the skirt section wrong side out.
- Slip the bodice inside the skirt section, so they are right sides together, aligning the raw top edge of the skirt with the raw bottom edge of the bodice.
- Match the side seams of the bodice to the side seams of the skirt. Pin these points first.
- Gently pull the gathering threads of the skirt until the skirt’s top edge matches the bodice’s bottom edge. Distribute the gathers evenly.
- Pin the gathered skirt to the bodice generously, placing pins perpendicular to the seam line.
- Stitch the bodice and skirt together using your specified seam allowance. Stitch between your two gathering lines.
- Remove the gathering stitches.
- Finish the raw edges of this waist seam.
- Press the seam allowance upwards towards the bodice.
Step 6: Finish the Neckline
A neat neckline gives your top a professional finish. Patterns often suggest facing or bias binding.
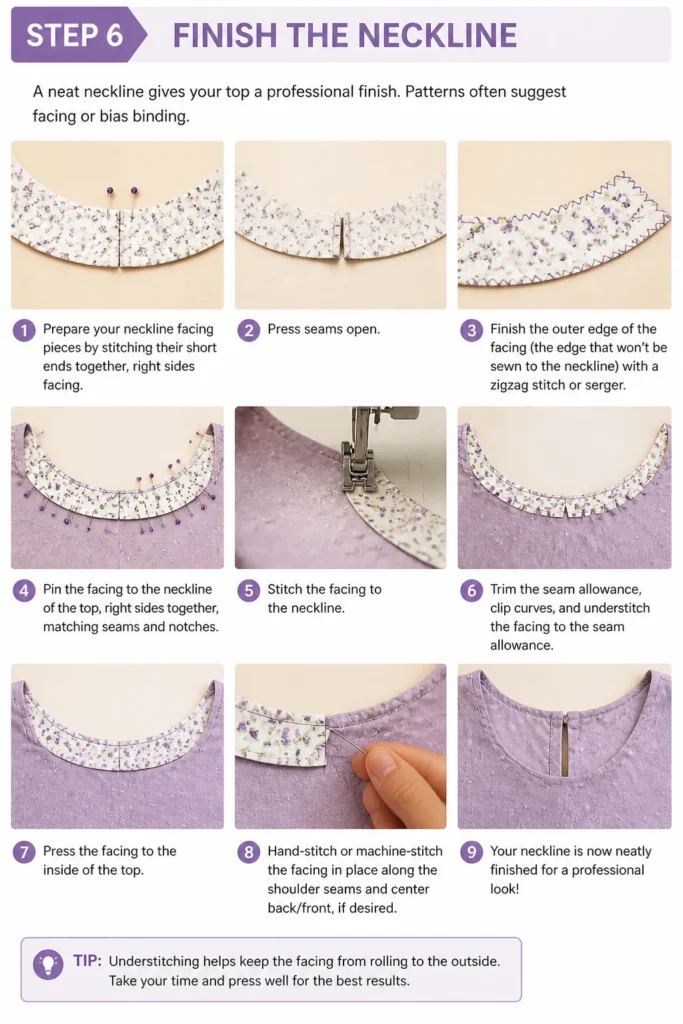
- Prepare your neckline facing pieces by stitching their short ends together, right sides facing. Press seams open.
- Finish the outer edge of the facing (the edge that won’t be sewn to the neckline) with a zigzag stitch or serger.
- Pin the facing to the neckline of the top, right sides together, matching seams and notches.
- Stitch the facing to the neckline.
- Trim the seam allowance, clip curves, and understitch the facing to the seam allowance.
- Press the facing to the inside of the top. Hand-stitch or machine-stitch the facing in place along the shoulder seams and center back/front, if desired.
Step 7: Attach Sleeves (if applicable)
If your babydoll top has sleeves, this is where they come into play. Many babydoll patterns feature puff sleeves or simple cap sleeves.
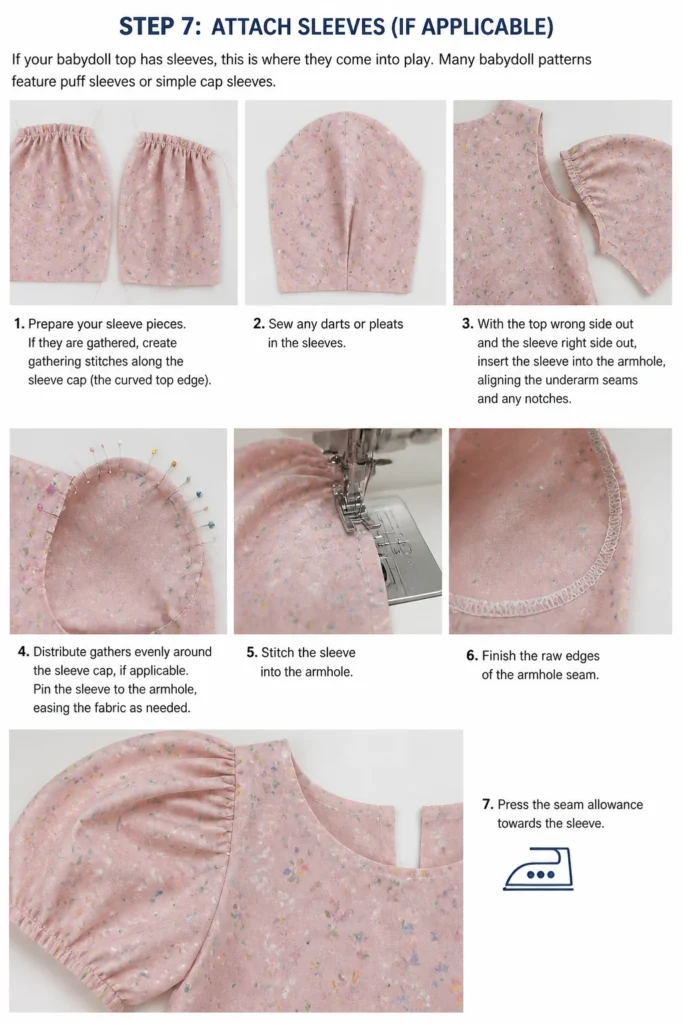
- Prepare your sleeve pieces. If they are gathered, create gathering stitches along the sleeve cap (the curved top edge).
- Sew any darts or pleats in the sleeves.
- With the top wrong side out and the sleeve right side out, insert the sleeve into the armhole, aligning the underarm seams and any notches.
- Distribute gathers evenly around the sleeve cap, if applicable.
- Pin the sleeve to the armhole, easing the fabric as needed.
- Stitch the sleeve into the armhole.
- Finish the raw edges of the armhole seam.
- Press the seam allowance towards the sleeve.
Step 8: Hem the Sleeves and Bottom Edge
Hems provide a clean, finished edge to your garment. Always press before stitching for crisp results.
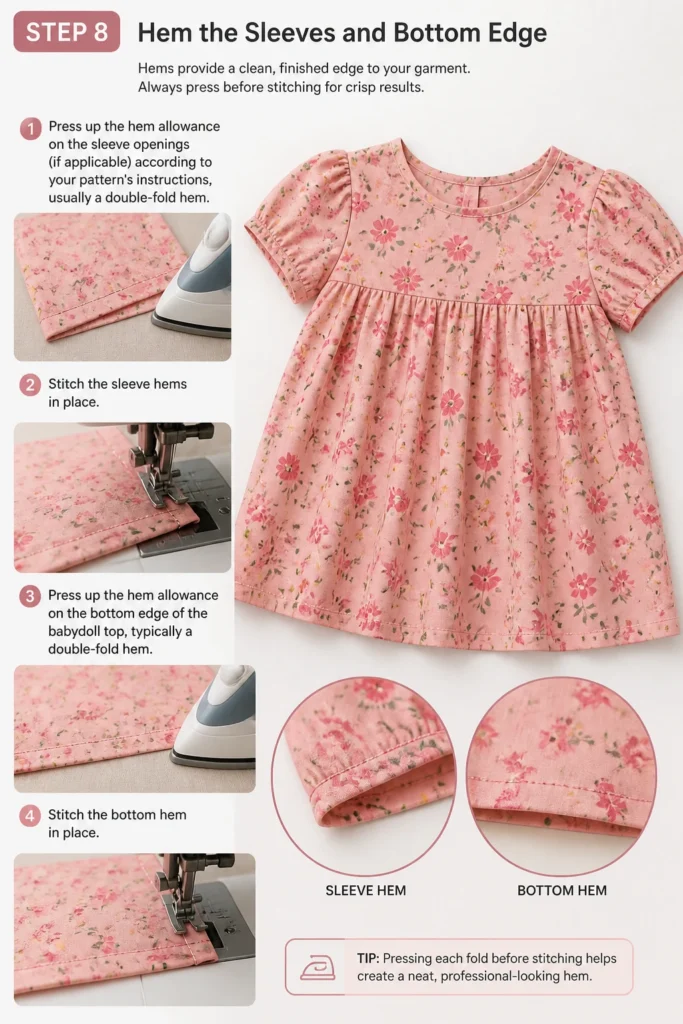
- Press up the hem allowance on the sleeve openings (if applicable) according to your pattern’s instructions, usually a double-fold hem.
- Stitch the sleeve hems in place.
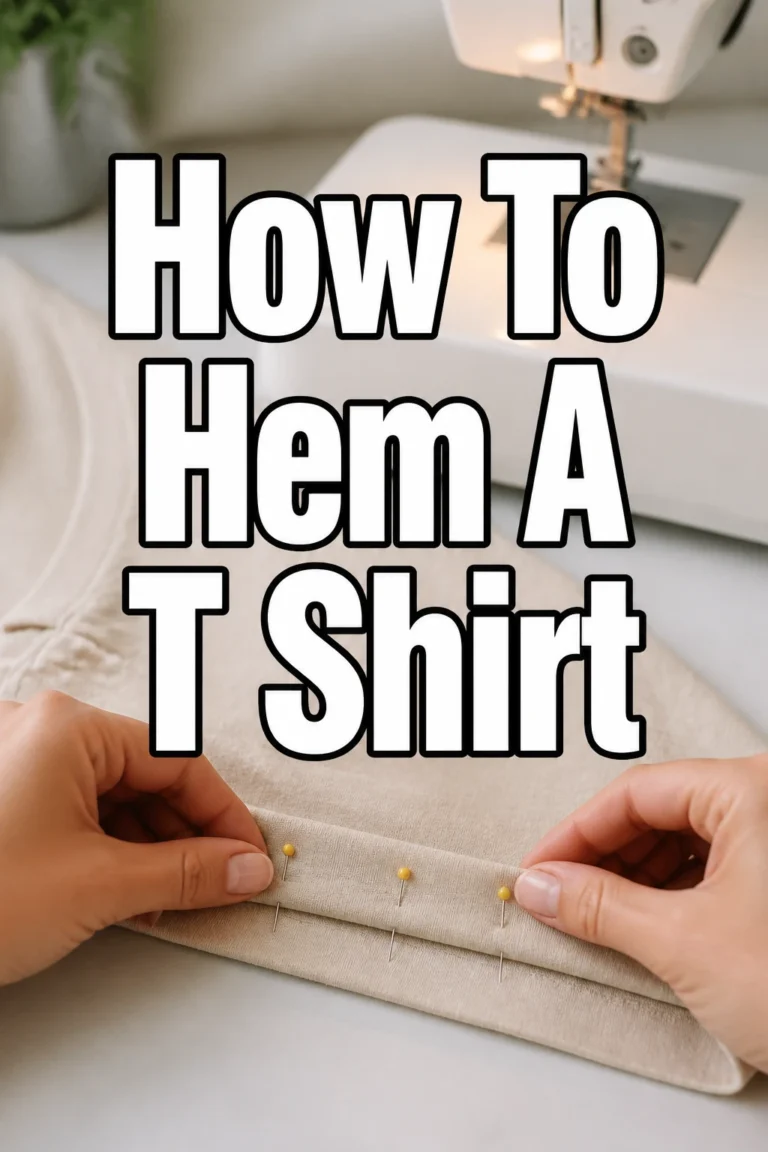
- Press up the hem allowance on the bottom edge of the babydoll top, typically a double-fold hem.
- Stitch the bottom hem in place.
Step 9: Final Touches and Pressing
The final steps involve a thorough inspection and pressing to give your new top a professional, ready-to-wear look.
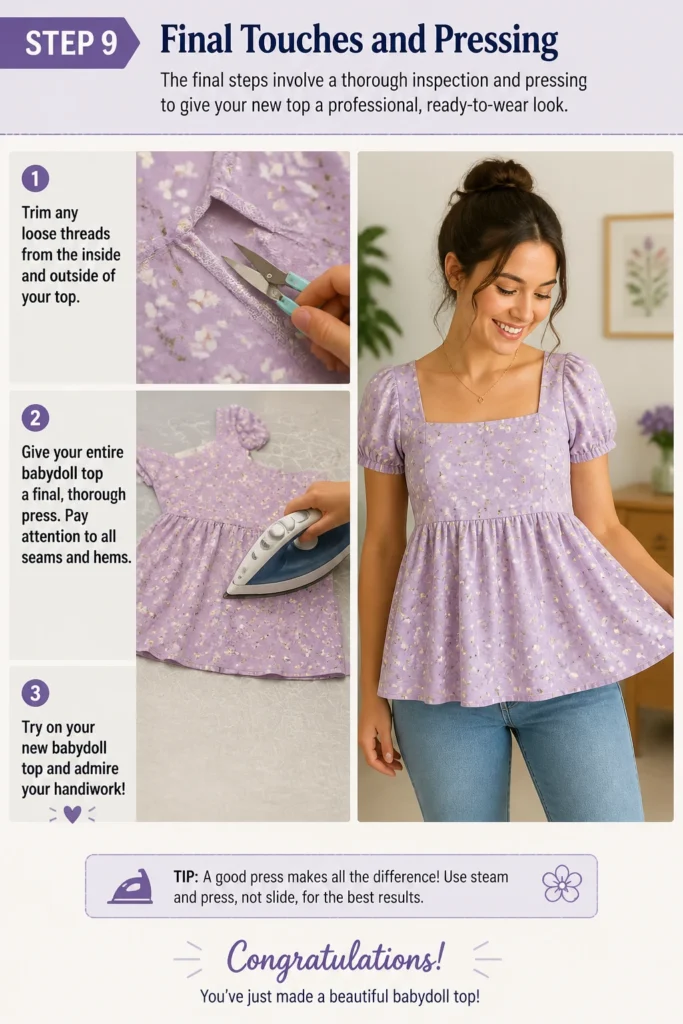
- Trim any loose threads from the inside and outside of your top.
- Give your entire babydoll top a final, thorough press. Pay attention to all seams and hems.
- Try on your new babydoll top and admire your handiwork!
Common Mistakes to Avoid
Incorrect Fabric Choice
Using a fabric that is too stiff or too heavy can ruin the intended drape and flow of a babydoll top. The characteristic silhouette relies on a fabric that gathers softly and hangs beautifully. Always check pattern recommendations and consider how the fabric will behave when gathered. Opt for lightweight wovens like rayon, cotton lawn, or voile for the best results.
Skipping Pre-Washing
It might seem like an extra step, but pre-washing your fabric is critical. Fabrics often shrink, sometimes significantly, after their first wash. If you cut and sew your garment before washing the fabric, your finished top could shrink to an unwearable size after its first laundry cycle. Always wash and dry your fabric the same way you intend to care for the finished garment.
Inaccurate Cutting
Precision in cutting is the foundation of a well-fitting garment. If your pieces are cut crooked or incorrectly, seams won’t align, and the top can pull or pucker in odd places. Use sharp fabric shears or a rotary cutter, ensure your fabric is laid flat and on-grain, and take your time to cut precisely along pattern lines, transferring all notches and markings.
Rushing Seam Finishes
Leaving raw edges unfinished can lead to your seams unraveling over time, especially with repeated wear and washing. While it might seem tedious, finishing your seams with a serger, zigzag stitch, or even pinking shears adds durability and a professional appearance to the inside of your garment. It’s a small effort that significantly extends the life of your handmade top.
Troubleshooting
Gathers are Uneven
If your gathered skirt section looks lumpy or unevenly distributed, it’s often because the gathering threads weren’t pulled gently or the fabric wasn’t eased enough. To fix this, carefully unpick the seam attaching the bodice and skirt. Re-do your gathering stitches, ensuring you have two parallel rows. Pull both bobbin threads simultaneously and take your time to evenly spread the fabric along the gathering threads before pinning and stitching.
Neckline is Gaping/Too Tight
A gaping neckline can occur if the facing isn’t properly understitched or if too much fabric was stretched during construction. A neckline that feels too tight might be due to not clipping curves enough or a pattern sizing issue. For a gaping neckline, ensure you’ve understitched the facing to the seam allowance fully. For tightness, check if your seam allowance was too generous. In some cases, you might need to carefully unpick the neckline, trim the seam allowance slightly, and re-stitch, or consider adding a small elastic casing to the back neckline if appropriate for the design.
Key Takeaways
- Pre-wash and press your fabric before cutting to prevent future shrinkage and ensure accurate pattern placement.
- Cut fabric precisely and transfer all markings; accuracy here is crucial for a well-fitting garment.
- Take your time with gathering stitches for the skirt section to ensure an even and beautiful drape.
- Finish all raw seam edges to enhance durability and give your babydoll top a professional finish.
- Press thoroughly at each step to set seams and create crisp, clean lines throughout the construction process.
- Don’t be afraid to use a seam ripper; it’s a valuable tool for correcting mistakes and achieving a polished result.
Frequently Asked Questions
Can I use a knit fabric for a babydoll top?
While most babydoll patterns are designed for woven fabrics, you can adapt some patterns for knits. If using a knit, choose one with good drape and consider sizing down, as knits have stretch. You might also need to adjust the neckline finish and opt for knit-friendly seams to prevent stretching out. Always check if your specific pattern offers a knit fabric option or instructions.
How do I choose the right size?
Always choose your size based on your body measurements, not your ready-to-wear clothing size. Compare your bust, waist, and hip measurements to the pattern’s size chart. For babydoll tops, the bust measurement is usually the most critical, as the waist and hip sections are typically loose. If you fall between sizes, consider making a muslin (test garment) to ensure a good fit.
What’s the easiest way to gather fabric?
The easiest and most consistent method for gathering is using two parallel lines of long basting stitches within the seam allowance. Stitch one line at 1/4″ and another at 5/8″ (or similar distances depending on your seam allowance). Leave long thread tails. Then, gently pull the bobbin threads of both stitch lines simultaneously. This technique helps distribute the gathers smoothly and evenly.
How can I make my babydoll top more unique?
There are many ways to personalize your babydoll top. Consider adding trim to the hem or sleeves, using contrasting fabric for the bodice or facing, or incorporating embroidery. You could also experiment with different sleeve styles, add pockets, or choose unique buttons if your design includes them. Fabric choice itself offers vast customization options.
Our Top Recommended Finds
- High-Quality Fabric Shears: A good pair of sharp fabric shears makes cutting a joy and ensures precise edges. Look for brands like Gingher or Kai for excellent durability and performance.
- Rotary Cutter and Self-Healing Mat: Ideal for cutting straight lines quickly and accurately, especially for the skirt and hem sections. A good quality rotary cutter with a sharp blade paired with a large self-healing mat is a fantastic investment.
- All-Purpose Polyester Thread: Strong, durable, and comes in a vast array of colors. Coats & Clark or Gutermann are reliable brands that will hold up well through washing and wear.
Craft Your Signature Style
You’ve just walked through the process of creating a beautiful babydoll top, a versatile garment that marries comfort with effortless style. Each stitch you make builds confidence and skill, opening up a world of creative possibilities.
Don’t stop here. Consider exploring patterns for other simple garments like skirts or tunics, applying the techniques you’ve mastered today. The satisfaction of wearing something truly unique, made by your own hands, is unparalleled. Grab your fabric and machine, and let your sewing journey continue to unfold with exciting new projects.
Beginner-friendly templates, step-by-step guides,
and weekly project ideas in your inbox.