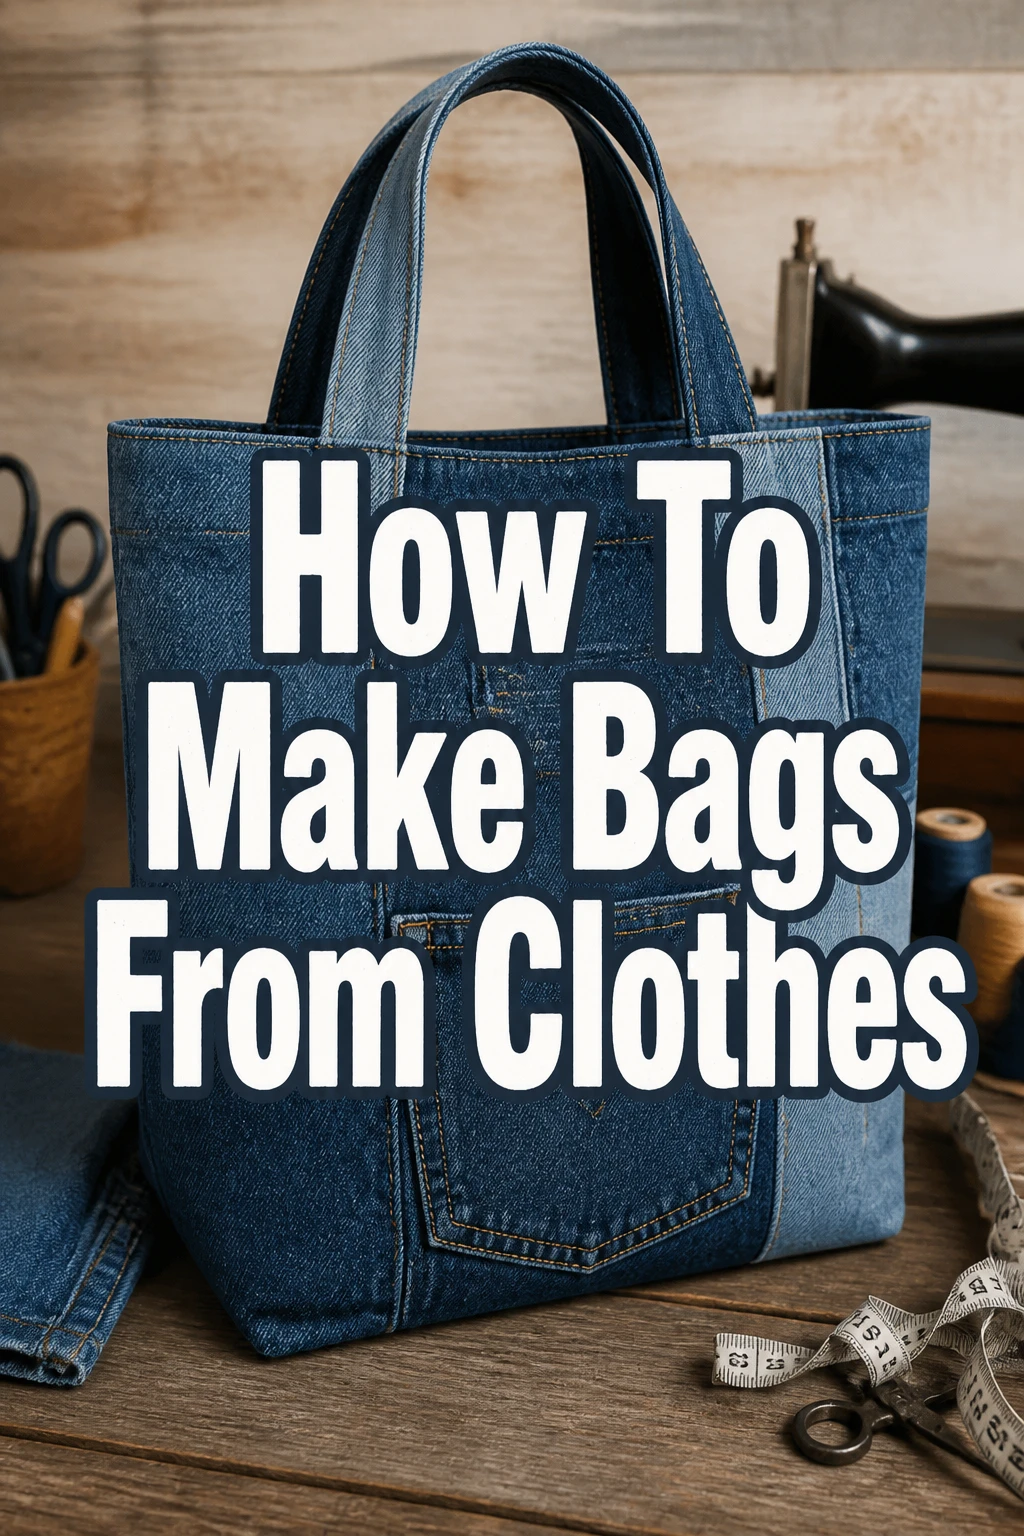
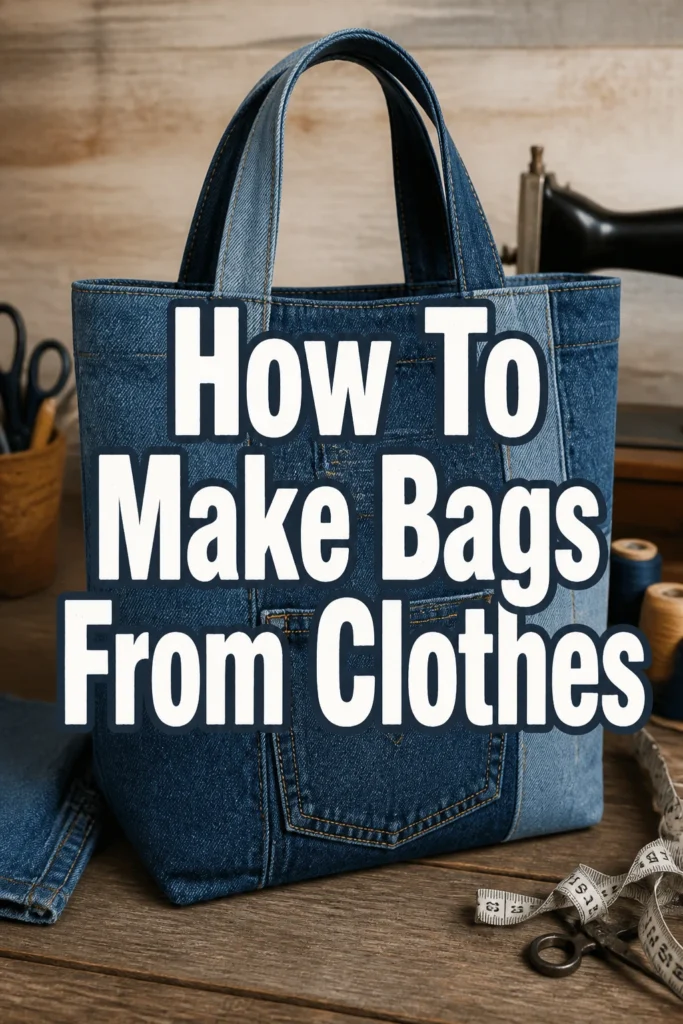
How To Make Bags From Clothes

Beginner-friendly templates, step-by-step guides,
and weekly project ideas in your inbox.
I remember the first time I transformed an old pair of jeans into a usable tote bag.
It felt incredibly rewarding, not just for the practicality but for giving new life to something destined for the landfill.
This guide shares that hands-on knowledge, helping you create beautiful, functional bags from your pre-loved garments.
Quick Overview
This guide will walk you through the process of upcycling old clothes into stylish and practical bags. You’ll learn to select the right materials, plan your design, and assemble your unique creation, whether you prefer sewing or a no-sew approach.
- Time needed: 2-6 hours (depending on complexity and sewing experience)
- Difficulty: Beginner to Intermediate
- What you’ll need: Old clothes, scissors, needle and thread/sewing machine, pins, ruler, iron, optional embellishments.
Step-by-Step Instructions
Step 1: Gather and Prepare Your Materials
Begin by selecting the clothes you wish to transform. Denim jeans, sturdy canvas pants, thick cotton shirts, or even old curtains work wonderfully for bag making.
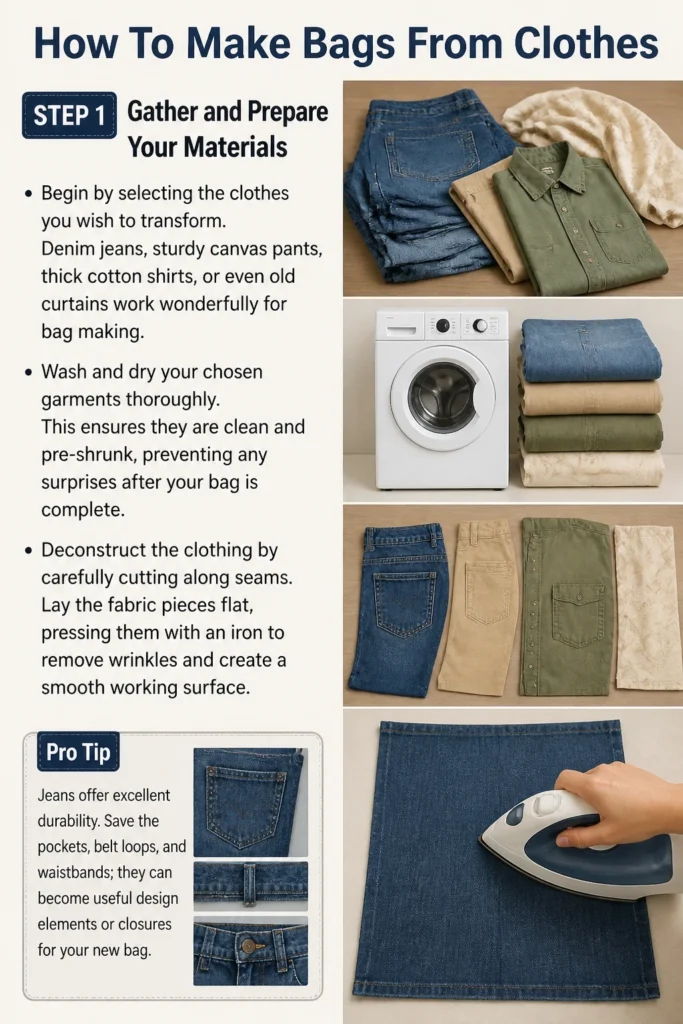
Wash and dry your chosen garments thoroughly. This ensures they are clean and pre-shrunk, preventing any surprises after your bag is complete.
Deconstruct the clothing by carefully cutting along seams. Lay the fabric pieces flat, pressing them with an iron to remove wrinkles and create a smooth working surface.
Pro Tip: Jeans offer excellent durability. Save the pockets, belt loops, and waistbands; they can become useful design elements or closures for your new bag.
Step 2: Envision Your Bag Design
Think about the type of bag you want to create. A simple tote bag is perfect for beginners, while a drawstring bag, clutch, or even a backpack offers more challenge.
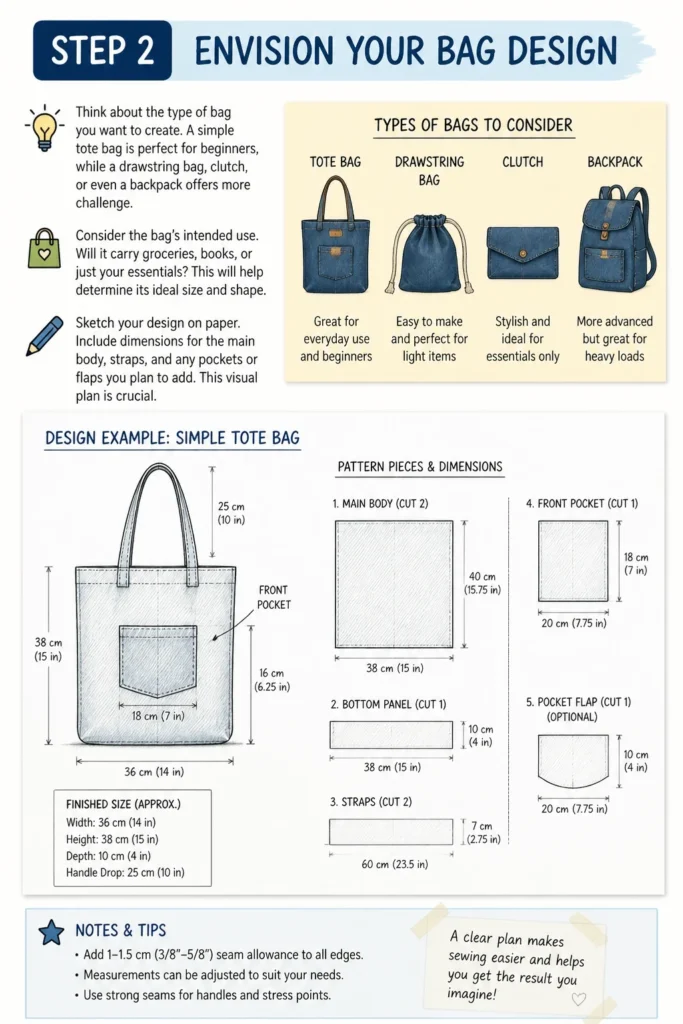
Consider the bag’s intended use. Will it carry groceries, books, or just your essentials? This will help determine its ideal size and shape.
Sketch your design on paper. Include dimensions for the main body, straps, and any pockets or flaps you plan to add. This visual plan is crucial.
Step 3: Measure and Cut Your Fabric Pieces
Using your sketch as a guide, measure out the main body pieces for your bag. Remember to add a seam allowance of at least 1/2 inch (1.25 cm) around all edges.
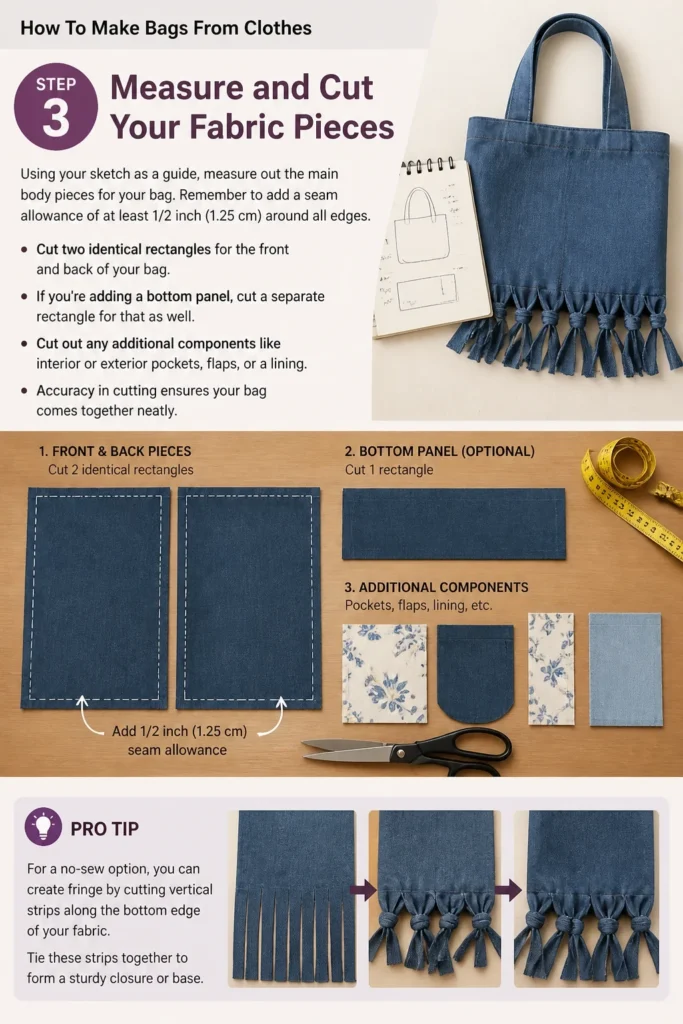
Cut two identical rectangles for the front and back of your bag. If you’re adding a bottom panel, cut a separate rectangle for that as well.
Cut out any additional components like interior or exterior pockets, flaps, or a lining. Accuracy in cutting ensures your bag comes together neatly.
Pro Tip: For a no-sew option, you can create fringe by cutting vertical strips along the bottom edge of your fabric. Tie these strips together to form a sturdy closure or base.
Step 4: Craft Your Straps or Handles
There are several ways to make straps. You can cut long strips from the remaining fabric, fold them lengthwise, and stitch them securely.
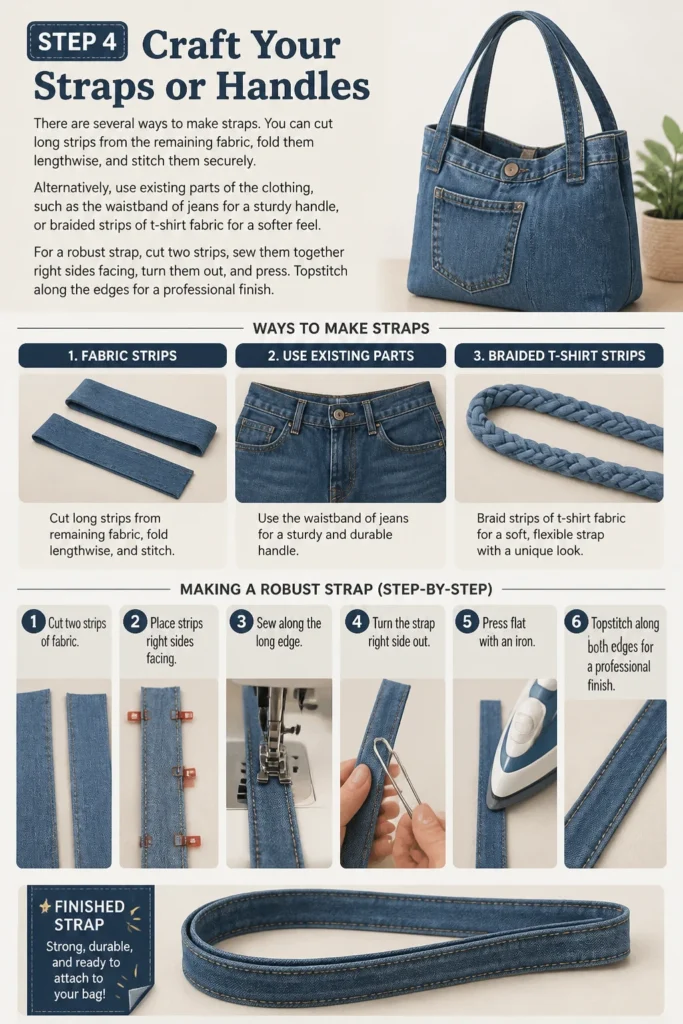
Alternatively, use existing parts of the clothing, such as the waistband of jeans for a sturdy handle, or braided strips of t-shirt fabric for a softer feel.
For a robust strap, cut two strips, sew them together right sides facing, turn them out, and press. Topstitch along the edges for a professional finish.
Step 5: Assemble the Bag Body
Place your two main body pieces right sides together. Pin along the side and bottom edges, leaving the top edge open.
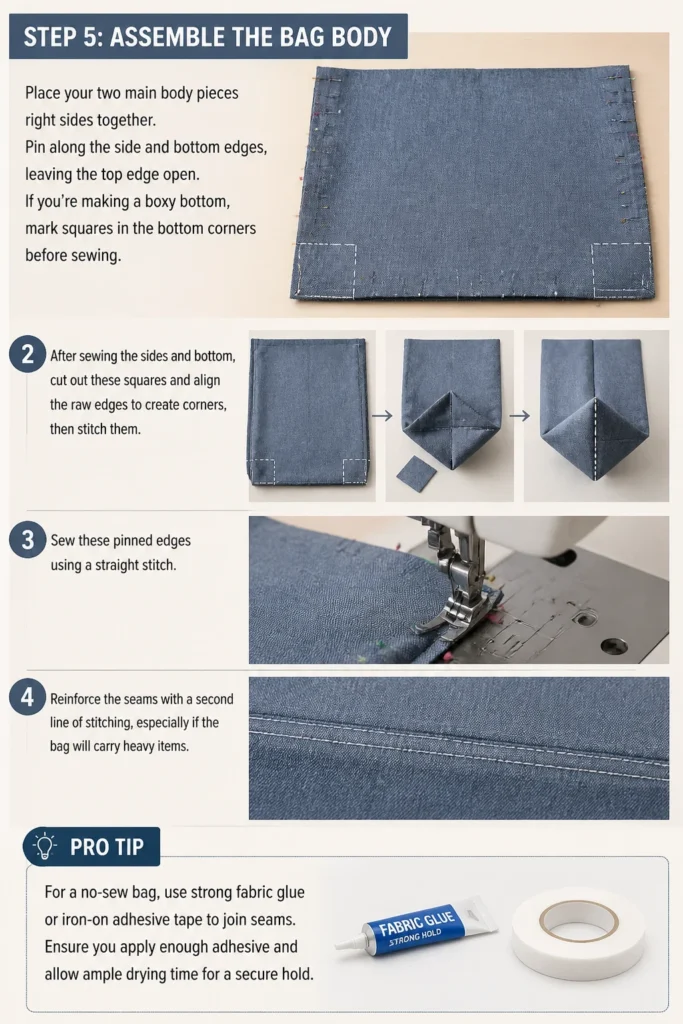
If you’re making a boxy bottom, mark squares in the bottom corners before sewing. After sewing the sides and bottom, cut out these squares and align the raw edges to create corners, then stitch them.
Sew these pinned edges using a straight stitch. Reinforce the seams with a second line of stitching, especially if the bag will carry heavy items.
Pro Tip: For a no-sew bag, use strong fabric glue or iron-on adhesive tape to join seams. Ensure you apply enough adhesive and allow ample drying time for a secure hold.
Step 6: Integrate Pockets and Lining (Optional)
If you’re adding interior or exterior pockets, now is the time to attach them. Hem the top edge of each pocket first, then position and stitch them onto your main bag pieces before assembling the body.
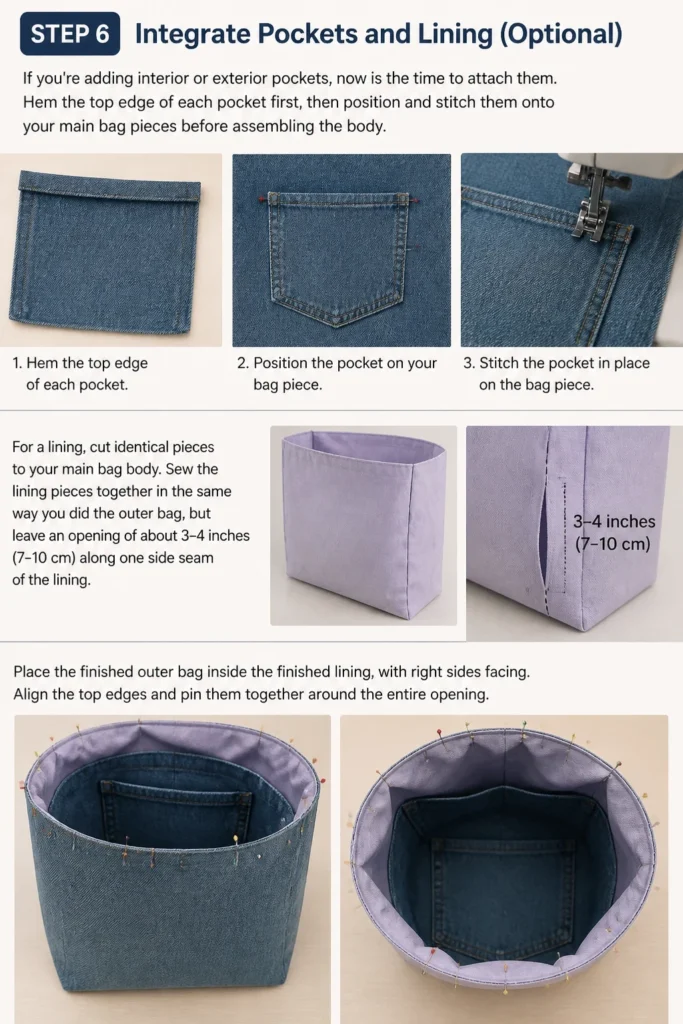
For a lining, cut identical pieces to your main bag body. Sew the lining pieces together in the same way you did the outer bag, but leave an opening of about 3-4 inches (7-10 cm) along one side seam of the lining.
Place the finished outer bag inside the finished lining, with right sides facing. Align the top edges and pin them together around the entire opening.
Step 7: Attach the Straps and Finalize the Top Edge
Position your prepared straps on the top edge of the outer bag, ensuring they are evenly spaced and not twisted. Pin them securely in place, sewing them to the top edge with a strong stitch.
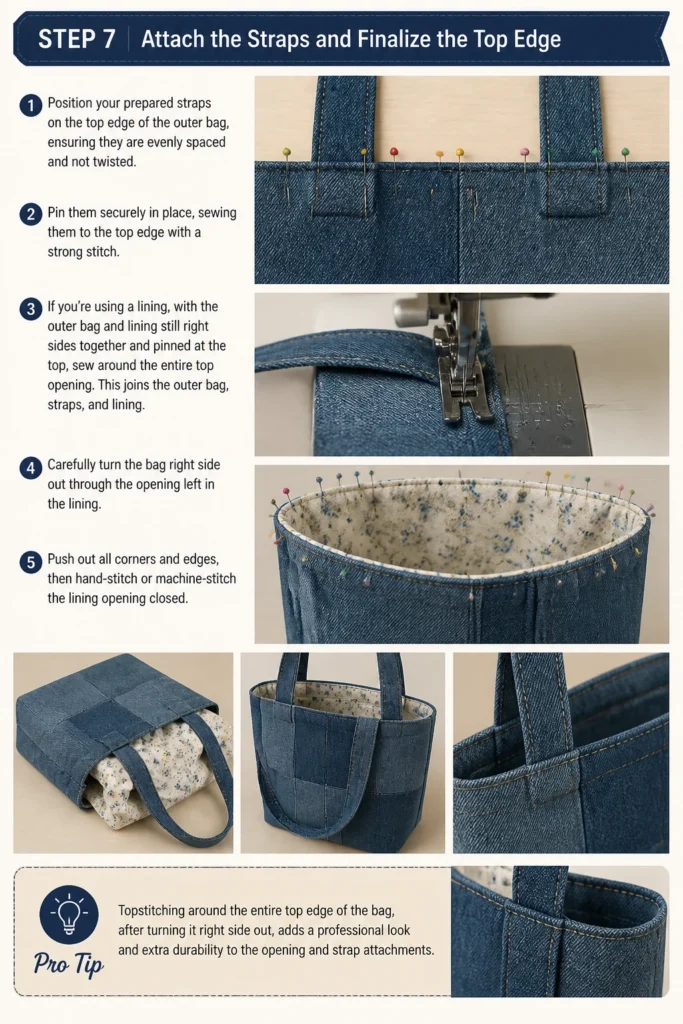
If you’re using a lining, with the outer bag and lining still right sides together and pinned at the top, sew around the entire top opening. This joins the outer bag, straps, and lining.
Carefully turn the bag right side out through the opening left in the lining. Push out all corners and edges, then hand-stitch or machine-stitch the lining opening closed.
Pro Tip: Topstitching around the entire top edge of the bag, after turning it right side out, adds a professional look and extra durability to the opening and strap attachments.
Step 8: Add Closures and Embellishments
Consider adding a closure to your bag. Options include a simple magnetic snap, a zipper, buttons and buttonholes, or even a drawstring channel.
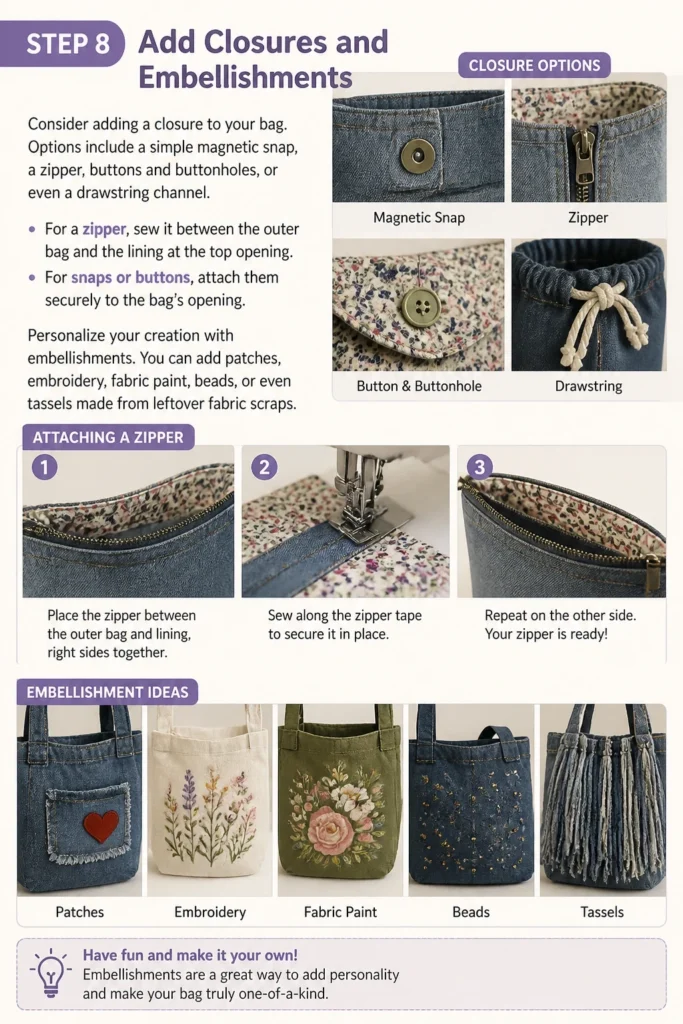
For a zipper, sew it between the outer bag and the lining at the top opening. For snaps or buttons, attach them securely to the bag’s opening.
Personalize your creation with embellishments. You can add patches, embroidery, fabric paint, beads, or even tassels made from leftover fabric scraps.
Common Mistakes to Avoid
Skipping Fabric Preparation
Many people rush into cutting their fabric without washing and pressing it first. This can lead to your bag shrinking or becoming distorted after its first wash, especially if the original garment was not pre-shrunk. Always clean and iron your fabric for the best results.
Ignoring Seam Allowances
Forgetting to add seam allowances when cutting your fabric pieces is a common error. This results in a bag that is smaller than intended and seams that are too tight, making assembly difficult and potentially weakening the bag’s structure. Always factor in your seam allowance.
Weak Strap Attachment
The straps are under significant stress, so attaching them insecurely is a recipe for disappointment. A single line of stitching often isn’t enough. Always reinforce strap attachments with multiple lines of stitching, or by sewing a box with an ‘X’ through it for maximum strength.
Uneven Cutting and Sewing
Hasty or inaccurate cutting leads to misaligned pieces and a lopsided bag. Similarly, inconsistent seam allowances during sewing can cause puckering or an uneven finish. Take your time with measuring, cutting, and sewing to ensure a professional and attractive outcome.
Troubleshooting
Bag Appears Crooked or Lopsided
This usually stems from uneven cutting or inconsistent seam allowances during sewing. Carefully check your measurements and ensure your cuts are straight before sewing. Pin your fabric pieces together more frequently and accurately before stitching to maintain alignment.
Seams are Pulling Apart or Weak
Weak seams often result from using too short a stitch length, not backstitching at the beginning and end of seams, or not reinforcing stress points. Use a slightly longer stitch for general seams and always backstitch. Double-stitch or triple-stitch areas that will bear weight, like strap attachments and the bag’s bottom corners.
Straps Detach During Use
If your straps are coming off, they weren’t attached securely enough. Go back and reinforce the attachment points. Sew a square around the strap’s base where it meets the bag, then sew an ‘X’ through that square. This distributes the stress over a larger area, making the attachment much stronger.
Key Takeaways
- Always prepare your fabric by washing and pressing it for optimal results.
- Plan your bag design and dimensions carefully, including all necessary seam allowances.
- Reinforce all stress points, especially strap attachments and bottom seams, for durability.
- Consider adding a lining to give your bag a professional finish and extra strength.
- Don’t be afraid to personalize your bag with unique embellishments and closures.
- Take your time with measuring, cutting, and sewing to ensure a high-quality finished product.
Frequently Asked Questions
Can I make a bag without a sewing machine?
Absolutely! Many bags can be made entirely by hand-stitching with a strong needle and sturdy thread. For no-sew options, you can use fabric glue, iron-on adhesive tape, or even ingenious knotting techniques, especially with t-shirt fabric.
What kind of clothes are best for making bags?
Durable fabrics like denim from old jeans, canvas, thick cotton twill, or even upholstery fabric scraps work best for the main bag body. T-shirts can be great for softer, stretchier bags or braided straps. Avoid very thin or delicate fabrics unless you plan to heavily reinforce them.
How do I make my bag more durable?
To increase durability, use strong thread, reinforce all seams with double or triple stitching, and always backstitch at the beginning and end of each seam. Adding a fusible interfacing to your fabric before cutting can also give it more body and strength. A lining also adds significant resilience.
Can I wash my homemade bag?
Yes, in most cases. If you pre-washed your original garments, your finished bag should be machine washable on a gentle cycle with cold water. If you used fabric glue or delicate embellishments, hand washing might be a safer option. Always air dry to prevent shrinkage.
Our Top Recommended Finds
- Sharp Fabric Scissors: Essential for clean, precise cuts that make all the difference in a professional-looking bag.
- Heavy-Duty Sewing Machine Needles: Crucial for sewing through multiple layers of denim or other thick fabrics without breaking.
- Fabric Glue or Iron-On Hemming Tape: Excellent for no-sew projects or for temporarily holding seams in place before stitching.
Begin Your Creative Upcycling Journey
Turning old clothes into new bags is more than just a craft; it’s a statement of creativity and sustainability.
Each stitch or carefully placed adhesive strip brings a unique, functional item into being, preventing waste and showcasing your personal style.
Why not gather those forgotten garments today and start on your very own custom bag project?
Beginner-friendly templates, step-by-step guides,
and weekly project ideas in your inbox.