How To Make Jorts With Jeans

Beginner-friendly templates, step-by-step guides,
and weekly project ideas in your inbox.
Transforming an old pair of jeans into stylish jorts is a rewarding DIY project.
I’ve personally upcycled countless denim pairs, learning the best techniques for a perfect fit and finish.
This guide will walk you through every step, ensuring you create a custom piece you’ll love.

Quick Overview
This guide will equip you with the skills to confidently convert any pair of jeans into custom-fit jorts. You’ll learn how to measure, cut, and finish your new denim shorts for a personalized look.
- Time needed: 1-2 hours (plus drying time if washing/distressing)
- Difficulty: Beginner
- What you’ll need: A pair of jeans, sharp fabric scissors, tailor’s chalk or marker, a ruler or tape measure, and optional items like sandpaper or a sewing machine.
Step-by-Step Instructions
Step 1: Gather Your Supplies
Collect all necessary tools before you begin. Having everything ready saves time and ensures a smooth process.
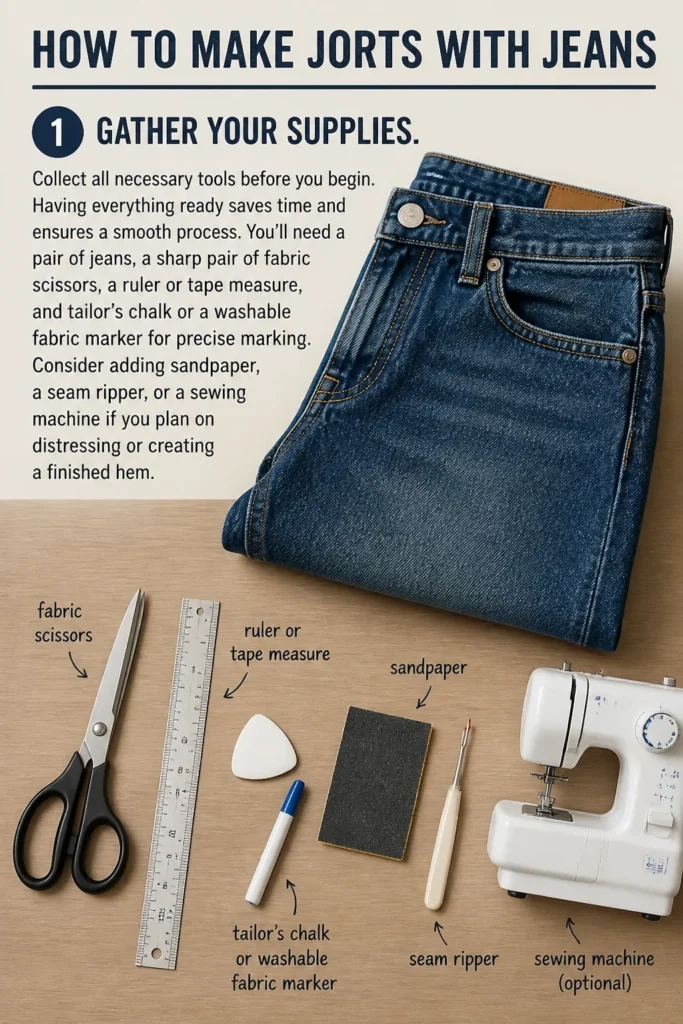
You’ll need a pair of jeans, a sharp pair of fabric scissors, a ruler or tape measure, and tailor’s chalk or a washable fabric marker for precise marking.
Consider adding sandpaper, a seam ripper, or a sewing machine if you plan on distressing or creating a finished hem.
Step 2: Choose the Right Jeans
Select a pair of jeans that fits well around your waist and hips. The fit in these areas will largely determine the overall look of your jorts.
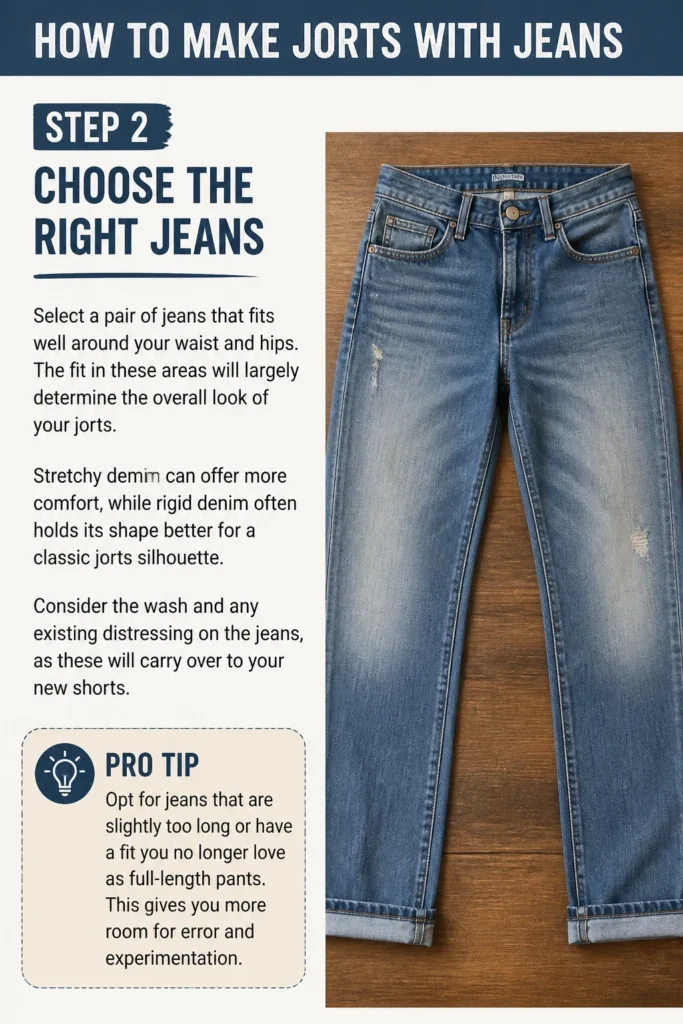
Stretchy denim can offer more comfort, while rigid denim often holds its shape better for a classic jorts silhouette.
Consider the wash and any existing distressing on the jeans, as these will carry over to your new shorts.
Pro Tip: Opt for jeans that are slightly too long or have a fit you no longer love as full-length pants. This gives you more room for error and experimentation.
Step 3: Try Them On and Mark Your Desired Length
Put on the jeans you intend to cut. Stand in front of a full-length mirror.
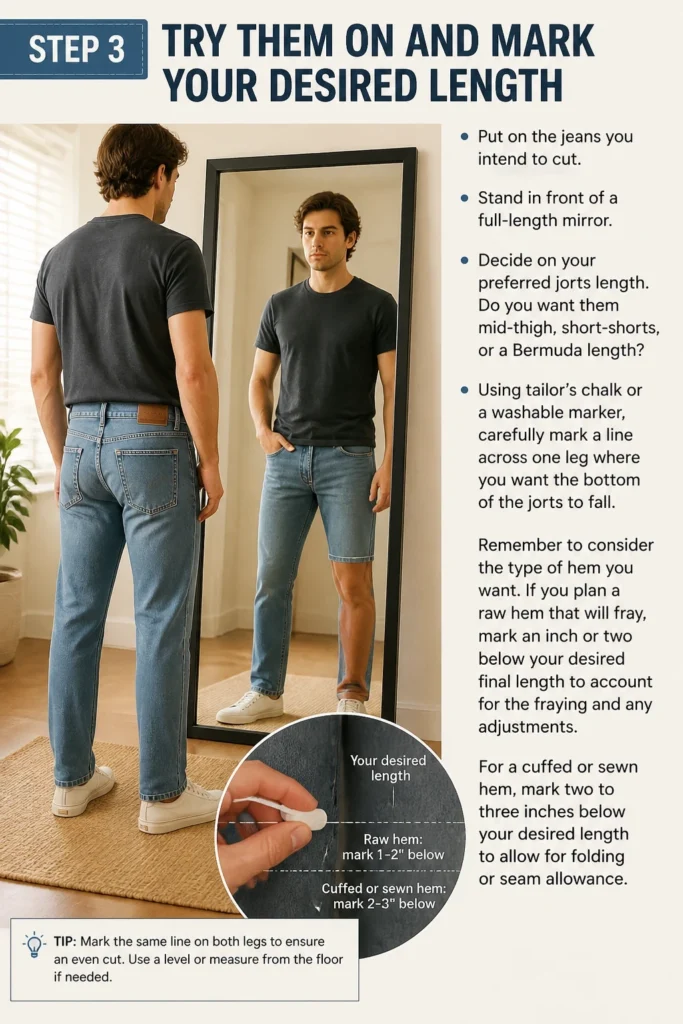
Decide on your preferred jorts length. Do you want them mid-thigh, short-shorts, or a Bermuda length?
Using tailor’s chalk or a washable marker, carefully mark a line across one leg where you want the bottom of the jorts to fall.
Remember to consider the type of hem you want. If you plan a raw hem that will fray, mark an inch or two below your desired final length to account for the fraying and any adjustments.
For a cuffed or sewn hem, mark two to three inches below your desired length to allow for folding or seam allowance.
Step 4: Double-Check and Refine Your Markings
Take off the jeans and lay them flat on a clean, hard surface. Smooth out any wrinkles or folds.
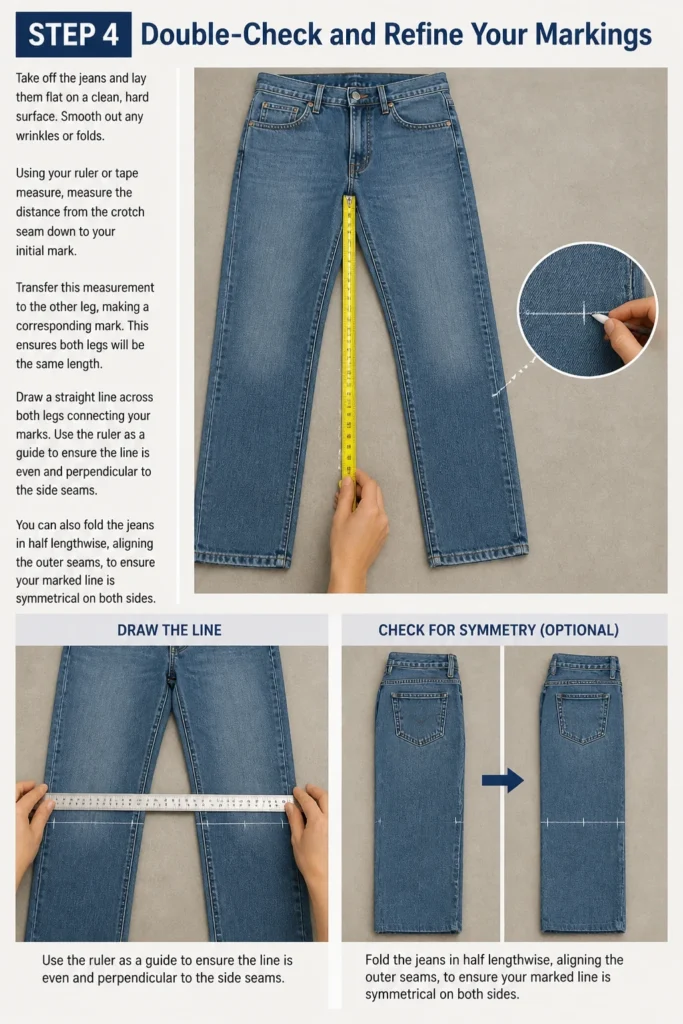
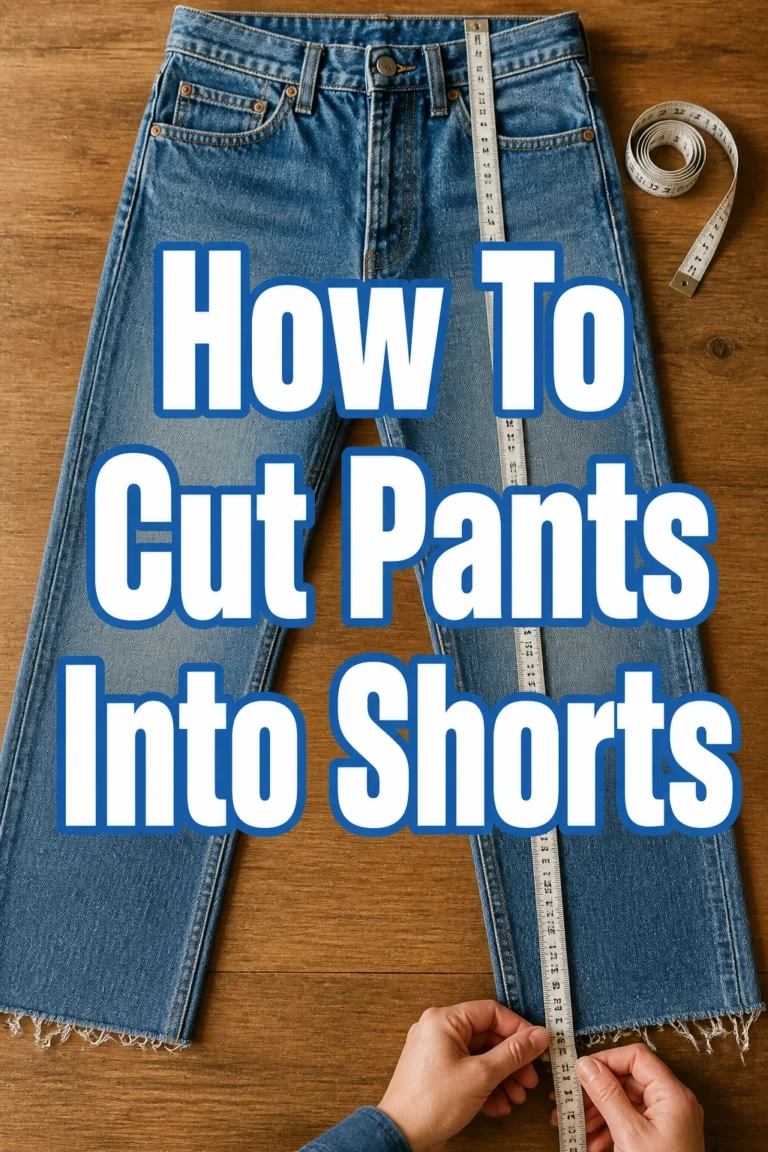
Using your ruler or tape measure, measure the distance from the crotch seam down to your initial mark.
Transfer this measurement to the other leg, making a corresponding mark. This ensures both legs will be the same length.
Draw a straight line across both legs connecting your marks. Use the ruler as a guide to ensure the line is even and perpendicular to the side seams.
You can also fold the jeans in half lengthwise, aligning the outer seams, to ensure your marked line is symmetrical on both sides.
Step 5: Make the Initial Cut
Use your sharp fabric scissors to carefully cut along the marked line on one leg.
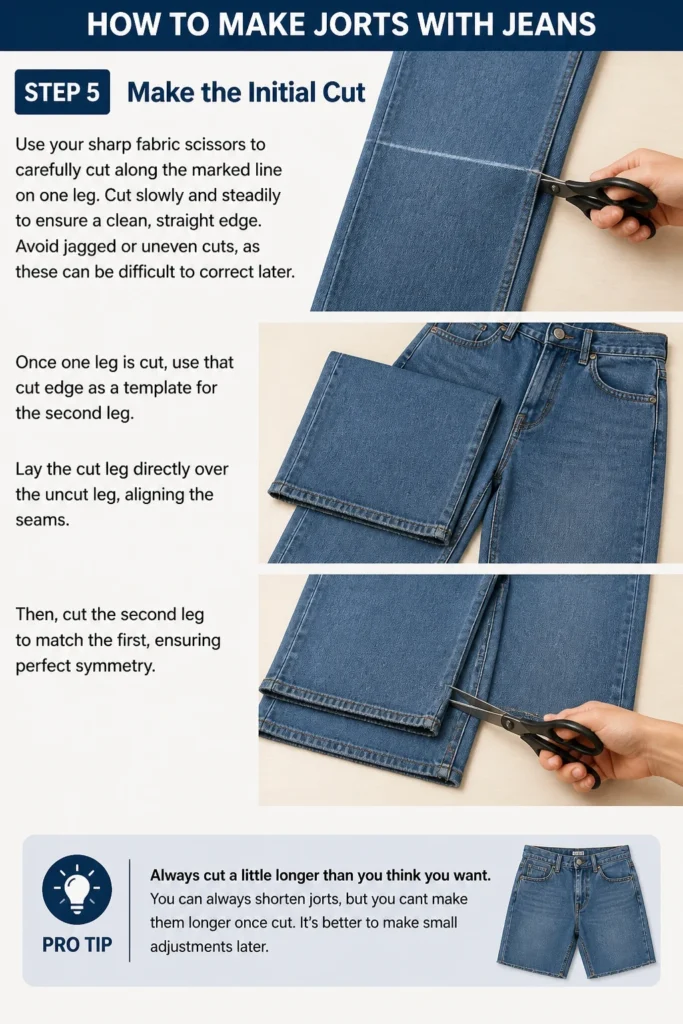
Cut slowly and steadily to ensure a clean, straight edge. Avoid jagged or uneven cuts, as these can be difficult to correct later.
Once one leg is cut, use that cut edge as a template for the second leg. Lay the cut leg directly over the uncut leg, aligning the seams.
Then, cut the second leg to match the first, ensuring perfect symmetry.
Pro Tip: Always cut a little longer than you think you want. You can always shorten jorts, but you can’t make them longer once cut. It’s better to make small adjustments later.
Step 6: Try On and Adjust the Length
Put on your newly cut jorts. Stand in front of the mirror again.
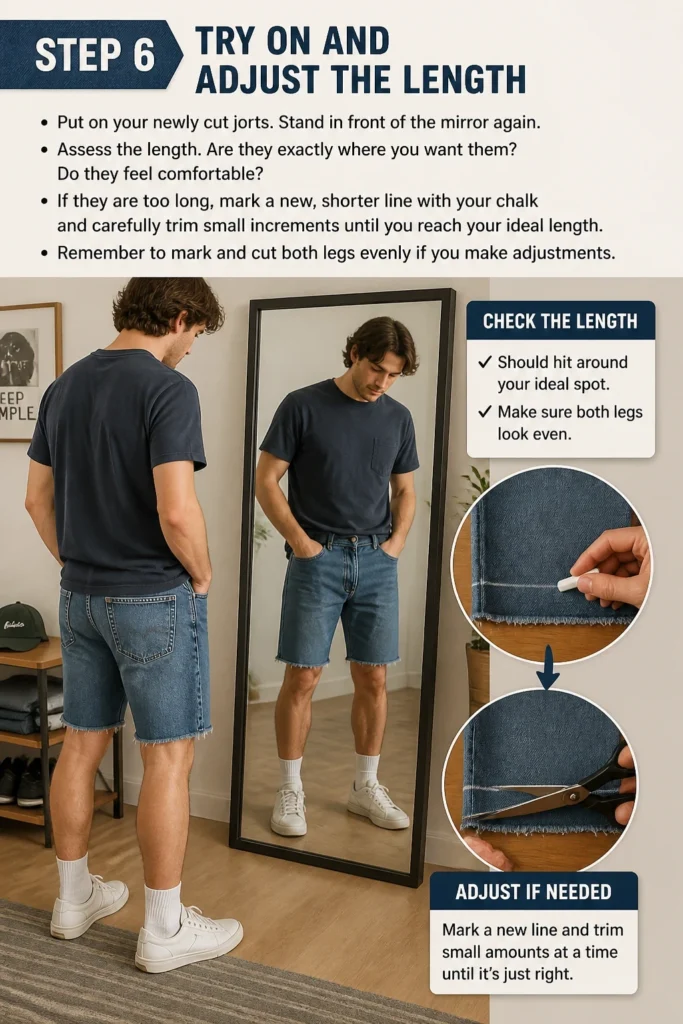
Assess the length. Are they exactly where you want them? Do they feel comfortable?
If they are too long, mark a new, shorter line with your chalk and carefully trim small increments until you reach your ideal length.
Remember to mark and cut both legs evenly if you make adjustments.
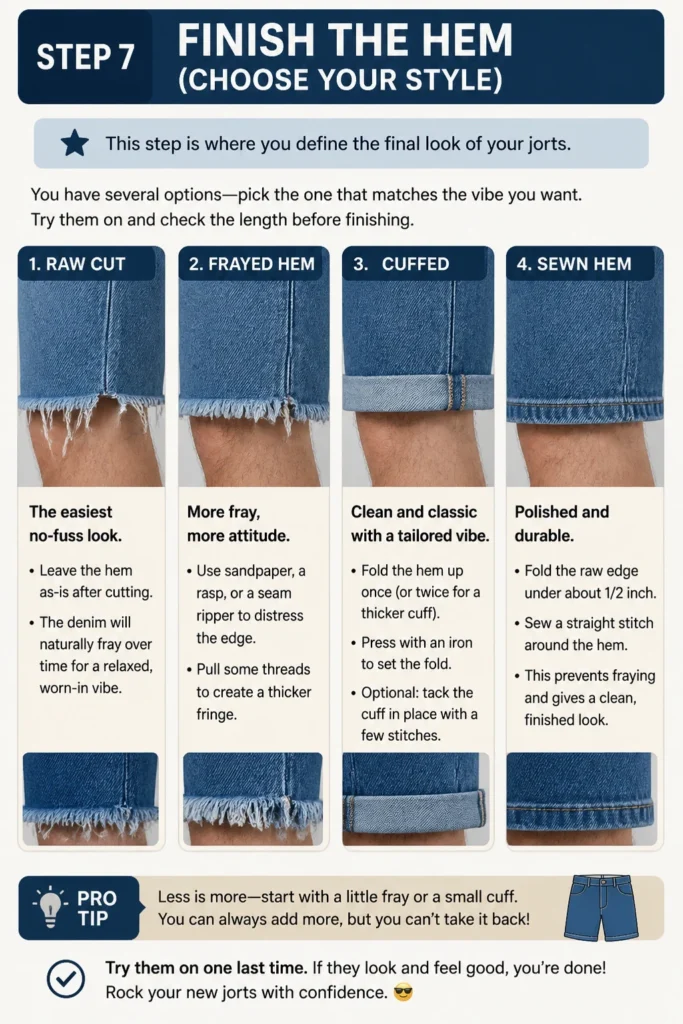
Step 7: Finish the Hem (Choose Your Style)
This step is where you define the final look of your jorts.
Raw Hem
For a raw, distressed look, simply leave the cut edges as they are.
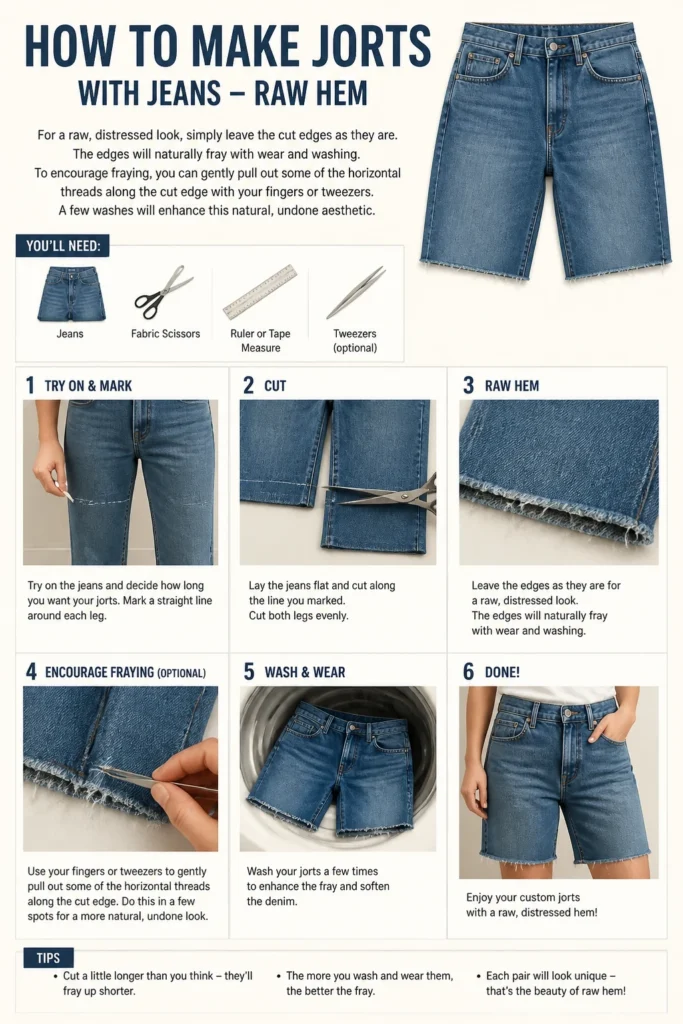
The edges will naturally fray with wear and washing. To encourage fraying, you can gently pull out some of the horizontal threads along the cut edge with your fingers or tweezers.
A few washes will enhance this natural, undone aesthetic.
Cuffed Hem
To create a classic cuffed look, fold up the bottom edge of each leg by about 1-2 inches.
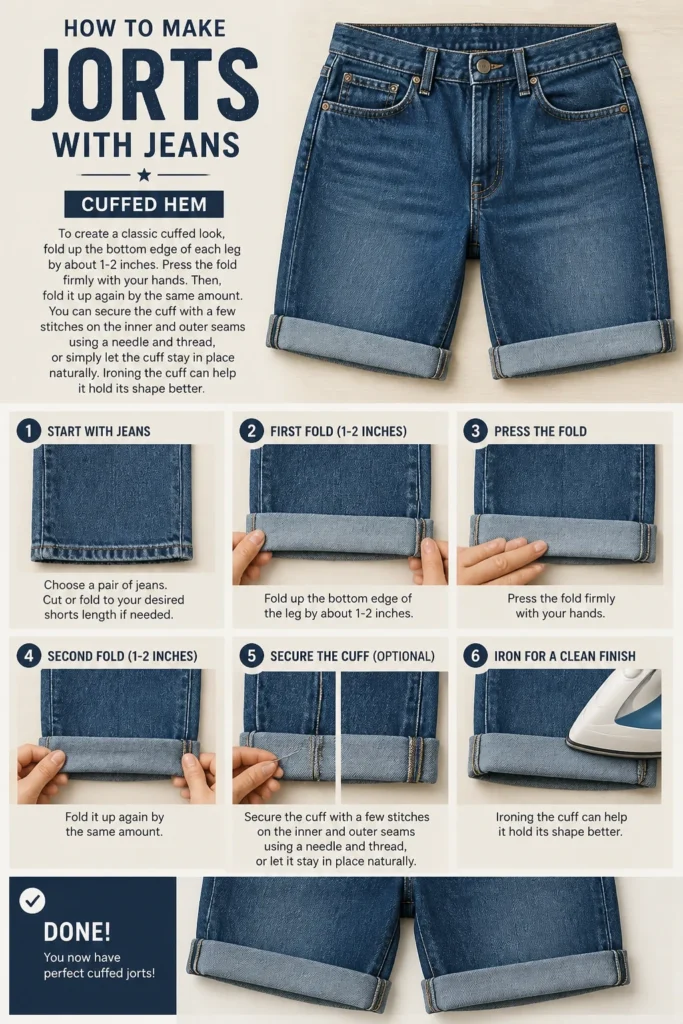
Press the fold firmly with your hands. Then, fold it up again by the same amount.
You can secure the cuff with a few stitches on the inner and outer seams using a needle and thread, or simply let the cuff stay in place naturally.
Ironing the cuff can help it hold its shape better.
Sewn Hem
For a clean, finished look, you’ll need a sewing machine or strong needle and thread.
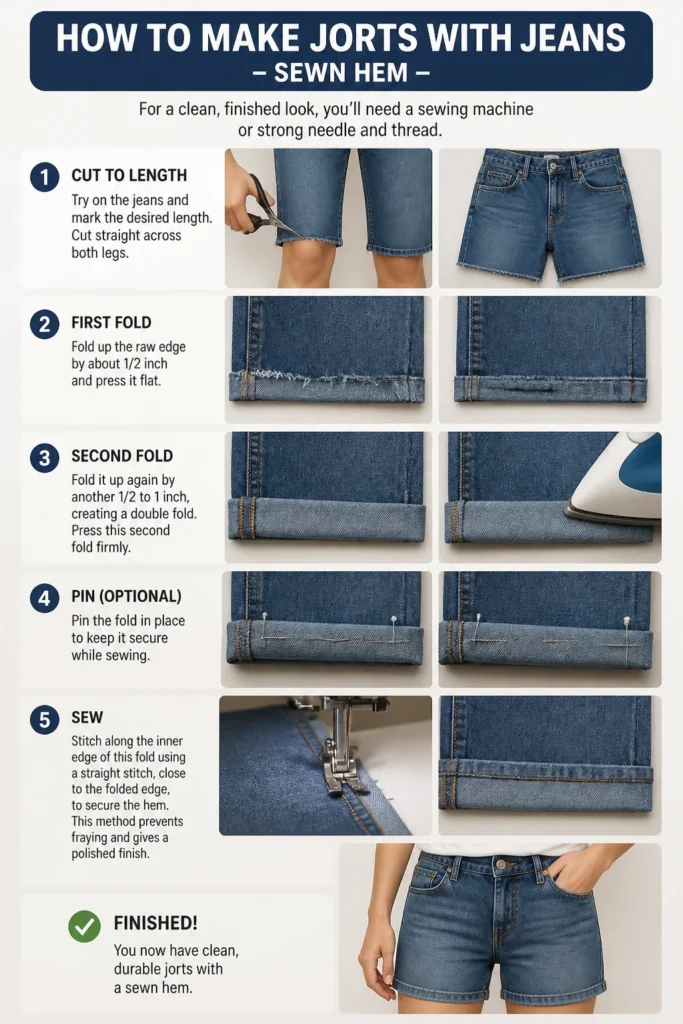
Fold up the raw edge by about 1/2 inch and press it flat. Then, fold it up again by another 1/2 to 1 inch, creating a double fold.
Press this second fold firmly. Stitch along the inner edge of this fold using a straight stitch, close to the folded edge, to secure the hem.
This method prevents fraying and gives a polished finish.
Step 8: Distress Your Jorts (Optional)
If you want a worn-in, vintage feel, this is the time to add distressing.
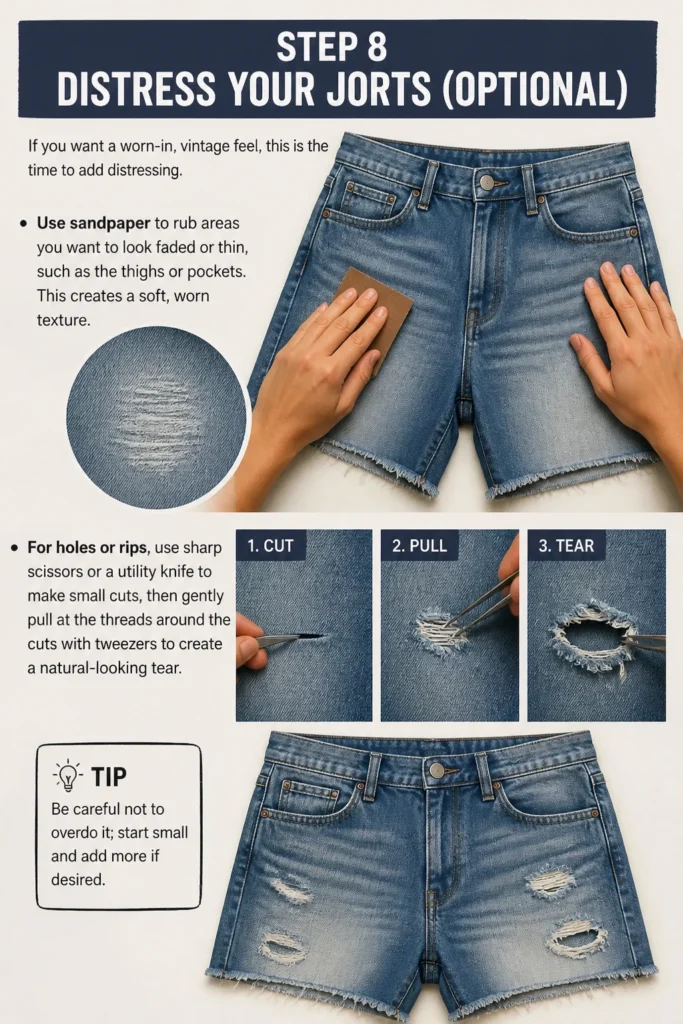
Use sandpaper to rub areas you want to look faded or thin, such as the thighs or pockets. This creates a soft, worn texture.
For holes or rips, use sharp scissors or a utility knife to make small cuts, then gently pull at the threads around the cuts with tweezers to create a natural-looking tear.
Be careful not to overdo it; start small and add more if desired.
Step 9: Wash and Dry
Wash your newly made jorts in cold water and tumble dry on a low setting.
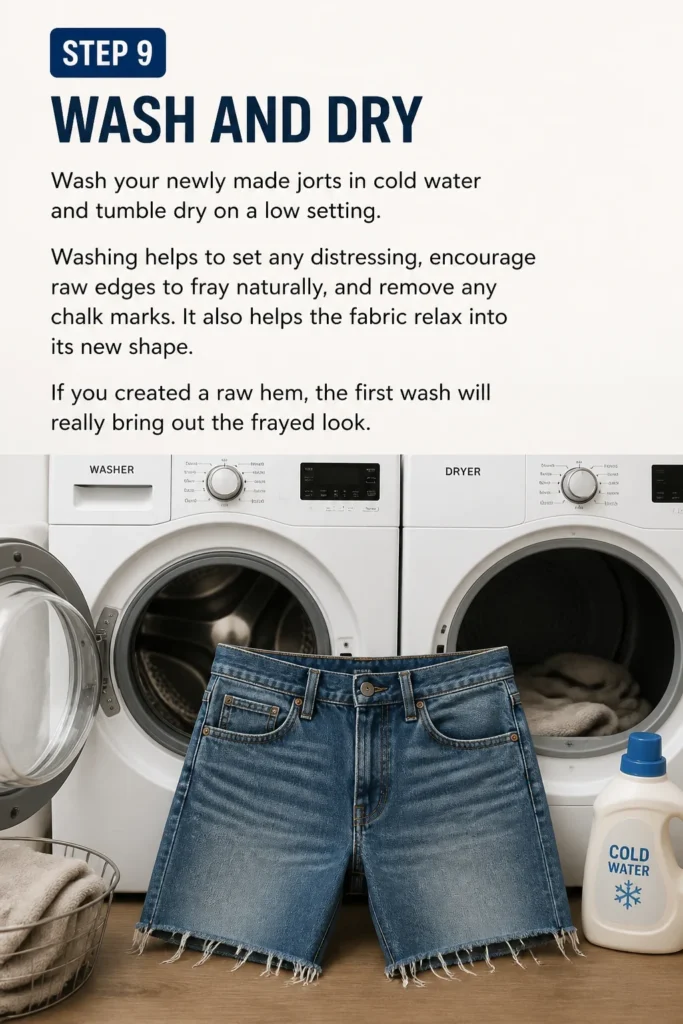
Washing helps to set any distressing, encourage raw edges to fray naturally, and remove any chalk marks.
It also helps the fabric relax into its new shape. If you created a raw hem, the first wash will really bring out the frayed look.
Common Mistakes to Avoid
Cutting Too Short Initially
Many first-timers get excited and cut their jeans much shorter than intended. Once the fabric is cut, there’s no going back.
Always mark your desired length and then cut about 1-2 inches below that mark. This gives you room for error and allows for adjustments, especially if you plan on fraying or cuffing the hem.
Uneven Cuts
Cutting freehand or without properly laying out the jeans can lead to one leg being longer or more crooked than the other. This creates an awkward, unbalanced look.
Always lay your jeans flat, smooth them out, and use a ruler or tape measure to draw a straight, even line across both legs before cutting. Double-check your measurements from the crotch seam for consistency.
Forgetting to Account for Hem Style
Different hem styles require different amounts of fabric. A raw hem needs a little extra for fraying, while a cuffed or sewn hem needs significantly more for folding.
If you don’t factor this into your initial cut, your jorts might end up much shorter than you wanted. Always decide on your hem style first and add the appropriate allowance to your marked cut line.
Not Trying On Before Final Cuts
Making all your cuts without trying on the jeans after the initial mark can lead to disappointment. What looks good on a flat surface might feel or look different on your body.
Always try on the jeans after marking your initial cut line and again after the first rough cut. This allows you to make precise adjustments before committing to the final length.
Troubleshooting
Jorts are Too Short or Long After Cutting
If your jorts are too short, unfortunately, you can’t add fabric back. This is why cutting longer than desired is crucial.
If they are too long, simply try them on again, mark a new, shorter line, and trim in small increments until you reach the perfect length. Remember to keep both legs even.
Hem is Fraying Excessively or Unevenly
For a raw hem, some fraying is expected and desired. If it’s becoming too much or looks messy, you can trim the longest, unruly threads with small scissors.
Alternatively, if you want less fraying, you can add a simple machine stitch about 1/4 inch above the raw edge. This “stop stitch” will limit how far the denim can unravel.
Legs Feel Too Tight or Loose
If the jorts feel too tight around the thighs, you might need to try a different pair of jeans with a looser fit. You can’t easily add width to cut denim.
If they feel too loose, especially around the leg opening, you can take them in slightly. Turn the jorts inside out, mark a new seam line along the inseam or outseam to narrow the leg, and stitch along your new line with a sewing machine or by hand. Trim any excess fabric, leaving a 1/2-inch seam allowance.
Key Takeaways
- Always start by choosing jeans that fit well around the waist and hips.
- Mark your desired length while wearing the jeans, then add extra for your chosen hem style.
- Cut longer than you think you need; you can always trim more, but you can’t add fabric back.
- Use a ruler and cut slowly and evenly to ensure symmetrical legs.
- Try on your jorts at multiple stages to make adjustments for the perfect fit.
- Washing and drying helps set the new shape and encourages natural fraying for raw hems.
Frequently Asked Questions
What type of jeans work best for making jorts?
Any type of jeans can work, but rigid, 100% cotton denim often holds its shape best and frays nicely for a raw hem. Stretchy jeans can also be comfortable, but be mindful of how they might stretch and sag after cutting.
How do I prevent my raw hem from fraying too much?
To control fraying, you can sew a straight stitch line about 1/4 to 1/2 inch above your raw edge. This “stop stitch” will prevent the denim from unraveling past that point while still allowing for a stylish, unfinished look below the stitch.
Can I make the jorts tighter around the thigh after cutting?
Yes, you can. Turn the jorts inside out and mark a new seam line along the inner or outer thigh to narrow the leg opening. Stitch along this new line with a sewing machine or by hand, then trim any excess fabric, leaving a small seam allowance.
How can I achieve a vintage or distressed look for my jorts?
You can use sandpaper or a cheese grater to rub areas like the thighs and pockets for a faded, worn look. For rips and holes, make small cuts with sharp scissors or a utility knife, then use tweezers to pull out individual threads around the cut for a natural, frayed opening.
Our Top Recommended Finds
- Sharp Fabric Scissors: A good pair makes all the difference for clean, straight cuts. Look for ones specifically designed for denim.
- Tailor’s Chalk or Washable Fabric Marker: Essential for precise, temporary markings that won’t stain your denim.
- Measuring Tape/Ruler: Crucial for accurate measurements and ensuring both jort legs are perfectly even.
Your Next Denim Adventure Awaits
You now possess the skills to transform old jeans into a fresh, personalized pair of jorts. This simple DIY project breathes new life into forgotten denim and adds a unique piece to your wardrobe.
Don’t stop here; consider experimenting with different washes, distressing techniques, or even adding patches to your next creation.
Grab those old jeans today and start crafting your perfect jorts. The satisfaction of wearing something you made yourself is truly unmatched.
Beginner-friendly templates, step-by-step guides,
and weekly project ideas in your inbox.