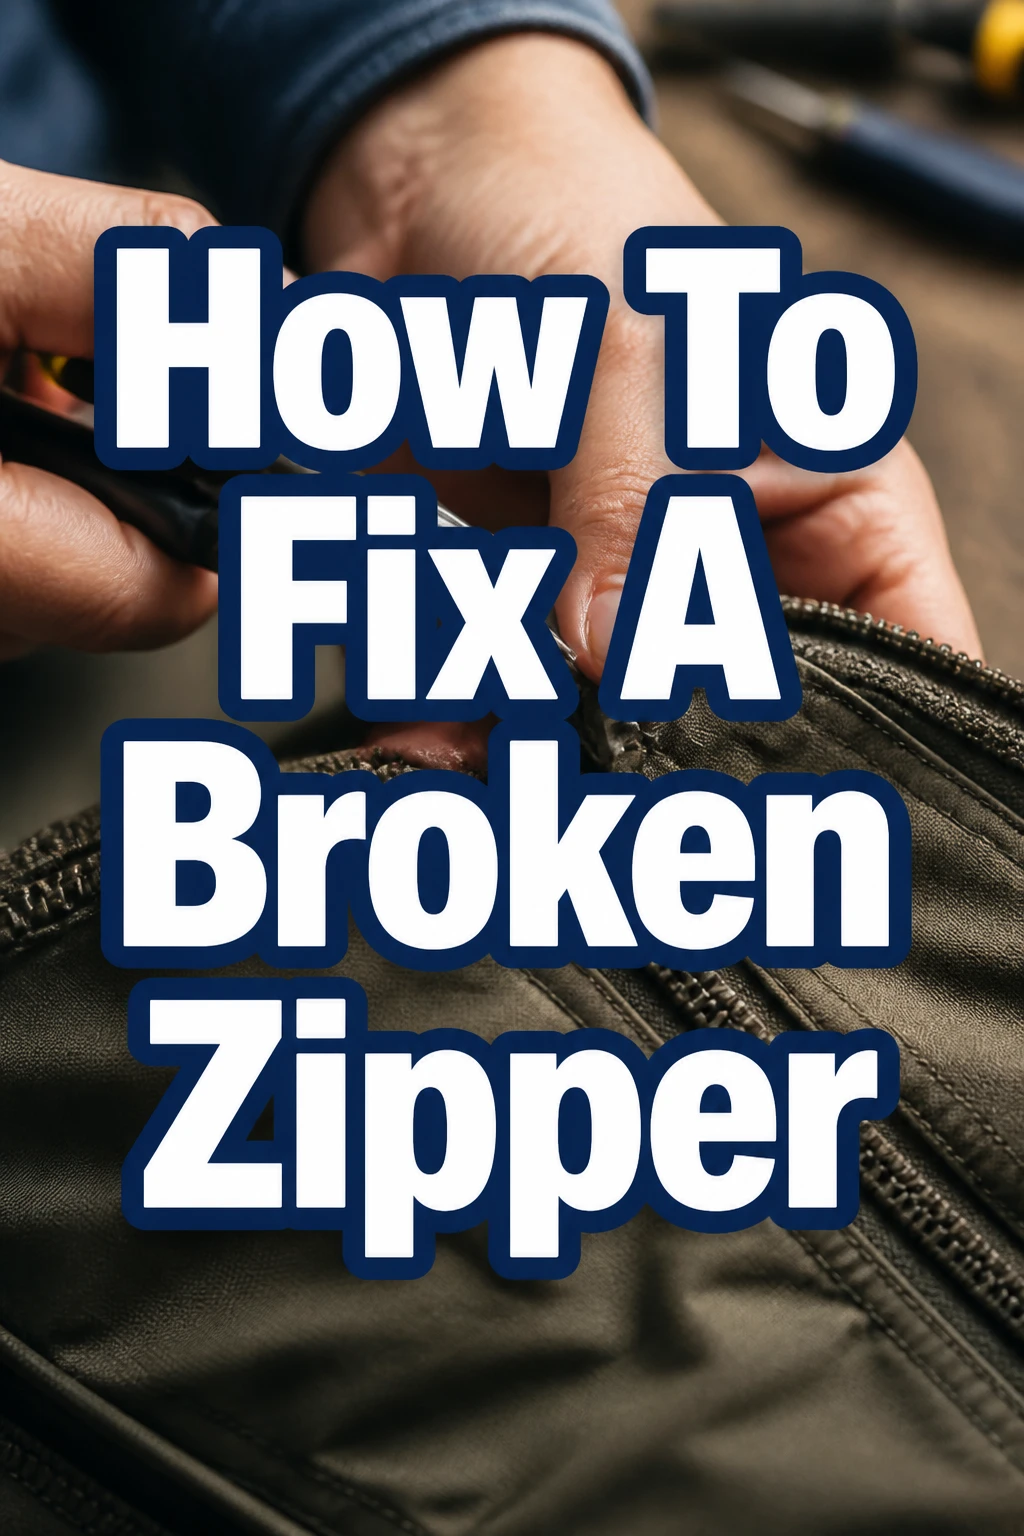
How To Fix A Broken Zipper

Beginner-friendly templates, step-by-step guides,
and weekly project ideas in your inbox.
That frustrating moment when your favorite jacket or bag zipper gives out can feel like a disaster.
I’ve been there, staring at a perfectly good item rendered useless by a tiny metal or plastic component.
Over the years, I’ve learned that many zipper woes are surprisingly simple to mend with a little patience and the right approach.
Quick Overview
Mending a broken zipper often saves you money and extends the life of your cherished items. This guide will walk you through common zipper problems and their practical solutions, empowering you to tackle these repairs yourself.
- Time needed: 15-60 minutes, depending on the damage
- Difficulty: Beginner to Intermediate
- What you’ll need: Pliers, scissors, sewing kit, graphite pencil, and a new zipper slider (if needed)
Step-by-Step Instructions
Step 1: Assess the Damage
Before you begin any repair, take a moment to understand what exactly went wrong with your zipper. Different problems require different solutions.
Examine the entire zipper track, the slider, and the stops at both ends.
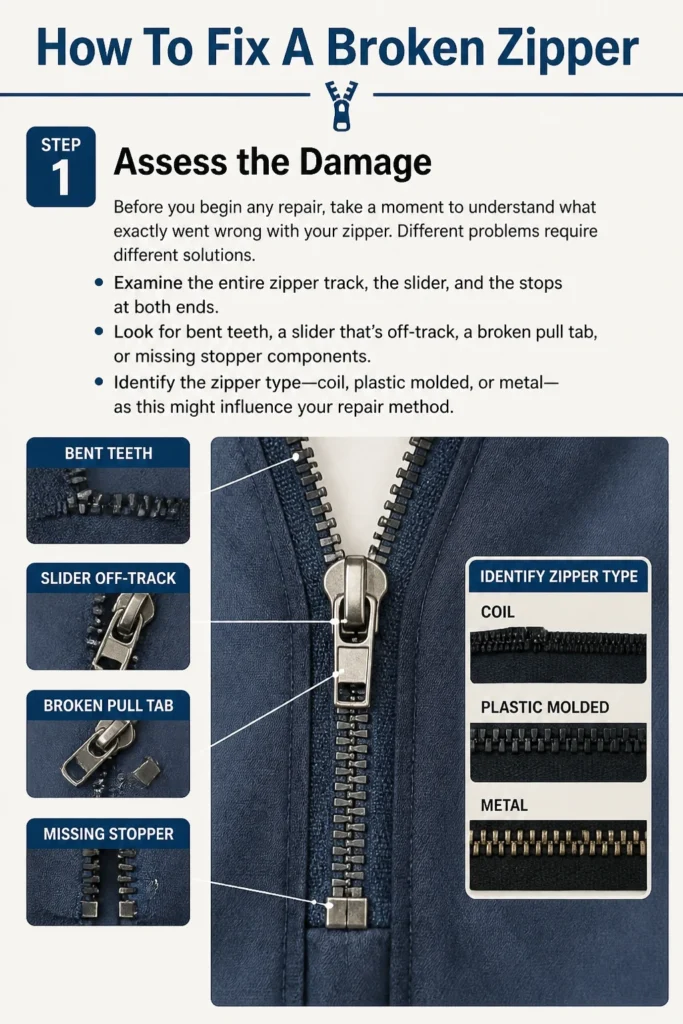
Look for bent teeth, a slider that’s off-track, a broken pull tab, or missing stopper components.
Identify the zipper type—coil, plastic molded, or metal—as this might influence your repair method.
Step 2: Gather Your Tools
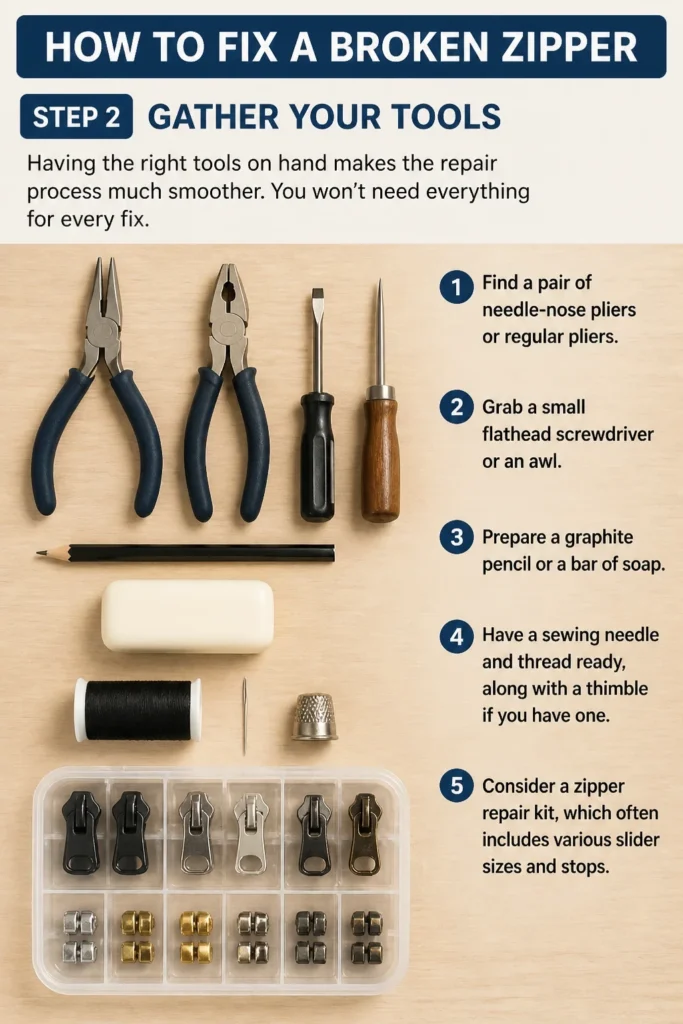
Having the right tools on hand makes the repair process much smoother. You won’t need everything for every fix.
- Find a pair of needle-nose pliers or regular pliers.
- Grab a small flathead screwdriver or an awl.
- Prepare a graphite pencil or a bar of soap.
- Have a sewing needle and thread ready, along with a thimble if you have one.
- Consider a zipper repair kit, which often includes various slider sizes and stops.
Step 3: Loosen a Stuck Zipper
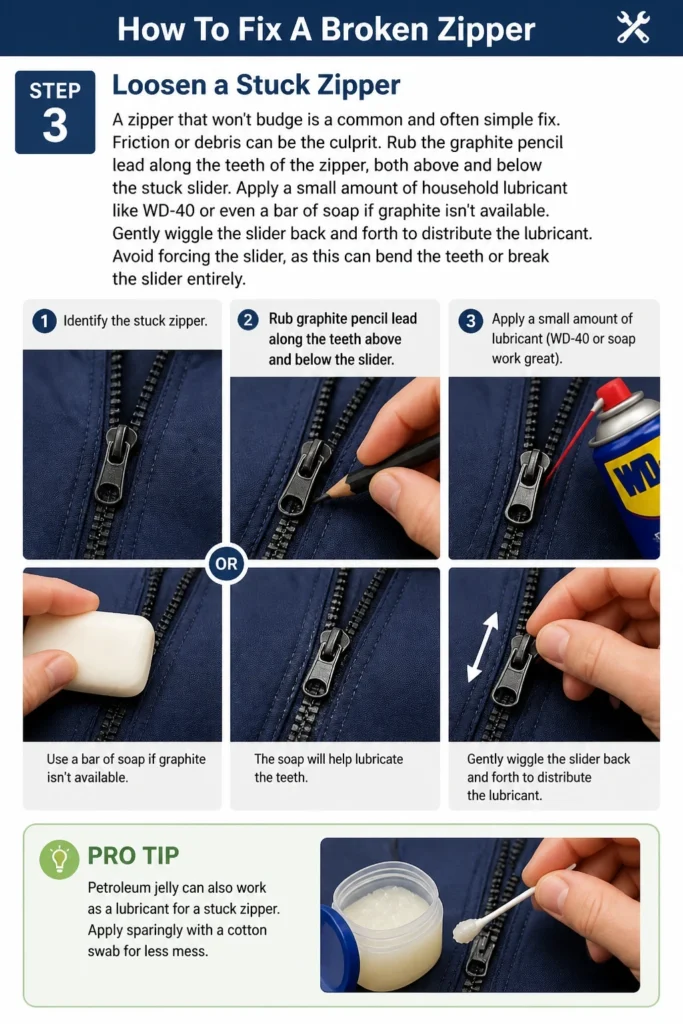
A zipper that won’t budge is a common and often simple fix. Friction or debris can be the culprit.
- Rub the graphite pencil lead along the teeth of the zipper, both above and below the stuck slider.
- Apply a small amount of household lubricant like WD-40 or even a bar of soap if graphite isn’t available.
- Gently wiggle the slider back and forth to distribute the lubricant.
- Avoid forcing the slider, as this can bend the teeth or break the slider entirely.
Pro Tip: Petroleum jelly can also work as a lubricant for a stuck zipper. Apply sparingly with a cotton swab for less mess.
Step 4: Tighten a Loose Slider
If your zipper slider moves too easily or the teeth aren’t interlocking properly, the slider might be too wide. This is a very common issue.
- Locate the base of the slider where it grips the zipper teeth.
- Use needle-nose pliers to gently squeeze the top and bottom plates of the slider together.
- Apply slight pressure, testing the zipper after each small squeeze.
- Be careful not to squeeze too hard, or you might make the slider too tight and cause it to jam.
Test the zipper by pulling it up and down a few times. If it’s still too loose, repeat the squeezing process with very light pressure.
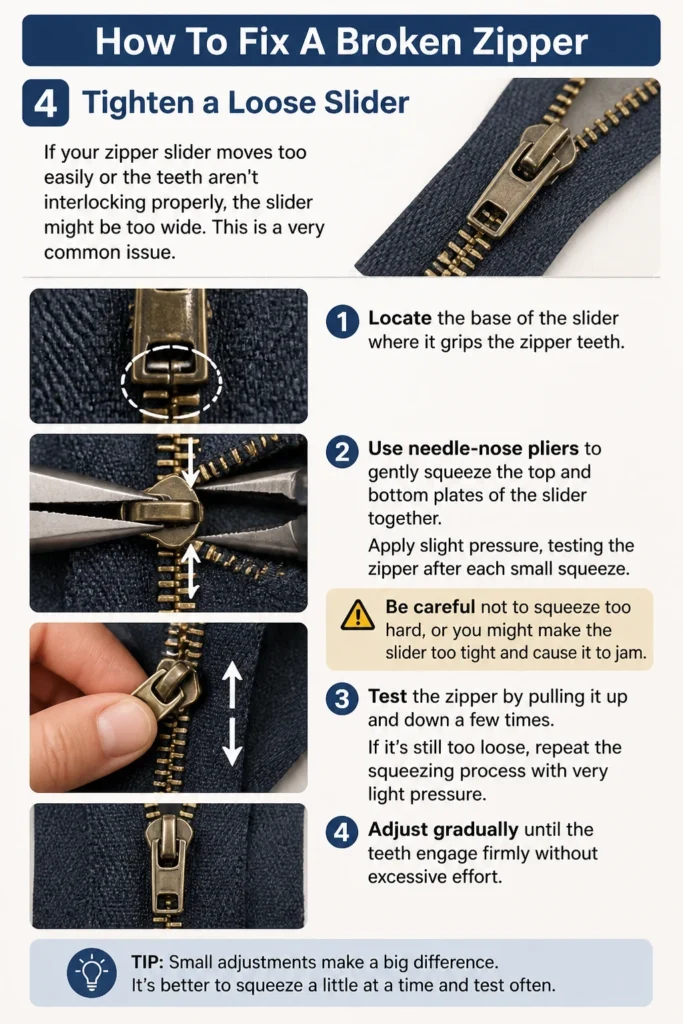
Adjust gradually until the teeth engage firmly without excessive effort.
Step 5: Fix a Separated Zipper (Slider Off Track)
When the slider has come completely off one or both sides of the zipper track, it looks daunting but is often fixable. This usually happens near the bottom stop.
- Identify the side where the slider has come off.
- Pry open the top stop on that side of the zipper with needle-nose pliers or a small flathead screwdriver.
- Slide the zipper slider back onto the track from the top.
- Ensure both sides of the zipper teeth are properly aligned inside the slider’s channels.
Replace the top stop by squeezing it back into place with your pliers.
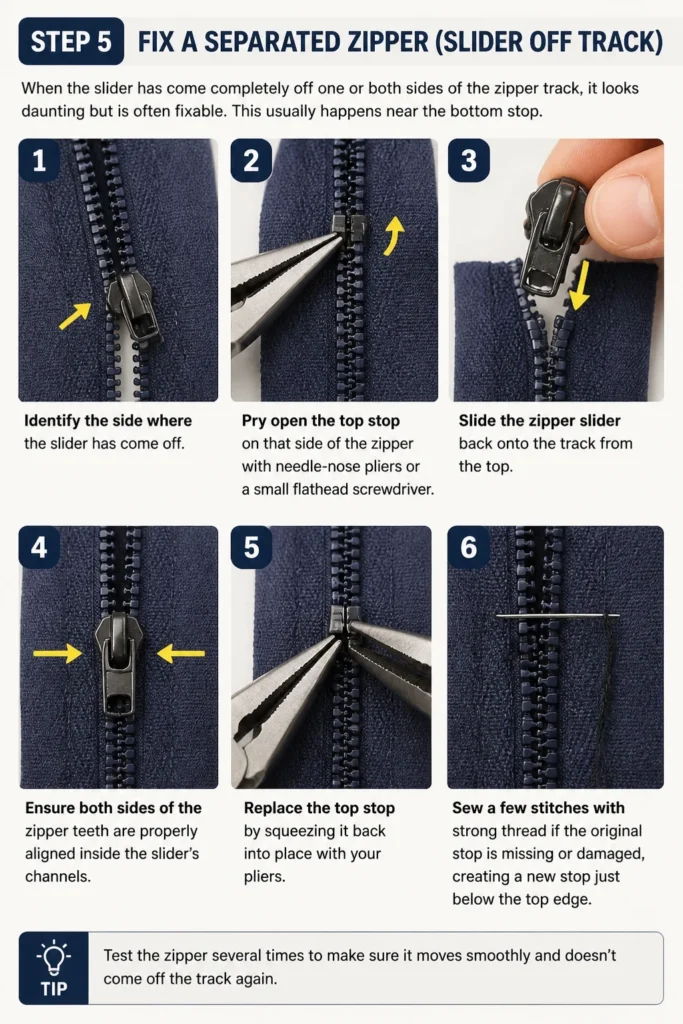
Sew a few stitches with strong thread if the original stop is missing or damaged, creating a new stop just below the top edge.
Step 6: Replace a Broken Zipper Slider
A broken slider, one with a missing pull tab or a fractured body, needs replacement. This is a more involved step.
- Remove the top stop on the side opposite the pull tab using pliers.
- Slide the old, broken slider completely off the zipper tape.
- Match the old slider with a new one from a repair kit or a donor zipper. Ensure the size and type (metal, plastic) are correct.
- Feed the new slider onto the zipper tape from the top, making sure both sides of the teeth enter the slider’s channels evenly.
Test the slider by pulling it down slightly to ensure it moves freely.
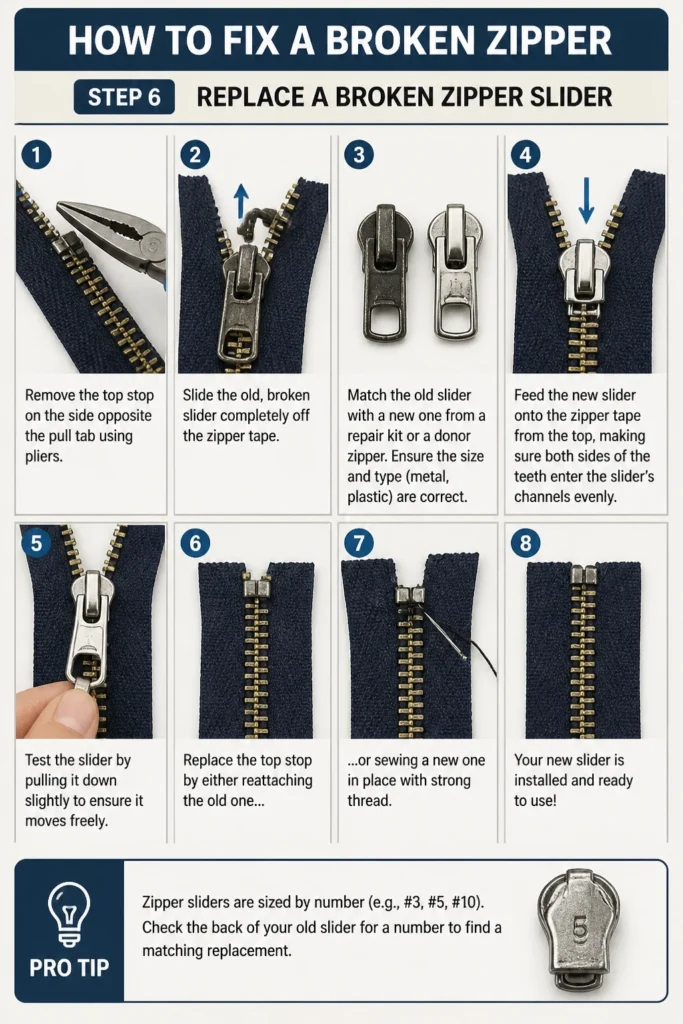
Replace the top stop by either reattaching the old one or sewing a new one in place with strong thread.
Pro Tip: Zipper sliders are sized by number (e.g., #3, #5, #10). Check the back of your old slider for a number to find a perfect match.
Step 7: Repair a Missing Zipper Tooth
Missing teeth can prevent the zipper from closing properly. This fix is temporary but effective.
- Clean the area around the missing tooth thoroughly.
- Use a needle and strong thread (nylon or upholstery thread works best).
- Stitch across the gap where the tooth is missing, creating a series of tight, parallel stitches.
- Mimic the shape and height of the surrounding zipper teeth with your thread.
Build up several layers of stitches to create a sturdy, tooth-like barrier.
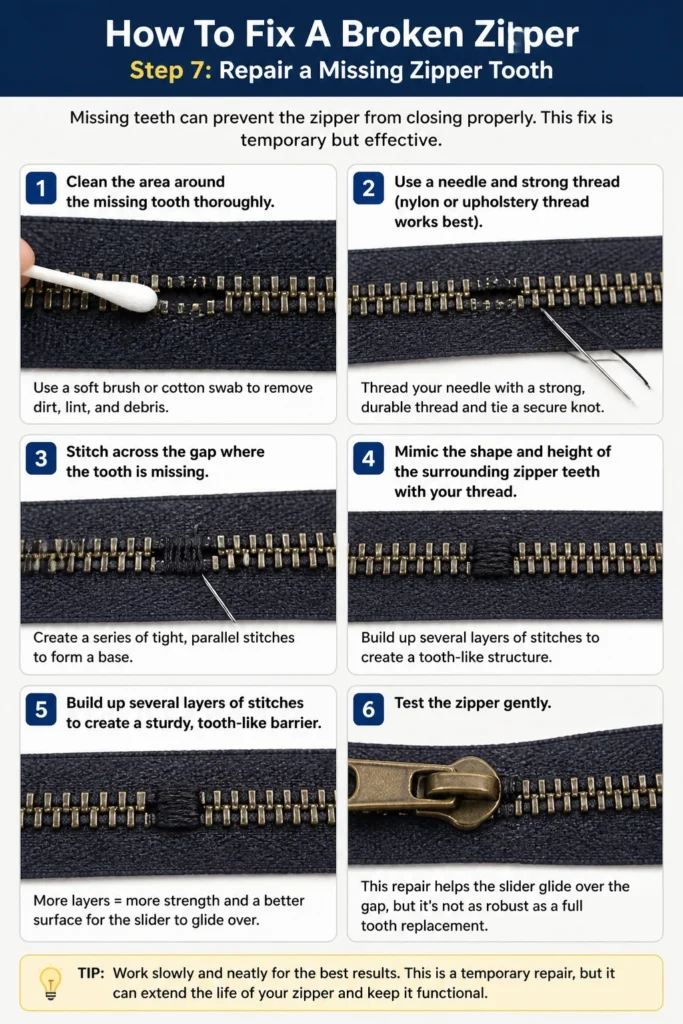
Test the zipper gently. This repair helps the slider glide over the gap, but it’s not as robust as a full tooth replacement.
Step 8: Replace the Bottom Stop
The bottom stop prevents the slider from coming off the bottom of the zipper. If it’s broken, the zipper will separate completely.
- Remove any remnants of the old bottom stop with pliers.
- Position a new bottom stop (from a repair kit) at the very bottom of the zipper teeth.
- Align the new stop precisely with the bottom edge of the fabric tape.
- Crimp the new stop firmly into place with pliers until it’s securely attached.
Alternatively, you can sew a new bottom stop. Use several tight, strong stitches across the bottom of the zipper tape to create a barrier.
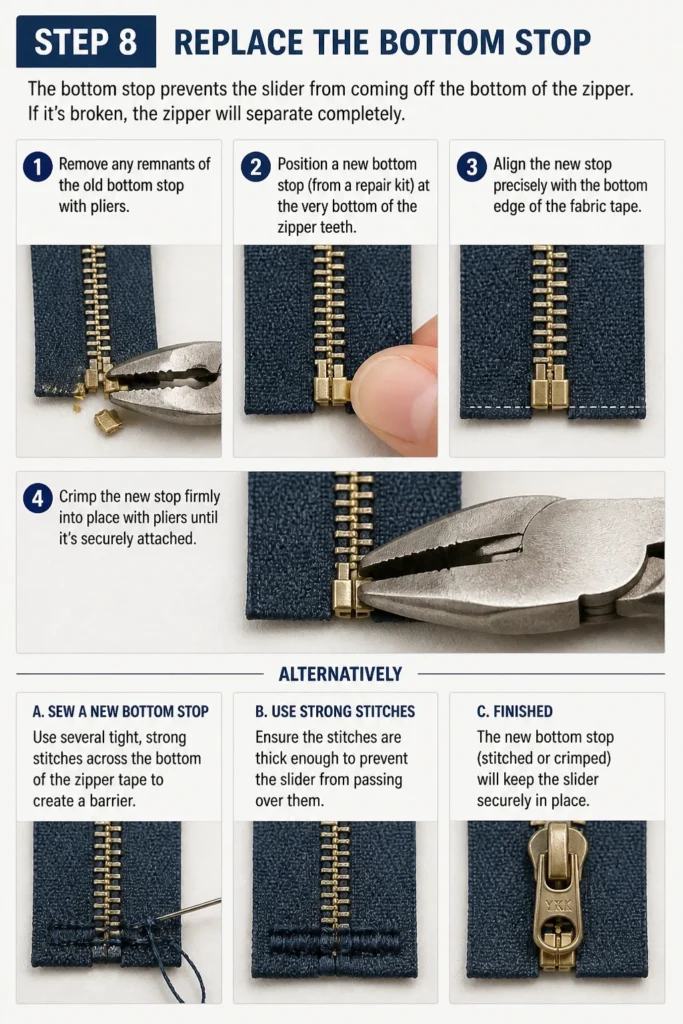
Ensure the stitches are thick enough to prevent the slider from passing over them.
Step 9: Replace the Top Stop
Just like the bottom stop, top stops prevent the slider from coming off the top. They are often smaller.
- Gently pry off any remaining pieces of the old top stop.
- Place a new top stop (from a repair kit) at the very top of the zipper teeth, just below the end of the fabric tape.
- Crimp it securely with pliers.
- Make sure it’s tight enough to prevent the slider from moving past it.
If you don’t have a replacement, you can create a sewn top stop.
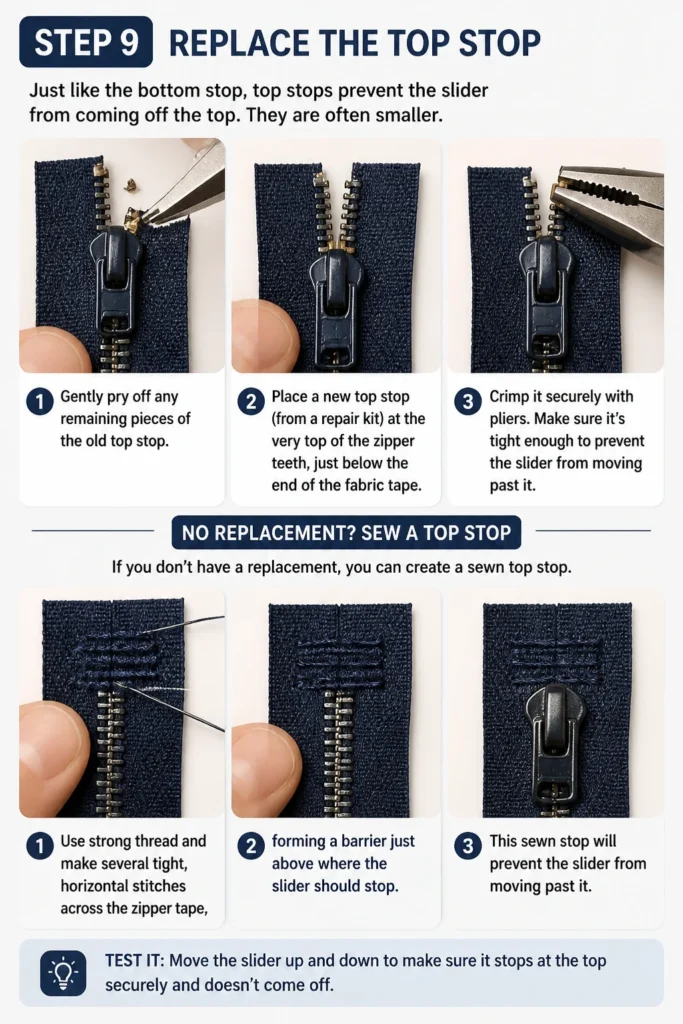
Use strong thread and make several tight, horizontal stitches across the zipper tape, forming a barrier just above where the slider should stop.
Step 10: Final Test and Finishing Touches
Once you’ve completed your repair, it’s essential to test it thoroughly and ensure everything is secure.
- Run the zipper up and down its entire length several times.
- Observe how the teeth engage and disengage.
- Listen for any grinding or catching sounds.
- Check that the slider moves smoothly without excessive force.
Trim any loose threads from sewn repairs.
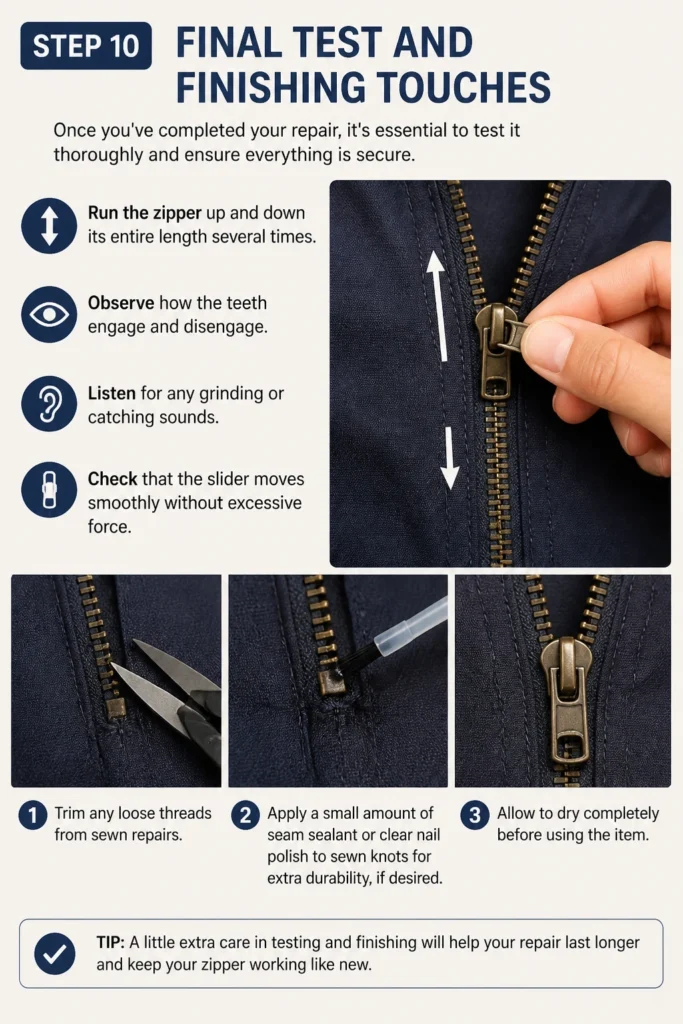
Apply a small amount of seam sealant or clear nail polish to sewn knots for extra durability, if desired.
Common Mistakes to Avoid
Forcing the Zipper
Many people try to yank or force a stuck zipper, thinking it will eventually give way. This is a common and damaging mistake. Forcing a zipper can bend the teeth, break the slider, or even tear the fabric tape. Always apply gentle pressure and use lubrication first.
Using the Wrong Tools
Attempting to fix a zipper with unsuitable tools, like a butter knife instead of pliers, can cause more harm than good. Imprecise tools can damage delicate zipper components or the surrounding fabric. Invest in a basic pair of needle-nose pliers and a small flathead screwdriver for best results.
Ignoring Underlying Issues
Sometimes a zipper problem is a symptom of a larger issue, like a misaligned garment or excessive stress on the zipper. Simply fixing the slider without addressing why it broke in the first place might lead to a quick re-break. Consider how the item is worn or used and if adjustments are needed.
Not Matching Slider Size
When replacing a slider, using the wrong size is a common pitfall. A slider that’s too small won’t fit, and one that’s too large won’t properly engage the teeth, causing the zipper to separate. Always try to match the original slider size, often indicated by a number on its back.
Troubleshooting
Zipper Keeps Separating After Repair
If your zipper continues to separate even after you’ve tried tightening the slider or re-aligning it, the slider itself might be worn out. Its internal mechanism could be too loose to properly interlock the teeth. In this case, a complete slider replacement is usually the most effective solution. Ensure the new slider is the correct size for your zipper.
Slider Won’t Move at All
If the slider is completely jammed and won’t budge even after lubrication, check for trapped fabric or debris. Use tweezers or a small, thin tool to carefully remove any obstructions. If no obstruction is visible, the slider might be bent or broken internally, requiring replacement. Ensure the zipper teeth themselves are not severely bent or damaged.
Teeth Won’t Interlock Even with New Slider
When teeth refuse to interlock, even with a new, correctly sized slider, the problem likely lies with the zipper teeth themselves. Individual teeth might be bent, damaged, or missing. Inspect the entire length of the zipper for any deformities. If multiple teeth are damaged, the entire zipper tape might need to be replaced by a professional, as individual tooth repair is often temporary.
Key Takeaways
- Assess the damage first: Different zipper problems require specific solutions.
- Lubrication is key: A graphite pencil or soap can often free a stuck zipper.
- Gentle pressure works best: Avoid forcing any part of the zipper to prevent further damage.
- Sliders are often the culprit: Many common issues can be resolved by tightening or replacing the slider.
- Proper tools simplify repairs: Needle-nose pliers and a basic sewing kit are invaluable.
- Don’t discard, repair: Most zipper issues are fixable, extending the life of your items.
Frequently Asked Questions
Are all types of zippers fixable?
Most common zipper types—coil, plastic molded, and metal—are fixable for issues like stuck sliders, loose sliders, or detached sliders. However, zippers with extensively damaged or missing teeth across a large section might be beyond simple DIY repair and could require professional replacement of the entire zipper.
When should I consider replacing the entire zipper?
You should consider replacing the entire zipper if the zipper tape is torn, if a significant number of teeth are missing or severely damaged, or if the item is frequently used and a temporary fix won’t suffice. For delicate or high-value items, a professional zipper replacement might be the best option.
Can I fix a zipper without special tools?
While specialized tools like zipper repair kits or specific pliers are helpful, many basic zipper repairs can be done with common household items. A regular pair of pliers, a graphite pencil, a bar of soap, and a needle and thread can fix many issues. Resourcefulness often goes a long way.
How do I prevent future zipper problems?
To prevent future zipper problems, always close zippers fully before washing items. Avoid overstuffing bags or pockets that put stress on zippers. Lubricate zippers periodically, especially on outdoor gear. Handle zippers gently, avoiding excessive force when opening or closing them.
Our Top Recommended Finds
- Zipper Repair Kit: A comprehensive kit includes various slider sizes, top stops, and bottom stops, preparing you for almost any common zipper issue.
- Needle-Nose Pliers: Essential for delicate adjustments, crimping stops, and squeezing sliders without damaging the surrounding material.
- Heavy-Duty Thread and Needles: For sewing new stops or mending torn zipper tape, strong thread ensures a durable repair.
Breathe New Life into Your Wardrobe
Don’t let a broken zipper condemn a perfectly good item to the back of your closet or, worse, the trash bin. With a little know-how and some basic tools, you possess the power to bring your favorite jacket, bag, or pair of pants back to full functionality.
Embrace the satisfaction of repairing something yourself and extending its useful life. Take a moment to examine that broken zipper today, gather your tools, and put these practical steps into action. You might be surprised at how easy it is to achieve a successful fix.
Beginner-friendly templates, step-by-step guides,
and weekly project ideas in your inbox.