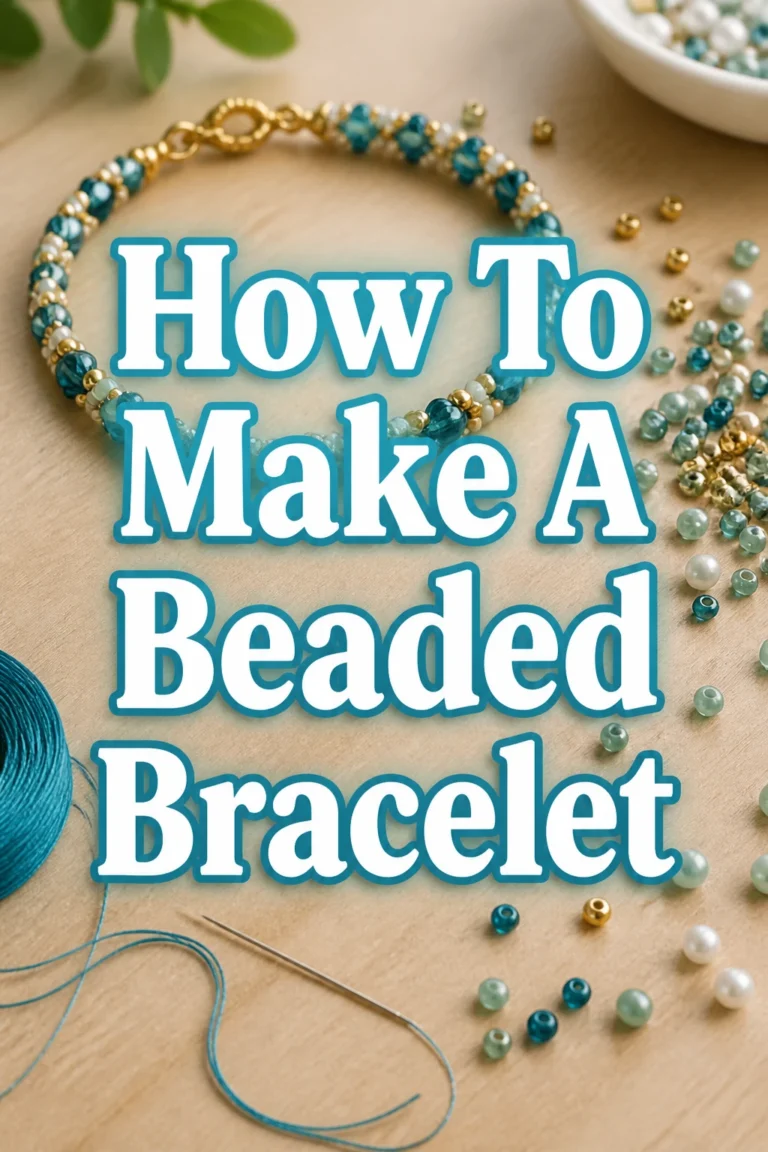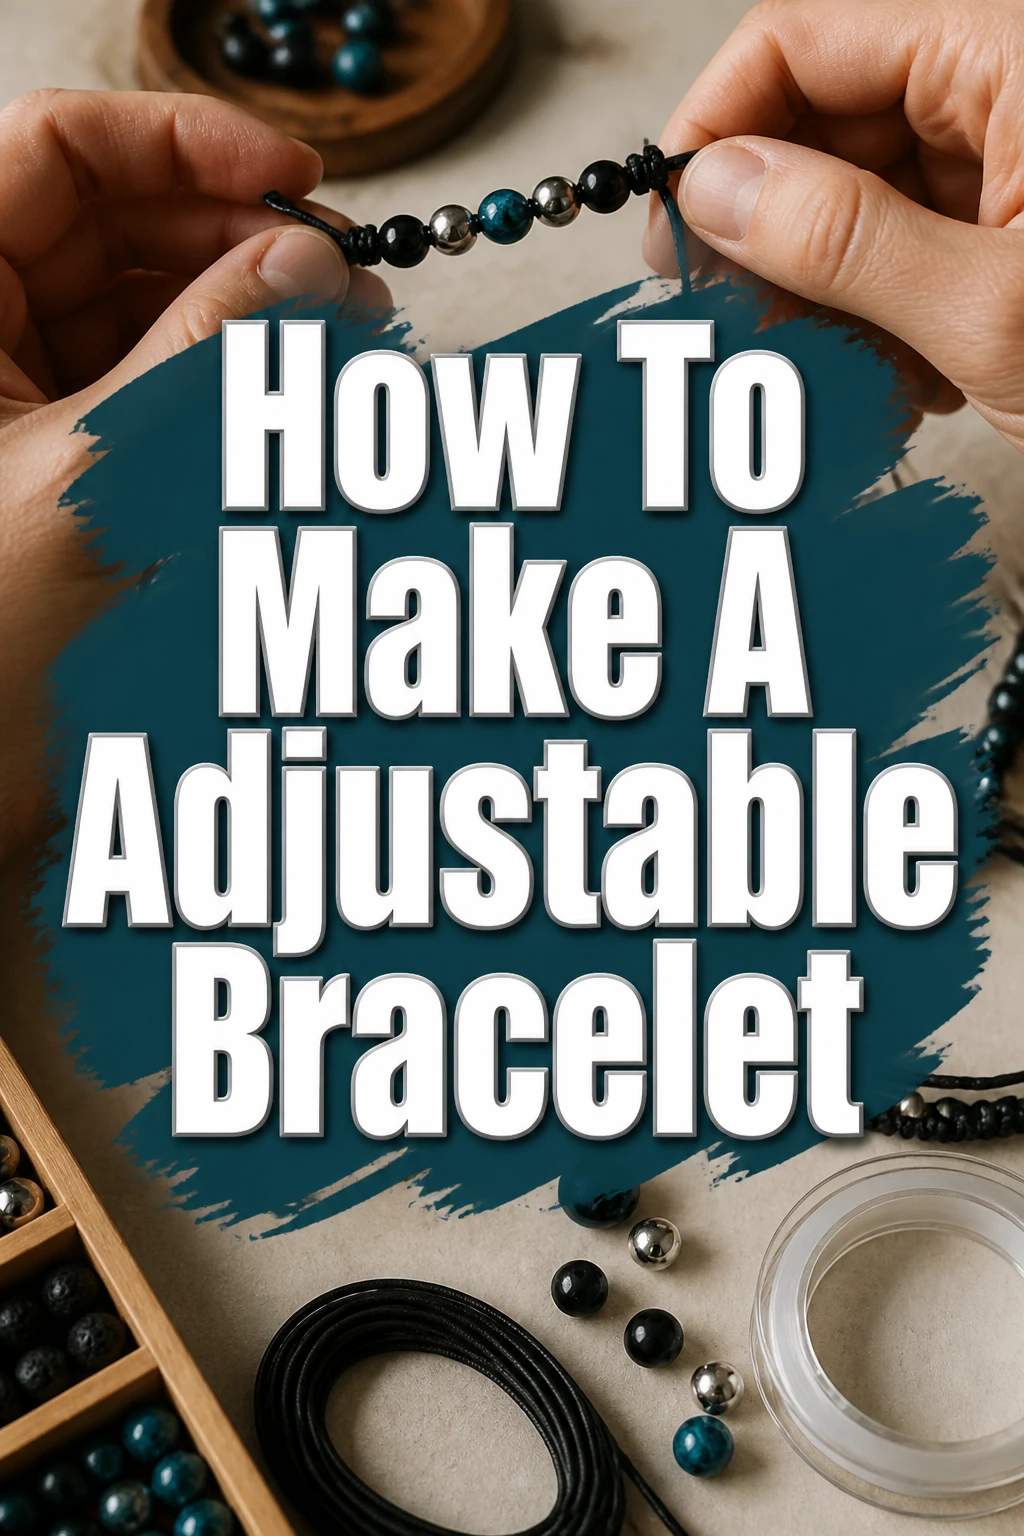
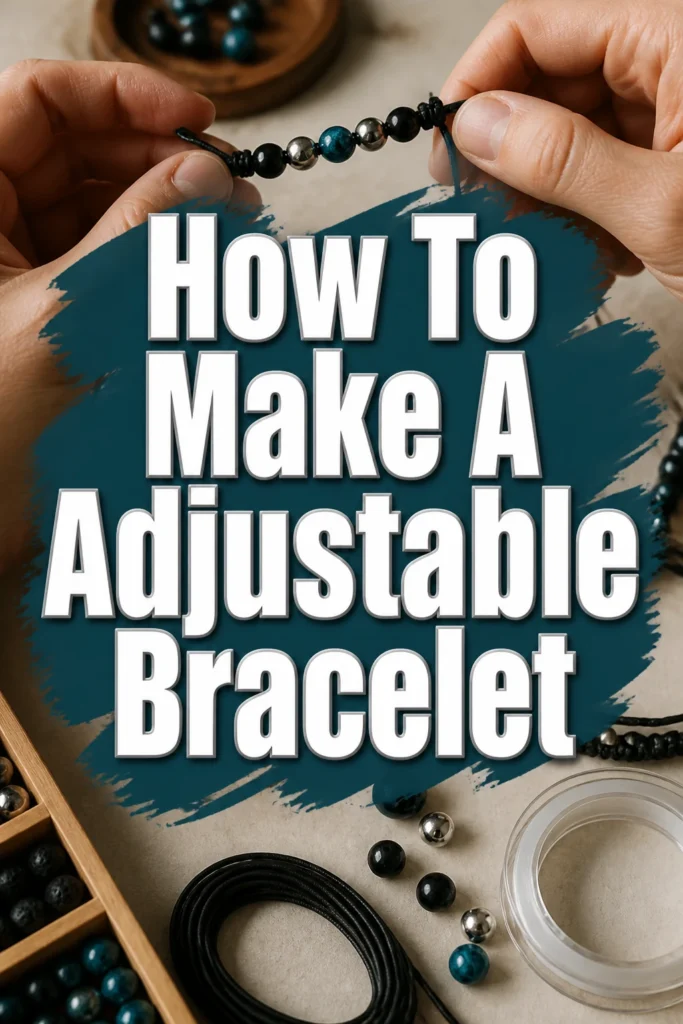
How To Make A Adjustable Bracelet

Beginner-friendly templates, step-by-step guides,
and weekly project ideas in your inbox.
Creating your own jewelry is a deeply satisfying experience.
I learned the joy of crafting custom pieces years ago, and adjustable bracelets quickly became a favorite for their versatility.
This guide shares my proven methods to help you craft a perfectly fitting bracelet every time.
Quick Overview
You’re about to learn how to construct a stylish, adjustable bracelet using simple materials and techniques.
This project is fantastic for personal wear, thoughtful gifts, or even starting a small crafting venture.
- Time needed: 45-90 minutes (depending on bead complexity)
- Difficulty: Beginner
- What you’ll need: Cord, beads, scissors, a ruler, and a lighter (optional)
Step-by-Step Instructions
Step 1: Gather Your Materials
Before you begin, ensure all your supplies are within easy reach.
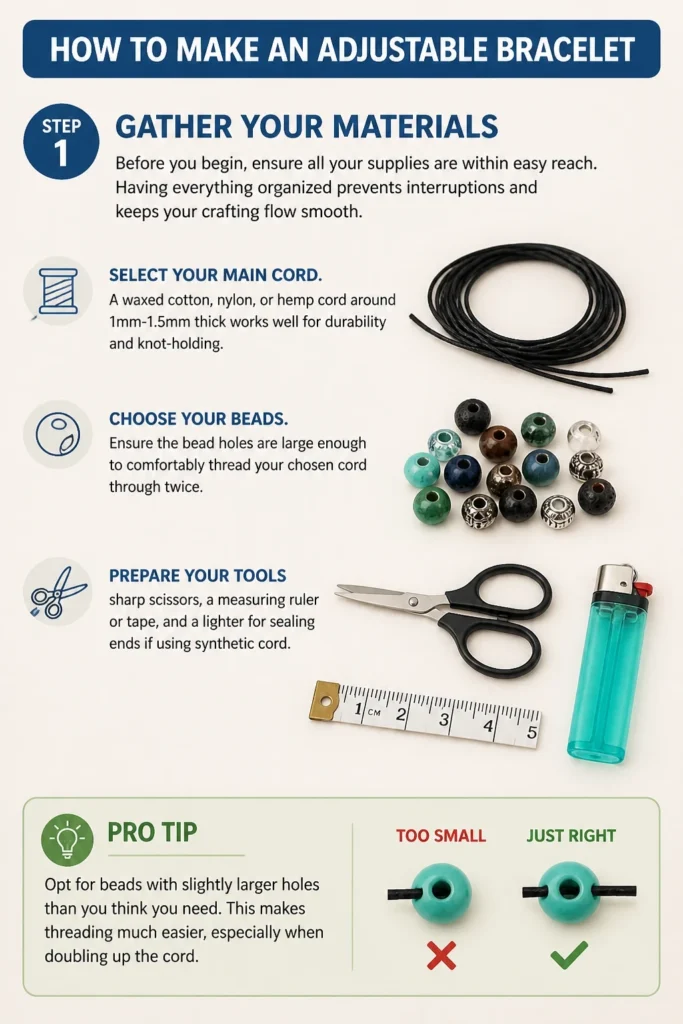
Having everything organized prevents interruptions and keeps your crafting flow smooth.
Select your main cord. A waxed cotton, nylon, or hemp cord around 1mm-1.5mm thick works well for durability and knot-holding.
Choose your beads. Ensure the bead holes are large enough to comfortably thread your chosen cord through twice.
Prepare your tools: sharp scissors, a measuring ruler or tape, and a lighter for sealing ends if using synthetic cord.
Pro Tip: Opt for beads with slightly larger holes than you think you need. This makes threading much easier, especially when doubling up the cord.
Step 2: Measure and Cut Your Cords
Accurate cord measurement is crucial for a well-proportioned bracelet.
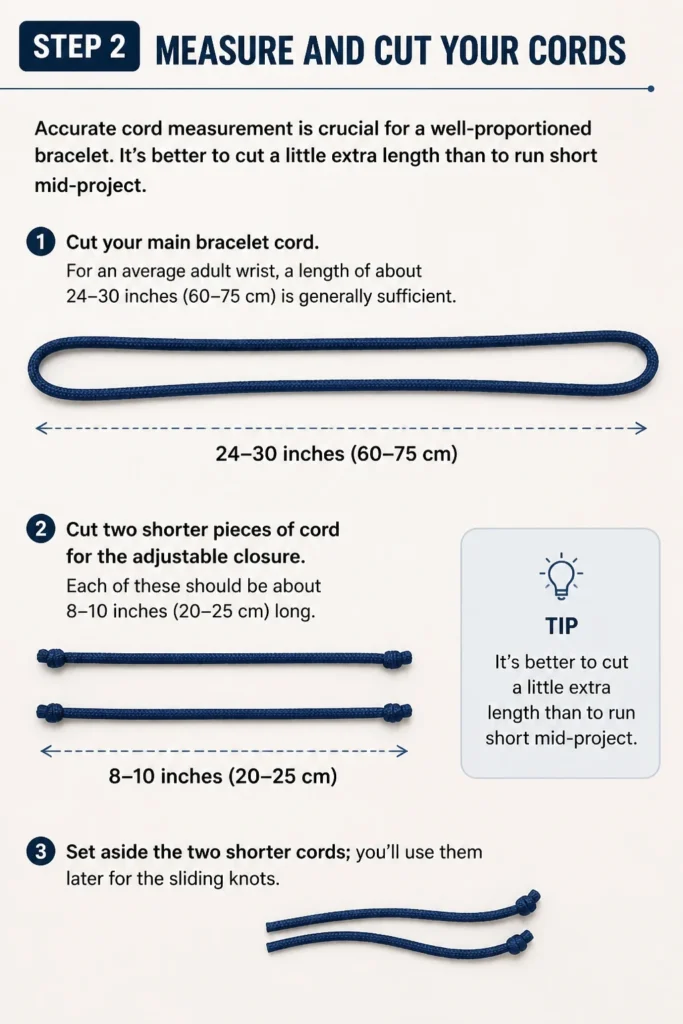
It’s better to cut a little extra length than to run short mid-project.
Cut your main bracelet cord. For an average adult wrist, a length of about 24-30 inches (60-75 cm) is generally sufficient.
Cut two shorter pieces of cord for the adjustable closure. Each of these should be about 8-10 inches (20-25 cm) long.
Set aside the two shorter cords; you’ll use them later for the sliding knots.
Step 3: Prepare the Main Cord Ends
Preparing the ends makes threading beads much simpler and prevents fraying.
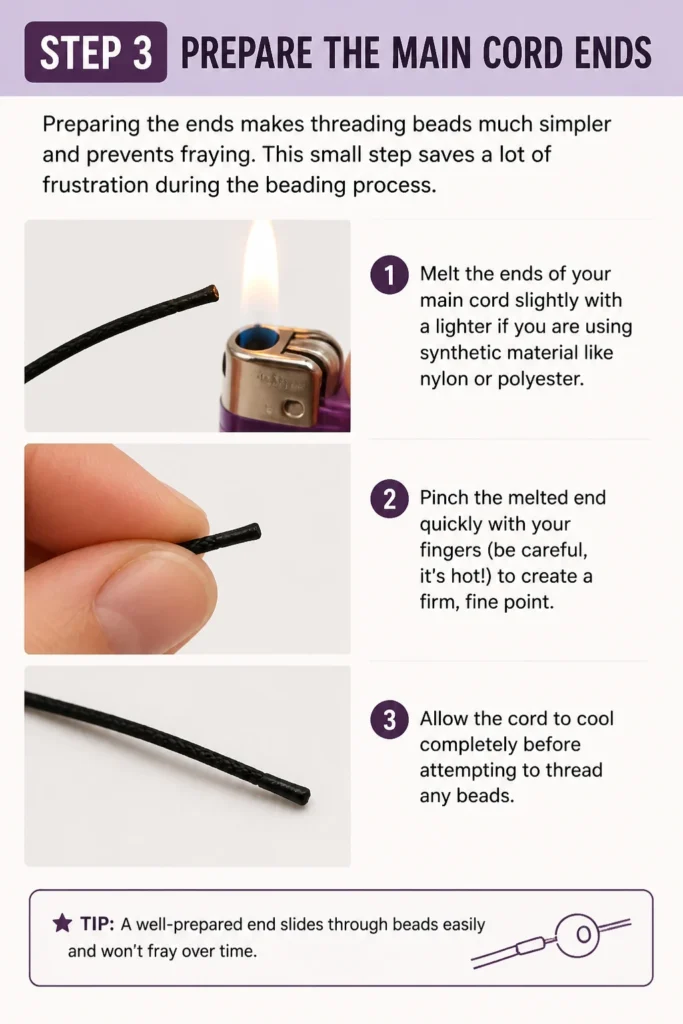
This small step saves a lot of frustration during the beading process.
Melt the ends of your main cord slightly with a lighter if you are using synthetic material like nylon or polyester.
Pinch the melted end quickly with your fingers (be careful, it’s hot!) to create a firm, fine point.
Allow the cord to cool completely before attempting to thread any beads.
Step 4: Thread Your Beads
Now comes the creative part: arranging your beads into your desired design.
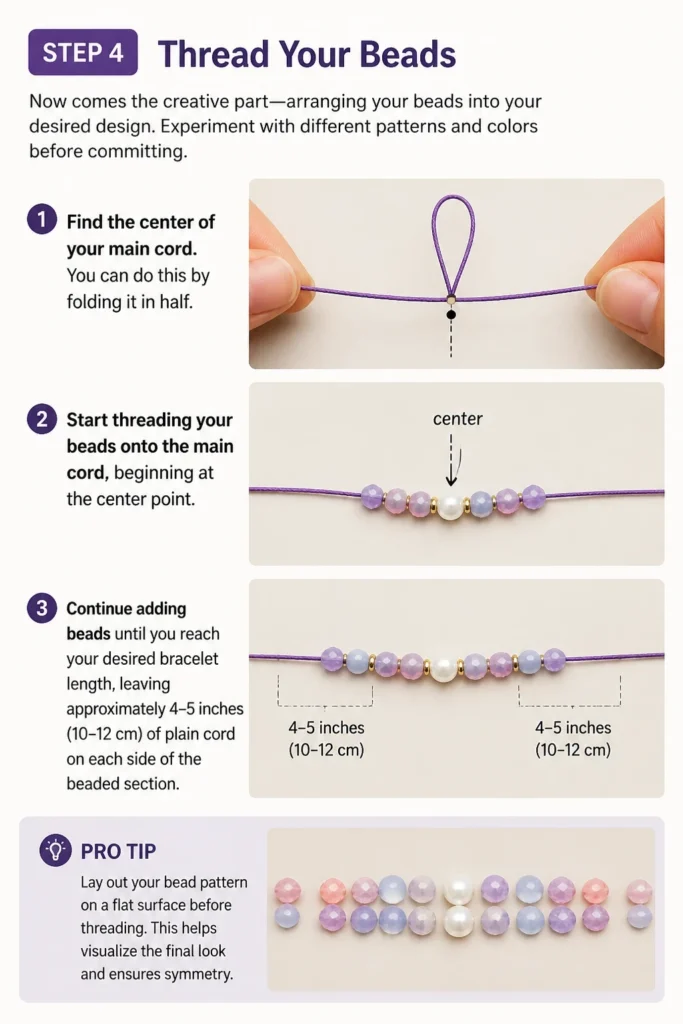
Experiment with different patterns and colors before committing.
Find the center of your main cord. You can do this by folding it in half.
Start threading your beads onto the main cord, beginning at the center point.
Continue adding beads until you reach your desired bracelet length, leaving approximately 4-5 inches (10-12 cm) of plain cord on each side of the beaded section.
Pro Tip: Lay out your bead pattern on a flat surface before threading. This helps visualize the final look and ensures symmetry.
Step 5: Create the First Loop and Knot
This step forms one side of the adjustable closure.
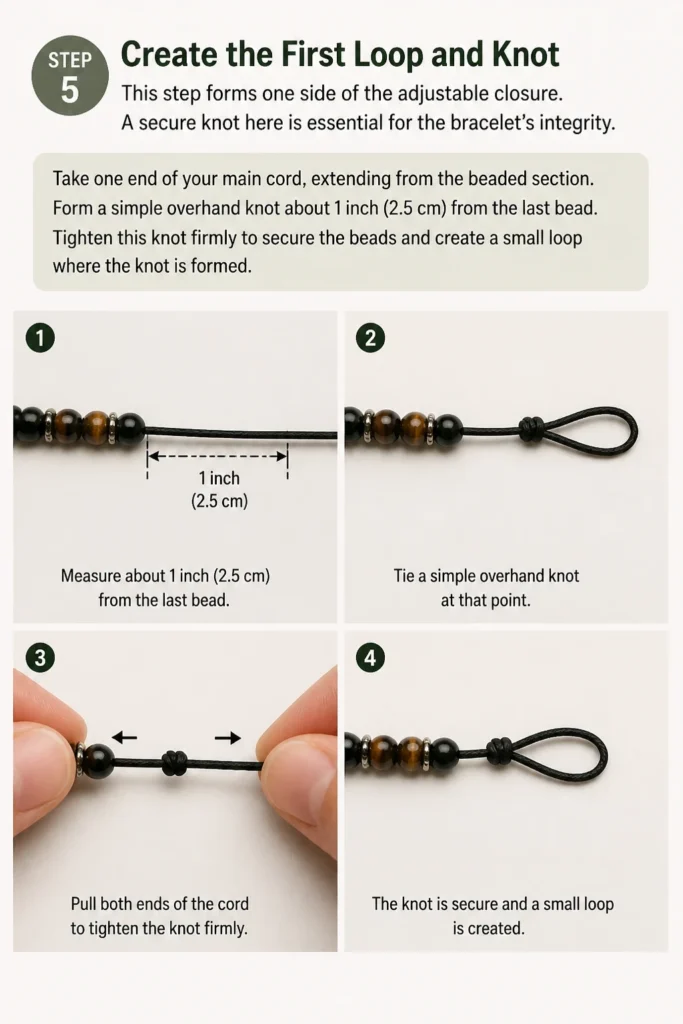
A secure knot here is essential for the bracelet’s integrity.
Take one end of your main cord, extending from the beaded section.
Form a simple overhand knot about 1 inch (2.5 cm) from the last bead.
Tighten this knot firmly to secure the beads and create a small loop where the knot is formed.
Step 6: Attach the Second Loop and Knot
The second loop mirrors the first, completing the bracelet’s main structure.
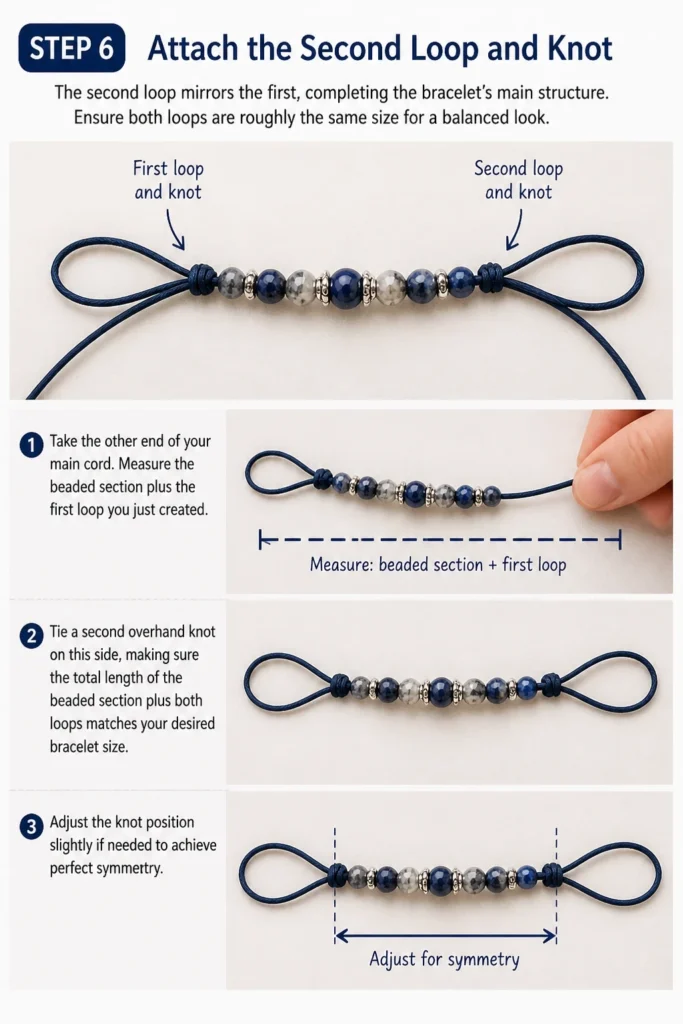
Ensure both loops are roughly the same size for a balanced look.
Take the other end of your main cord.
Measure the beaded section plus the first loop you just created.
Tie a second overhand knot on this side, making sure the total length of the beaded section plus both loops matches your desired bracelet size.
Adjust the knot position slightly if needed to achieve perfect symmetry.
Step 7: Prepare for the Sliding Knots
The sliding knots are what make your bracelet adjustable.
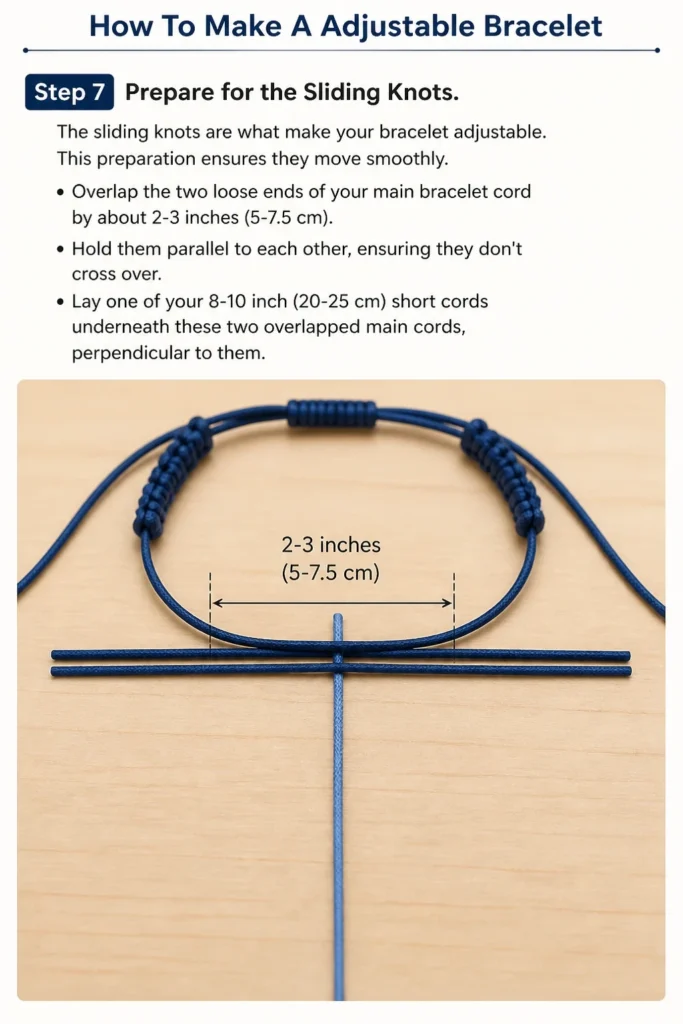
This preparation ensures they move smoothly.
Overlap the two loose ends of your main bracelet cord by about 2-3 inches (5-7.5 cm).
Hold them parallel to each other, ensuring they don’t cross over.
Lay one of your 8-10 inch (20-25 cm) short cords underneath these two overlapped main cords, perpendicular to them.
Step 8: Tie the First Sliding Knot
This is a fundamental knot for adjustable closures, often called a square knot or macrame sliding knot.
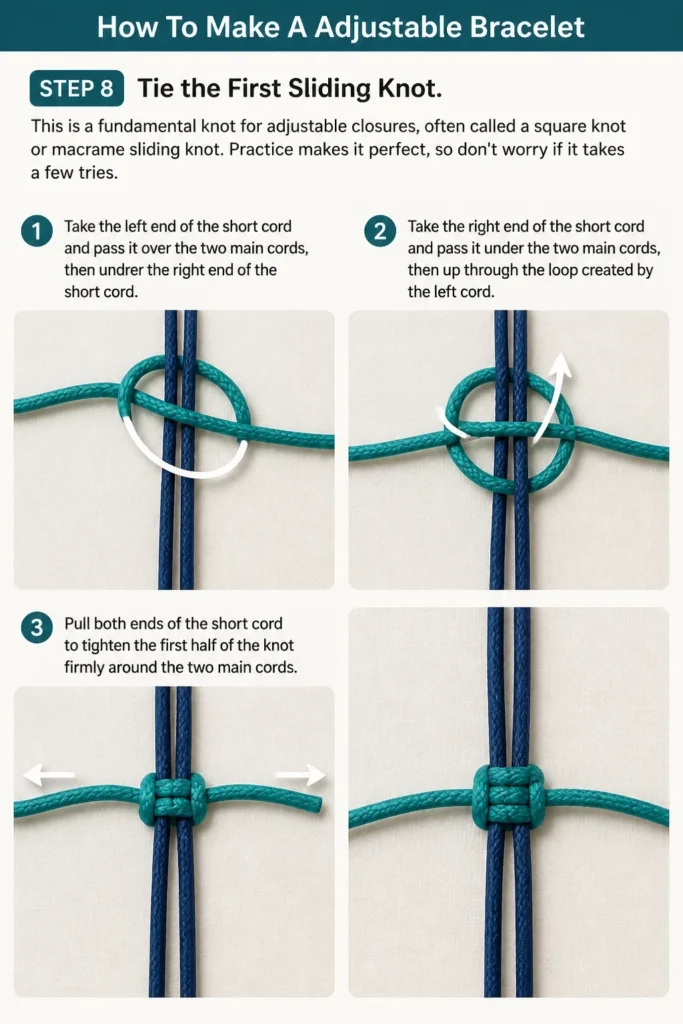
Practice makes it perfect, so don’t worry if it takes a few tries.
Take the left end of the short cord and pass it over the two main cords, then under the right end of the short cord.
Take the right end of the short cord and pass it under the two main cords, then up through the loop created by the left cord.
Pull both ends of the short cord to tighten the first half of the knot firmly around the two main cords.
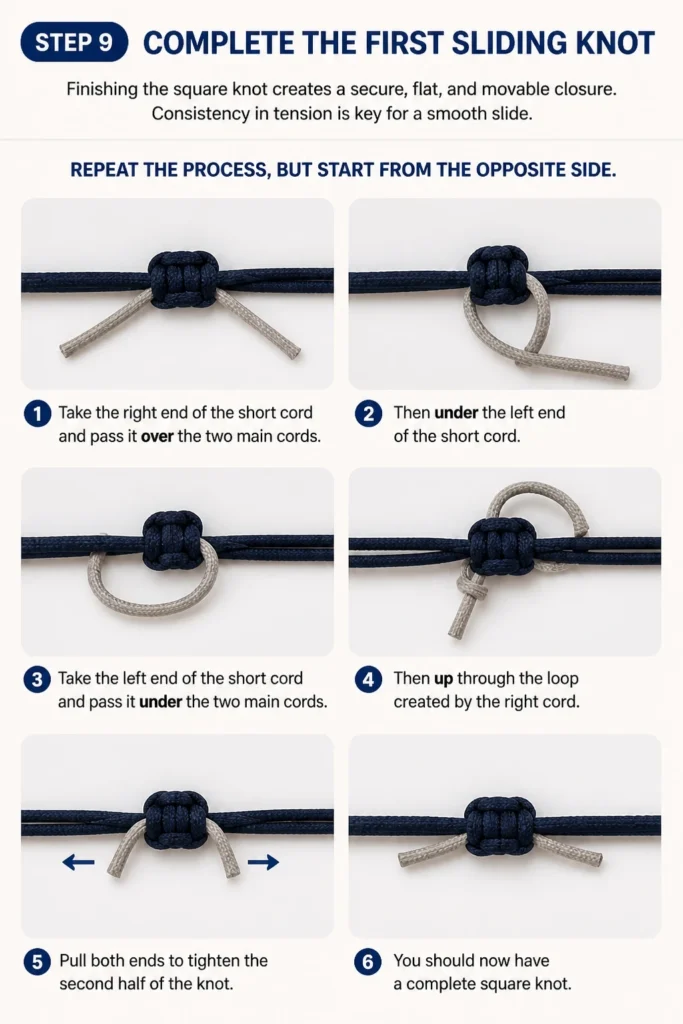
Step 9: Complete the First Sliding Knot
Finishing the square knot creates a secure, flat, and movable closure.
Consistency in tension is key for a smooth slide.
Repeat the process, but start from the opposite side.
Take the right end of the short cord and pass it over the two main cords, then under the left end of the short cord.
Take the left end of the short cord and pass it under the two main cords, then up through the loop created by the right cord.
Pull both ends to tighten the second half of the knot. You should now have a complete square knot.
Step 10: Finish the Adjustable Closure
Repeat the square knot process several times to create a robust and functional sliding mechanism.
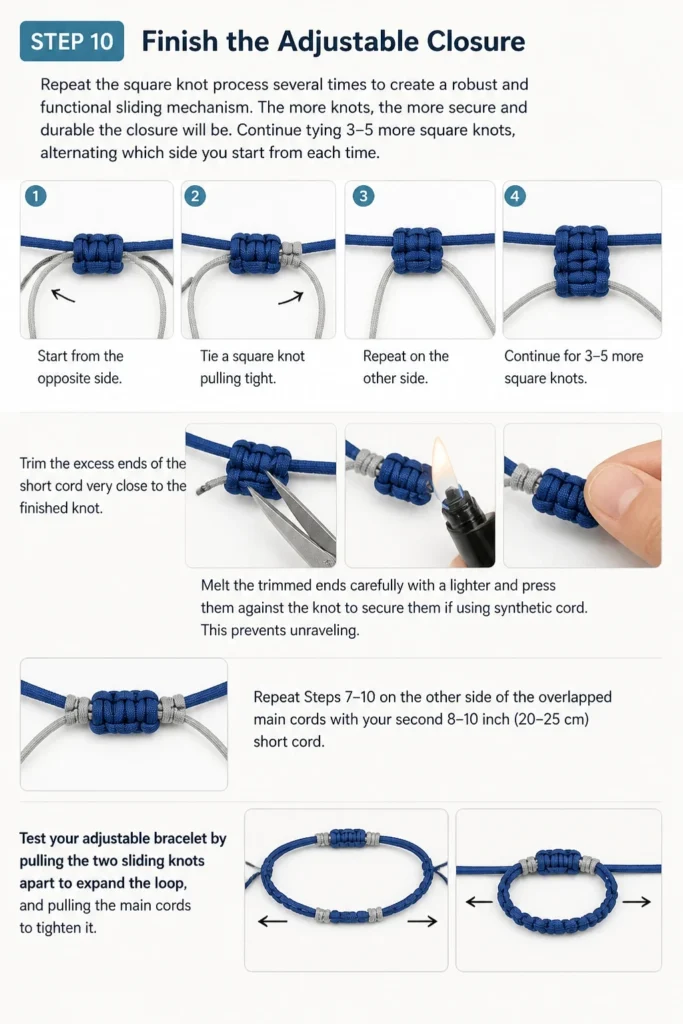
The more knots, the more secure and durable the closure will be.
Continue tying 3-5 more square knots, alternating which side you start from each time.
Trim the excess ends of the short cord very close to the finished knot.
Melt the trimmed ends carefully with a lighter and press them against the knot to secure them if using synthetic cord. This prevents unraveling.
Repeat Steps 7-10 on the other side of the overlapped main cords with your second 8-10 inch (20-25 cm) short cord.
Test your adjustable bracelet by pulling the two sliding knots apart to expand the loop, and pulling the main cords to tighten it.
Common Mistakes to Avoid
Cutting Cords Too Short
One of the most common pitfalls is underestimating the cord length needed. Running out of cord mid-beading or when tying the final knots is incredibly frustrating. Always add a few extra inches to your initial measurements to give yourself ample working room.
If you find yourself with too much cord, you can always trim it later, but adding more once it’s cut is impossible without starting over. Generous cuts save time and prevent waste.
Uneven Knot Tension
When tying the sliding knots, it’s easy to pull one side tighter than the other. This can result in a lopsided or stiff knot that doesn’t slide smoothly. Inconsistent tension also makes the knot look less neat and professional.
Aim for even, firm pulls on both ends of the short cord with each half of the square knot. Practice on scrap cord first to get a feel for the right tension. A well-tied sliding knot should be snug but still movable.
Skipping Cord End Preparation
Neglecting to melt or stiffen cord ends, especially with synthetic materials, can lead to endless fraying. Frayed ends are difficult to thread through beads and can make your finished bracelet look messy and unfinished. This step might seem minor but it’s a huge time-saver.
Always take the extra moment to prepare your cord ends properly. For natural fibers like hemp, a dab of super glue or clear nail polish can stiffen the tip, making it easier to work with.
Incorrect Bead Hole Size
Choosing beads with holes that are too small for your cord is a frequent issue. If the cord barely fits, it will be very difficult to thread, especially if you need to pass it through the bead more than once. This can also damage the cord as you force it through.
Before you commit to a design, test thread a bead or two with your chosen cord. Ensure there’s enough room for the cord to pass through without excessive struggle. Remember that some cords expand slightly when knotted.
Troubleshooting
Sliding Knot Feels Too Tight or Loose
If your adjustable knot doesn’t slide easily, or conversely, slides too freely, the tension during tying was likely off. A knot that’s too tight won’t move, while one that’s too loose will unravel.
Untie the problematic sliding knot carefully and retie it, paying close attention to applying even, firm tension to both working ends. Ensure the main cords are held parallel and taut while tying to provide a stable base for the knot.
Beads Are Not Centered
Sometimes, after threading, you might notice your beaded section is off-center. This usually happens if you didn’t accurately find the middle of your main cord initially or if beads shifted during knotting.
If the beads are only slightly off, you might be able to gently nudge them into place before tying the final overhand knots. For significant misalignment, untie the overhand knots and re-center your beads. Take your time to measure from the folded center point of your cord.
Cord Ends Fray After Trimming
Even after melting, some synthetic cord ends can still fray, especially with rough handling. This can compromise the neatness and longevity of your adjustable knots.
After trimming and melting, if you notice fraying, apply a tiny dab of clear-drying glue (like E6000 or even clear nail polish) to the very tip of the melted end. Press it firmly against the knot to create a more permanent seal. Allow it to dry completely before manipulating the bracelet.
Key Takeaways
- Always cut cords with extra length to avoid running short during crafting.
- Prepare cord ends by melting or stiffening for easier bead threading and a neat finish.
- Center your beads carefully to ensure a balanced and aesthetically pleasing design.
- Practice tying square knots for the adjustable closure to achieve smooth, consistent tension.
- Confirm bead hole sizes before starting to prevent frustration during the threading process.
- Test the adjustability of your finished bracelet to ensure it slides freely and securely.
Frequently Asked Questions
What type of cord is best for adjustable bracelets?
Waxed cotton, nylon, or hemp cord between 1mm and 1.5mm thick are excellent choices. They are durable, hold knots well, and come in a wide range of colors. The best choice depends on the desired look and feel of your bracelet.
Can I make an adjustable bracelet without beads?
Absolutely! You can create beautiful adjustable bracelets using just cord, focusing on different knotting techniques or braiding patterns. The adjustable sliding knot closure works perfectly with plain cord bracelets, offering a minimalist and versatile style.
How do I make the adjustable knots slide more easily?
Ensuring even tension when tying the square knots is key. If they feel stiff, try working them back and forth gently a few times. For synthetic cords, a very tiny amount of silicone lubricant spray (applied to a cloth, then to the knot) can sometimes help, but be careful not to overdo it.
How long should an adjustable bracelet be?
For the main beaded section, a good starting point for an adult is 6-7 inches (15-18 cm). The adjustable closure then adds flexibility. The total length of the cord will be much longer to accommodate the beads and the knots, typically 24-30 inches for the main cord.
Our Top Recommended Finds
- Waxed Cotton Cord Assortment: A multi-color pack allows for endless design possibilities and experimentation.
- Bead Assortment with Large Holes: Look for kits specifically labeled for macrame or larger hole beads to ensure compatibility.
- Crafting Scissors with Fine Point: Sharp, precise scissors make trimming cord ends neat and easy, especially in tight spaces.
Your Next Creative Adventure Awaits
You’ve now mastered the art of making an adjustable bracelet, a skill that opens up a world of creative possibilities.
This foundational technique can be adapted for necklaces, anklets, or even keychains.
Why not gather your materials and start crafting your first adjustable bracelet today?
Beginner-friendly templates, step-by-step guides,
and weekly project ideas in your inbox.