How To Make Jewelry For Beginners

Beginner-friendly templates, step-by-step guides,
and weekly project ideas in your inbox.
I remember sitting at my small kitchen table with a pile of tangled wire and a handful of mismatched glass beads.
My first attempt at a bracelet fell apart before I could even put it on because I didn’t understand how to secure the ends properly.
I spent years trial-and-erroring my way through different tools and techniques so that you don’t have to face the same frustration.
Quick Overview
This guide provides a clear path for anyone looking to start creating their own wearable art from scratch.
You will learn how to select the right tools, choose compatible materials, and master the basic construction techniques used by professionals.
- Time needed: 1 to 2 hours for your first project
- Difficulty: Beginner
- What you’ll need: Needle-nose pliers, wire cutters, beading wire, crimp beads, clasps, and your choice of decorative beads.
Step-by-Step Instructions
Step 1: Gather Your Essential Toolkit
Identify the three main tools every beginner needs to have on their workbench before starting.
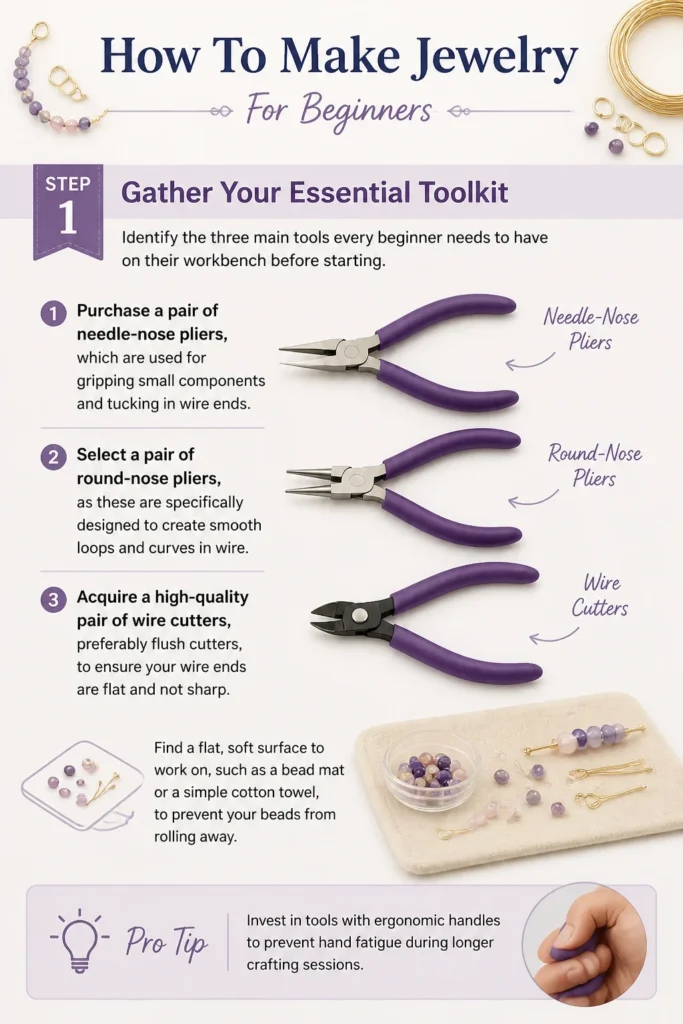
Purchase a pair of needle-nose pliers, which are used for gripping small components and tucking in wire ends.
Select a pair of round-nose pliers, as these are specifically designed to create smooth loops and curves in wire.
Acquire a high-quality pair of wire cutters, preferably flush cutters, to ensure your wire ends are flat and not sharp.
Find a flat, soft surface to work on, such as a bead mat or a simple cotton towel, to prevent your beads from rolling away.
Pro Tip: Invest in tools with ergonomic handles to prevent hand fatigue during longer crafting sessions.
Step 2: Choose Your Stringing Material
Understand that not all “string” is created equal when it comes to jewelry durability and drape.
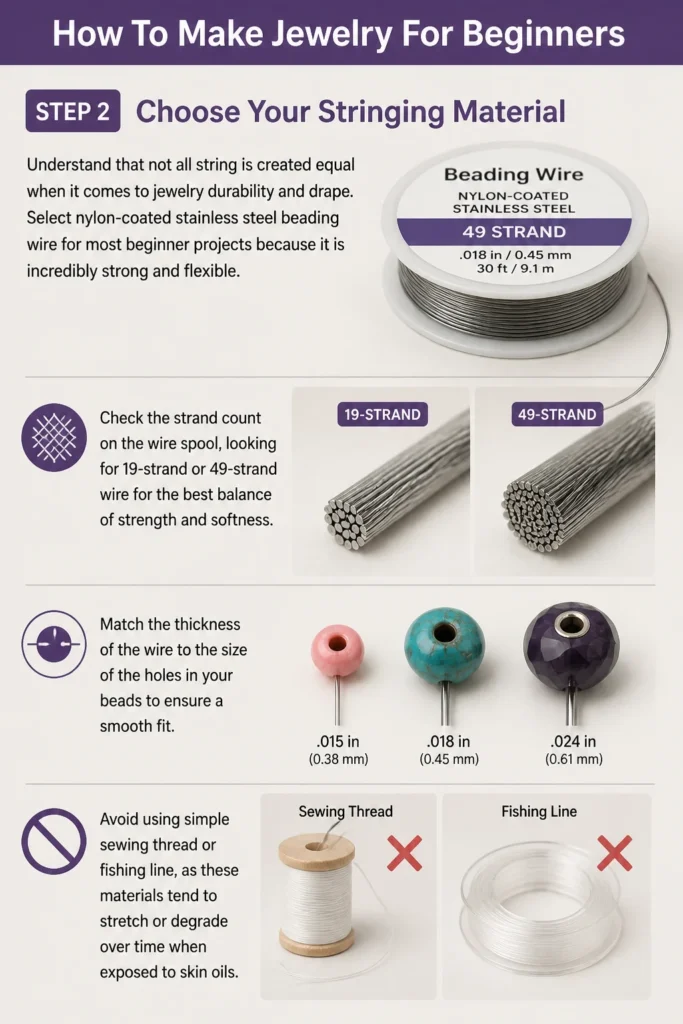
Select nylon-coated stainless steel beading wire for most beginner projects because it is incredibly strong and flexible.
Check the “strand count” on the wire spool, looking for 19-strand or 49-strand wire for the best balance of strength and softness.
Match the thickness of the wire to the size of the holes in your beads to ensure a smooth fit.
Avoid using simple sewing thread or fishing line, as these materials tend to stretch or degrade over time when exposed to skin oils.
Step 3: Organize Your Design Layout
Place your beads on your work surface in the exact order you want them to appear on the finished piece.
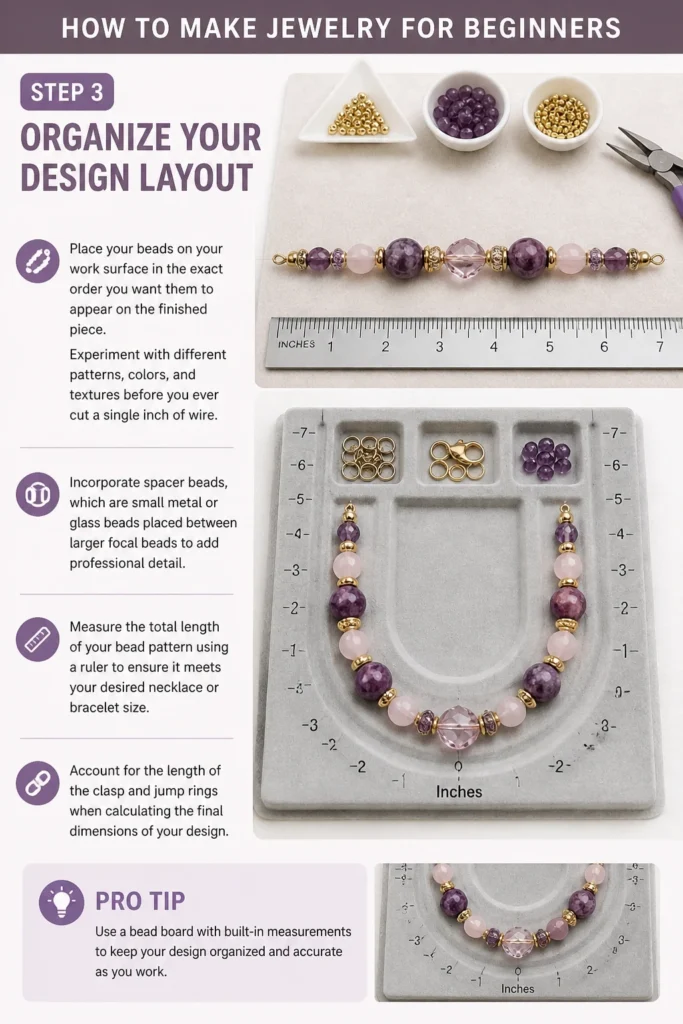
Experiment with different patterns, colors, and textures before you ever cut a single inch of wire.
Incorporate spacer beads, which are small metal or glass beads placed between larger focal beads to add professional detail.
Measure the total length of your bead pattern using a ruler to ensure it meets your desired necklace or bracelet size.
Account for the length of the clasp and jump rings when calculating the final dimensions of your design.
Pro Tip: Use a bead board with built-in measurements to keep your design organized and accurate as you work.
Step 4: Cut and Prepare Your Wire
Measure a length of wire that is at least four to six inches longer than your intended finished piece.
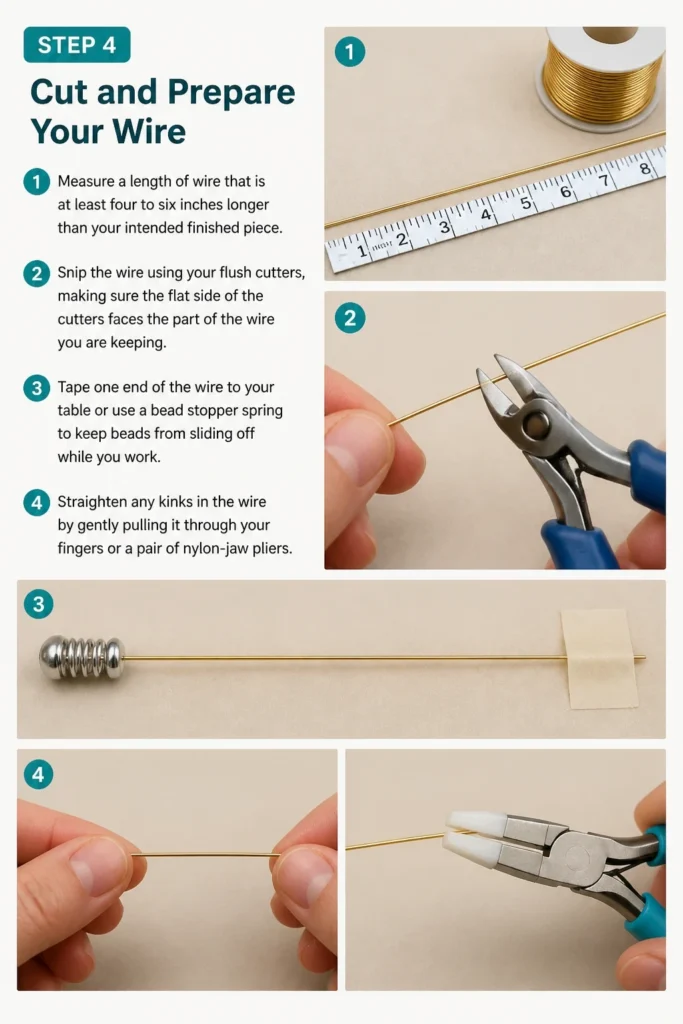
Snip the wire using your flush cutters, making sure the flat side of the cutters faces the part of the wire you are keeping.
Tape one end of the wire to your table or use a “bead stopper” spring to keep beads from sliding off while you work.
Straighten any kinks in the wire by gently pulling it through your fingers or a pair of nylon-jaw pliers.
Step 5: String Your Beads
Thread your beads onto the wire one by one, following the pattern you laid out earlier.
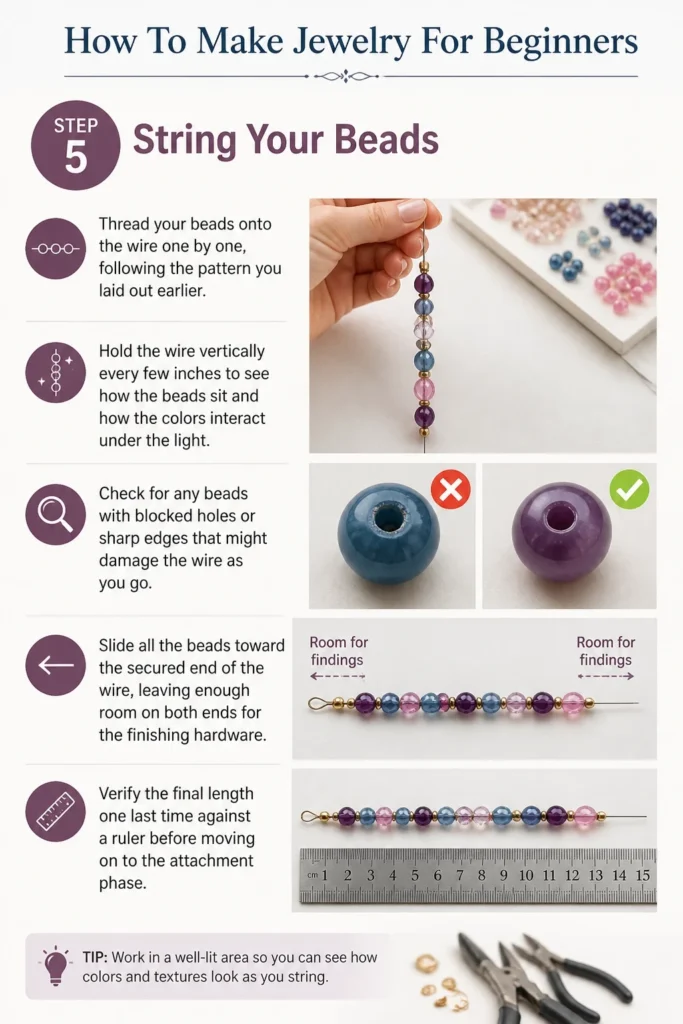
Hold the wire vertically every few inches to see how the beads sit and how the colors interact under the light.
Check for any beads with blocked holes or sharp edges that might damage the wire as you go.
Slide all the beads toward the secured end of the wire, leaving enough room on both ends for the finishing hardware.
Verify the final length one last time against a ruler before moving on to the attachment phase.
Step 6: Attach the Crimp Beads
Slide a small crimp bead onto the open end of your wire followed by one half of your clasp or a jump ring.
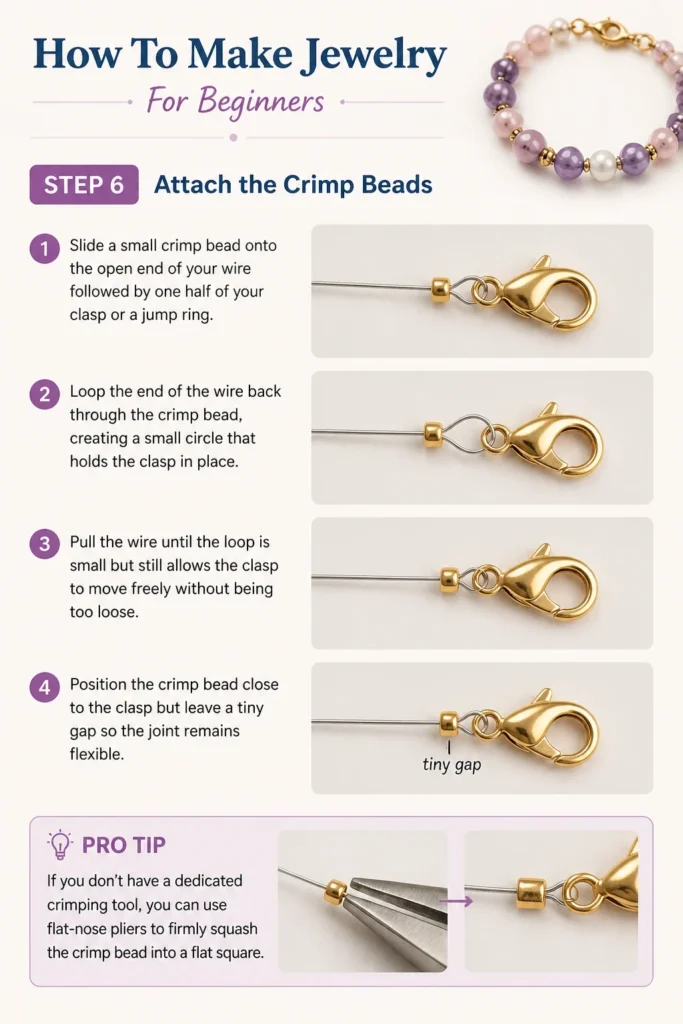
Loop the end of the wire back through the crimp bead, creating a small circle that holds the clasp in place.
Pull the wire until the loop is small but still allows the clasp to move freely without being too loose.
Position the crimp bead close to the clasp but leave a tiny gap so the joint remains flexible.
Pro Tip: If you don’t have a dedicated crimping tool, you can use flat-nose pliers to firmly squash the crimp bead into a flat square.
Step 7: Secure the Connection
Squeeze the crimp bead firmly with your pliers until it grips the wire tightly and cannot move.
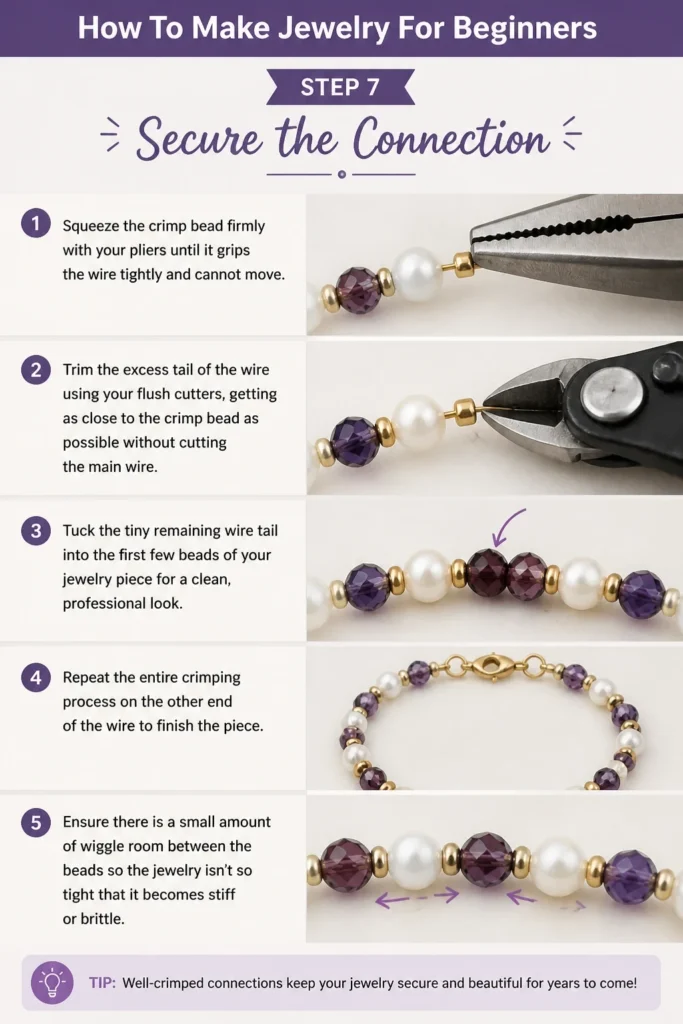
Trim the excess “tail” of the wire using your flush cutters, getting as close to the crimp bead as possible without cutting the main wire.
Tuck the tiny remaining wire tail into the first few beads of your jewelry piece for a clean, professional look.
Repeat the entire crimping process on the other end of the wire to finish the piece.
Ensure there is a small amount of “wiggle room” between the beads so the jewelry isn’t so tight that it becomes stiff or brittle.
Step 8: Perform a Final Quality Check
Tug gently on both ends of the finished piece to make sure the crimp beads are holding securely.
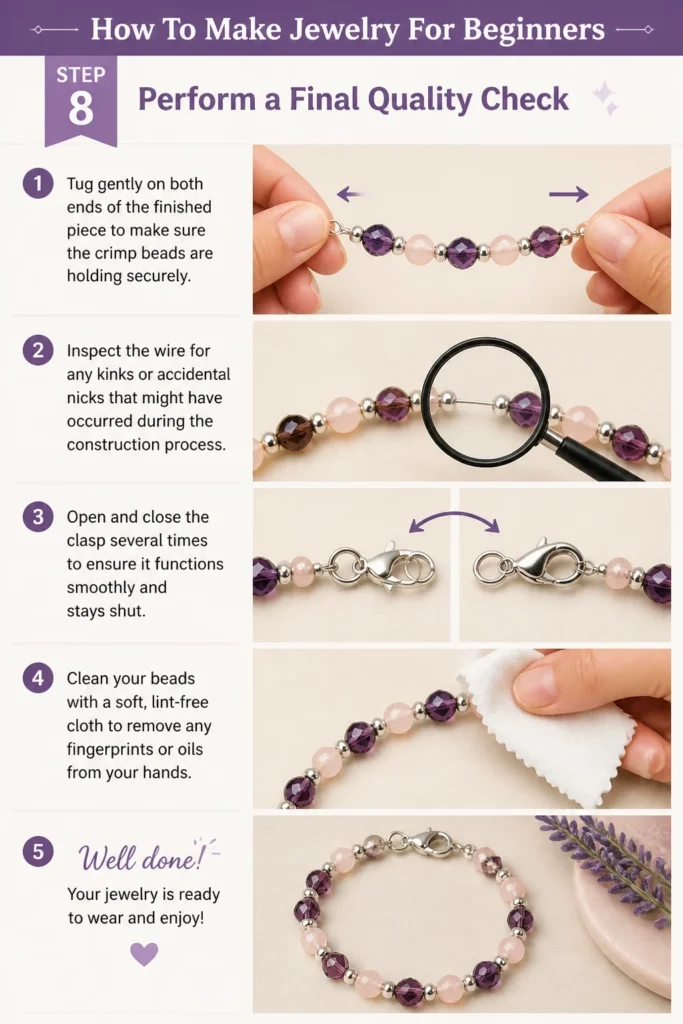
Inspect the wire for any kinks or accidental nicks that might have occurred during the construction process.
Open and close the clasp several times to ensure it functions smoothly and stays shut.
Clean your beads with a soft, lint-free cloth to remove any fingerprints or oils from your hands.
Common Mistakes to Avoid
Using the Wrong Wire Gauge
Many beginners choose wire that is either too thick to fit through their beads or too thin to support the weight of the project.
A wire that is too thin will eventually snap under the weight of heavy stone or glass beads.
Always check the weight rating on your wire spool to ensure it matches the materials you are using.
Over-Tightening the Crimp Beads
It is tempting to pull the wire as tight as possible before crimping to eliminate gaps between beads.
However, a piece of jewelry with no “play” in the wire will be stiff and uncomfortable to wear.
Extreme tension also puts unnecessary stress on the wire, which can lead to it snapping at the connection points.
Closing Jump Rings Incorrectly
Beginners often pull the ends of a jump ring apart horizontally, which ruins the circular shape of the metal.
The correct method is to twist the ends past each other vertically using two pairs of pliers.
This maintains the structural integrity of the ring and ensures a much tighter closure when you twist them back together.
Troubleshooting
The Wire Snaps Near the Clasp
This usually happens because the wire was bent at a sharp angle or the crimp bead was crushed too hard with sharp pliers.
To fix this, you will need to restring the piece using a new length of wire and more controlled pressure on the crimp.
Consider using “wire guardians,” which are small U-shaped metal tubes that protect the wire from rubbing against the clasp.
Beads Are Sliding Over the Crimp
If your beads have very large holes, they might slide right over your finished crimp bead, ruining the look.
The solution is to place a small “seed bead” or a metal spacer bead between the crimp and the larger bead.
This acts as a buffer and ensures the crimp stays visible and functional at the end of the strand.
Key Takeaways
- Always use the correct pliers for the specific task to avoid damaging your wire or findings.
- Nylon-coated beading wire is the most reliable choice for beginner stringing projects.
- Layout your design fully before cutting any wire to avoid wasting materials.
- Leave a tiny amount of slack in the wire so the jewelry drapes naturally on the body.
- Double-check every crimp with a gentle pull test before wearing or gifting your creation.
Frequently Asked Questions
Do I need to buy expensive tools to get started?
No, you can find very affordable starter kits that include the basic three pliers and a wire cutter.
As you progress, you might want to upgrade to professional-grade tools, but basic sets are perfectly fine for learning.
What is the best way to clean handmade jewelry?
Most handmade jewelry can be cleaned with a soft, dry cloth or a very slightly damp cloth if the beads are glass or stone.
Avoid harsh chemicals or ultrasonic cleaners, as these can damage certain types of beads or the coating on beading wire.
How do I know what size to make a bracelet?
The average woman’s bracelet is about 7 inches, and the average man’s is about 8 inches.
It is always best to measure the wearer’s wrist and add about half an inch to an inch for a comfortable fit.
Can I use regular pliers from a hardware store?
Hardware store pliers often have “teeth” inside the jaws that will scratch and mar the delicate metal of jewelry findings.
Jewelry-specific pliers have smooth jaws that allow you to grip metal without leaving ugly marks or dents.
Our Top Recommended Finds
- Precision Needle-Nose Pliers: Essential for reaching into small spaces and holding tiny jump rings securely.
- Velvet Bead Mat: A simple but effective way to keep your beads from rolling off the table while you work.
- Multi-Strand Beading Wire: Look for a 19-strand variety in a medium diameter to cover a wide range of project types.
Expanding Your Creative Skills
Once you have mastered the basics of stringing and crimping, you have opened the door to endless creative possibilities.
You might want to explore wire wrapping next, which allows you to create custom pendants using raw stones or crystals.
Another great next step is learning how to make your own ear wires and clasps using bulk wire and a few simple jigs.
The most important thing is to keep practicing and don’t be afraid to take a piece apart if it doesn’t look exactly how you imagined.
Pick up your pliers and start your first project today to see where your creativity takes you.
Beginner-friendly templates, step-by-step guides,
and weekly project ideas in your inbox.