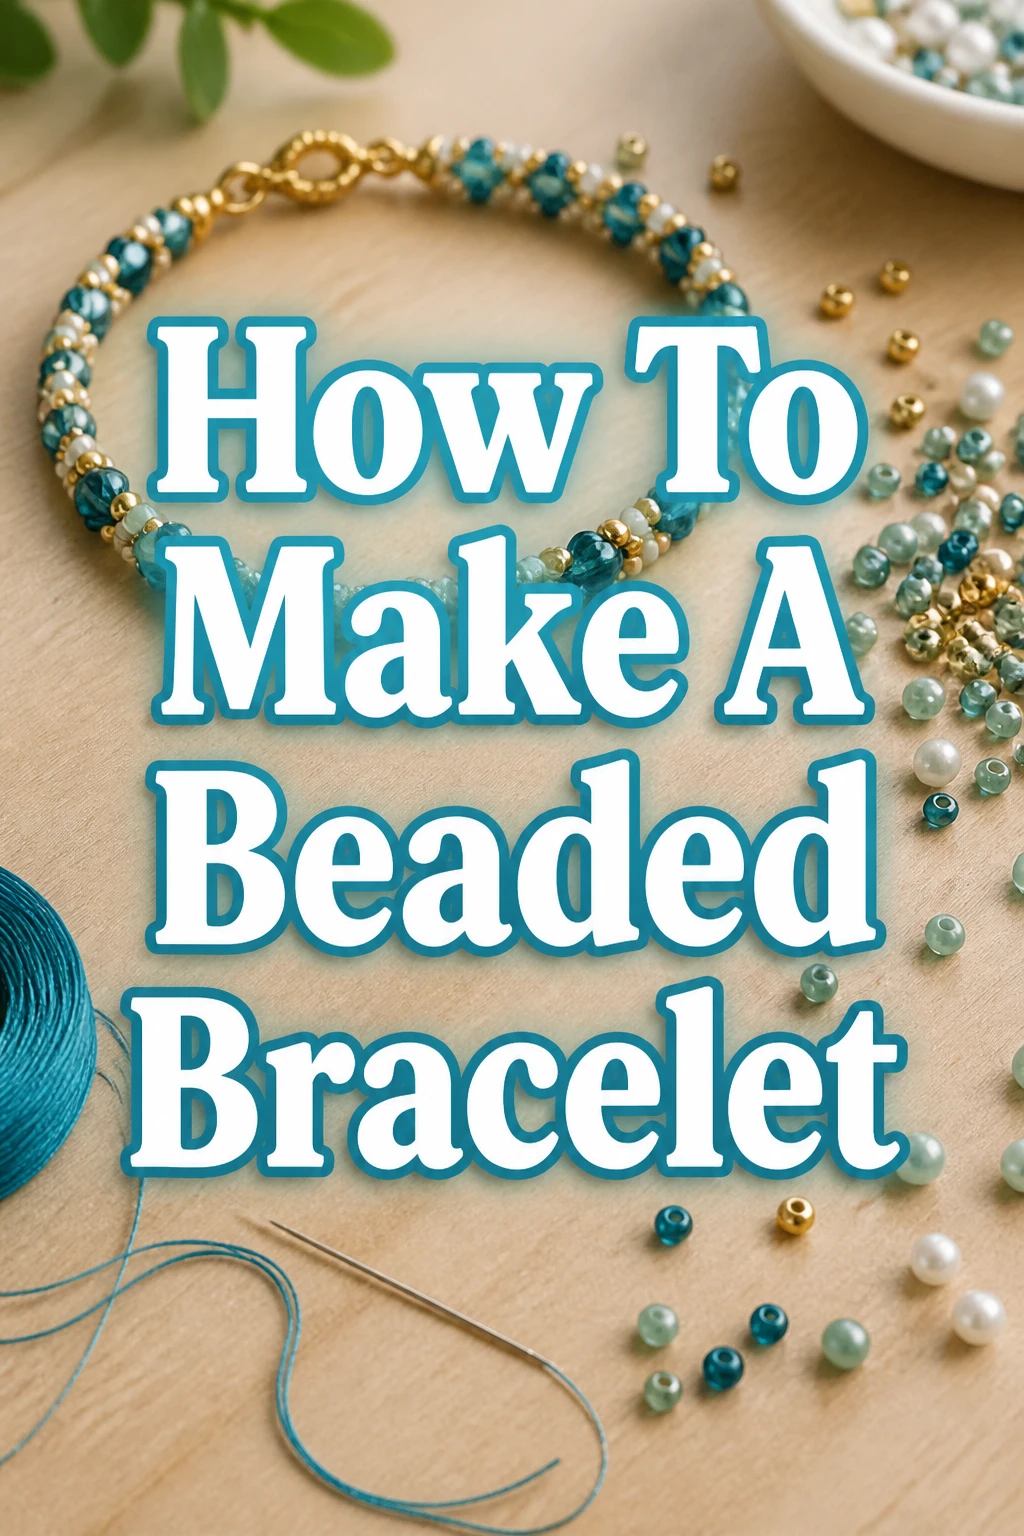
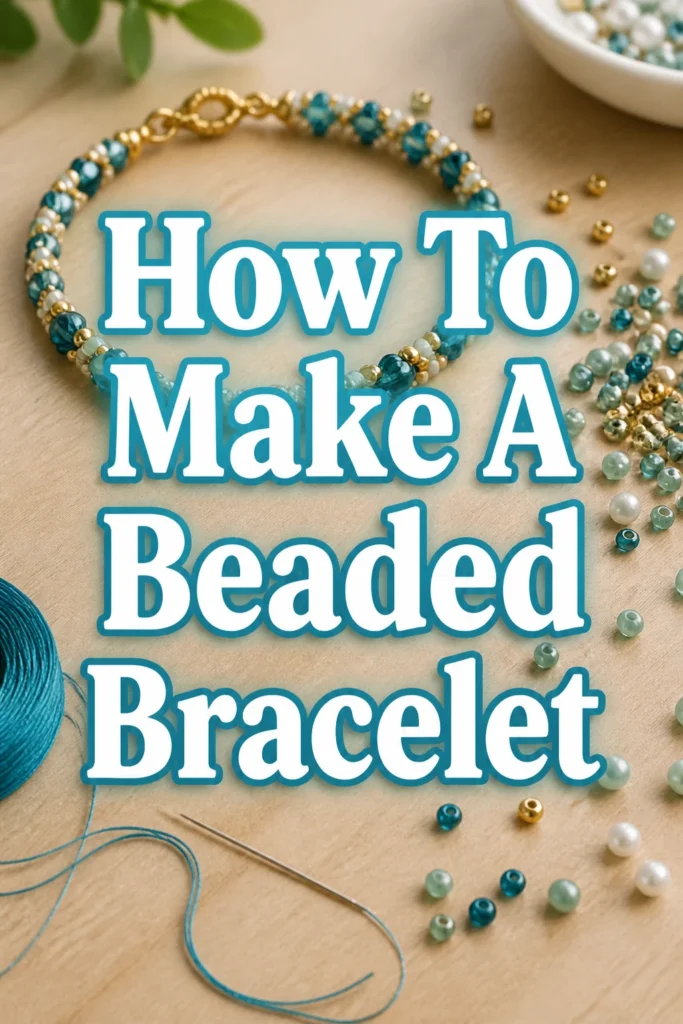
How To Make A Beaded Bracelet

Beginner-friendly templates, step-by-step guides,
and weekly project ideas in your inbox.
There’s a special joy in wearing something you’ve created yourself.
I still remember the first beaded bracelet I ever made; it wasn’t perfect, but it was uniquely mine.
This guide will show you exactly how to craft your own beautiful bracelet, step by step, even if you’ve never tried beading before.
Quick Overview
Crafting a beaded bracelet is a rewarding project that allows for immense personal expression.
By the end of this guide, you’ll have a custom-made piece of jewelry, perfect for yourself or as a thoughtful gift.
- Time needed: 1-2 hours (depending on design complexity)
- Difficulty: Beginner
- What you’ll need: Beads, jewelry cord, a clasp, crimp beads, and basic jewelry tools.
Step-by-Step Instructions
Step 1: Gather Your Materials
Before you begin, ensure you have all your supplies ready and organized.
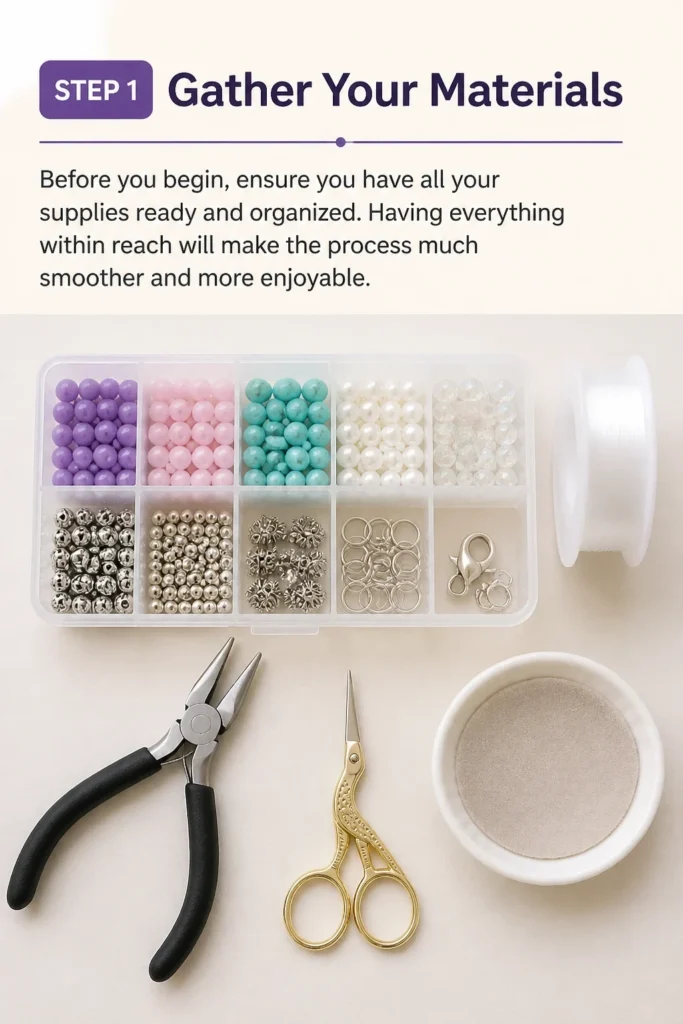
Having everything within reach will make the process much smoother and more enjoyable.
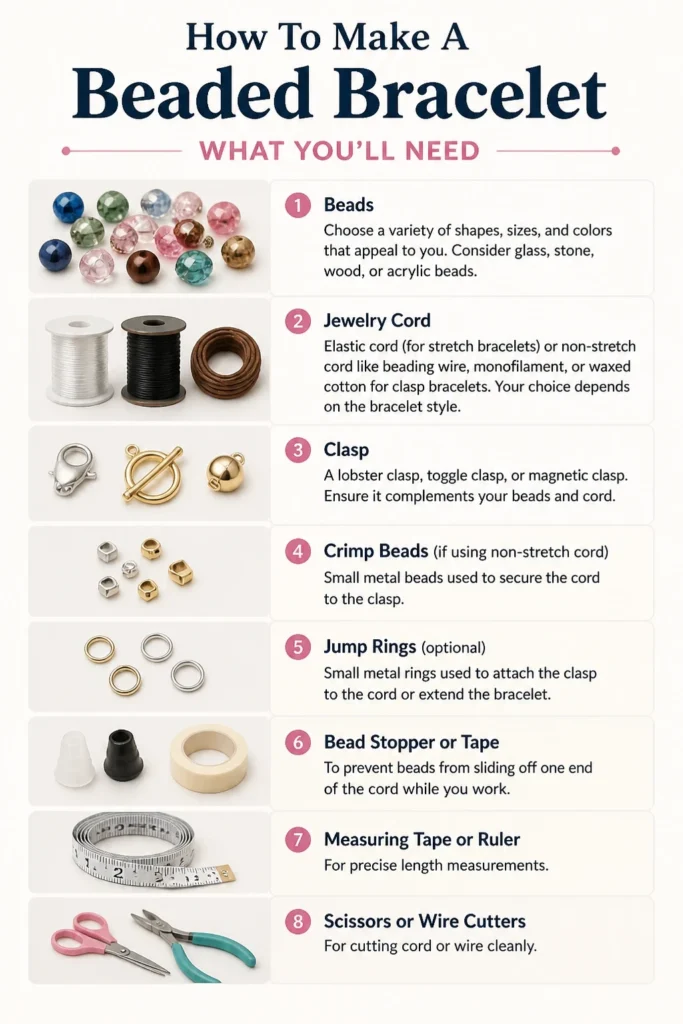
What You’ll Need:
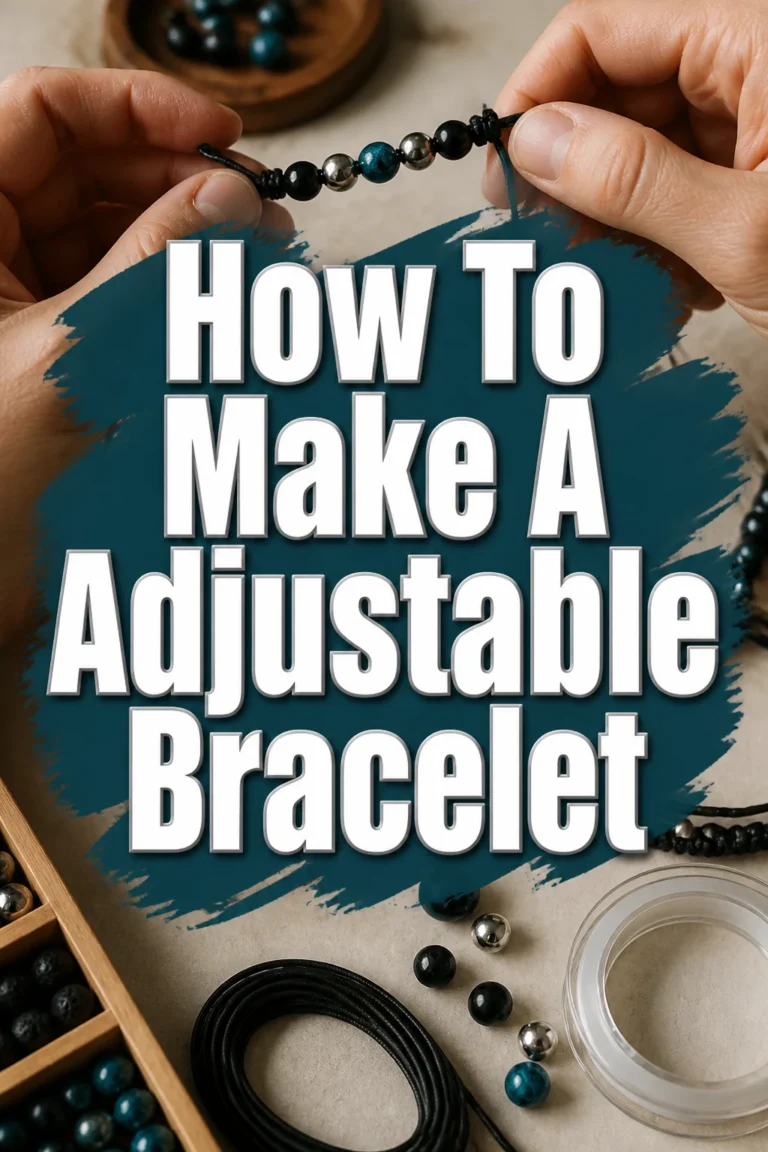
- Beads: Choose a variety of shapes, sizes, and colors that appeal to you. Consider glass, stone, wood, or acrylic beads.
- Jewelry Cord: Elastic cord (for stretch bracelets) or non-stretch cord like beading wire, monofilament, or waxed cotton for clasp bracelets. Your choice depends on the bracelet style.
- Clasp: A lobster clasp, toggle clasp, or magnetic clasp. Ensure it complements your beads and cord.
- Crimp Beads (if using non-stretch cord): Small metal beads used to secure the cord to the clasp.
- Jump Rings (optional): Small metal rings used to attach the clasp to the cord or extend the bracelet.
- Bead Stopper or Tape: To prevent beads from sliding off one end of the cord while you work.
- Measuring Tape or Ruler: For precise length measurements.
- Scissors or Wire Cutters: For cutting cord or wire.
- Crimping Pliers (if using crimp beads): Essential for securing crimp beads properly.
- Flat-Nose Pliers (optional): Useful for opening and closing jump rings or manipulating small components.
- Bead Mat or Tray: To keep beads from rolling away and to help with design layout.
Pro Tip: Invest in a good quality bead mat. It makes a huge difference in preventing beads from scattering and keeps your workspace tidy.
Step 2: Design Your Bracelet Layout
Planning your design beforehand saves time and helps visualize the final product.
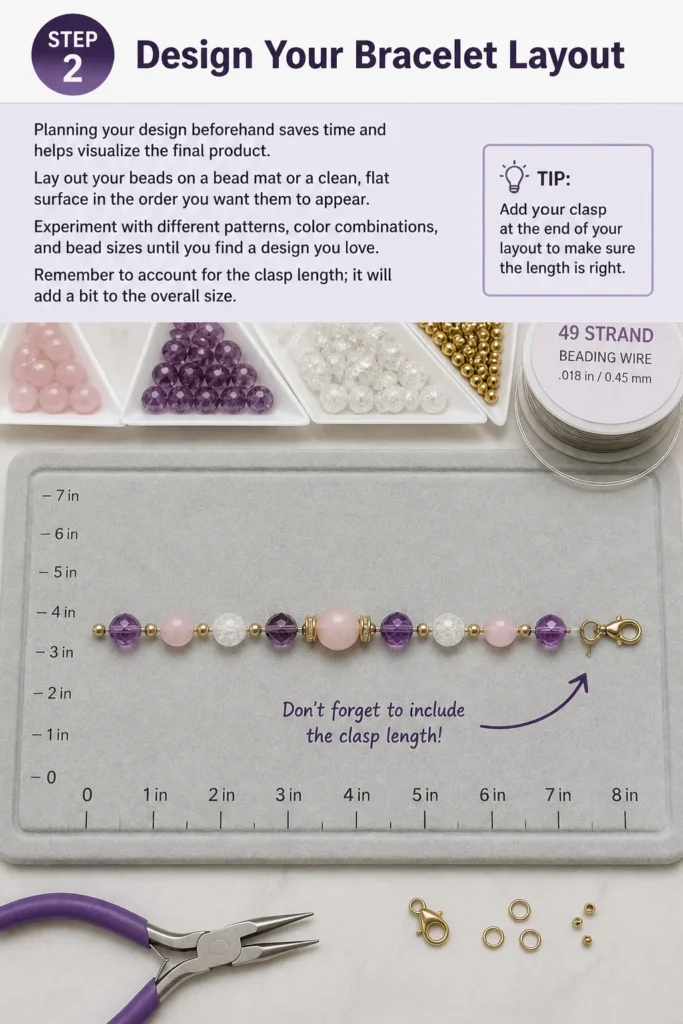
Lay out your beads on a bead mat or a clean, flat surface in the order you want them to appear.
Experiment with different patterns, color combinations, and bead sizes until you find a design you love.
Remember to account for the clasp length; it will add a bit to the overall size.
Step 3: Measure and Cut Your Cord
The length of your cord is crucial for a comfortable fit and enough working room.
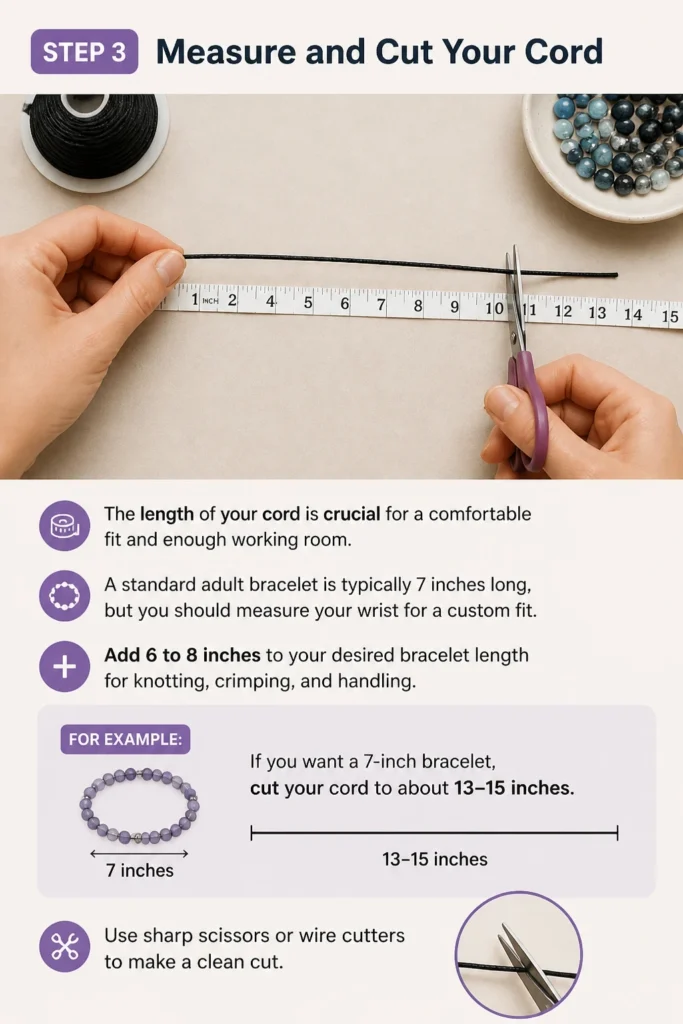
A standard adult bracelet is typically 7 inches long, but you should measure your wrist for a custom fit.
Add 6 to 8 inches to your desired bracelet length for knotting, crimping, and handling.
For example, if you want a 7-inch bracelet, cut your cord to about 13-15 inches.
Use sharp scissors or wire cutters to make a clean cut.
Step 4: Start Stringing Your Beads
Once your cord is cut, place a bead stopper or a piece of tape securely on one end of the cord.
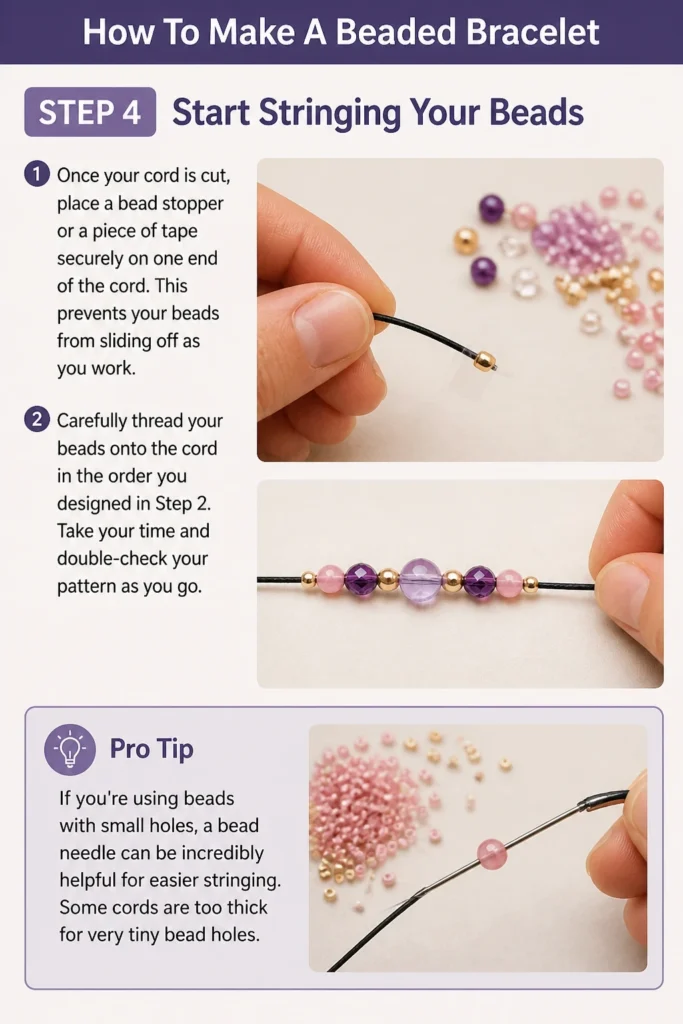
This prevents your beads from sliding off as you work.
Carefully thread your beads onto the cord in the order you designed in Step 2.
Take your time and double-check your pattern as you go.
Pro Tip: If you’re using beads with small holes, a bead needle can be incredibly helpful for easier stringing. Some cords are too thick for very tiny bead holes.
Step 5: Add the First Side of the Clasp (for Non-Stretch Cords)
If you’re making a stretch bracelet, you can skip this step and proceed to knotting.
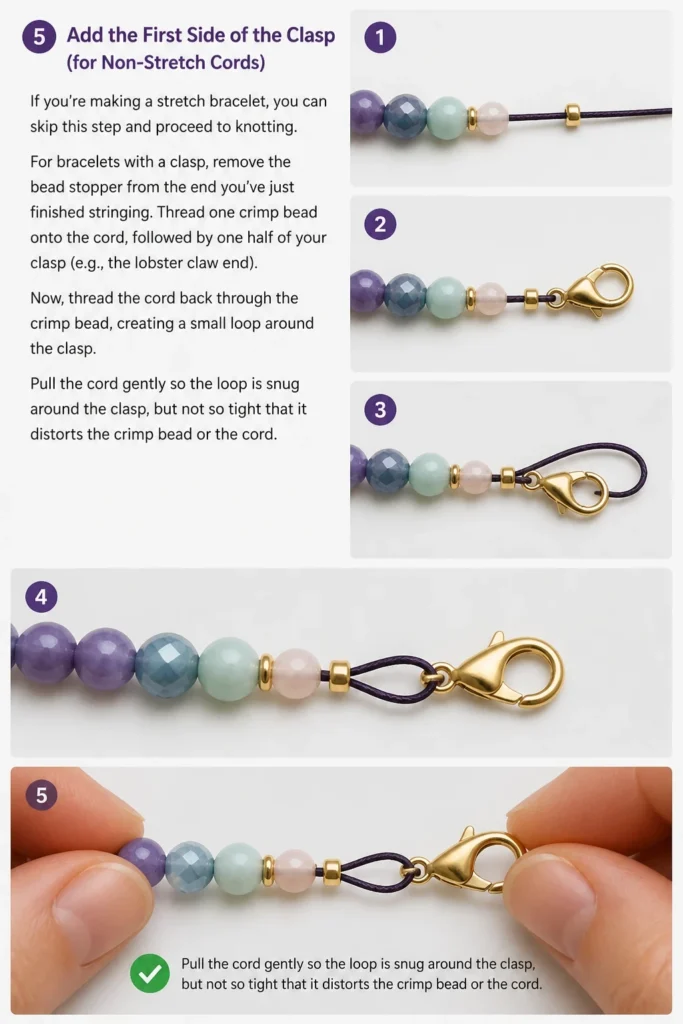
For bracelets with a clasp, remove the bead stopper from the end you’ve just finished stringing.
Thread one crimp bead onto the cord, followed by one half of your clasp (e.g., the lobster claw end).
Now, thread the cord back through the crimp bead, creating a small loop around the clasp.
Pull the cord gently so the loop is snug around the clasp, but not so tight that it distorts the crimp bead or the cord.
Step 6: Secure the Crimp Bead
Position the crimp bead so it’s close to the clasp but still allows the clasp to move freely.
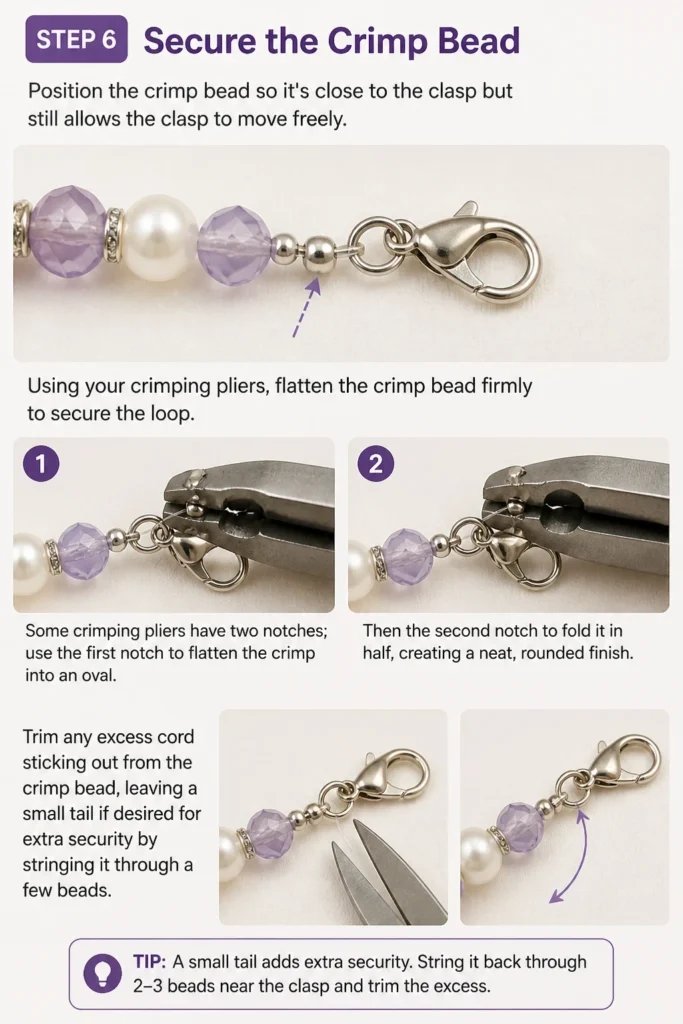
Using your crimping pliers, flatten the crimp bead firmly to secure the loop.
Some crimping pliers have two notches; use the first notch to flatten the crimp into an oval, then the second notch to fold it in half, creating a neat, rounded finish.
Trim any excess cord sticking out from the crimp bead, leaving a small tail if desired for extra security by stringing it through a few beads.
Step 7: Finish Stringing and Add the Second Clasp Side
Now, gently push all the beads down towards the secured clasp end.
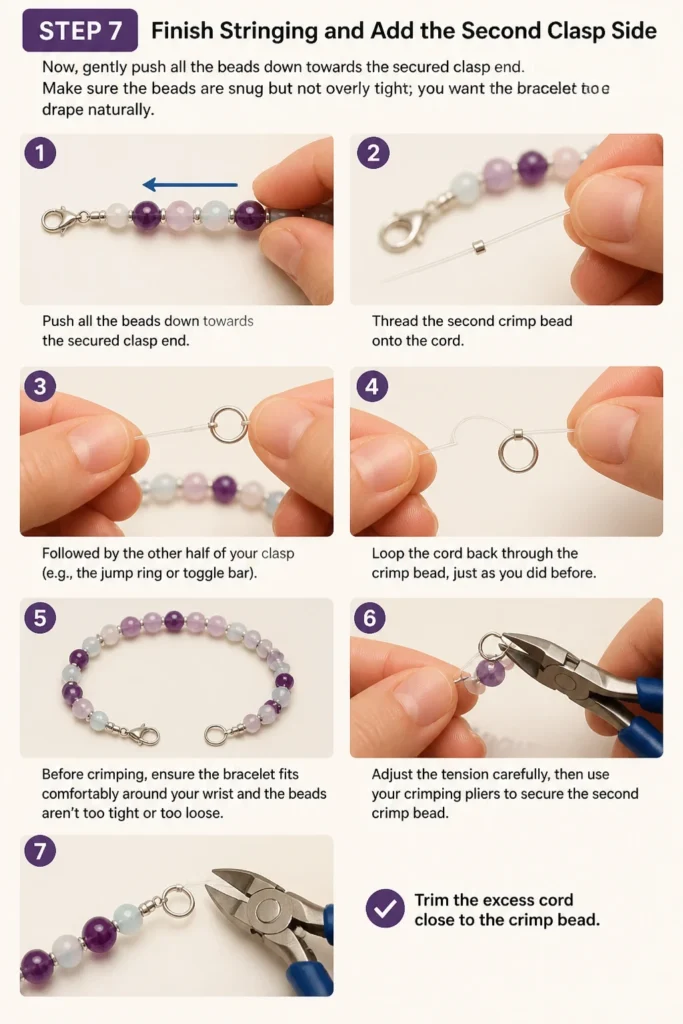
Make sure the beads are snug but not overly tight; you want the bracelet to drape naturally.
Thread the second crimp bead onto the cord, followed by the other half of your clasp (e.g., the jump ring or toggle bar).
Loop the cord back through the crimp bead, just as you did before.
Before crimping, ensure the bracelet fits comfortably around your wrist and the beads aren’t too tight or too loose.
Adjust the tension carefully, then use your crimping pliers to secure the second crimp bead.
Trim the excess cord close to the crimp bead.
Step 8: Knot and Secure (for Stretch Cords)
If you’re using elastic cord, string all your beads, then bring the two ends of the cord together.
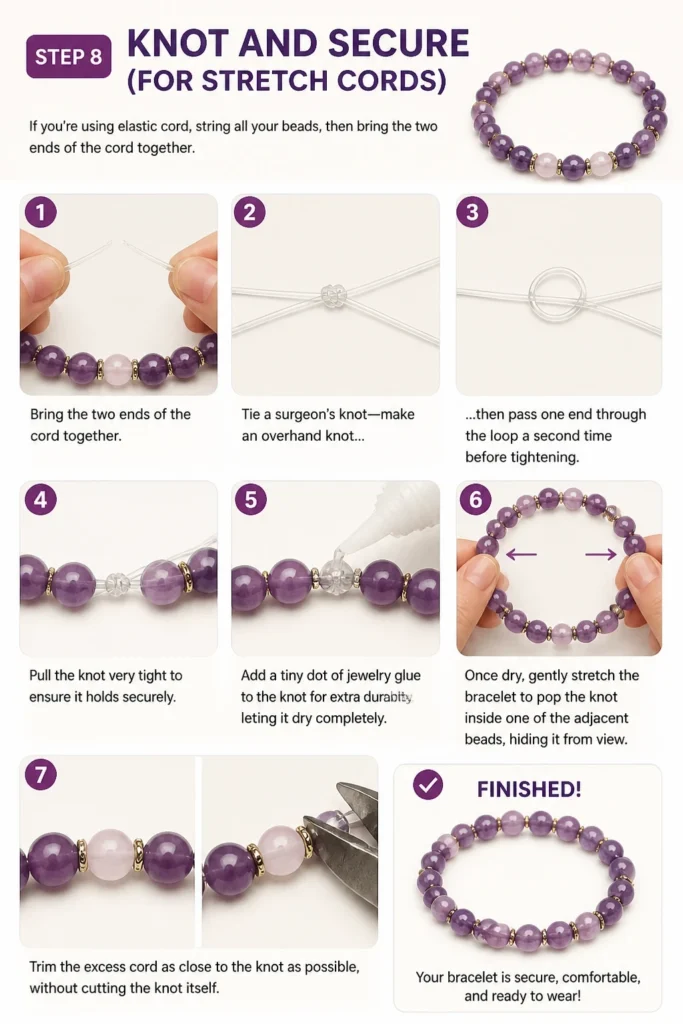
Tie a surgeon’s knot: make an overhand knot, then pass one end through the loop a second time before tightening.
Pull the knot very tight to ensure it holds securely.
Add a tiny dot of jewelry glue to the knot for extra durability, letting it dry completely.
Once dry, gently stretch the bracelet to pop the knot inside one of the adjacent beads, hiding it from view.
Trim the excess cord as close to the knot as possible, without cutting the knot itself.
Common Mistakes to Avoid
Using the Wrong Cord
Many beginners choose a cord that is too thin or too thick for their beads.
A cord that’s too thin might break easily, while one that’s too thick won’t fit through the bead holes.
Always check the diameter of your bead holes and match it to an appropriate cord size. Beading wire (like Beadalon or Soft Flex) is excellent for clasp bracelets, and elastic cord is ideal for stretch designs.
Not Planning Your Design
Jumping straight into stringing without a layout can lead to an unbalanced or unappealing bracelet.
You might run out of certain beads or realize the pattern doesn’t work well once strung.
Always lay out your beads first on a bead mat. This allows you to visualize and adjust the design before committing to stringing.
Weak Knots or Crimps
The security of your bracelet largely depends on how well the ends are finished.
Weak knots on elastic cord or improperly crimped beads on wire can cause your bracelet to fall apart quickly.
For elastic cord, use a surgeon’s knot and consider a dab of jewelry glue. For crimp beads, use proper crimping pliers and ensure the crimp is flattened and folded securely, without over-tightening which can cut the wire.
Incorrect Bracelet Length
Making a bracelet too tight can be uncomfortable and prone to breaking, while one that’s too loose might slip off.
Guessing the length often leads to disappointment.
Always measure the wearer’s wrist and add about 0.5 to 1 inch for comfort, depending on bead size. Remember that larger beads take up more interior space, so a bracelet made with chunky beads may need to be slightly longer than one made with tiny beads for the same wrist.
Troubleshooting
Beads Don’t Fit on Cord
This is a common issue when bead holes are smaller than anticipated or the cord is thicker than planned.
If your cord is too thick, you’ll need to switch to a thinner cord or find beads with larger holes. If the issue is just a tiny obstruction, sometimes a bead reamer can carefully enlarge or clear the hole, but proceed with caution as beads can break.
Bracelet Breaks Easily
A fragile bracelet can be frustrating, often indicating an issue with cord choice or finishing.
If your bracelet breaks, evaluate if you used an appropriate cord for the weight and type of beads. Ensure knots are secure and reinforced with glue for elastic, or that crimp beads are properly flattened and folded without cutting the wire. Consider using a stronger beading wire or thicker elastic next time.
Clasp Won’t Close Securely
A loose clasp can mean your bracelet falls off unexpectedly, which is easily fixed.
Inspect the clasp itself. Sometimes lobster clasps need a gentle squeeze with flat-nose pliers to tighten the spring mechanism. If it’s a magnetic clasp, ensure the magnets are strong enough for the bracelet’s weight. If the jump ring attached to the clasp is open, close it tightly with pliers.
Key Takeaways
- Preparation is Key: Always gather all your materials and plan your design before you start stringing.
- Measure Accurately: Cut your cord with ample extra length and measure your wrist for a perfect fit.
- Secure Your Ends: Proper knotting for elastic cord or careful crimping for wire is essential for durability.
- Mind Your Tension: String beads snugly but not too tightly to allow for natural drape and movement.
- Practice Makes Perfect: Don’t be discouraged by initial imperfections; each bracelet you make will improve your skills.
Frequently Asked Questions
What’s the best cord for beginners?
For beginners, elastic cord is often the easiest to work with for stretch bracelets, as it doesn’t require a clasp or crimping tools. For bracelets with clasps, a flexible beading wire like Beadalon or Soft Flex is forgiving and strong, making it a good choice once you’re comfortable with crimping.
How do I know what size bracelet to make?
The best way is to measure the wrist where the bracelet will be worn. Add 0.5 to 1 inch to this measurement for comfort, depending on how loose you want the bracelet and the size of your beads. Thicker beads require a slightly longer overall length for the same wrist size.
Can I mix different bead materials?
Absolutely! Mixing different bead materials like glass, wood, stone, and metal can create unique textures and visual interest in your bracelet. Just ensure the weight distribution feels balanced and that the bead holes are compatible with your chosen cord.
How do I clean my beaded bracelet?
The cleaning method depends on the bead materials. Generally, a soft, damp cloth is safe for most beads. Avoid harsh chemicals or abrasive cleaners, especially on plated metals or delicate stones. For elastic bracelets, avoid submerging them in water for long periods, as it can degrade the elastic over time.
Our Top Recommended Finds
- Bead Organizer Box: Essential for keeping your beads sorted by color, size, or type, making future projects easier to start.
- Jewelry Pliers Set: A basic set including flat-nose, round-nose, and wire cutters will cover most of your beading needs, offering precision and control.
- Variety Pack of Beads: Great for beginners to experiment with different styles and colors without committing to large quantities of one type.
Unleash Your Creativity: Start Beading Today
You now have all the knowledge and practical steps to create your very own beaded bracelet.
The process is not just about making jewelry; it’s about expressing your unique style and enjoying a calming, creative activity.
Why not gather your materials this afternoon and begin your first project? The world of custom jewelry is waiting for you to explore.
Beginner-friendly templates, step-by-step guides,
and weekly project ideas in your inbox.