How To Sew On A Button

Beginner-friendly templates, step-by-step guides,
and weekly project ideas in your inbox.
I remember the first time a button popped off my favorite shirt, leaving me feeling a bit helpless.
It seemed like a daunting task to fix, something only a seasoned tailor could manage.
But with a bit of patience and the right steps, I quickly learned that sewing on a button is a fundamental skill everyone can master, and I’m here to show you exactly how.
Quick Overview
This guide will walk you through the simple yet essential process of reattaching a button, ensuring it stays firmly in place.
By the end, you’ll have a perfectly secured button and the confidence to tackle other minor clothing repairs.
- Time needed: 10-20 minutes
- Difficulty: Beginner
- What you’ll need: Button, needle, thread, scissors
Step-by-Step Instructions
Step 1: Gather Your Tools
Before you begin, make sure you have all the necessary items at hand.
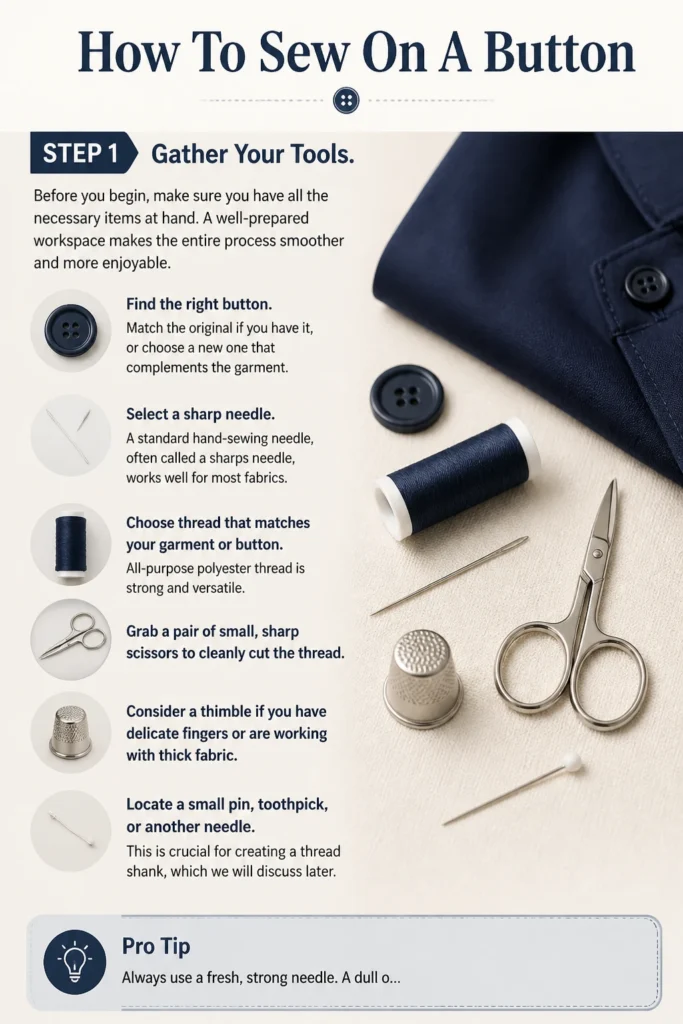
A well-prepared workspace makes the entire process smoother and more enjoyable.
- Find the right button. Match the original if you have it, or choose a new one that complements the garment.
- Select a sharp needle. A standard hand-sewing needle, often called a “sharps” needle, works well for most fabrics.
- Choose thread that matches your garment or button. All-purpose polyester thread is strong and versatile.
- Grab a pair of small, sharp scissors to cleanly cut the thread.
- Consider a thimble if you have delicate fingers or are working with thick fabric.
- Locate a small pin, toothpick, or another needle. This is crucial for creating a thread shank, which we will discuss later.
Pro Tip: Always use a fresh, strong needle. A dull or bent needle can snag fabric and make sewing much harder.
Step 2: Prepare Your Thread
Proper thread preparation is key to preventing tangles and ensuring a secure stitch.
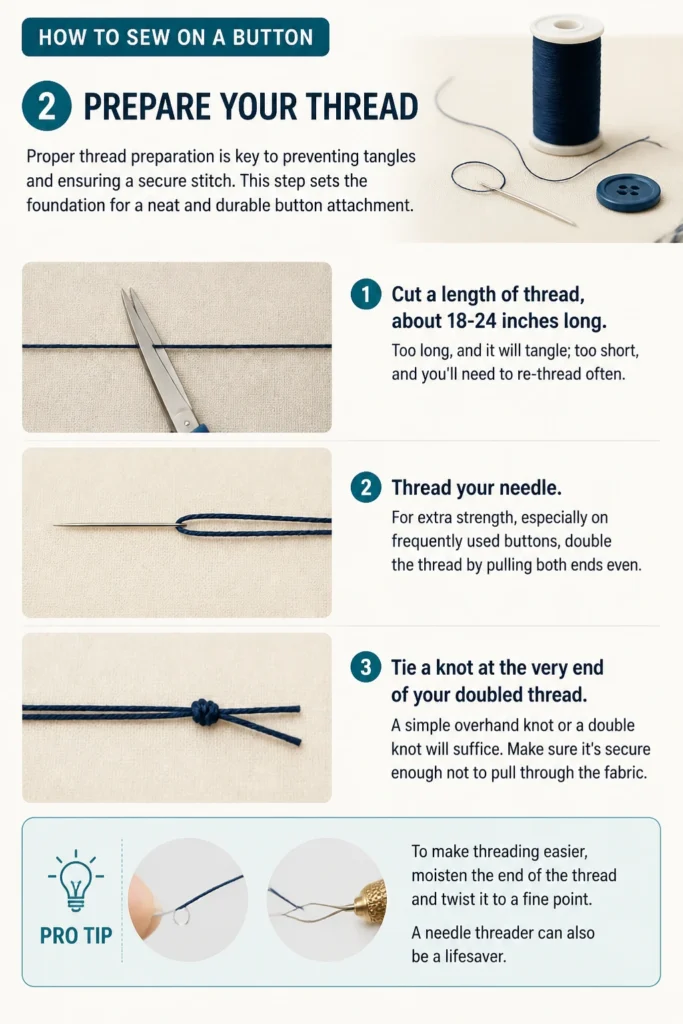
This step sets the foundation for a neat and durable button attachment.
- Cut a length of thread, about 18-24 inches long. Too long, and it will tangle; too short, and you’ll need to re-thread often.
- Thread your needle. For extra strength, especially on frequently used buttons, double the thread by pulling both ends even.
- Tie a knot at the very end of your doubled thread. A simple overhand knot or a double knot will suffice. Make sure it’s secure enough not to pull through the fabric.
Pro Tip: To make threading easier, moisten the end of the thread and twist it to a fine point. A needle threader can also be a lifesaver.
Step 3: Mark the Button Placement
Accurate placement ensures the button aligns correctly with its buttonhole and looks professional.
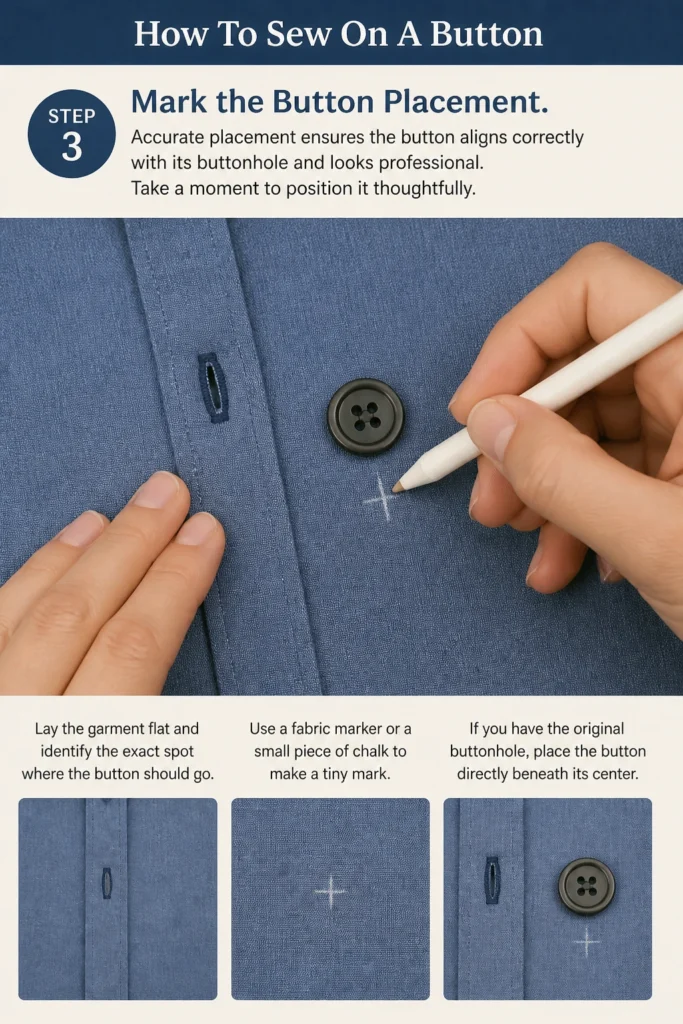
Take a moment to position it thoughtfully.
- Lay the garment flat and identify the exact spot where the button should go.
- Use a fabric marker or a small piece of chalk to make a tiny mark. If you have the original buttonhole, place the button directly beneath its center.
Step 4: Anchor Your Thread
Starting with a secure anchor stitch prevents the button from becoming loose over time.
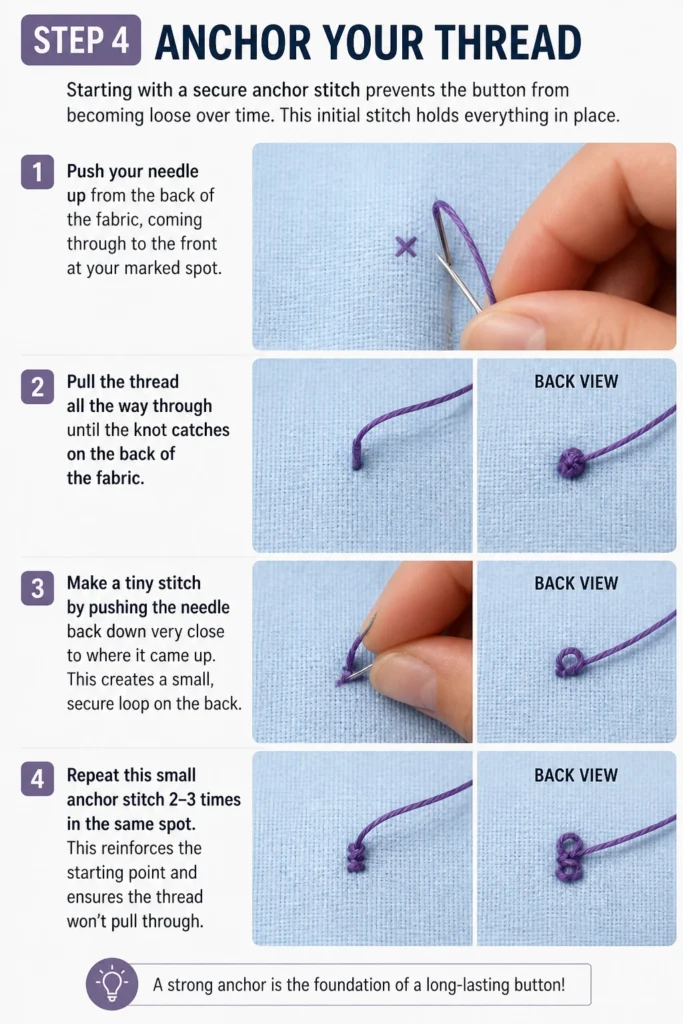
This initial stitch holds everything in place.
- Push your needle up from the back of the fabric, coming through to the front at your marked spot.
- Pull the thread all the way through until the knot catches on the back of the fabric.
- Make a tiny stitch by pushing the needle back down very close to where it came up. This creates a small, secure loop on the back.
- Repeat this small anchor stitch 2-3 times in the same spot. This reinforces the starting point and ensures the thread won’t pull through.
Step 5: Position the Button and Begin Sewing
Now, it’s time to bring the button into play and start attaching it firmly.
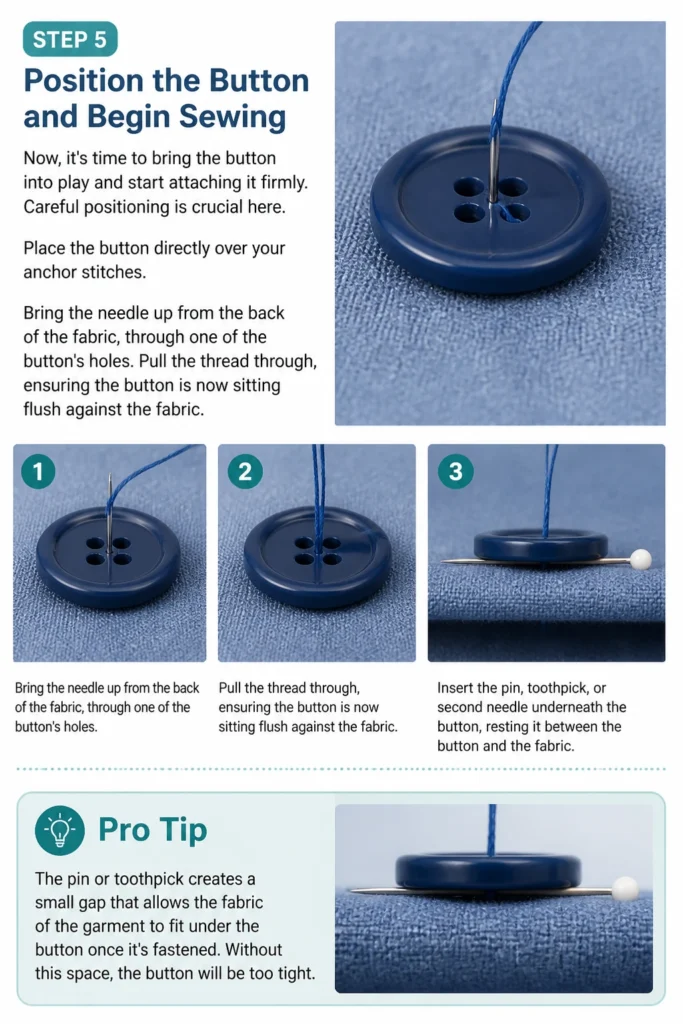
Careful positioning is crucial here.
- Place the button directly over your anchor stitches.
- Bring the needle up from the back of the fabric, through one of the button’s holes.
- Pull the thread through, ensuring the button is now sitting flush against the fabric.
- Insert the pin, toothpick, or second needle underneath the button, resting it between the button and the fabric. This creates space for the thread shank, which is vital for ease of buttoning.
Pro Tip: The pin or toothpick creates a small gap that allows the fabric of the garment to fit under the button once it’s fastened. Without this space, the button will be too tight.
Step 6: Sew Through the Button Holes
This is the main sewing phase, where you create the strong connections that hold the button.
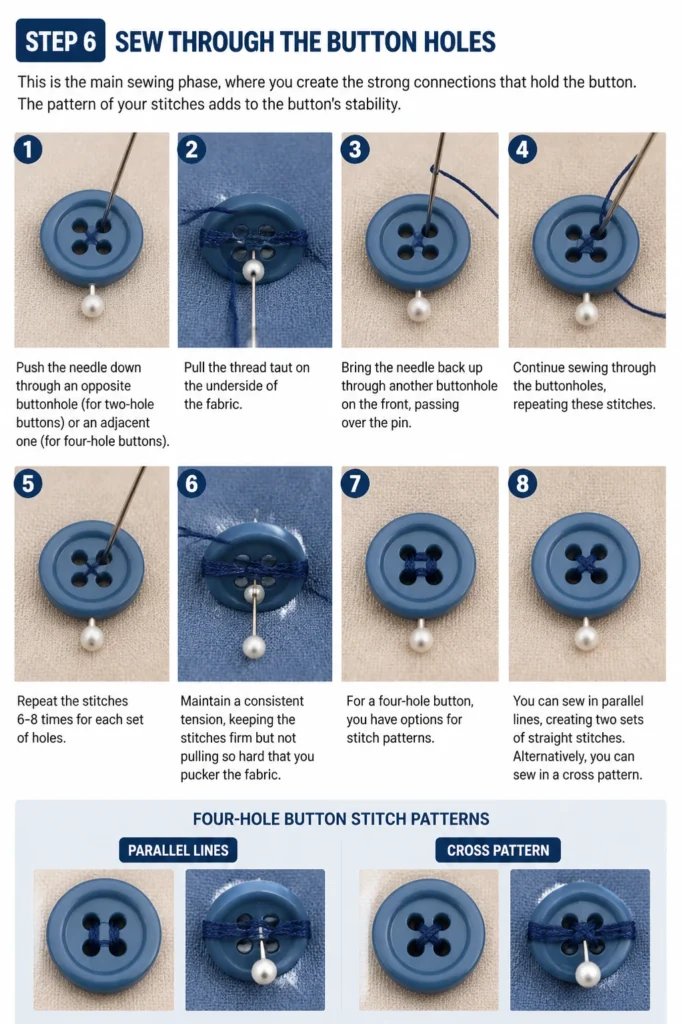
The pattern of your stitches adds to the button’s stability.
- Push the needle down through an opposite buttonhole (for two-hole buttons) or an adjacent one (for four-hole buttons).
- Pull the thread taut on the underside of the fabric.
- Bring the needle back up through another buttonhole on the front, passing over the pin.
- Continue sewing through the buttonholes, repeating these stitches 6-8 times for each set of holes.
- Maintain a consistent tension, keeping the stitches firm but not pulling so hard that you pucker the fabric.
For a four-hole button, you have options for stitch patterns.
You can sew in parallel lines, creating two sets of straight stitches.
Alternatively, you can sew in a cross pattern, connecting diagonal holes.
Both patterns are equally strong; choose the one you prefer or that matches existing buttons.
Step 7: Create the Thread Shank
This step is often overlooked but is critical for a functional and durable button.
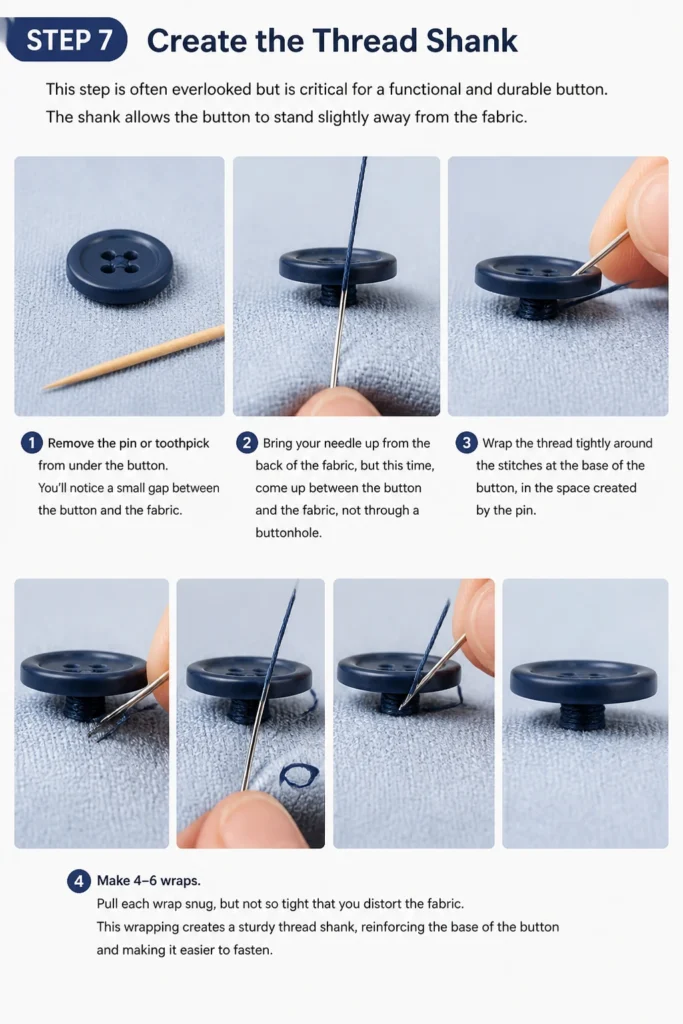
The shank allows the button to stand slightly away from the fabric.
- Remove the pin or toothpick from under the button. You’ll notice a small gap between the button and the fabric.
- Bring your needle up from the back of the fabric, but this time, come up between the button and the fabric, not through a buttonhole.
- Wrap the thread tightly around the stitches at the base of the button, in the space created by the pin. Make 4-6 wraps.
- Pull each wrap snug, but not so tight that you distort the fabric. This wrapping creates a sturdy thread shank, reinforcing the base of the button and making it easier to fasten.
Step 8: Secure with a Knot
A strong finishing knot prevents your hard work from unraveling.
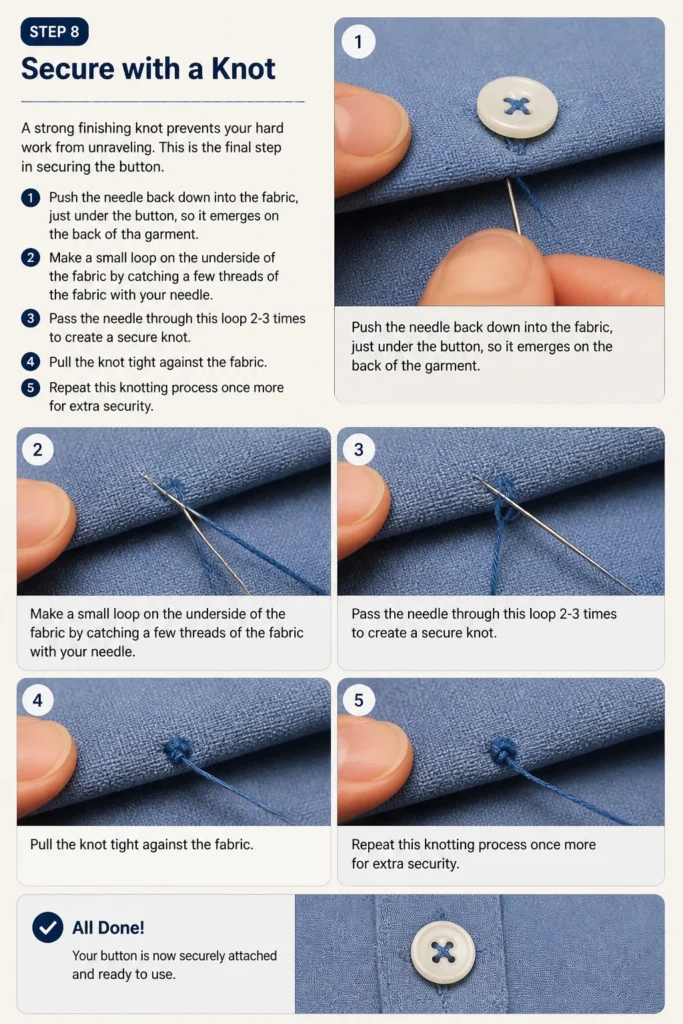
This is the final step in securing the button.
- Push the needle back down into the fabric, just under the button, so it emerges on the back of the garment.
- Make a small loop on the underside of the fabric by catching a few threads of the fabric with your needle.
- Pass the needle through this loop 2-3 times to create a secure knot.
- Pull the knot tight against the fabric.
- Repeat this knotting process once more for extra security.
Step 9: Trim the Thread
A clean finish makes your repair look professional.
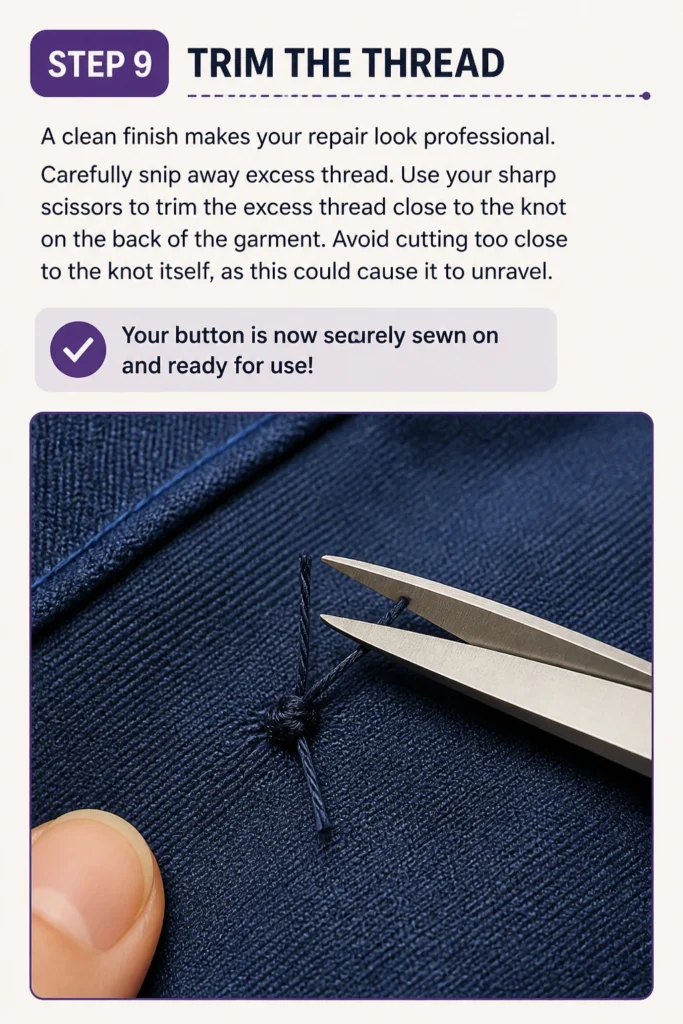
Carefully snip away excess thread.
- Use your sharp scissors to trim the excess thread close to the knot on the back of the garment.
- Avoid cutting too close to the knot itself, as this could cause it to unravel.
Your button is now securely sewn on and ready for use!
Common Mistakes to Avoid
Using Too Short or Too Long a Thread
Cutting your thread too short means you’ll constantly run out and have to re-thread your needle, which interrupts your flow.
On the other hand, an excessively long thread is prone to tangling, knotting on itself, and fraying, making the sewing process frustrating.
Aim for a length of about 18-24 inches, which is manageable and usually sufficient for one button without excessive waste or tangles.
Not Creating a Thread Shank
Forgetting to create a thread shank is a very common oversight. Without this small bundle of thread wrapped around the base stitches, the button will lie too flat against the fabric.
This makes it difficult to push through the buttonhole, especially on thicker fabrics, and puts undue stress on the button and thread, leading to it popping off again quickly.
Always use a pin or toothpick to create space, then wrap the thread around the base stitches to form a sturdy shank.
Loose Starting Knot
If your initial knot on the thread isn’t tied securely, it can pull through the fabric when you start sewing.
This means your button won’t be properly anchored and could come loose easily, even with many stitches.
Always double-knot your thread ends firmly, and consider making a few small anchor stitches on the fabric before attaching the button itself to further secure the starting point.
Sewing Too Tightly or Too Loosely
Applying too much tension while sewing can pucker the fabric around the button, making it look unprofessional and potentially weakening the fabric.
Conversely, stitches that are too loose won’t hold the button firmly, allowing it to wobble and eventually detach.
Aim for consistent, firm tension. The button should feel secure but the fabric should lay flat without distortion.
Troubleshooting
Button Feels Wobbly After Sewing
If your button feels loose or wobbly even after many stitches, it’s usually due to insufficient thread wraps around the base or the absence of a proper thread shank.
The solution is to reinforce the shank. Bring your needle up from the back, between the button and the fabric, and add more tight wraps (4-6 more) around the existing stitches at the base.
Then, secure with a fresh knot on the underside.
Thread Keeps Tangling While Sewing
Thread tangling is a common frustration, often caused by using too long a piece of thread or not pulling the thread straight through with each stitch.
Try cutting a shorter length of thread, around 18 inches, to reduce the chances of tangles.
Additionally, always pull your thread completely through in a single, smooth motion after each stitch, avoiding jerky movements that can create knots.
If a tangle forms, stop immediately and gently untangle it before proceeding.
Needle Won’t Go Through Fabric
Struggling to push the needle through the fabric usually means your needle is too dull, too thick for the fabric, or you’re working with a very dense material.
Switch to a sharper, thinner needle if possible. If the fabric is particularly thick, use a thimble to protect your finger and apply firm, steady pressure.
Sometimes, rocking the needle slightly from side to side as you push can help it penetrate stubborn weaves.
Button Falls Off Quickly After Repair
If your newly sewn button detaches soon after, it often indicates a weak finishing knot or not enough stitches used to secure the button.
Ensure you’re making at least 6-8 stitches through each set of buttonholes and creating a robust thread shank.
When tying off, make a double or triple knot on the underside of the fabric, passing the needle through the loop multiple times for extra security.
Key Takeaways
- Always gather all your tools before starting to ensure a smooth process.
- Use a double strand of thread for extra strength, especially for frequently used buttons.
- Creating a thread shank with a pin or toothpick is crucial for a functional and durable button.
- Make 6-8 stitches through each set of buttonholes for optimal security.
- Finish with a strong, double or triple knot on the underside of the fabric.
- Consistent tension prevents puckering and ensures a firm attachment.
Frequently Asked Questions
What kind of thread should I use?
All-purpose polyester thread is typically the best choice for sewing on buttons. It’s strong, durable, and resistant to shrinking and fading.
For decorative buttons or very fine fabrics, you might consider cotton or silk thread, but polyester offers the most practical strength for everyday wear.
How do I sew a button with only two holes?
Sewing a two-hole button follows the same principles. After anchoring your thread, bring it up through one hole and down through the other, making a straight line.
Repeat this stitch 6-8 times, always passing over the pin to create your thread shank, then finish with the wraps and knot.
What is a shank button?
A shank button has a loop or bar on its underside, instead of holes running through the button face. This built-in shank naturally creates space between the button and the fabric, making it easier to fasten.
When sewing on a shank button, you simply pass the needle through the fabric, then through the shank loop, and back down through the fabric, repeating several times to secure it.
Can I use a sewing machine to sew on a button?
Many modern sewing machines have a button-sewing foot and a specific stitch setting for attaching buttons. This method is much faster than hand sewing.
However, it’s generally best for flat buttons on items that won’t experience extreme stress. For very thick fabrics or frequently used buttons, hand-sewing often provides superior durability and a more secure attachment.
Our Top Recommended Finds
- Assorted Hand Sewing Needles: A good quality pack offers various sizes and types, ensuring you always have the right needle for any fabric.
- All-Purpose Polyester Thread Kit: A small kit with various basic colors means you’ll always have a matching thread on hand for repairs.
- Small, Sharp Fabric Scissors: Precision is key for clean cuts, and dedicated fabric scissors prevent fraying and ensure neat work.
Empower Your Wardrobe, One Button At A Time
You’ve now learned a fundamental skill that will serve you well for years to come.
No longer will a missing button mean the end of a favorite shirt or coat.
Take this newfound confidence and look through your closet today.
Is there a garment patiently waiting for a small repair? Grab your needle and thread, and bring it back to life.
Beginner-friendly templates, step-by-step guides,
and weekly project ideas in your inbox.