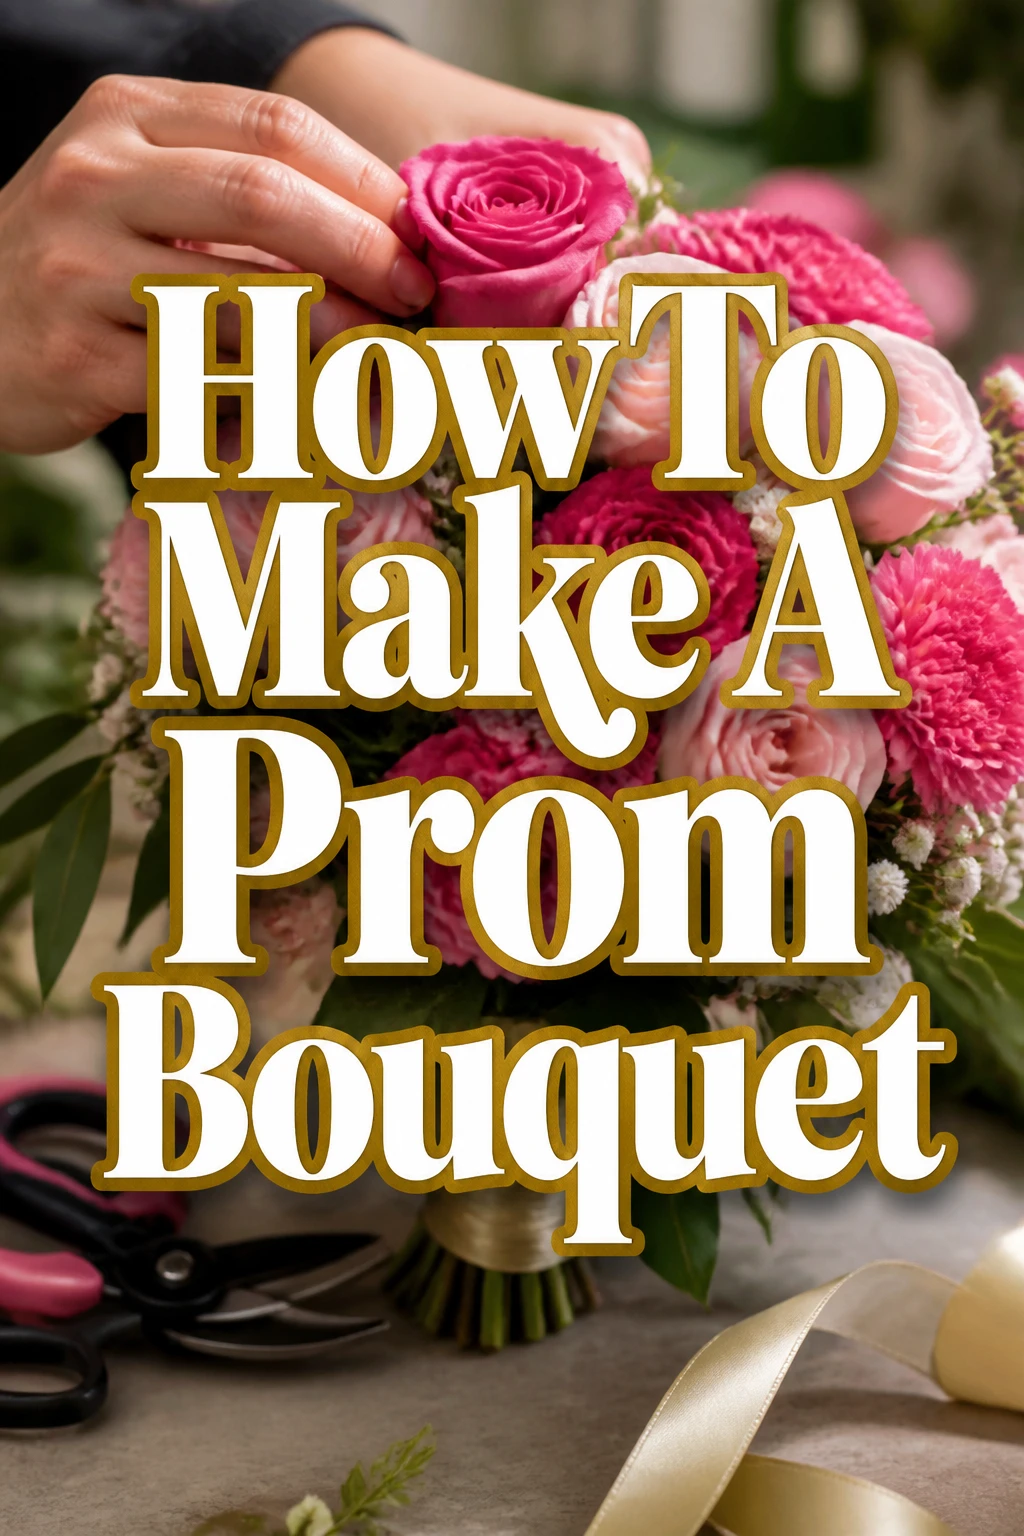
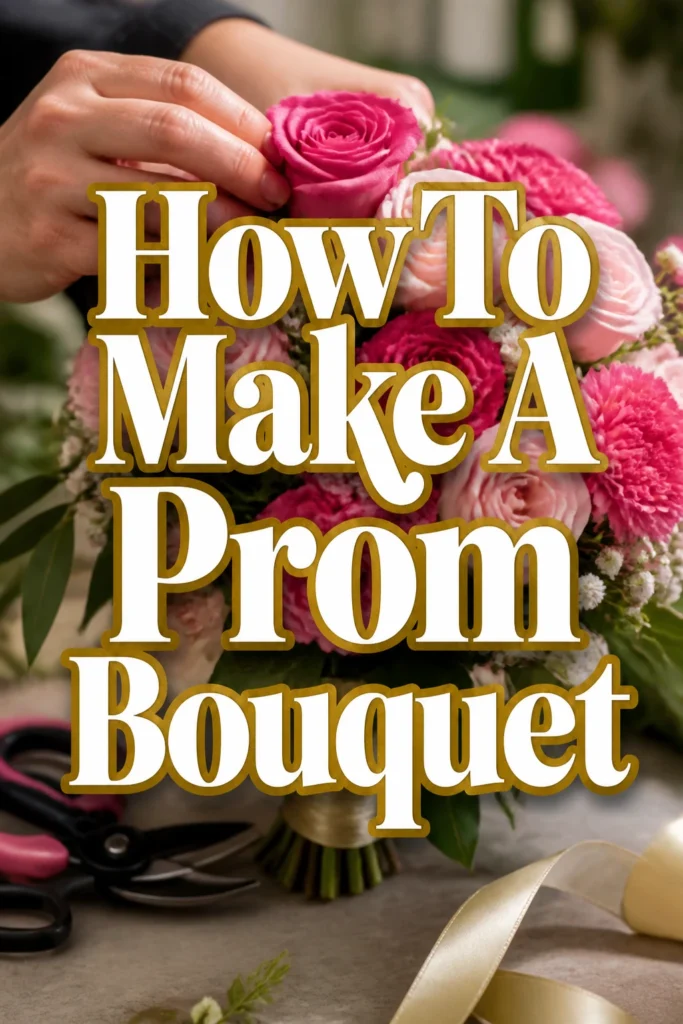
How To Make A Prom Bouquet

Beginner-friendly templates, step-by-step guides,
and weekly project ideas in your inbox.
Remember my own prom night? The excitement was palpable, from choosing the dress to the final touches.
Creating a beautiful prom bouquet for someone special is a truly heartfelt gesture, adding a unique, personal flair to their big night.
This guide distills years of floral crafting experience, ensuring your bouquet is a stunning success, made with confidence and care.
Quick Overview
You’re about to embark on a rewarding project: crafting a personalized prom bouquet that will be a cherished accessory for a memorable evening. This guide walks you through every essential stage, from selecting your blooms to the final elegant wrap.
- Time needed: 1.5 – 3 hours (including preparation and assembly)
- Difficulty: Intermediate
- What you’ll need: Fresh flowers, filler flowers, foliage, floral tape, floral wire, sharp floral shears, ribbon, decorative pins, floral food, a vase or bucket.
Step-by-Step Instructions
Step 1: Gather Your Floral Treasures
Embark on your floral journey by carefully selecting the perfect blooms and foliage for your prom bouquet. Thoughtful choices ensure a harmonious and stunning final arrangement that complements the prom-goer’s style.
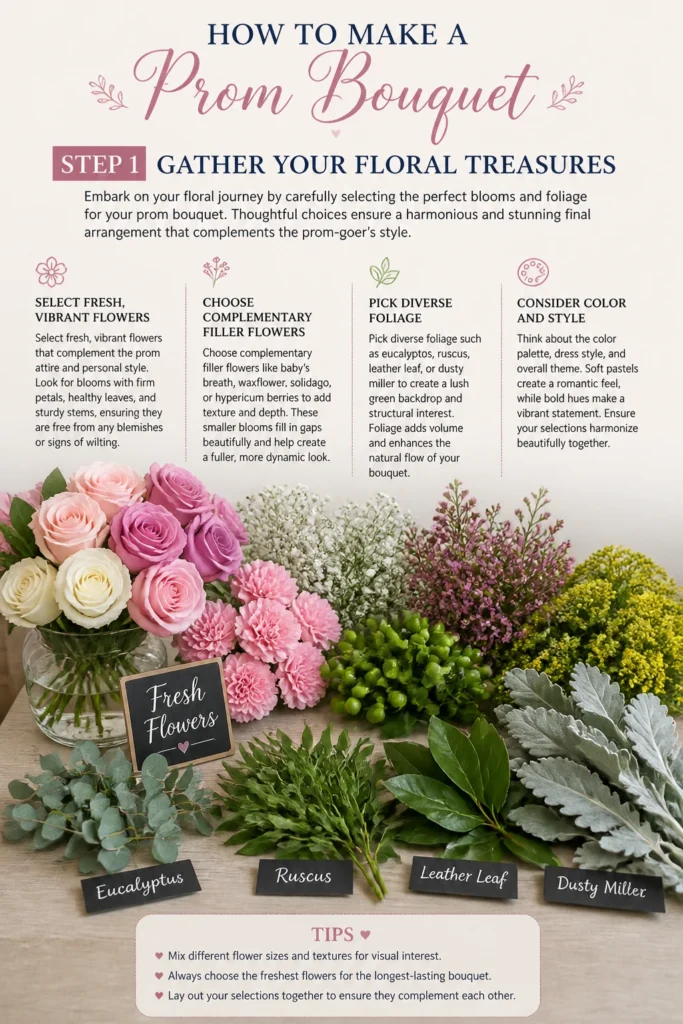
- Select fresh, vibrant flowers that complement the prom attire and personal style. Look for blooms with firm petals, healthy leaves, and sturdy stems, ensuring they are free from any blemishes or signs of wilting.
- Choose complementary filler flowers like baby’s breath, waxflower, solidago, or hypericum berries to add texture and depth. These smaller blooms fill in gaps beautifully and help create a fuller, more dynamic look.
- Pick diverse foliage such as eucalyptus, ruscus, leather leaf, or dusty miller to create a lush green backdrop and structural interest. Foliage adds volume, defines the bouquet’s shape, and makes your main flowers pop.
Pro Tip: Always buy a few extra stems of your main flowers and fillers. It’s better to have too many than to run short during assembly, especially if some stems get damaged or don’t meet your aesthetic standards.
Having all your materials ready before you begin assembling saves time and reduces stress. Think about color palettes and textures that work well together to achieve your desired aesthetic.
Step 2: Prepare Your Blooms for Longevity
Proper preparation is crucial for ensuring your flowers stay fresh and vibrant throughout the prom night. This step sets the foundation for a long-lasting and beautiful bouquet.
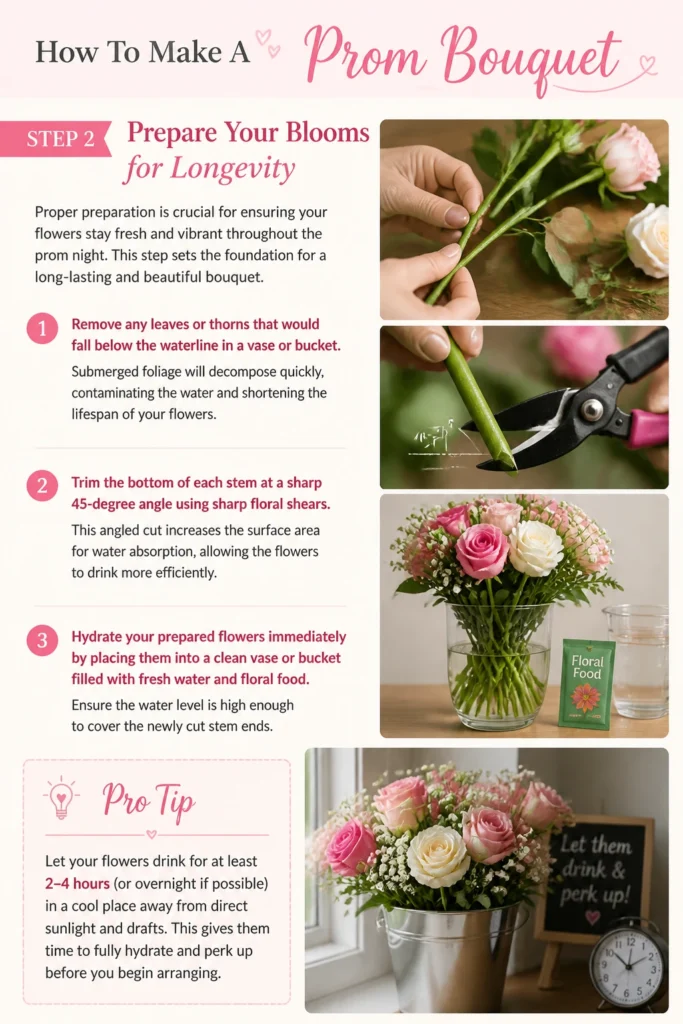
- Remove any leaves or thorns that would fall below the waterline in a vase or bucket. Submerged foliage will decompose quickly, contaminating the water and shortening the lifespan of your flowers.
- Trim the bottom of each stem at a sharp 45-degree angle using sharp floral shears. This angled cut increases the surface area for water absorption, allowing the flowers to drink more efficiently.
- Hydrate your prepared flowers immediately by placing them into a clean vase or bucket filled with fresh water and floral food. Ensure the water level is high enough to cover the newly cut stem ends.
Pro Tip: Let your flowers drink for at least two to four hours, or even overnight, before you begin arranging. This deep hydration process, called “conditioning,” maximizes their freshness and extends their vase life significantly.
A well-hydrated flower is a happy flower, and proper conditioning will make your bouquet more resilient. This simple step makes a huge difference in the overall appearance and longevity of your final arrangement.
Step 3: Wire and Tape Delicate Stems (If Needed)
Some flowers, especially those with delicate or short stems, benefit from wiring and taping to provide extra support and flexibility. This technique ensures every bloom stays perfectly in place.
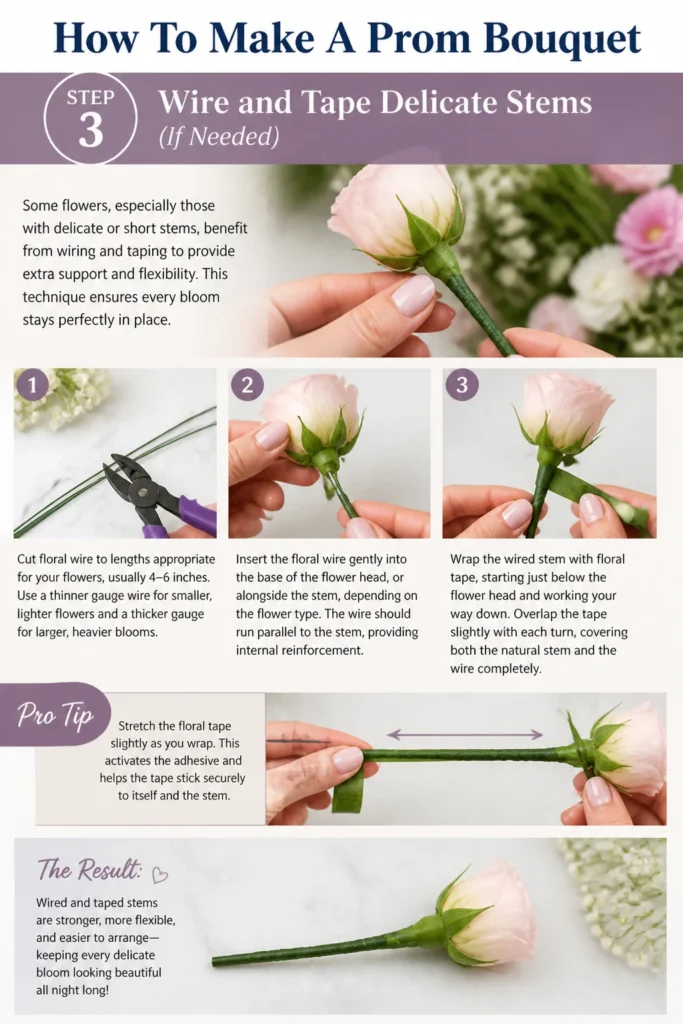
- Cut floral wire to lengths appropriate for your flowers, usually 4-6 inches. Use a thinner gauge wire for smaller, lighter flowers and a thicker gauge for larger, heavier blooms.
- Insert the floral wire gently into the base of the flower head, or alongside the stem, depending on the flower type. The wire should run parallel to the stem, providing internal reinforcement.
- Wrap the wired stem with floral tape, starting just below the flower head and working your way down. Overlap the tape slightly with each turn, covering both the natural stem and the wire completely.
Pro Tip: Stretch the floral tape slightly as you wrap it. This stretching activates the adhesive within the tape, making it stick better and creating a more secure, uniform covering.
Wiring allows you to position flowers precisely within the bouquet and prevent drooping. It’s an essential skill for creating structurally sound and aesthetically pleasing arrangements.
Step 4: Build the Bouquet’s Foundation
Begin assembling your bouquet using the spiral technique, which creates a naturally rounded shape and ensures all stems lay neatly. This method is the secret to a professional-looking arrangement.
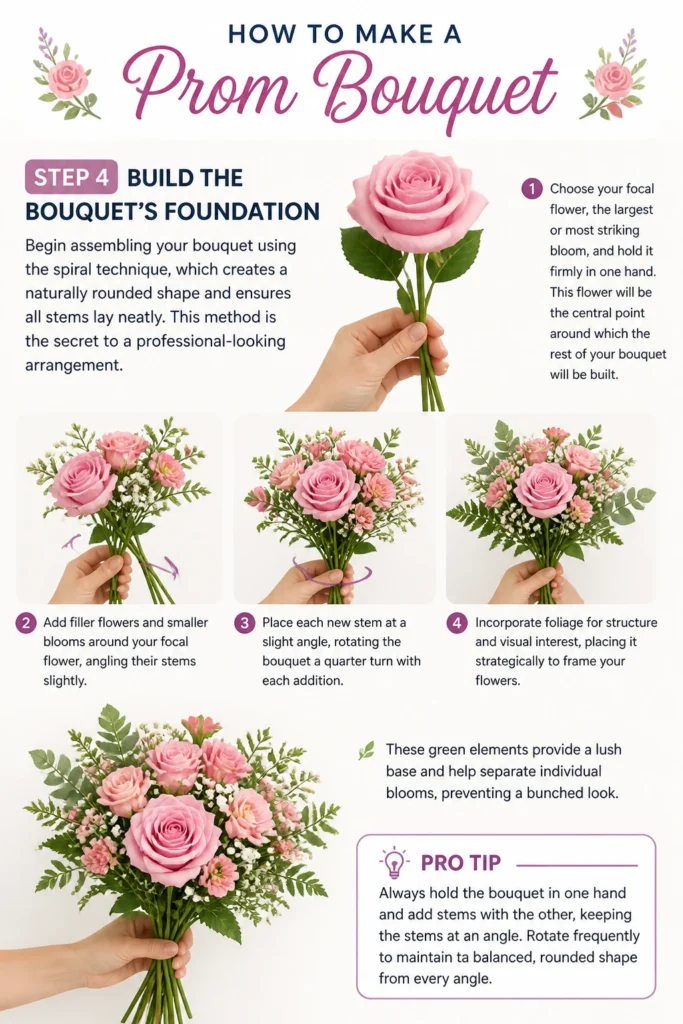
- Choose your focal flower, the largest or most striking bloom, and hold it firmly in one hand. This flower will be the central point around which the rest of your bouquet will be built.
- Add filler flowers and smaller blooms around your focal flower, angling their stems slightly. Place each new stem at a slight angle, rotating the bouquet a quarter turn with each addition.
- Incorporate foliage for structure and visual interest, placing it strategically to frame your flowers. These green elements provide a lush base and help separate individual blooms, preventing a “bunched” look.
Pro Tip: Always hold the bouquet at the point where you want the final tie to be. This consistent grip helps maintain the spiral shape and prevents the stems from shifting too much as you add more elements.
The spiral technique ensures that all stems cross at a single point, making the bouquet easy to hold and giving it a balanced, elegant drape. Take your time to get this foundation right.
Step 5: Continue Layering and Shaping
With the foundation set, continue to build out your bouquet, carefully placing each stem to achieve a harmonious and balanced design. This is where your artistic vision truly comes to life.
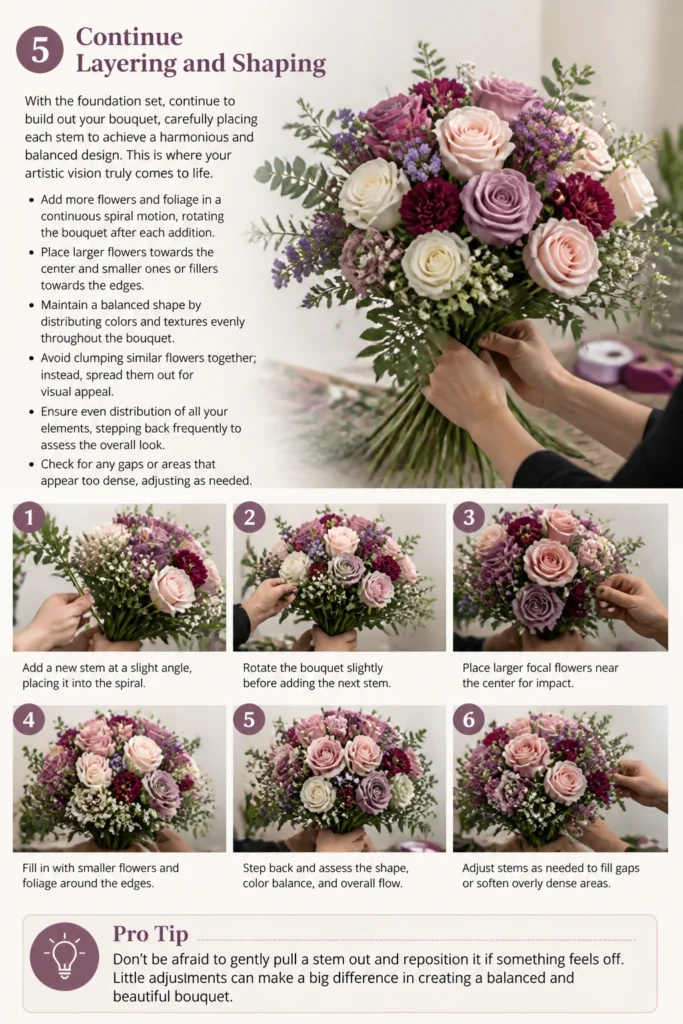
- Add more flowers and foliage in a continuous spiral motion, rotating the bouquet after each addition. Place larger flowers towards the center and smaller ones or fillers towards the edges.
- Maintain a balanced shape by distributing colors and textures evenly throughout the bouquet. Avoid clumping similar flowers together; instead, spread them out for visual appeal.
- Ensure even distribution of all your elements, stepping back frequently to assess the overall look. Check for any gaps or areas that appear too dense, adjusting as needed.
Pro Tip: Don’t be afraid to gently pull a stem out and reposition it if it doesn’t look right. It’s much easier to make adjustments during this stage than after the bouquet is fully secured.
Keep the bouquet relatively loose during this phase, allowing you to manipulate the placement of each flower. Aim for a natural, flowing appearance rather than a rigid, stiff arrangement.
Step 6: Secure the Stems Tightly
Once you are satisfied with the arrangement and shape of your bouquet, it’s time to secure the stems firmly. This crucial step prevents the bouquet from falling apart and keeps everything in place.
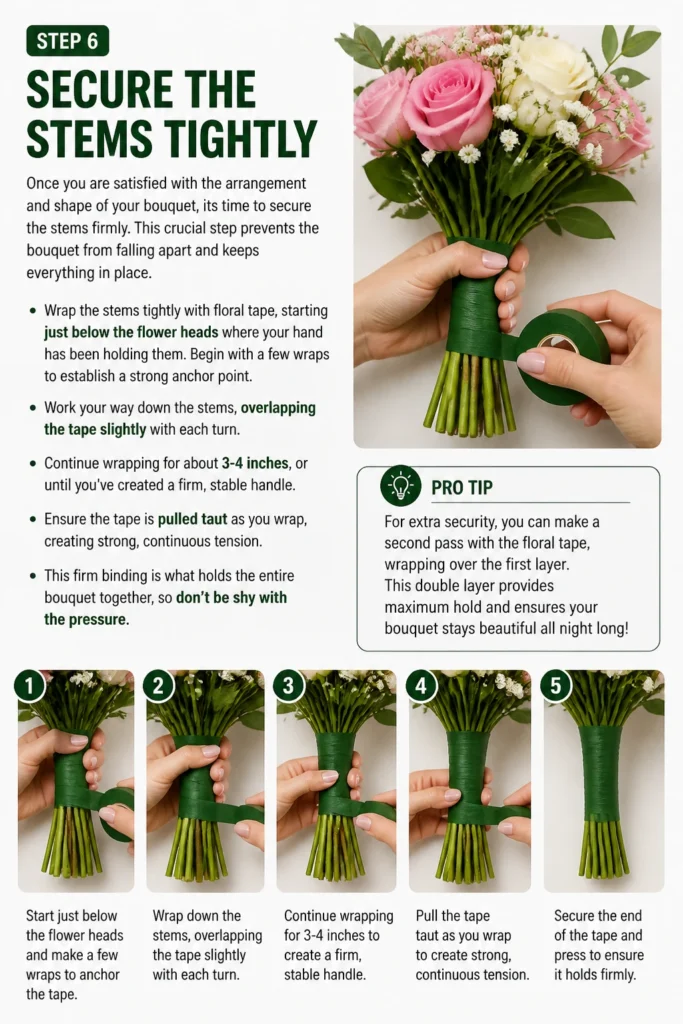
- Wrap the stems tightly with floral tape, starting just below the flower heads where your hand has been holding them. Begin with a few wraps to establish a strong anchor point.
- Work your way down the stems, overlapping the tape slightly with each turn. Continue wrapping for about 3-4 inches, or until you’ve created a firm, stable handle.
- Ensure the tape is pulled taut as you wrap, creating strong, continuous tension. This firm binding is what holds the entire bouquet together, so don’t be shy with the pressure.
Pro Tip: For extra security, you can make a second pass with the floral tape, wrapping back up the stems towards the flower heads. This double-layer provides superior stability and prevents any slippage.
A well-taped bouquet feels solid and cohesive. This secure foundation is vital for the bouquet’s durability, especially during an evening of dancing and celebration.
Step 7: Trim and Finish the Stems
With the bouquet securely taped, the next step is to prepare the handle for comfort and aesthetics. This involves trimming the stems and adding a decorative ribbon wrap.
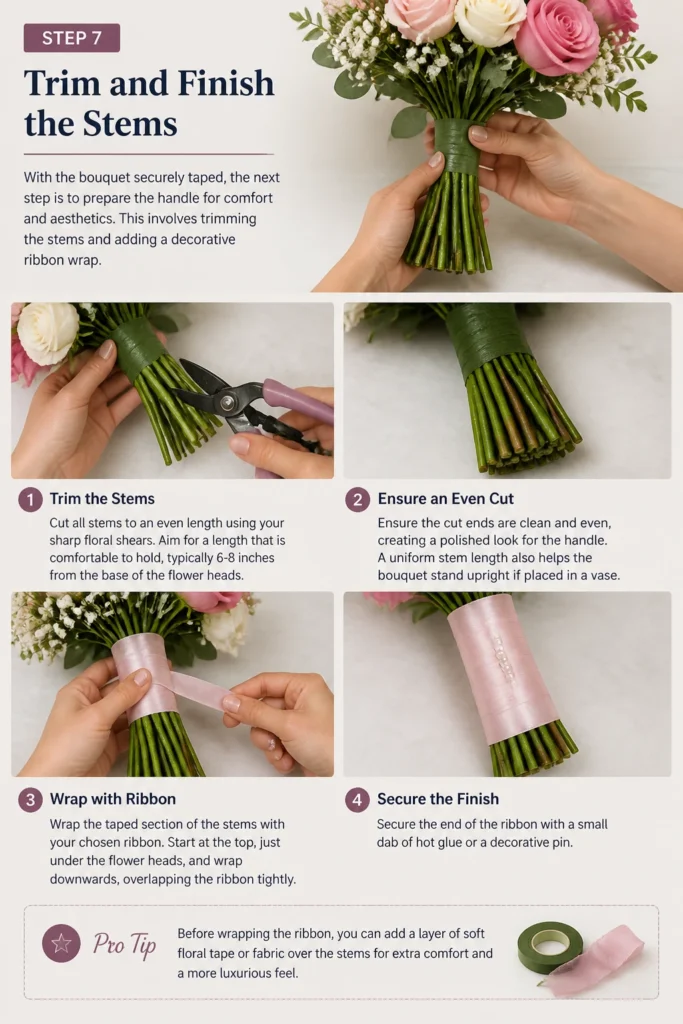
- Cut all stems to an even length using your sharp floral shears. Aim for a length that is comfortable to hold, typically 6-8 inches from the base of the flower heads.
- Ensure the cut ends are clean and even, creating a polished look for the handle. A uniform stem length also helps the bouquet stand upright if placed in a vase.
- Wrap the taped section of the stems with your chosen ribbon. Start at the top, just under the flower heads, and wrap downwards, overlapping the ribbon tightly. Secure the end of the ribbon with a small dab of hot glue or a decorative pin.
Pro Tip: Before wrapping the ribbon, you can add a layer of soft fabric or cotton batting around the taped stems for a more comfortable grip. This padding makes the handle softer for the prom-goer to hold.
The ribbon not only covers the floral tape but also adds a touch of elegance and color, tying the bouquet’s handle into the overall design. Choose a ribbon that matches the prom attire for a coordinated look.
Step 8: Embellish and Personalize
The final touches transform your beautiful arrangement into a truly unique and personalized prom bouquet. These details add sparkle and reflect the prom-goer’s individual style.
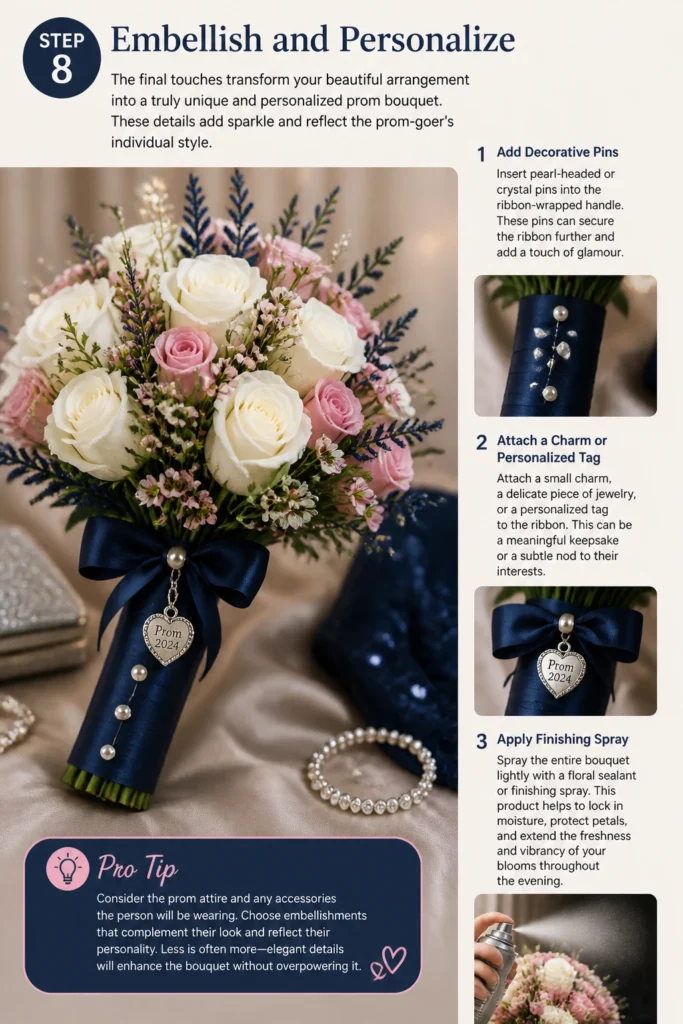
- Add decorative pins, such as pearl-headed or crystal pins, by inserting them into the ribbon-wrapped handle. These pins can secure the ribbon further and add a touch of glamour.
- Attach a small charm, a delicate piece of jewelry, or a personalized tag to the ribbon. This can be a meaningful keepsake or a subtle nod to their interests.
- Spray the entire bouquet lightly with a floral sealant or finishing spray. This product helps to lock in moisture, protect petals, and extend the freshness and vibrancy of your blooms throughout the evening.
Pro Tip: Consider the prom attire and any accessories the person will be wearing. Matching the ribbon, pins, or charms to their dress or jewelry creates a cohesive and thoughtful ensemble.
Step back and admire your creation! These thoughtful embellishments make the bouquet truly special and memorable. Your handmade prom bouquet is now ready to shine.
Common Mistakes to Avoid
Overcrowding the Bouquet
A common pitfall is trying to squeeze too many flowers into one bouquet. This can make the arrangement look dense, heavy, and diminish the individual beauty of each bloom, losing its elegant shape.
Instead, focus on balance and allow each flower space to breathe and shine. A well-designed bouquet prioritizes thoughtful placement over sheer volume, creating a lighter, more graceful presentation.
Ignoring Stem Preparation
Skipping the crucial steps of removing lower leaves, trimming stems at an angle, and hydrating flowers can lead to rapid wilting. Flowers deprived of proper water absorption will quickly lose their freshness.
Always prioritize preparing your stems properly by cutting them at an angle and allowing them to hydrate in floral food solution. This simple routine is essential for maximizing their longevity and ensuring they look vibrant all night.
Loose Taping
A bouquet that feels unstable or has stems slipping out is often the result of insufficient or loose floral tape. A poorly secured bouquet is prone to falling apart, causing unnecessary stress on prom night.
Wrap the stems tightly and firmly with floral tape, ensuring consistent tension. The taped section should feel solid and secure, holding every stem in place without any wobbling or looseness.
Lack of Focal Point
A bouquet without a clear focal point can appear chaotic and unfocused, lacking a central element to draw the eye. It might look like a random collection of flowers rather than a cohesive design.
Designate a main flower or a cluster of dominant blooms to anchor the arrangement. Build around this focal point, allowing other flowers and foliage to complement and enhance its presence, creating visual harmony.
Troubleshooting
Bouquet Feels Unstable
If your finished bouquet wobbles, feels loose, or individual stems seem to be slipping, the initial floral tape wrap might not be tight enough. This instability is a common issue with handmade arrangements.
Re-wrap the taped section with firmer tension, starting just below the flower heads and working your way down. Ensure each stem is held securely within the bundle, adding extra layers of tape if necessary to create a solid, unyielding handle.
Flowers Wilting Quickly
Flowers losing freshness prematurely often points to insufficient hydration before assembly or damage during handling. This can be disheartening after all your effort.
Before assembly, always re-trim stems and place them in fresh water with floral food for several hours. After assembly, mist lightly with floral sealant and store in a cool, dark place, ideally with the stem ends in a little water, until needed.
Lopsided Shape
If one side of your bouquet looks noticeably heavier, fuller, or taller than the other, you might have unevenly distributed your flowers and foliage. This creates an unbalanced and less aesthetically pleasing silhouette.
Gently redistribute flowers and foliage, rotating the bouquet as you work to achieve a symmetrical or pleasing asymmetrical balance. Add smaller fillers or wispy greens to sparse areas to fill them out without adding bulk, creating a more harmonious shape.
Key Takeaways
- Preparation is paramount for flower longevity, ensuring your blooms stay fresh and vibrant throughout the entire event.
- Build your bouquet using the spiral technique to create a natural, well-rounded shape and a comfortable, ergonomic handle.
- Secure stems tightly with floral tape to guarantee the bouquet’s durability and prevent any flowers from shifting or falling out.
- Personalize the bouquet with ribbon and embellishments to match the prom-goer’s unique style and the aesthetic of their attire.
- Don’t be afraid to experiment with different textures and colors to create a truly unique and memorable floral arrangement.
Frequently Asked Questions
How far in advance can I make the bouquet?
You can assemble a prom bouquet 1-2 days in advance to allow for proper planning and reduce last-minute stress. Store it in a cool, dark place, ideally with the stem ends in a vase with a small amount of water, or in a floral box if fully wrapped, to maintain optimal freshness.
What kind of flowers last longest?
Roses, carnations, lilies, and chrysanthemums are well-known for their excellent longevity and resilience, making them ideal choices for prom bouquets. Hydrangeas and tulips can be more delicate and require extra careful handling and consistent hydration to prevent wilting.
Can I use artificial flowers?
Absolutely! Artificial flowers offer superb durability and can be prepared well in advance, eliminating any worry about wilting. You can combine them with fresh foliage for a realistic touch, or use them entirely for a lasting keepsake that the prom-goer can cherish long after the event.
How do I make the bouquet smell good?
Many fresh flowers, such as roses, freesias, and gardenias, are naturally fragrant and will provide a lovely scent. For an extra touch, you can lightly mist the bouquet with a floral-scented spray, ensuring it’s specifically designed for flowers and won’t stain or damage the petals.
Our Top Recommended Finds
- High-Quality Floral Shears: Essential for making clean, precise cuts that help flowers absorb water efficiently and prolong their freshness.
- Green Floral Tape: Provides a strong, discreet bind for stems, crucial for creating a sturdy and cohesive bouquet that holds its shape.
- Floral Wire (various gauges): Perfect for reinforcing delicate stems, shaping your arrangement, and ensuring every bloom is perfectly positioned.
Crafting Memories, One Bloom at a Time
You now possess the knowledge and practical steps to create a truly special prom bouquet. This thoughtful, handcrafted gift will surely be cherished, adding a personal and heartfelt touch to a truly memorable night.
The joy of giving something made with your own hands is immense, and this bouquet will be a testament to your care.
Why not extend your floral journey? Consider trying your hand at making a matching corsage or boutonniere next, perfecting your skills and creating a complete ensemble.
Gather your supplies, embrace your creativity, and start arranging your beautiful prom bouquet today!
Beginner-friendly templates, step-by-step guides,
and weekly project ideas in your inbox.