How To Tie Stretchy String Bracelet

Beginner-friendly templates, step-by-step guides,
and weekly project ideas in your inbox.
There’s a special satisfaction in wearing a bracelet you’ve made yourself.
I’ve spent countless hours crafting stretchy bracelets, and through trial and error, I’ve discovered the secrets to making them last.
This guide shares those proven techniques, ensuring your creations are both beautiful and durable.
Quick Overview
This guide will show you how to create beautiful, custom stretchy bracelets that hold up to everyday wear.
You’ll learn the specific knotting technique that prevents common breakage and ensures your bracelet stays secure.
- Time needed: 15-30 minutes (depending on bead complexity)
- Difficulty: Beginner
- What you’ll need: Stretchy cord, beads, scissors, super glue (optional but recommended)
Step-by-Step Instructions
Step 1: Gather Your Materials
Lay out all the items you will need before you begin. This helps streamline your creative process and prevents interruptions.
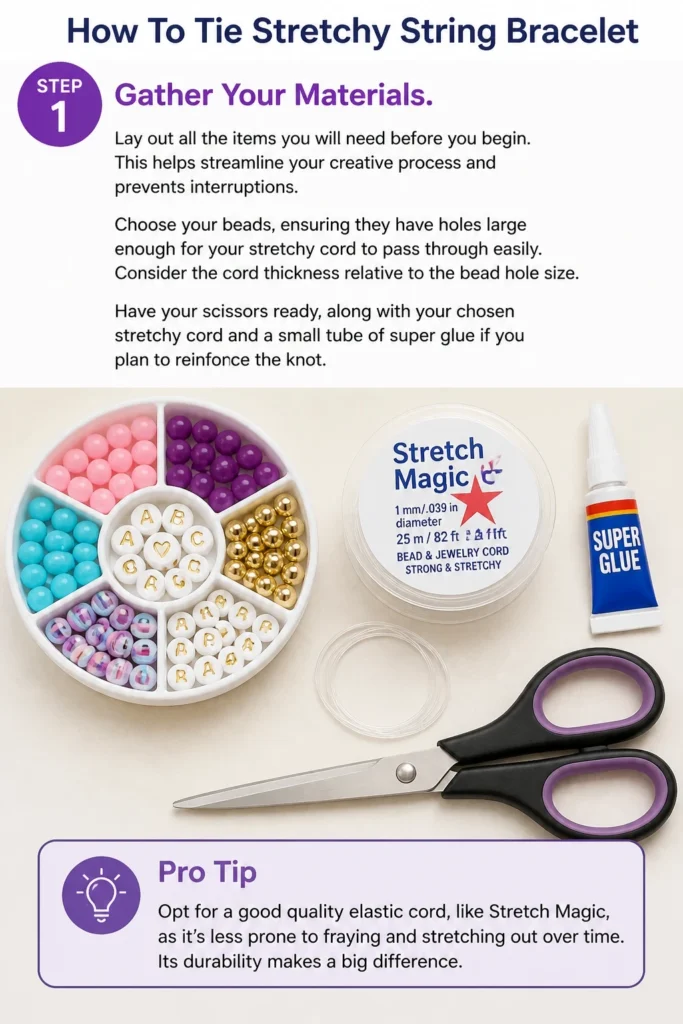
Choose your beads, ensuring they have holes large enough for your stretchy cord to pass through easily. Consider the cord thickness relative to the bead hole size.
Have your scissors ready, along with your chosen stretchy cord and a small tube of super glue if you plan to reinforce the knot.
Pro Tip: Opt for a good quality elastic cord, like “Stretch Magic,” as it’s less prone to fraying and stretching out over time. Its durability makes a big difference.
Step 2: Measure Your Wrist
Wrap the stretchy cord around your wrist to get an approximate measurement for the bracelet’s length. This is your desired finished size.
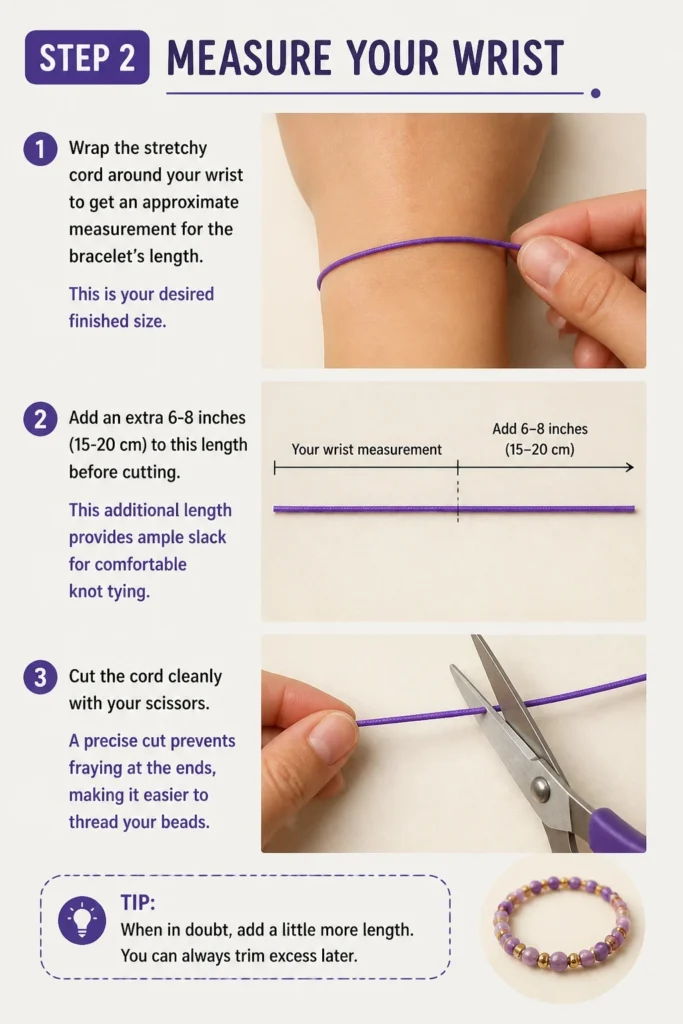
Add an extra 6-8 inches (15-20 cm) to this length before cutting. This additional length provides ample slack for comfortable knot tying.
Cut the cord cleanly with your scissors. A precise cut prevents fraying at the ends, making it easier to thread your beads.
Step 3: String Your Beads
Begin threading your chosen beads onto the stretchy cord. You can create any pattern or sequence you desire.
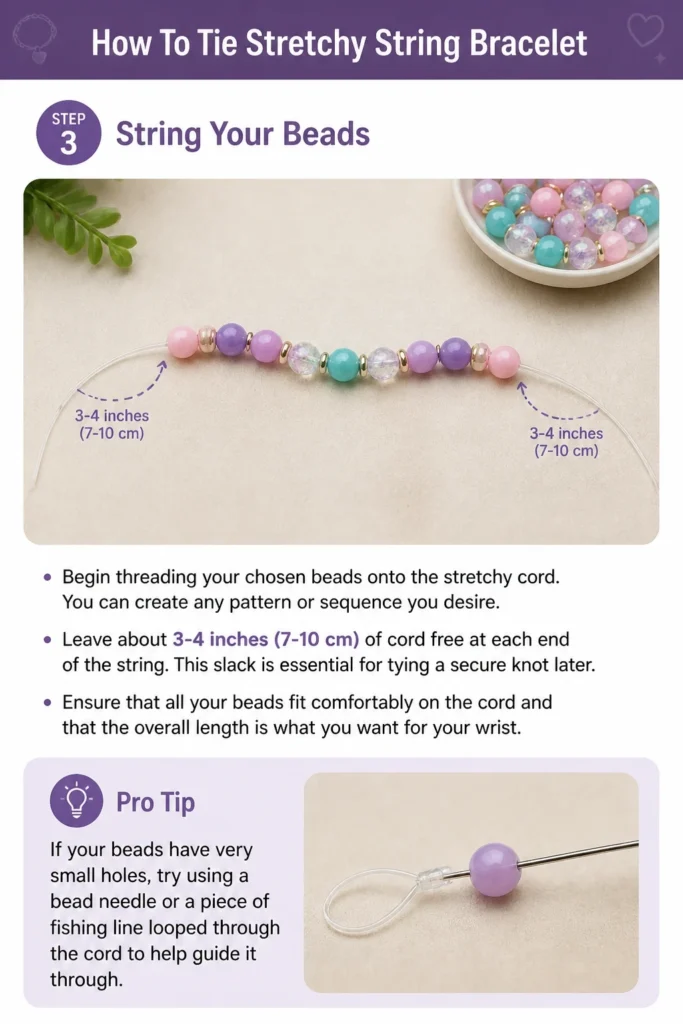
Leave about 3-4 inches (7-10 cm) of cord free at each end of the string. This slack is essential for tying a secure knot later.
Ensure that all your beads fit comfortably on the cord and that the overall length is what you want for your wrist.
Pro Tip: If your beads have very small holes, try using a bead needle or a piece of fishing line looped through the cord to help guide it through.
Step 4: Prepare for the Knot
Bring the two ends of the stretchy cord together. Ensure that all your beads are pushed snugly against each other in the middle of the cord.
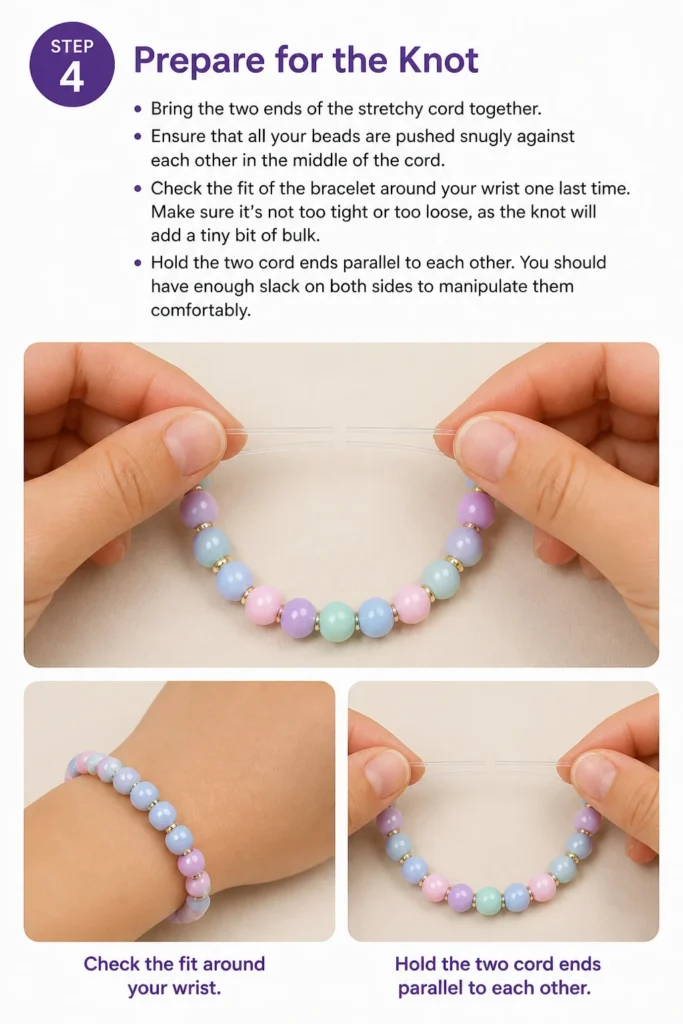
Check the fit of the bracelet around your wrist one last time. Make sure it’s not too tight or too loose, as the knot will add a tiny bit of bulk.
Hold the two cord ends parallel to each other. You should have enough slack on both sides to manipulate them comfortably.
Step 5: Tie a Surgeon’s Knot (First Pass)
Cross the left cord over the right cord, just as you would begin to tie a regular shoelace knot. This forms a simple overhand knot.
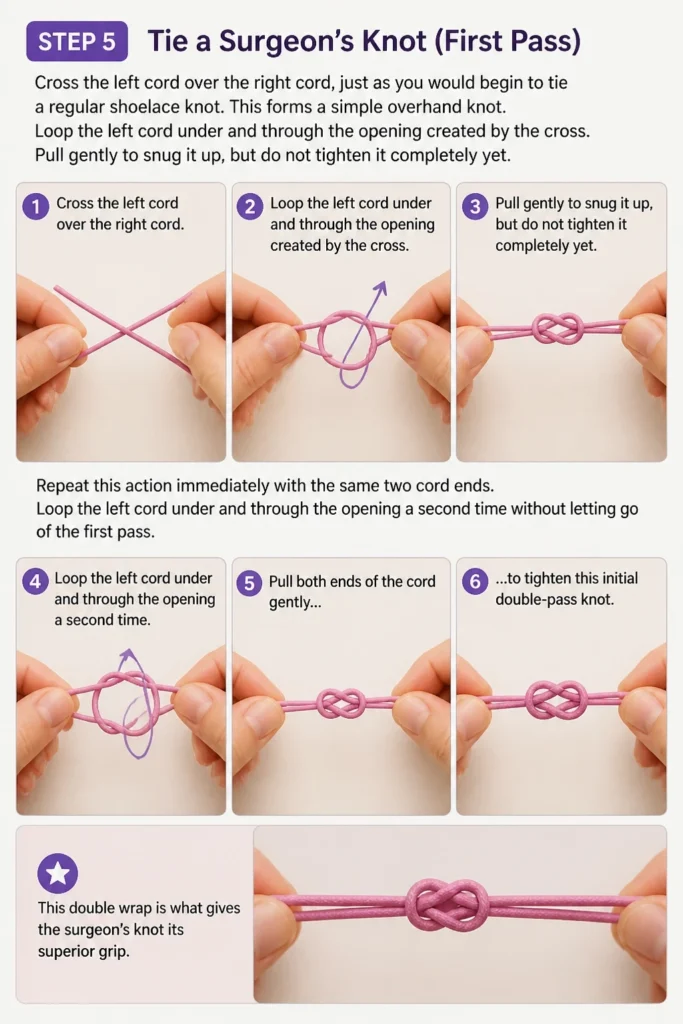
Loop the left cord under and through the opening created by the cross. Pull gently to snug it up, but do not tighten it completely yet.
Repeat this action immediately with the same two cord ends. Loop the left cord under and through the opening a second time without letting go of the first pass.
Pull both ends of the cord gently to tighten this initial double-pass knot. This double wrap is what gives the surgeon’s knot its superior grip.
Step 6: Tie a Surgeon’s Knot (Second Pass)
Reverse the direction of your cords for the second part of the surgeon’s knot. The cord that was on top in the previous step should now be on the bottom.
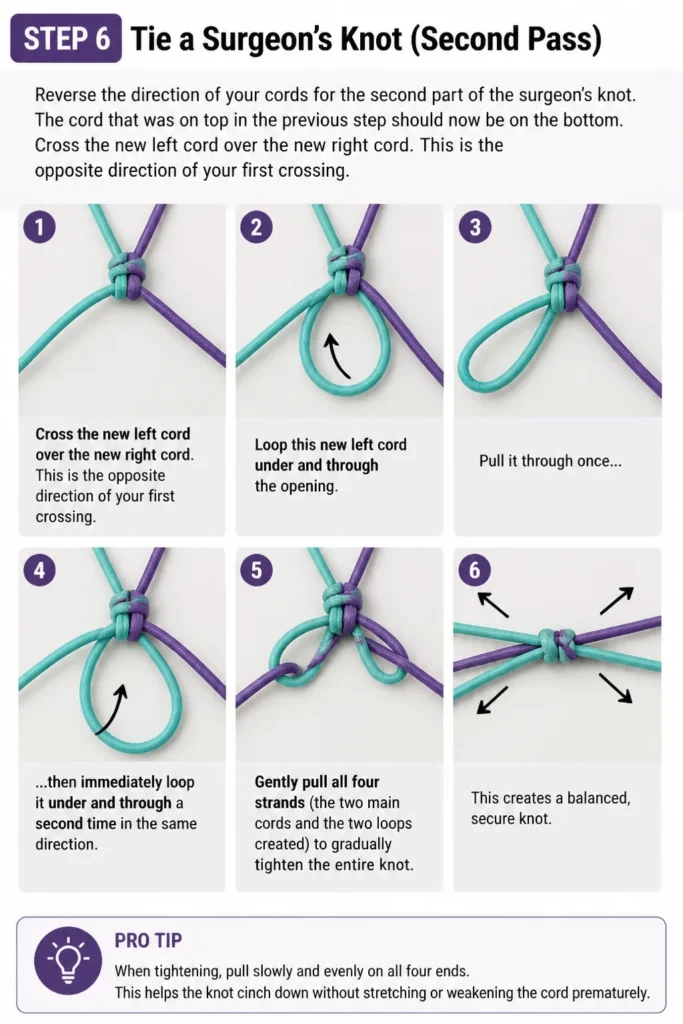
Cross the new left cord over the new right cord. This is the opposite direction of your first crossing.
Loop this new left cord under and through the opening. Pull it through once, then immediately loop it under and through a second time in the same direction.
Gently pull all four strands (the two main cords and the two loops created) to gradually tighten the entire knot. This creates a balanced, secure knot.
Pro Tip: When tightening, pull slowly and evenly on all four ends. This helps the knot cinch down without stretching or weakening the cord prematurely.
Step 7: Reinforce the Knot (Optional but Recommended)
Apply a tiny dab of super glue directly onto the knot. Use a gel-based super glue for better control and less mess.
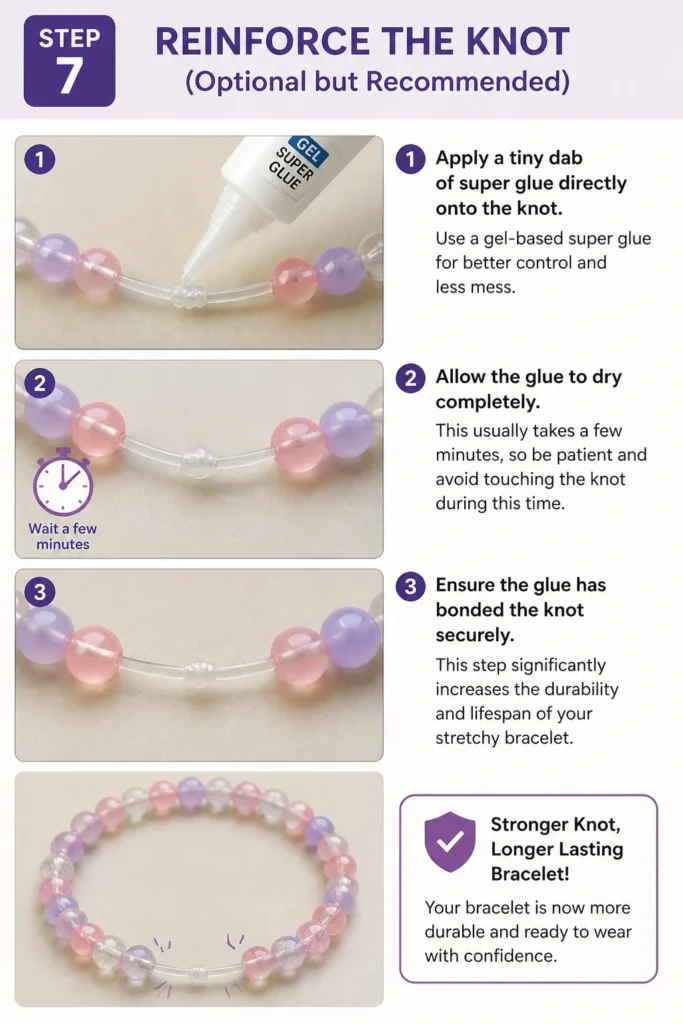
Allow the glue to dry completely. This usually takes a few minutes, so be patient and avoid touching the knot during this time.
Ensure the glue has bonded the knot securely. This step significantly increases the durability and lifespan of your stretchy bracelet.
Step 8: Trim Excess Cord
Wait until the super glue is fully dry if you chose to apply it. Trimming too early can cause the knot to unravel.
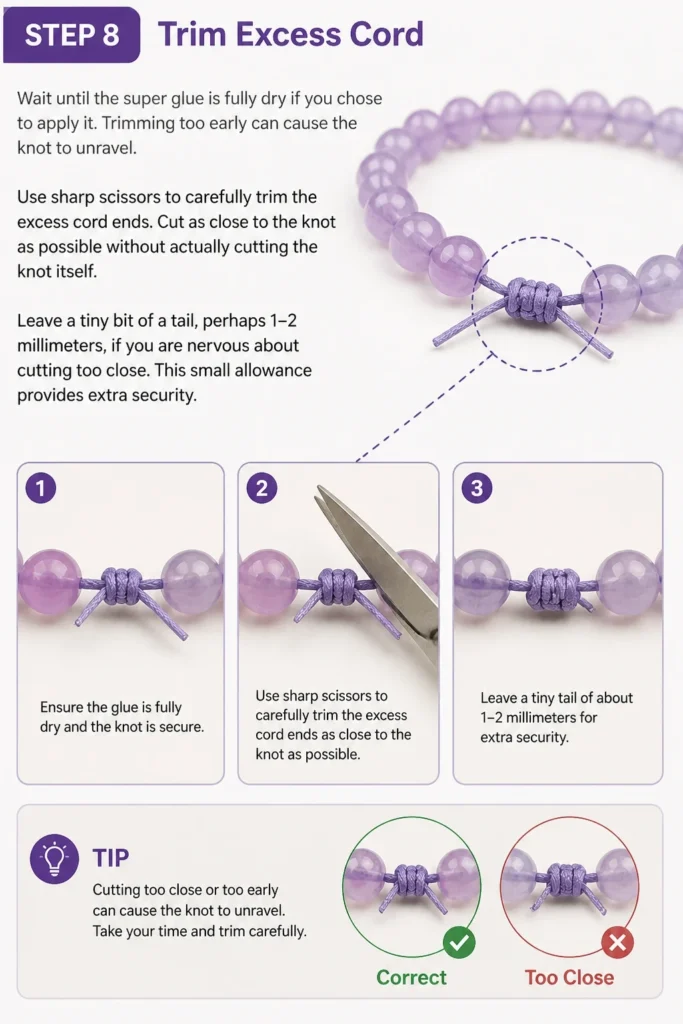
Use sharp scissors to carefully trim the excess cord ends. Cut as close to the knot as possible without actually cutting the knot itself.
Leave a tiny bit of a tail, perhaps 1-2 millimeters, if you are nervous about cutting too close. This small allowance provides extra security.
Step 9: Hide the Knot
Locate a bead with a slightly larger hole next to your knot. This bead will serve as the hiding spot.
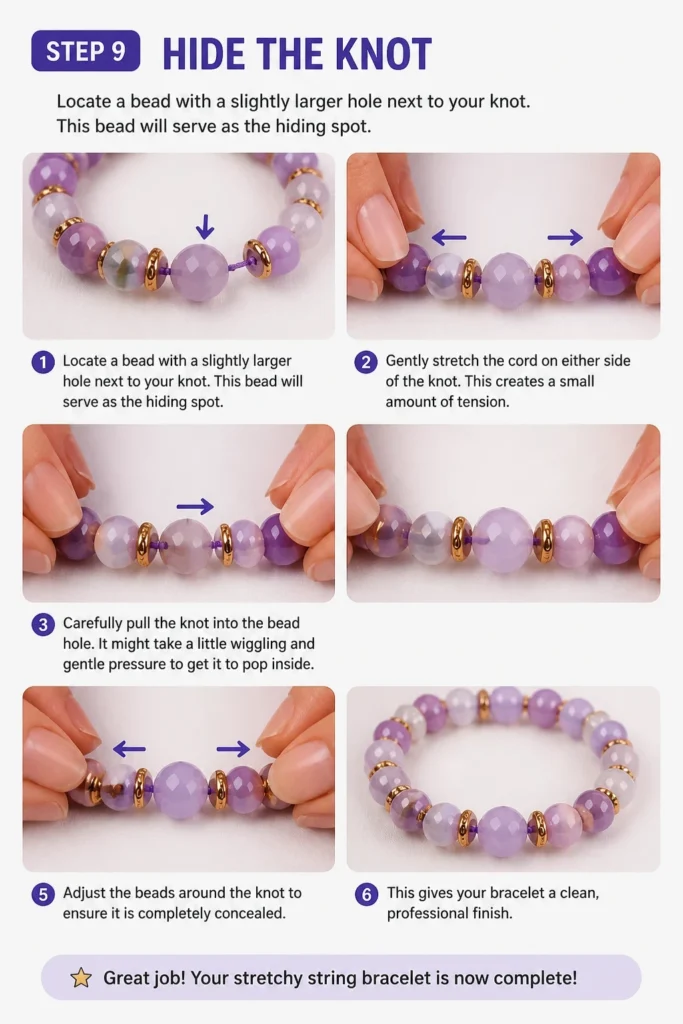
Gently stretch the cord on either side of the knot. This creates a small amount of tension.
Carefully pull the knot into the bead hole. It might take a little wiggling and gentle pressure to get it to pop inside.
Adjust the beads around the knot to ensure it is completely concealed. This gives your bracelet a clean, professional finish.
Step 10: Test Your Bracelet
Put on your newly finished stretchy bracelet. Wear it for a few minutes to get a feel for its fit and comfort.
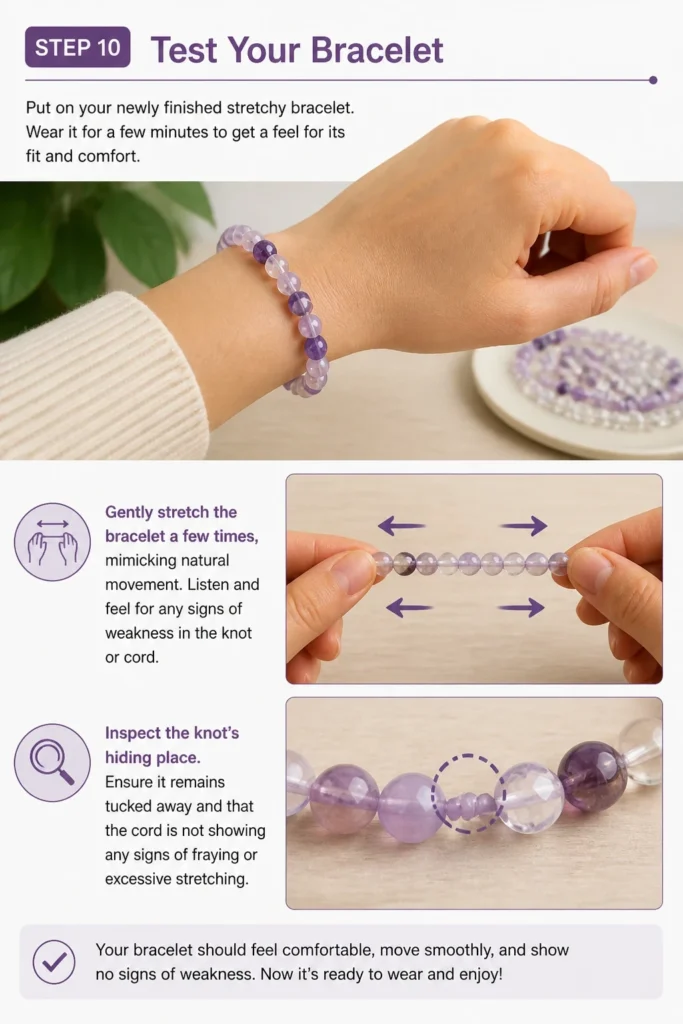
Gently stretch the bracelet a few times, mimicking natural movement. Listen and feel for any signs of weakness in the knot or cord.
Inspect the knot’s hiding place. Ensure it remains tucked away and that the cord is not showing any signs of fraying or excessive stretching.
Common Mistakes to Avoid
Using the Wrong Knot
A simple square knot or granny knot might seem sufficient, but they are not designed for stretchy materials. These knots tend to slip and unravel over time, especially with the constant tension from elastic cord.
The surgeon’s knot, with its double wraps in opposing directions, creates superior friction and grip, holding the elastic securely. Always prioritize this specific knot for durability.
Cutting the Cord Too Short
It’s tempting to be conservative with cord length, but cutting it too short makes tying the knot incredibly difficult and frustrating. You need enough slack to comfortably manipulate the ends.
Always add an extra 6-8 inches to your wrist measurement. This ensures you have plenty of room to tie a strong, secure knot without struggling or running out of cord.
Not Reinforcing the Knot
While a well-tied surgeon’s knot is strong, elastic cords can sometimes still work themselves loose over extended periods of wear. Skipping reinforcement is a common oversight that leads to premature breakage.
A tiny dab of gel super glue applied directly to the knot, once tied and tightened, creates an extra layer of security. This step significantly extends the life of your bracelet and prevents unraveling.
Over-Stretching During Creation
Constantly pulling and stretching the cord excessively while stringing beads or tying the knot can weaken the elastic fibers. This leads to a bracelet that loses its shape or breaks more easily.
Handle the cord gently. Stretch it only when necessary to test the fit or to pull the knot into a bead. Be mindful of the cord’s natural tension throughout the process.
Troubleshooting
Knot Keeps Slipping
If your knot consistently slips, it’s usually an indication that the surgeon’s knot wasn’t tied correctly. Ensure you are performing both sets of double wraps in opposing directions.
Re-tie the knot, paying close attention to the technique in Step 5 and Step 6. Make sure to pull all four strands evenly and firmly to cinch it down properly. Applying a small amount of super glue after tying will also help secure it.
Bracelet Breaks Easily
Frequent breakage often points to either low-quality stretchy cord or an improperly reinforced knot. Cheap cords can degrade quickly or have inherent weaknesses.
Invest in high-quality elastic cord like Stretch Magic. Also, ensure you are reinforcing your surgeon’s knot with a small dab of super glue. Over-stretching the bracelet during wear can also contribute to early breakage, so be gentle.
Knot Won’t Hide
Sometimes, even a perfectly tied knot seems too bulky to disappear into a bead. This can happen if the knot is too large or the adjacent bead hole is too small.
Try gently stretching the bracelet around the knot and wiggling it into the bead hole. If it still doesn’t fit, consider re-tying the knot slightly tighter or choosing a bead with a slightly larger hole next to where you want to hide it.
Key Takeaways
- The surgeon’s knot is the most reliable knot for stretchy string bracelets, providing superior durability.
- Always add extra cord length for comfortable and secure knot tying, preventing frustration.
- Reinforcing the knot with a tiny dab of super glue significantly extends the life of your bracelet.
- Avoid excessive stretching of the elastic cord during the creation process to maintain its integrity.
- Hiding the knot inside a bead provides a clean, professional, and comfortable finish to your design.
- Practice makes perfect; don’t be discouraged if your first attempt isn’t flawless.
Frequently Asked Questions
What kind of stretchy string is best?
For durable bracelets, a high-quality elastic cord like “Stretch Magic” is highly recommended. It comes in various thicknesses and is known for its strength and resistance to fraying and stretching out over time.
Can I use any type of super glue?
While most super glues will work, a gel-based super glue is often preferred. It offers more control during application, preventing drips and messy residue on your beads or cord. E6000 craft adhesive is another excellent, flexible option.
How long do these bracelets last?
The lifespan of a stretchy bracelet varies greatly depending on the quality of the materials, how well the knot is tied and reinforced, and how often it’s worn. With good materials and proper knotting, they can last for many months, even years, with careful wear.
How do I clean my stretchy bracelet?
To clean your bracelet, gently wipe it with a soft cloth dampened with mild soap and water. Avoid harsh chemicals or prolonged soaking, as these can damage the cord or beads. Pat it dry thoroughly before wearing again.
Our Top Recommended Finds
- Stretch Magic Elastic Cord: Known for its strength and durability, it’s the gold standard for stretchy bracelets. It holds knots well and resists fraying.
- Assorted Bead Kit with Various Sizes: A good starter kit provides a wide range of bead types and sizes, allowing for creative freedom and ensuring you have beads with holes large enough for knot hiding.
- Precision Jewelry Scissors: Sharp, small scissors are crucial for making clean cuts close to the knot without damaging the main cord or nearby beads.
Craft Your Own Wearable Art
Now you possess the knowledge and practical steps to create durable, beautiful stretchy string bracelets.
Embrace the joy of personalizing your accessories or crafting thoughtful gifts for loved ones.
Don’t hesitate to experiment with different bead combinations and cord colors. Start your next bracelet project today and wear your creativity with pride!
Beginner-friendly templates, step-by-step guides,
and weekly project ideas in your inbox.