How To Draft A Bustier Pattern

Beginner-friendly templates, step-by-step guides,
and weekly project ideas in your inbox.
Creating your own bustier pattern can seem daunting at first.
However, with a clear guide and precise measurements, it’s a deeply rewarding process.
Having drafted numerous fitted garments myself, I know the satisfaction of a pattern tailored perfectly to unique body shapes.
Quick Overview
This guide will walk you through drafting a custom bustier pattern from your own measurements.
You’ll learn to create perfectly fitting cups and a shaped bodice that flatters your figure.
- Time needed: 3-5 hours (initial draft)
- Difficulty: Intermediate
- What you’ll need: Measuring tape, pattern paper (or large sheets of paper), pencils, rulers (straight and curved), French curve, scissors, calculator, eraser.
Step-by-Step Instructions
Step 1: Gather Your Tools and Take Precise Measurements
Before any drawing begins, ensure you have all your tools ready and a clean, flat workspace.
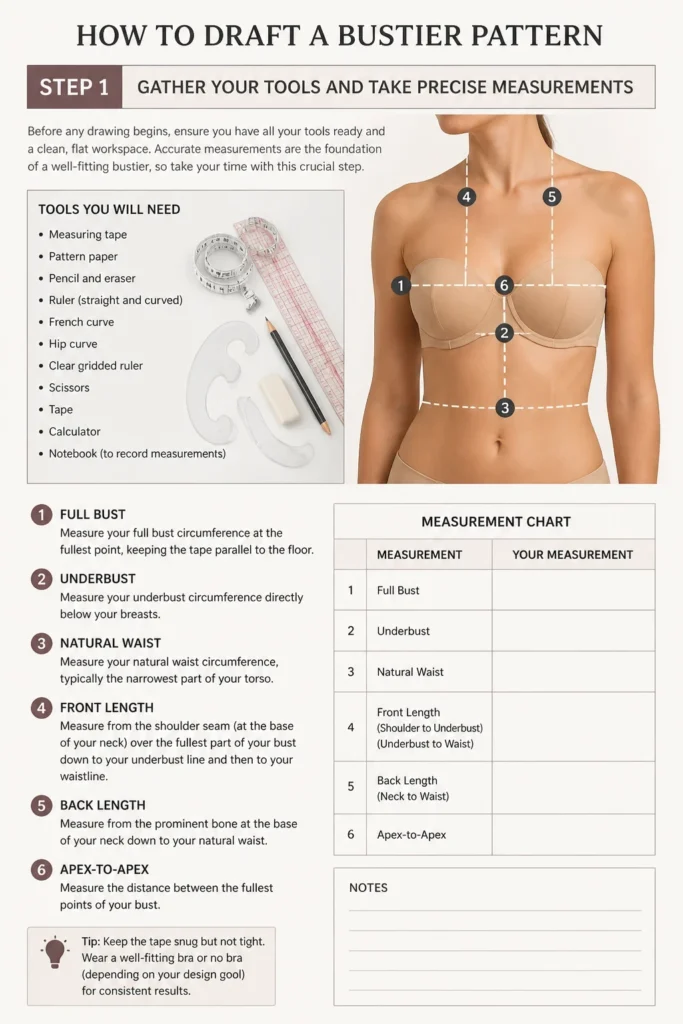
Accurate measurements are the foundation of a well-fitting bustier, so take your time with this crucial step.
- Measure your full bust circumference at the fullest point, keeping the tape parallel to the floor.
- Measure your underbust circumference directly below your breasts.
- Measure your natural waist circumference, typically the narrowest part of your torso.
- Record your front length from the shoulder seam (at the base of your neck) over the fullest part of your bust down to your underbust line and then to your waistline.
- Note your back length from the prominent bone at the base of your neck down to your natural waist.
- Find your apex-to-apex measurement, the distance between the fullest points of your breasts.
- Determine your side length from your underarm crease (where your arm meets your body) down to your waistline.
- Measure your shoulder width from one shoulder point to the other across your back.
Pro Tip: Wear a well-fitting, unpadded bra and form-fitting clothing when taking measurements to ensure accuracy. Have a friend help for back measurements.
Step 2: Draft Your Basic Front and Back Blocks
Begin by drawing foundational rectangles for your front and back bodice pieces on your pattern paper.
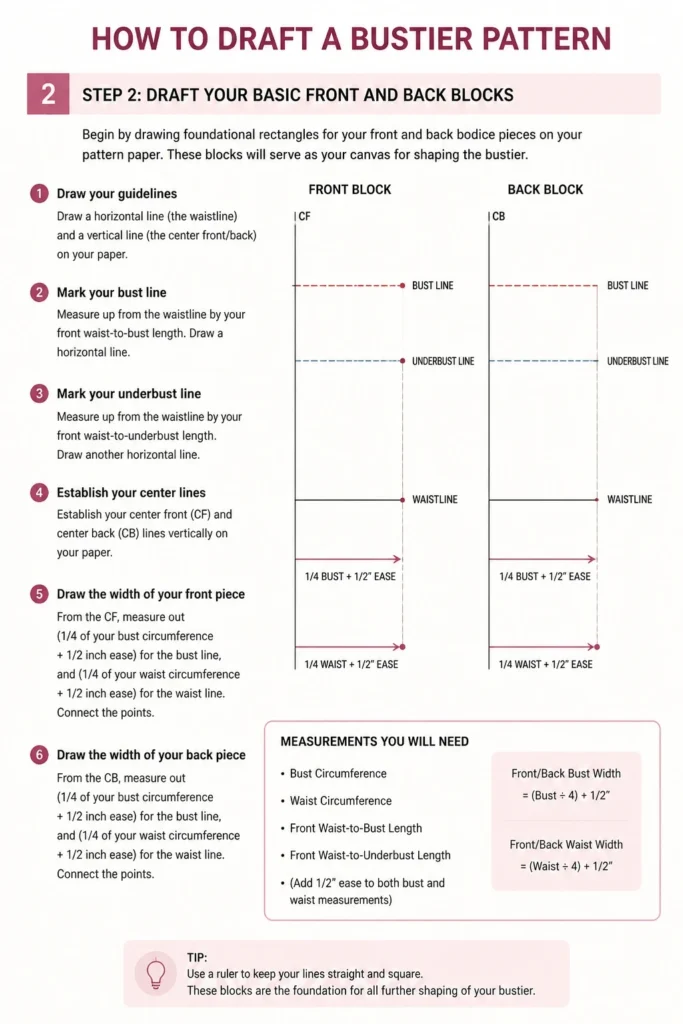
These blocks will serve as your canvas for shaping the bustier.
- Draw a horizontal line (the waistline) and a vertical line (the center front/back) on your paper.
- Mark your bust line: Measure up from the waistline by your front waist-to-bust length. Draw a horizontal line.
- Mark your underbust line: Measure up from the waistline by your front waist-to-underbust length. Draw another horizontal line.
- Establish your center front (CF) and center back (CB) lines vertically on your paper.
- Draw the width of your front piece: From the CF, measure out (1/4 of your bust circumference + 1/2 inch ease) for the bust line, and (1/4 of your waist circumference + 1/2 inch ease) for the waist line. Connect these points to form a basic side seam.
- Draw the width of your back piece: From the CB, measure out (1/4 of your bust circumference + 1/2 inch ease) for the bust line, and (1/4 of your waist circumference + 1/2 inch ease) for the waist line. Connect these points.
- Mark the shoulder point on both front and back. For the front, measure from CF at the bust line, then up to your shoulder point using your front length measurement. For the back, use your back length.
- Square a short line from the shoulder point inwards, representing the shoulder width.
Step 3: Place Darts and Contour Lines
Darts are essential for shaping the flat fabric to your three-dimensional body, especially for the bust area.
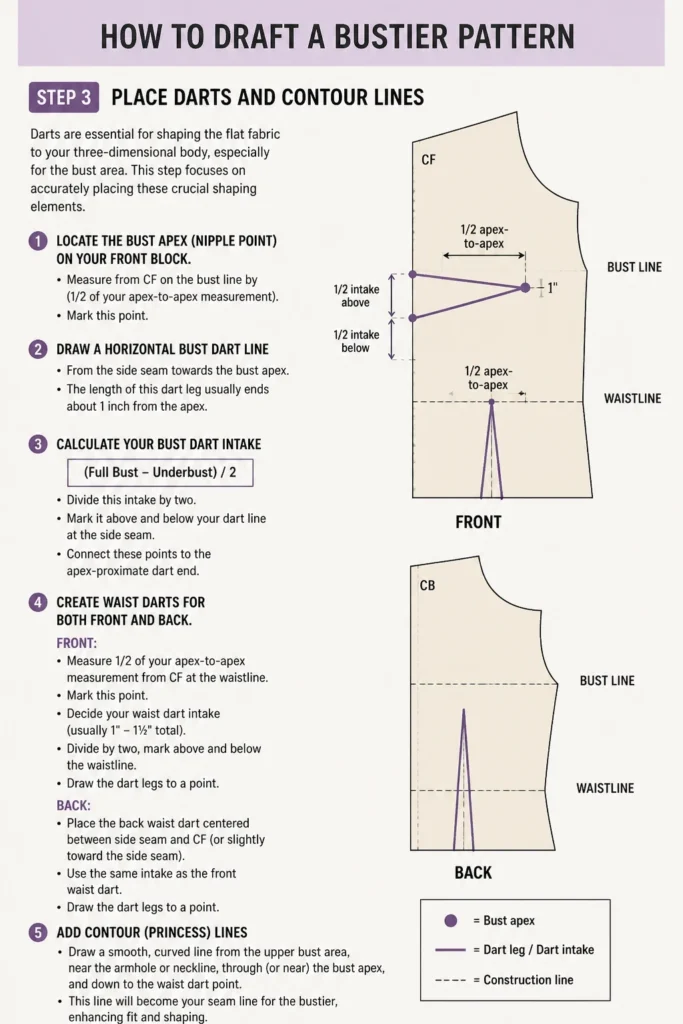
This step focuses on accurately placing these crucial shaping elements.
- Locate the bust apex (nipple point) on your front block. Measure from CF on the bust line by (1/2 of your apex-to-apex measurement). Mark this point.
- Draw a horizontal bust dart line from the side seam towards the bust apex. The length of this dart leg usually ends about 1 inch from the apex.
- Calculate your bust dart intake: (Full Bust – Underbust) / 2. Divide this intake by two and mark it above and below your dart line at the side seam. Connect these points to the apex-proximate dart end.
- Create waist darts for both front and back. For the front, measure 1/2 of your apex-to-apex measurement from CF at the waistline. Draw a vertical line up to the underbust line and down towards the hem.
- Determine waist dart intake: (1/4 Bust – 1/4 Waist) for each panel. Distribute this excess into your waist darts. For example, a 2-inch excess for the front could mean two 1-inch darts or one 2-inch dart.
- Draw the waist darts from the underbust line (or slightly below the bust apex for the front) down to the waistline, tapering to a point.
- Add a small dart at the back shoulder to accommodate shoulder blade curvature, typically 1/2 to 3/4 inch wide, ending before the shoulder blade.
Pro Tip: The bust apex is a pivot point. All bust darts should point towards it but usually stop 1-1.5 inches away to avoid a pointy bust.
Step 4: Design the Bust Cups and Seamlines
This is where the bustier truly takes shape, as you convert darts into elegant seam lines that define the cups.
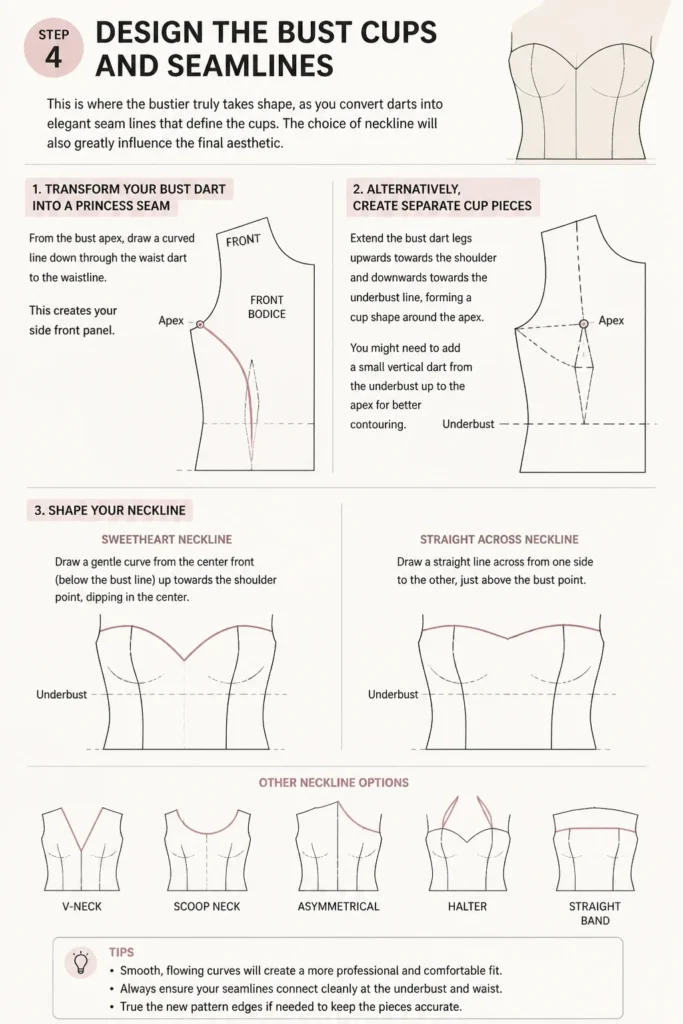
The choice of neckline will also greatly influence the final aesthetic.
- Transform your bust dart into a princess seam. From the bust apex, draw a curved line down through the waist dart to the waistline. This creates your side front panel.
- Alternatively, create separate cup pieces. Extend the bust dart legs upwards towards the shoulder and downwards towards the underbust line, forming a cup shape around the apex. You might need to add a small vertical dart from the underbust up to the apex for better contouring.
- Shape your neckline. For a sweetheart neckline, draw a gentle curve from the center front (below the bust line) up towards the shoulder point, dipping in the center. For a straight neckline, draw a horizontal line across the bust or underbust area.
- Refine the armhole curve. Use a French curve to create a smooth armhole from the shoulder point down to the side seam, avoiding any sharp angles.
- Adjust the center front line. For a truly contoured bustier, the center front might need to be slightly curved inwards between the bust points to prevent gaping.
Step 5: Shape the Side Panels and Back
The side and back panels provide the structure and fit for the rest of the torso.
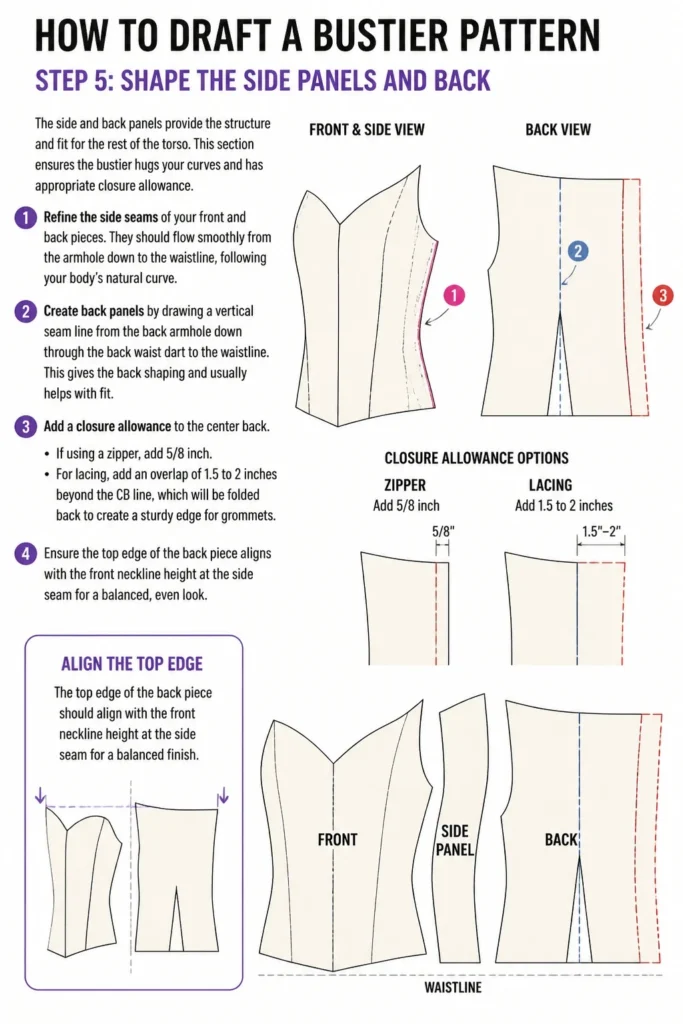
This section ensures the bustier hugs your curves and has appropriate closure allowance.
- Refine the side seams of your front and back pieces. They should flow smoothly from the armhole down to the waistline, following your body’s natural curve.
- Create back panels by drawing a vertical seam line from the back armhole down through the back waist dart to the waistline. This gives the back shaping and usually helps with fit.
- Add a closure allowance to the center back. If using a zipper, add 5/8 inch. For lacing, add an overlap of 1.5 to 2 inches beyond the CB line, which will be folded back to create a sturdy edge for grommets.
- Ensure the top edge of the back piece aligns with the front neckline height at the side seam, or design a different back neckline if desired.
Step 6: Define the Hemline
The hemline determines where your bustier ends on the torso.
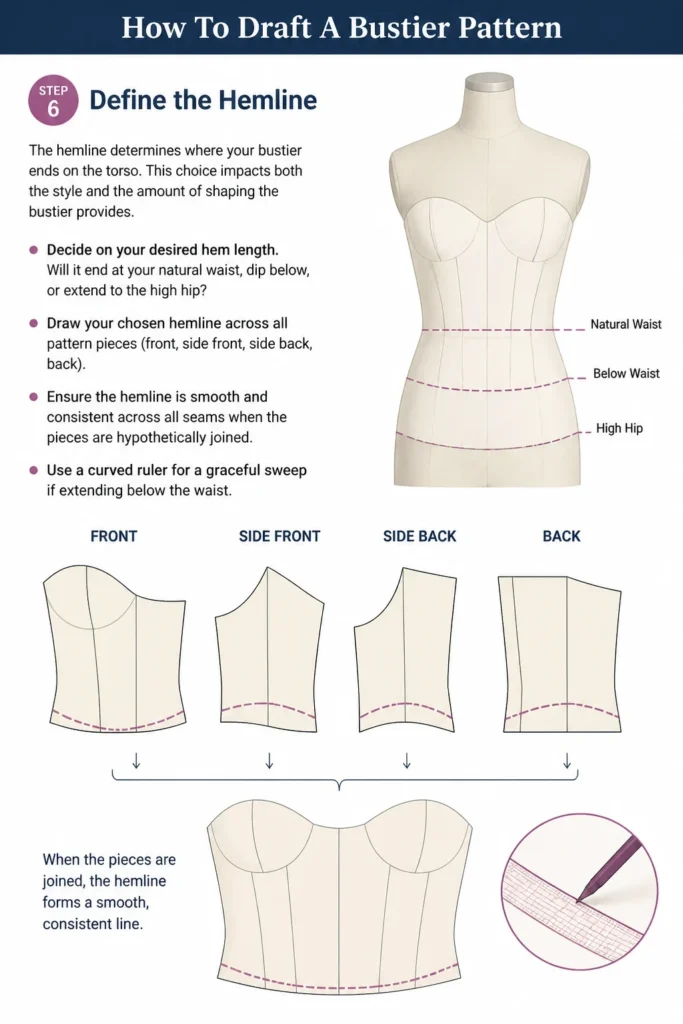
This choice impacts both the style and the amount of shaping the bustier provides.
- Decide on your desired hem length. Will it end at your natural waist, dip below, or extend to the high hip?
- Draw your chosen hemline across all pattern pieces (front, side front, side back, back).
- Ensure the hemline is smooth and consistent across all seams when the pieces are hypothetically joined. Use a curved ruler for a graceful sweep if extending below the waist.
Step 7: Add Seam Allowances, Grainlines, and Notches
These markings are critical for sewing your bustier together accurately.
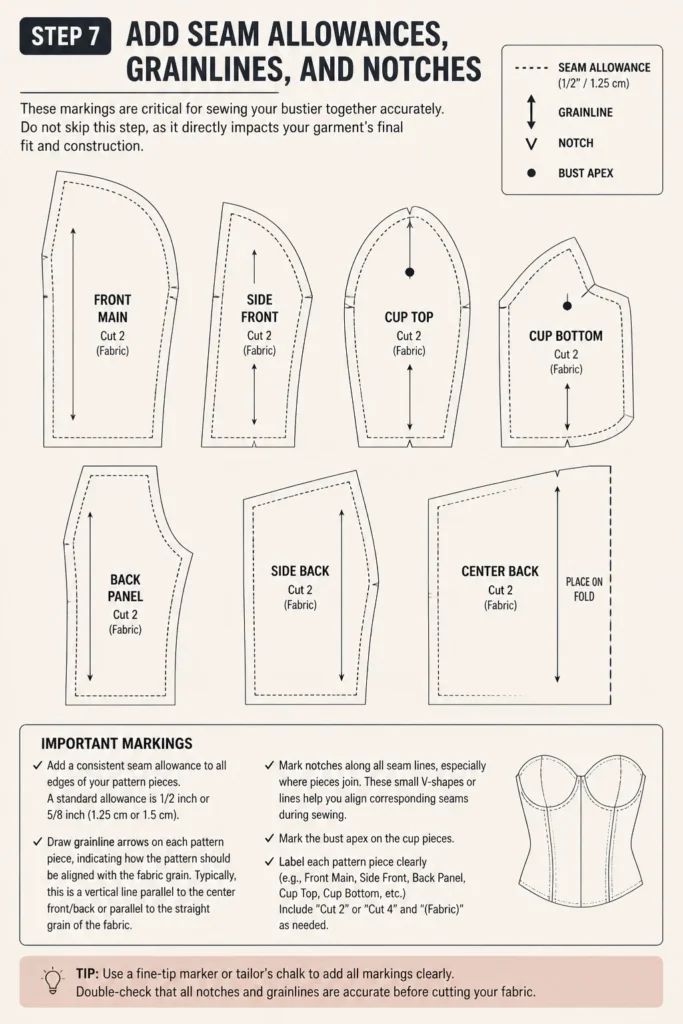
Do not skip this step, as it directly impacts your garment’s final fit and construction.
- Add a consistent seam allowance to all edges of your pattern pieces. A standard allowance is 1/2 inch or 5/8 inch (1.25 cm or 1.5 cm).
- Draw grainline arrows on each pattern piece, indicating how the pattern should be aligned with the fabric grain. Typically, this is a vertical line parallel to the center front/back or parallel to the straight grain of the fabric.
- Mark notches along all seam lines, especially where pieces join. These small V-shapes or lines help you align corresponding seams during sewing. Mark the bust apex on the cup pieces.
- Label each pattern piece clearly (e.g., “Front Main,” “Side Front,” “Back Panel,” “Cup Top,” “Cup Bottom”), indicating “Cut 2” or “Cut 1 on Fold” as appropriate.
Step 8: True Your Pattern Pieces
Pattern truing is the final check to ensure all curves are smooth and all corresponding seams match perfectly.
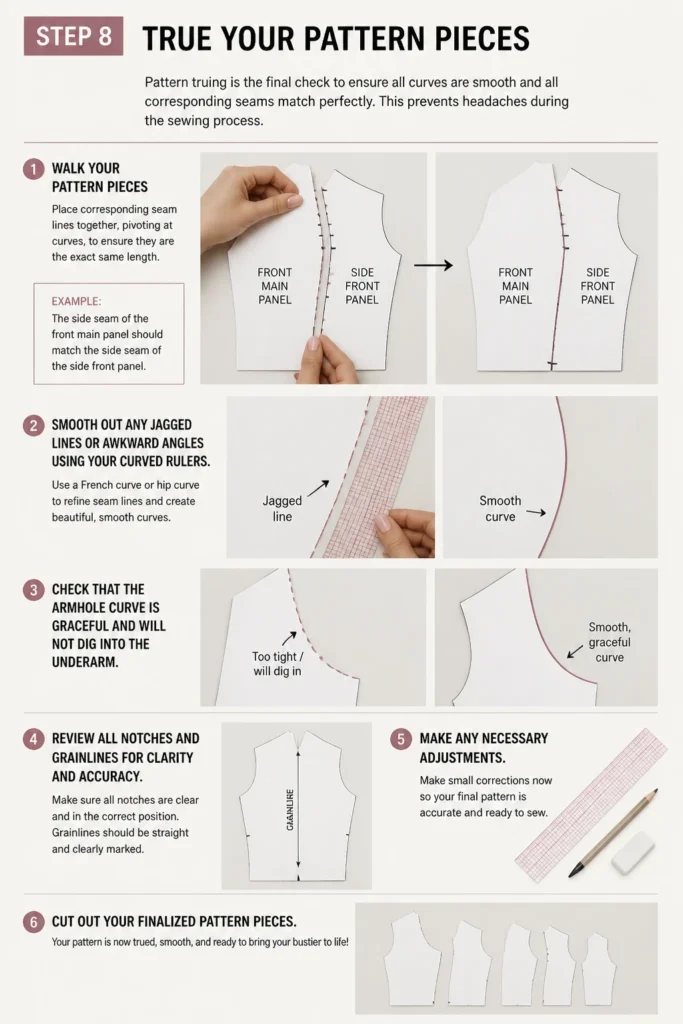
This prevents headaches during the sewing process.
- Walk your pattern pieces: Place corresponding seam lines together, pivoting at curves, to ensure they are the exact same length. For example, the side seam of the front main panel should match the side seam of the side front panel.
- Smooth out any jagged lines or awkward angles using your curved rulers.
- Check that the armhole curve is graceful and will not dig into the underarm.
- Review all notches and grainlines for clarity and accuracy. Make any necessary adjustments.
- Cut out your finalized pattern pieces.
Common Mistakes to Avoid
Ignoring Body Contours
Many beginners draft straight lines where curves should be. The human body is not a series of straight edges. Failing to incorporate sufficient contouring, especially at the bust and waist, will result in a boxy, ill-fitting garment that gaps or wrinkles. Always use curved rulers and ensure your darts and seams follow the natural curves of the body.
Inaccurate Measurements
The entire success of a custom pattern hinges on precise measurements. Rushing this step or measuring incorrectly will lead to a pattern that simply doesn’t fit. Double-check all measurements, ideally with a friend’s help, and compare them to a size chart if you’re unsure, though custom drafting aims to move beyond standard sizes.
Forgetting Seam Allowances and Notches
A pattern without seam allowances is unsewable without adding them during cutting, which often leads to inaccuracies. Similarly, missing notches make assembly difficult and prone to errors, as you won’t know which parts align. Always add these critical markings as the final step before cutting out your paper pattern.
Skipping Pattern Truing
It’s easy to assume your lines are perfect, but mistakes happen. Skipping the pattern truing step means you’ll only discover misaligned seams or uneven curves when you’re already cutting fabric or, worse, sewing. Take the time to “walk” your pattern pieces and smooth all lines; it saves significant time and frustration later.
Troubleshooting
Bustier Gaps at the Top Edge
If your bustier’s top edge, especially the neckline, gaps away from your body, it often means the pattern has too much width or not enough contouring in that area. To fix this, create small darts (slash and overlap) at the neckline on your pattern where the gaping occurs, effectively reducing the circumference. You can then blend these into existing seams or add new small darts.
Cups are Too Pointy or Flat
A pointy cup usually indicates the bust dart ends too close to the apex, or the dart intake is too large for the cup’s curvature. Redraw the dart ending further from the apex (1 to 1.5 inches). If the cup is too flat, it might lack sufficient dart intake or shaping. You may need to increase the dart volume or add a secondary dart from the underbust up to the apex for more projection.
Bustier Rides Up or Down
If the bustier consistently rides up, it might be too tight around the underbust or waist, or too loose at the shoulder/armhole, allowing it to shift. Conversely, if it slides down, it’s likely too loose overall, especially at the waist and underbust, failing to grip the body. Re-evaluate your underbust and waist measurements, ensuring there’s enough negative ease (slightly smaller than your body) for a snug fit, and check the vertical lengths.
Key Takeaways
- Accurate body measurements are the absolute cornerstone of a well-fitting bustier pattern.
- Darts are crucial for shaping a flat pattern into a three-dimensional garment that contours the body.
- Converting bust darts into princess seams or cup lines creates the signature bustier silhouette.
- Always add consistent seam allowances, clear grainlines, and precise notches to all pattern pieces.
- Pattern truing is a non-negotiable final step to ensure all seams will align and curves are smooth.
- Practice and patience are key; your first draft may require adjustments, which is part of the learning process.
Frequently Asked Questions
Can I use a commercial pattern as a starting point?
Yes, you can. A commercial pattern can be a helpful guide for understanding construction. However, you’ll still need to adjust it significantly using your personal measurements to achieve a truly custom fit, especially in the bust and waist areas, which are critical for a bustier.
What is “ease” and how much should I add?
Ease is the extra room added to a garment beyond your body measurements, allowing for movement and comfort. For a bustier, you generally want minimal ease, often referred to as “negative ease” (meaning the pattern is slightly smaller than your body) for a very snug fit, or just 1/2 inch to 1 inch of positive ease for a very close fit, especially around the bust and waist.
How do I make a toile (muslin) for fitting?
A toile or muslin is a test garment made from inexpensive fabric (like calico or muslin) using your drafted pattern. Cut out your pattern pieces in muslin, baste them together, and try it on. This allows you to identify and mark any fit issues directly on the fabric, which you can then transfer back to your paper pattern for adjustments before cutting your fashion fabric.
What fabric is best for a bustier?
Bustiers require fabrics with good structure and stability. Non-stretch fabrics like duchess satin, brocade, heavy cotton twill, or even leather are excellent choices. For lining, consider a stable cotton or silk. If using a stretch fabric, you’ll need to adjust your pattern for negative ease accordingly and potentially add boning for structure.
Our Top Recommended Finds
- Large Roll of Pattern Paper: Essential for drafting full-size pieces without running out. Look for non-fusible interfacing or medical exam table paper.
- French Curve and Hip Curve Ruler Set: These specialized rulers are invaluable for creating smooth, professional-looking armholes, necklines, and side seams.
- Tailor’s Chalk or Fabric Marking Pens: Crucial for transferring pattern markings onto your fabric accurately during the cutting and sewing stages.
Crafting Your Custom Fit
Drafting a bustier pattern is a journey of precision and creativity. Each line you draw, each dart you shape, brings you closer to a garment that celebrates your unique form.
Don’t be afraid to experiment, make mistakes, and learn from them; that’s how true mastery is achieved in pattern making.
Now, gather your tools, take a deep breath, and begin the rewarding process of bringing your vision to life today.
Beginner-friendly templates, step-by-step guides,
and weekly project ideas in your inbox.