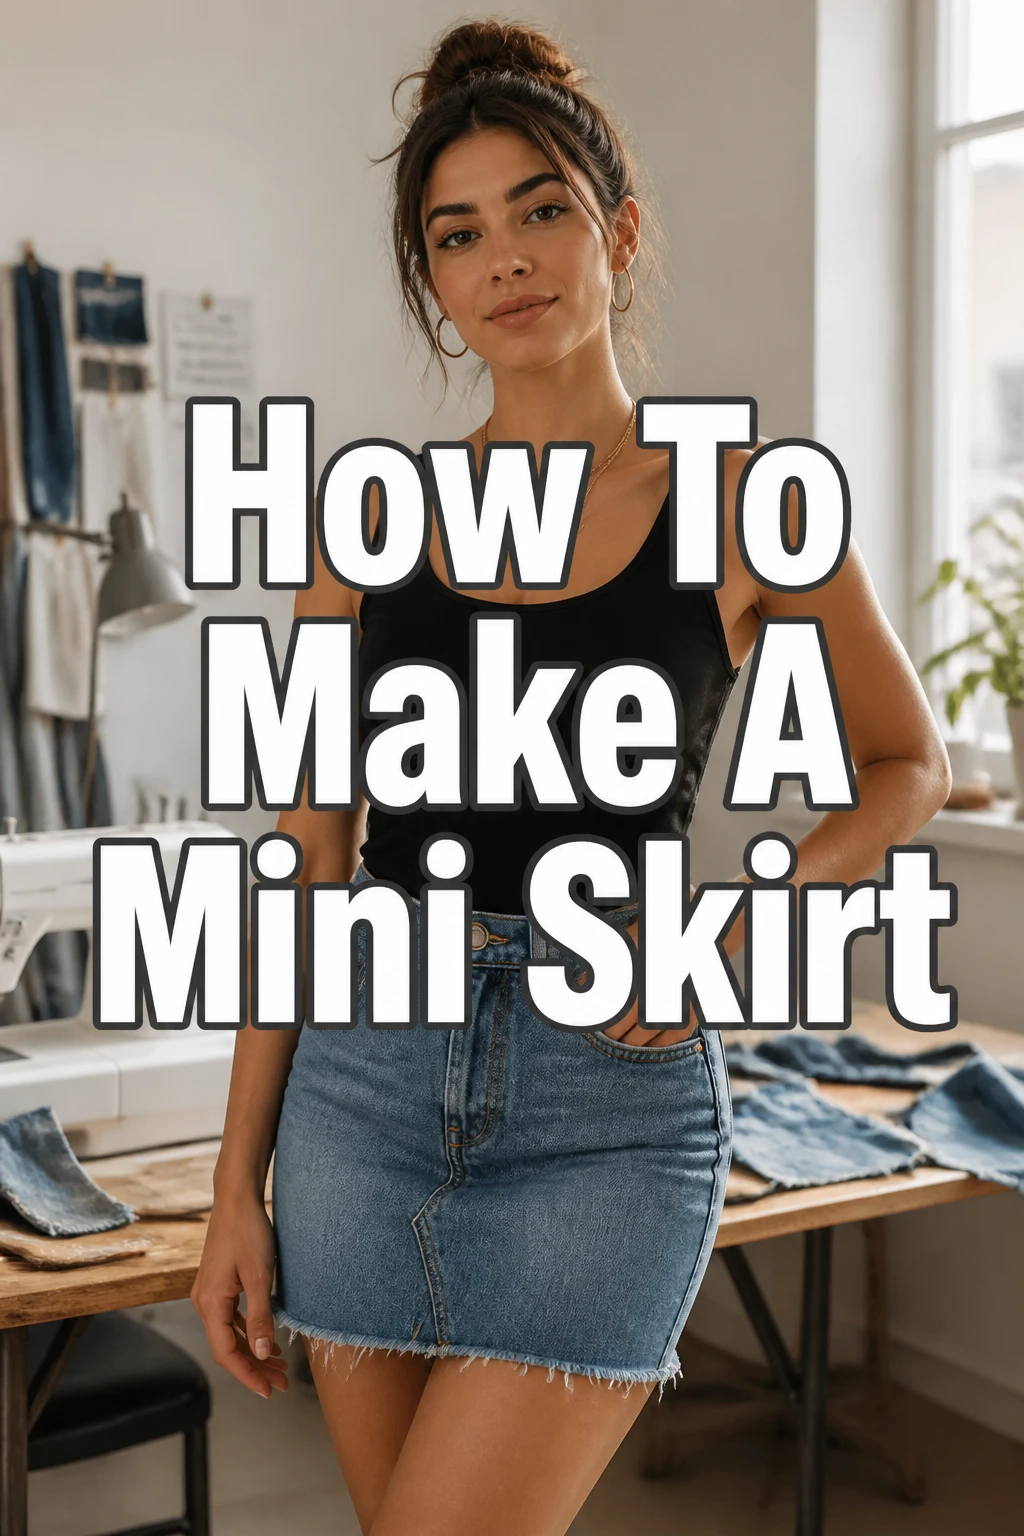
How To Make A Mini Skirt

Beginner-friendly templates, step-by-step guides,
and weekly project ideas in your inbox.
Dreaming of a custom mini skirt that perfectly fits your style and body?
Making your own clothing is incredibly rewarding, and a mini skirt is a fantastic project to start with.
I’ve sewn countless garments over the years, and a simple skirt was one of the first pieces I ever tackled, proving just how accessible this can be for anyone.
Quick Overview
This guide will walk you through creating a stylish and comfortable mini skirt from scratch.
You’ll learn essential sewing techniques that build confidence for future projects.
- Time needed: 3-5 hours (depending on experience)
- Difficulty: Beginner
- What you’ll need: Fabric, sewing machine, basic sewing tools, elastic
Step-by-Step Instructions
Step 1: Gather Your Materials and Tools
Collect all your necessary items before starting. This prevents interruptions and makes the process smoother.
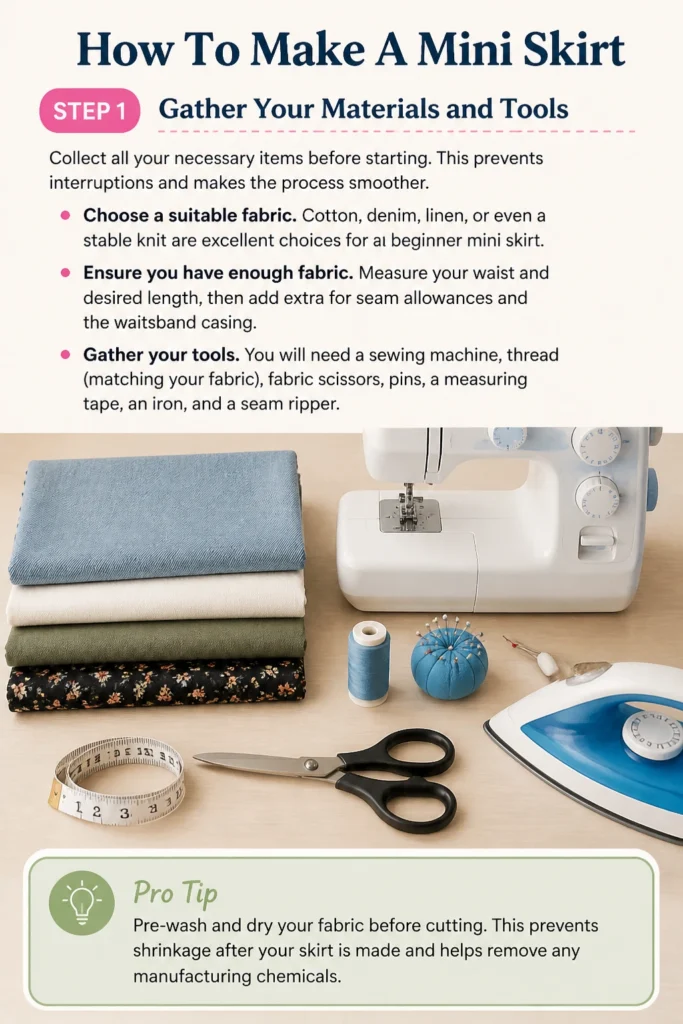
Choose a suitable fabric. Cotton, denim, linen, or even a stable knit are excellent choices for a beginner mini skirt.
Ensure you have enough fabric. Measure your waist and desired length, then add extra for seam allowances and the waistband casing.
Gather your sewing machine, thread (matching your fabric), fabric scissors, pins, a measuring tape, an iron, and a seam ripper.
Pro Tip: Pre-wash and dry your fabric before cutting. This prevents shrinkage after your skirt is made and helps remove any manufacturing chemicals.
Step 2: Take Measurements and Plan Your Pattern
Measure your natural waistline. This is usually the narrowest part of your torso.
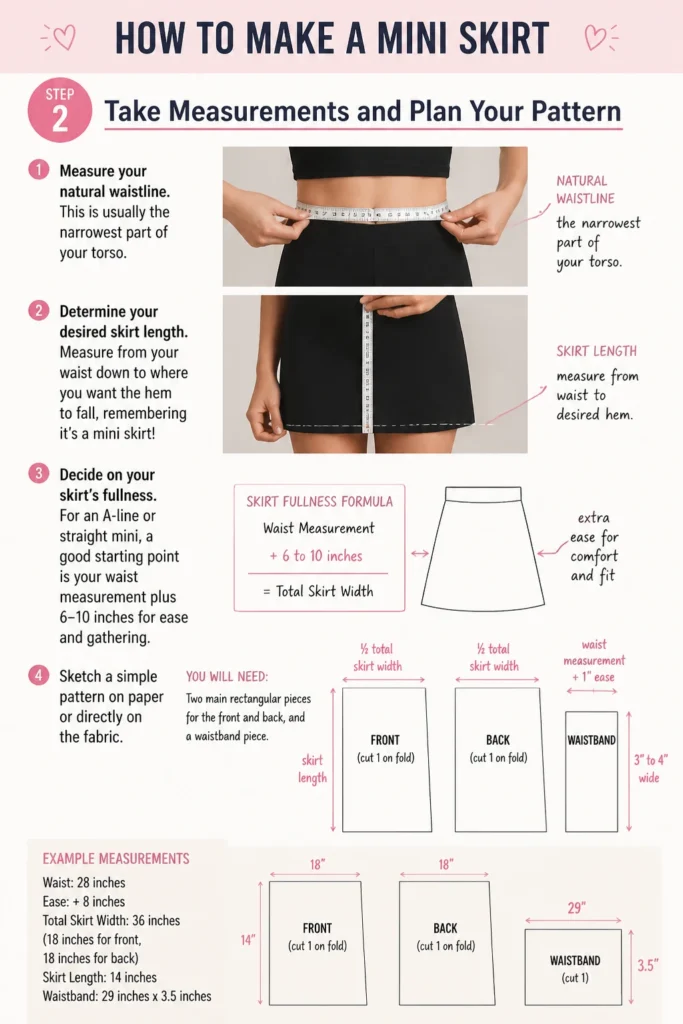
Determine your desired skirt length. Measure from your waist down to where you want the hem to fall, remembering it’s a mini skirt!
Decide on your skirt’s fullness. For an A-line or straight mini, a good starting point is your waist measurement plus 6-10 inches for ease and gathering.
Sketch a simple pattern on paper or directly on the fabric. You’ll need two main rectangular pieces for the front and back, and a waistband piece.
Step 3: Cut Your Fabric Pieces
Lay your pre-washed and ironed fabric flat. Ensure it’s smooth and free of wrinkles.
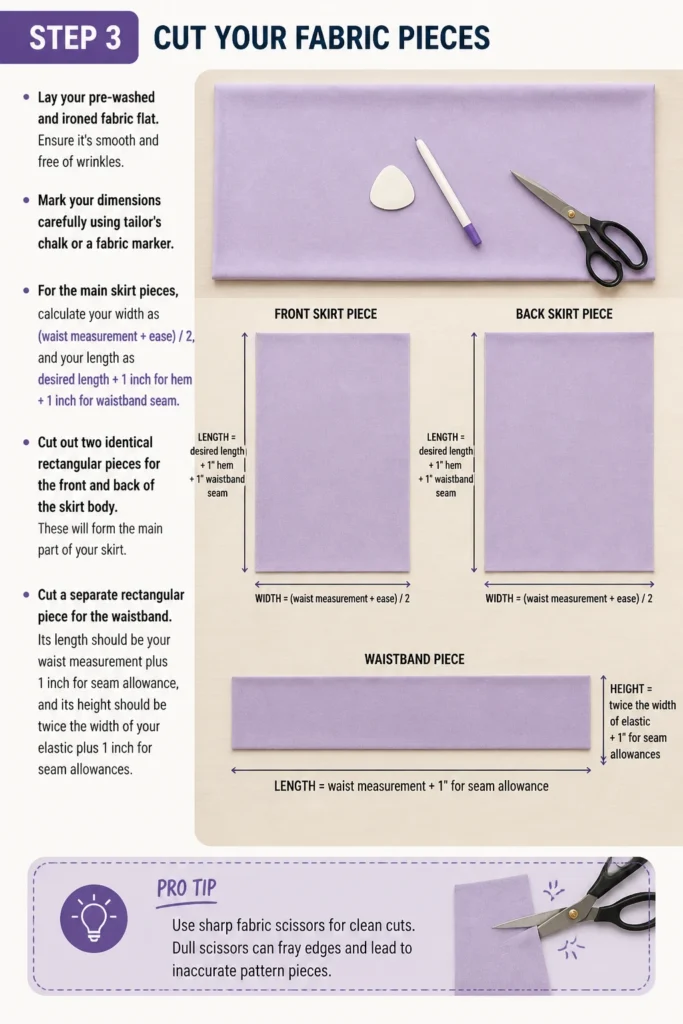
Mark your dimensions carefully using tailor’s chalk or a fabric marker. For the main skirt pieces, calculate your width as (waist measurement + ease) / 2, and your length as desired length + 1 inch for hem + 1 inch for waistband seam.
Cut out two identical rectangular pieces for the front and back of the skirt body. These will form the main part of your skirt.
Cut a separate rectangular piece for the waistband. Its length should be your waist measurement plus 1 inch for seam allowance, and its height should be twice the width of your elastic plus 1 inch for seam allowances.
Pro Tip: Use sharp fabric scissors for clean cuts. Dull scissors can fray edges and lead to inaccurate pattern pieces.
Step 4: Sew the Side Seams
Place the two main skirt pieces right sides together. Align the raw edges perfectly.
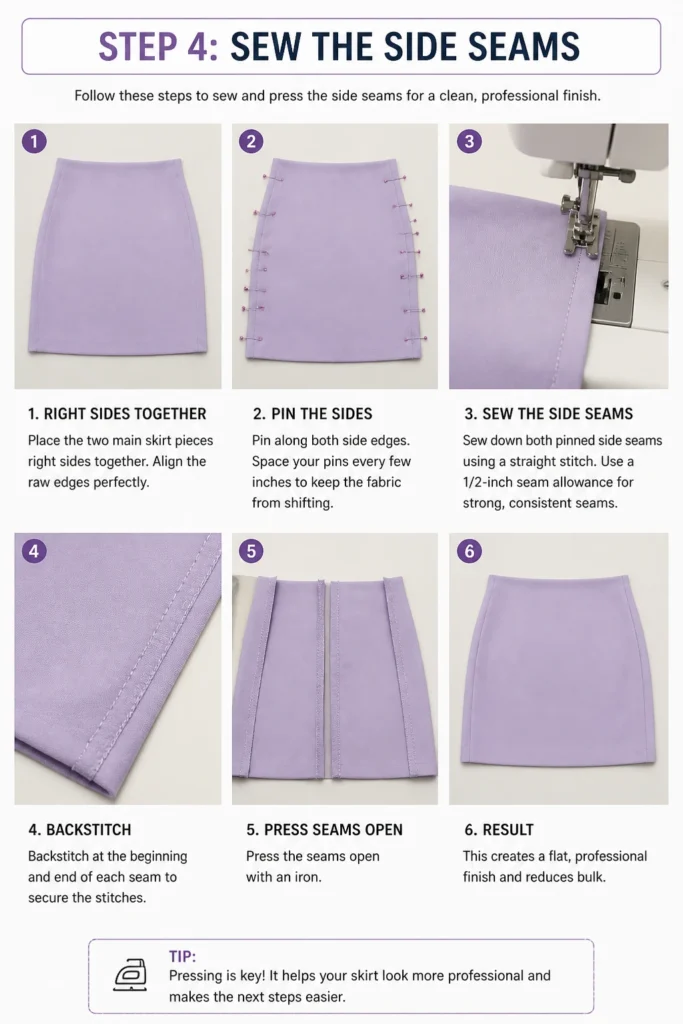
Pin along both side edges. Space your pins every few inches to keep the fabric from shifting.
Sew down both pinned side seams using a straight stitch. Use a 1/2-inch seam allowance for strong, consistent seams.
Backstitch at the beginning and end of each seam to secure the stitches.
Press the seams open with an iron. This creates a flat, professional finish and reduces bulk.
Step 5: Prepare and Attach the Waistband
Fold the waistband piece in half lengthwise, right sides together. Press the fold to create a crease.
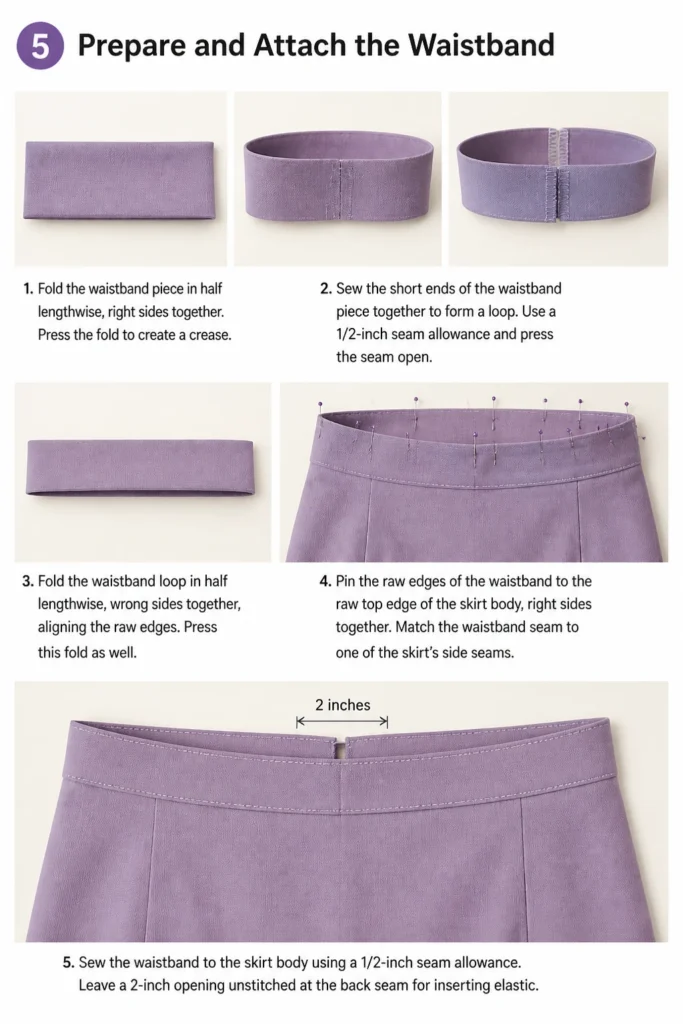
Sew the short ends of the waistband piece together to form a loop. Use a 1/2-inch seam allowance and press the seam open.
Fold the waistband loop in half lengthwise, wrong sides together, aligning the raw edges. Press this fold as well.
Pin the raw edges of the waistband to the raw top edge of the skirt body, right sides together. Match the waistband seam to one of the skirt’s side seams.
Sew the waistband to the skirt body using a 1/2-inch seam allowance. Leave a 2-inch opening unstitched at the back seam for inserting elastic.
Step 6: Create the Elastic Casing
Press the waistband seam allowance upwards, towards the waistband.
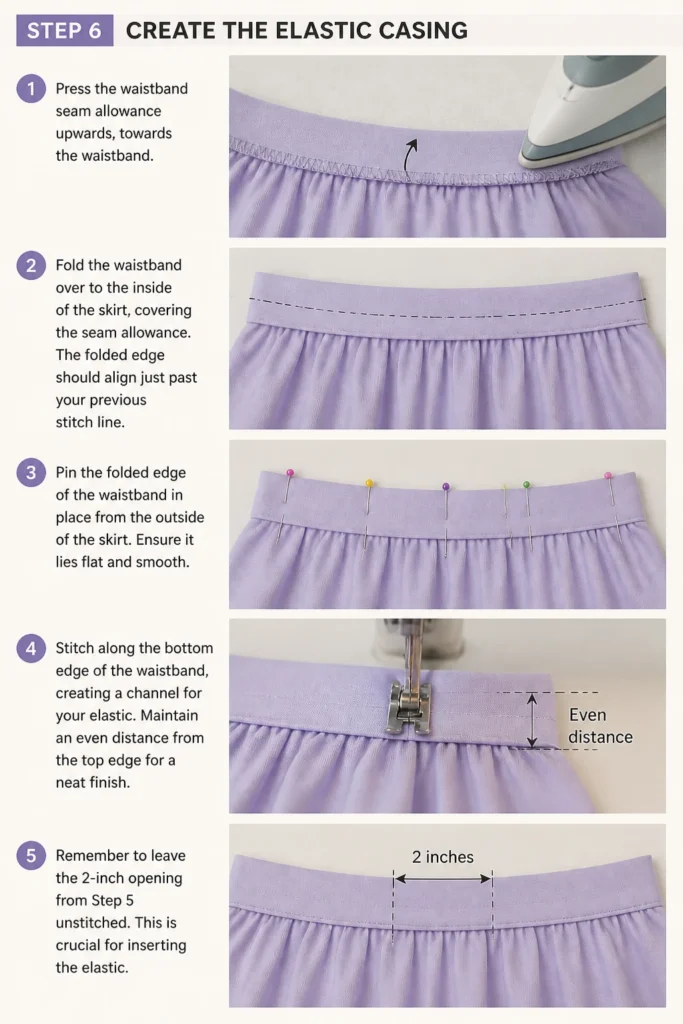
Fold the waistband over to the inside of the skirt, covering the seam allowance. The folded edge should align just past your previous stitch line.
Pin the folded edge of the waistband in place from the outside of the skirt. Ensure it lies flat and smooth.
Stitch along the bottom edge of the waistband, creating a channel for your elastic. Maintain an even distance from the top edge for a neat finish.
Remember to leave the 2-inch opening from Step 5 unstitched. This is crucial for inserting the elastic.
Step 7: Insert the Elastic
Measure your elastic. A good starting point is your natural waist measurement minus 2-4 inches, depending on how snug you like it.
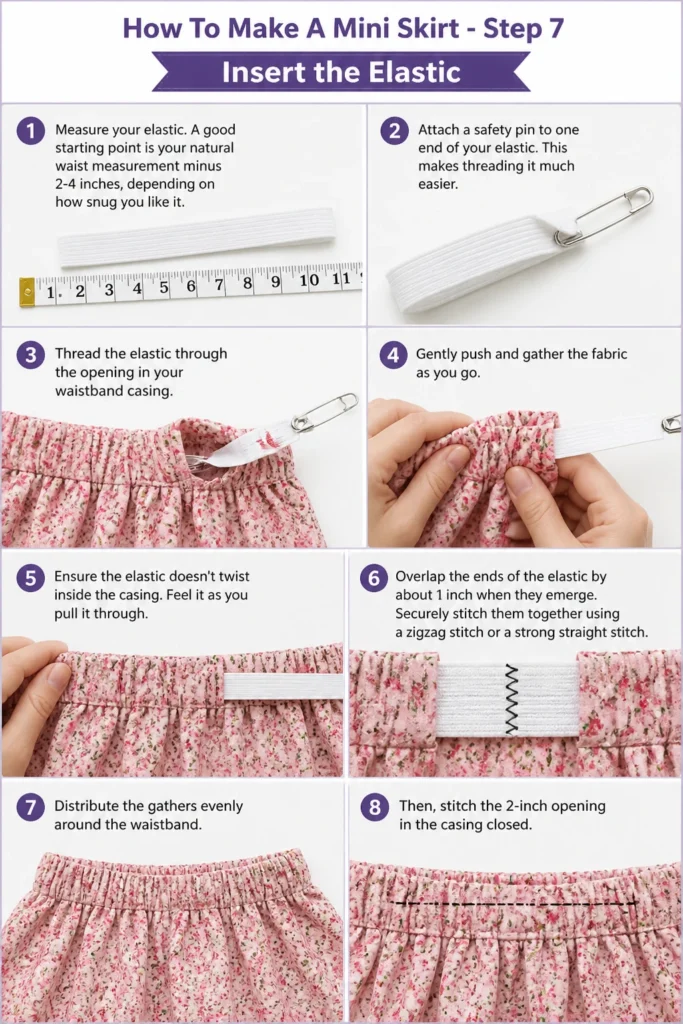
Attach a safety pin to one end of your elastic. This makes threading it much easier.
Thread the elastic through the opening in your waistband casing. Gently push and gather the fabric as you go.
Ensure the elastic doesn’t twist inside the casing. Feel it as you pull it through.
Overlap the ends of the elastic by about 1 inch when they emerge. Securely stitch them together using a zigzag stitch or a strong straight stitch.
Distribute the gathers evenly around the waistband. Then, stitch the 2-inch opening in the casing closed.
Step 8: Hem the Skirt
Try on your skirt to determine the final desired length. Mark where you want the hem to fall.
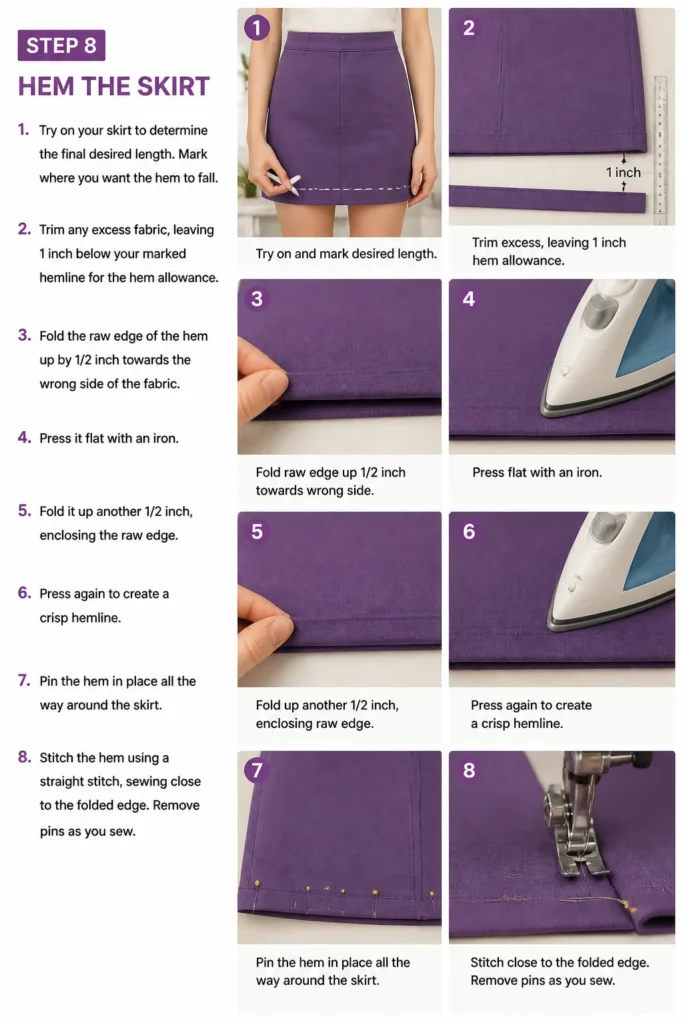
Trim any excess fabric, leaving 1 inch below your marked hemline for the hem allowance.
Fold the raw edge of the hem up by 1/2 inch towards the wrong side of the fabric. Press it flat with an iron.
Fold it up another 1/2 inch, enclosing the raw edge. Press again to create a crisp hemline.
Pin the hem in place all the way around the skirt.
Stitch the hem using a straight stitch, sewing close to the folded edge. Remove pins as you sew.
Common Mistakes to Avoid
Not Pre-Washing Fabric
Many beginners skip this step, eager to start sewing. However, most fabrics shrink when first washed, especially cottons and linens.
If you don’t pre-wash, your perfectly fitted skirt might become too tight after its first trip through the laundry. Always wash and dry your fabric as you would the finished garment.
Incorrect Seam Allowances
Inconsistent seam allowances lead to crooked seams and a garment that doesn’t fit as intended. A 1/2-inch seam allowance is standard for many patterns, but always check your specific instructions.
Use the guide marks on your sewing machine’s needle plate to maintain a straight and accurate seam allowance throughout your project.
Skipping Pressing Steps
Pressing isn’t just ironing; it’s a crucial part of garment construction. Pressing seams open or to one side helps define the shape of your garment and gives it a professional, crisp finish.
Neglecting to press will result in bulky, lumpy seams and a less polished appearance for your finished mini skirt.
Rushing the Cutting Process
Cutting your fabric accurately is just as important as sewing accurately. Any mistakes made during cutting will be carried through the entire project and are difficult to correct later.
Take your time, use sharp scissors, and double-check your measurements before making any cuts. Lay your fabric flat and smooth to prevent distortion.
Troubleshooting
Waistband Feels Too Tight or Too Loose
If your elastic waistband isn’t comfortable, it’s likely due to the elastic length. A too-short elastic will dig in, while a too-long one won’t keep the skirt up.
Carefully unpick the seam where you closed the elastic casing. Adjust the elastic length, trying it on if possible, then re-stitch the elastic ends and close the casing.
Hem is Uneven or Wavy
An uneven hem often results from not pressing properly or not trimming the excess fabric evenly. A wavy hem can also happen if you pull the fabric too much while sewing.
Use an iron to press the hem flat before stitching. If it’s still uneven, unpick the hem, re-trim the bottom edge evenly, and then re-fold and stitch, being careful not to stretch the fabric.
Stitches are Skipping or Bunching
Skipping stitches often indicates a dull or incorrect needle. Bunching can be a tension issue or incorrect threading of your machine.
First, change your needle to a fresh, sharp one appropriate for your fabric type. Then, re-thread your machine completely, checking both the top thread and bobbin. Adjust tension if necessary, typically starting with the default setting.
Key Takeaways
- Always pre-wash and dry your fabric to prevent future shrinkage.
- Accurate measuring and cutting are fundamental for a well-fitting skirt.
- Pressing seams as you go creates a professional and neat finish.
- Don’t be afraid to adjust elastic length for your perfect comfort.
- Take your time with each step; patience leads to better results.
- A simple elastic waistband mini skirt is a perfect project for beginners.
Frequently Asked Questions
What type of fabric is best for a first mini skirt project?
For beginners, woven cotton fabrics like broadcloth, poplin, or quilting cotton are ideal. They are easy to cut, don’t stretch, and hold their shape well, making them forgiving to sew.
How much fabric do I need for a mini skirt?
A good rule of thumb for a simple elastic waist mini skirt is one yard (about 36 inches) of fabric. This typically accommodates most waist sizes and mini skirt lengths, with some room for error.
Can I make this skirt without a sewing machine?
While possible with hand sewing, it will take significantly longer and the seams may not be as durable. A sewing machine is highly recommended for efficiency and strength, but basic hand stitches can be used if you’re patient.
How do I make the skirt less see-through if my fabric is thin?
If your chosen fabric is lightweight or sheer, you can add a lining. Cut an identical set of skirt body pieces from a lighter, complementary fabric like rayon lining or cotton voile and sew it in before attaching the waistband.
Our Top Recommended Finds
- Good Quality Fabric Shears: Sharp scissors make all the difference for clean, accurate cuts. Invest in a pair specifically for fabric.
- Fabric Markers or Tailor’s Chalk: These tools allow you to mark your fabric clearly without leaving permanent stains.
- Seam Ripper: Every sewer needs one! It’s indispensable for correcting mistakes without damaging your fabric.
Your Custom Mini Skirt Awaits
You’ve now learned the fundamental steps to craft your very own mini skirt. This project is more than just sewing; it’s about creating something unique that reflects your personal style.
The skills you’ve gained here are transferable to countless other sewing projects, from simple tops to more complex dresses.
Don’t hesitate to experiment with different fabrics, colors, and embellishments to make your mini skirt truly yours. Grab your materials and start sewing today!
Beginner-friendly templates, step-by-step guides,
and weekly project ideas in your inbox.