How To Make A Phone Stand

Beginner-friendly templates, step-by-step guides,
and weekly project ideas in your inbox.
I remember struggling to watch cooking videos or join video calls, always propping my phone precariously against whatever was handy.
It was frustrating, often leading to a sudden tumble right at a crucial moment.
Through countless DIY experiments, I discovered simple, effective ways to create reliable phone stands that genuinely work.
Quick Overview
This guide will walk you through creating a sturdy, functional phone stand using common household materials. You’ll build a reliable holder that keeps your device stable for hands-free viewing, video calls, or charging.
- Time needed: 45-75 minutes
- Difficulty: Beginner
- What you’ll need: Cardboard, ruler, pencil, utility knife, strong glue
Step-by-Step Instructions
Step 1: Gather Your Tools and Materials
Collect all the necessary items before you begin your project.
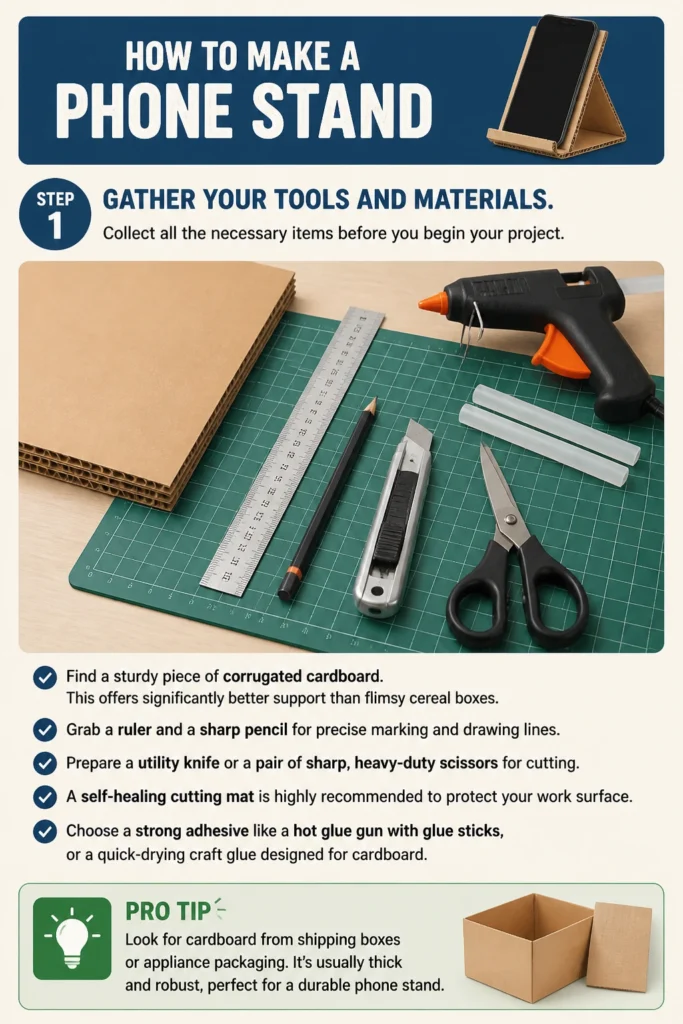
- Find a sturdy piece of corrugated cardboard. This offers significantly better support than flimsy cereal boxes.
- Grab a ruler and a sharp pencil for precise marking and drawing lines.
- Prepare a utility knife or a pair of sharp, heavy-duty scissors for cutting. A self-healing cutting mat is highly recommended to protect your work surface.
- Choose a strong adhesive like a hot glue gun with glue sticks, or a quick-drying craft glue designed for cardboard.
Pro Tip: Look for cardboard from shipping boxes or appliance packaging. It’s usually thick and robust, perfect for a durable phone stand.
Step 2: Measure and Mark Your Pieces
Outline the individual components of your stand onto the cardboard. Accuracy here ensures a stable final product.
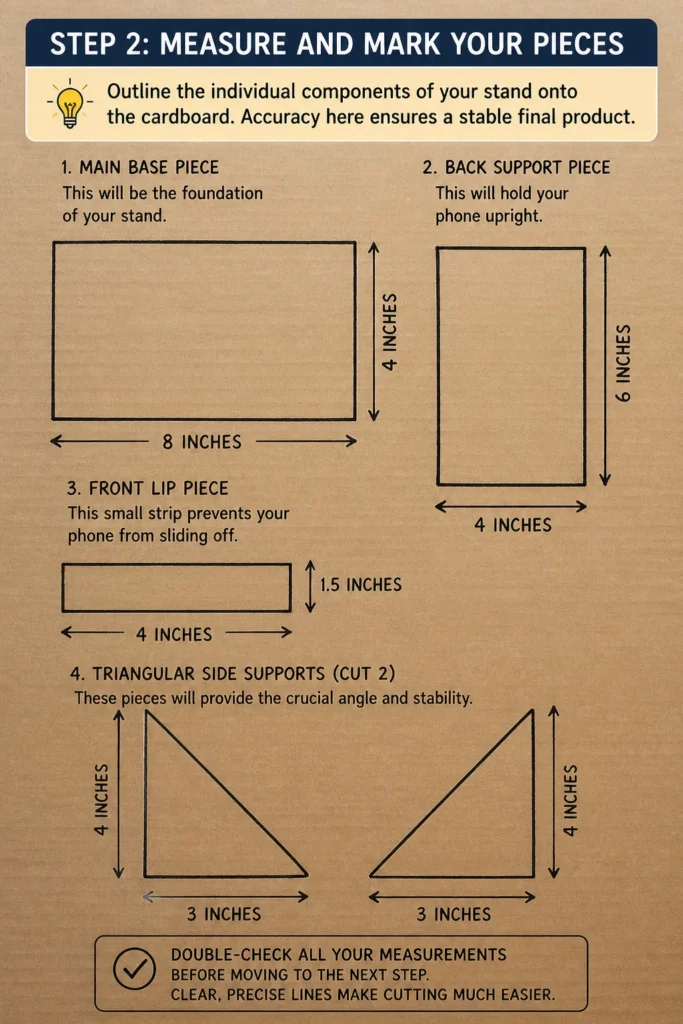
- Draw the main base piece. This will be the foundation of your stand. A good starting size is 8 inches long by 4 inches wide.
- Mark the back support piece. This will hold your phone upright. Make it 6 inches high by 4 inches wide.
- Sketch the front lip piece. This small strip prevents your phone from sliding off. It should be 1.5 inches high by 4 inches wide.
- Design two triangular side supports. These pieces will provide the crucial angle and stability. For each, draw a right-angle triangle with a base of 3 inches and a height of 4 inches.
Double-check all your measurements before moving to the next step. Clear, precise lines make cutting much easier.
Step 3: Carefully Cut Out Your Components
Execute precise cuts along the lines you’ve drawn. Take your time for clean edges.
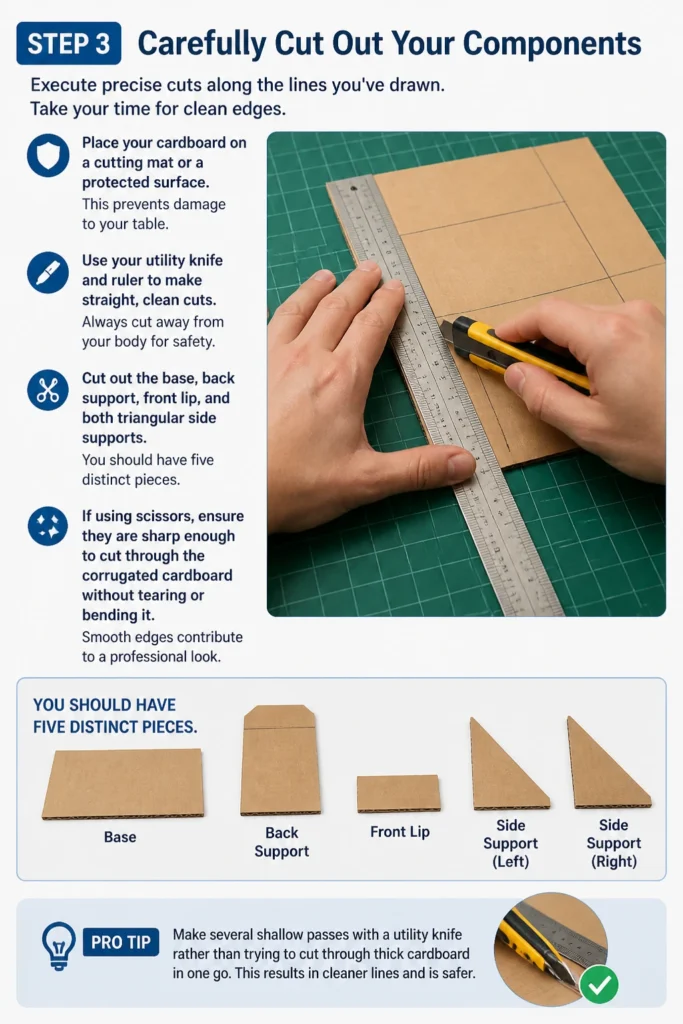
- Place your cardboard on a cutting mat or a protected surface. This prevents damage to your table.
- Use your utility knife and ruler to make straight, clean cuts. Always cut away from your body for safety.
- Cut out the base, back support, front lip, and both triangular side supports. You should have five distinct pieces.
If using scissors, ensure they are sharp enough to cut through the corrugated cardboard without tearing or bending it. Smooth edges contribute to a professional look.
Pro Tip: Make several shallow passes with a utility knife rather than trying to cut through thick cardboard in one go. This results in cleaner lines and is safer.
Step 4: Prepare the Back Support Angle
Set the foundation for your phone’s viewing angle. The side supports will define this.
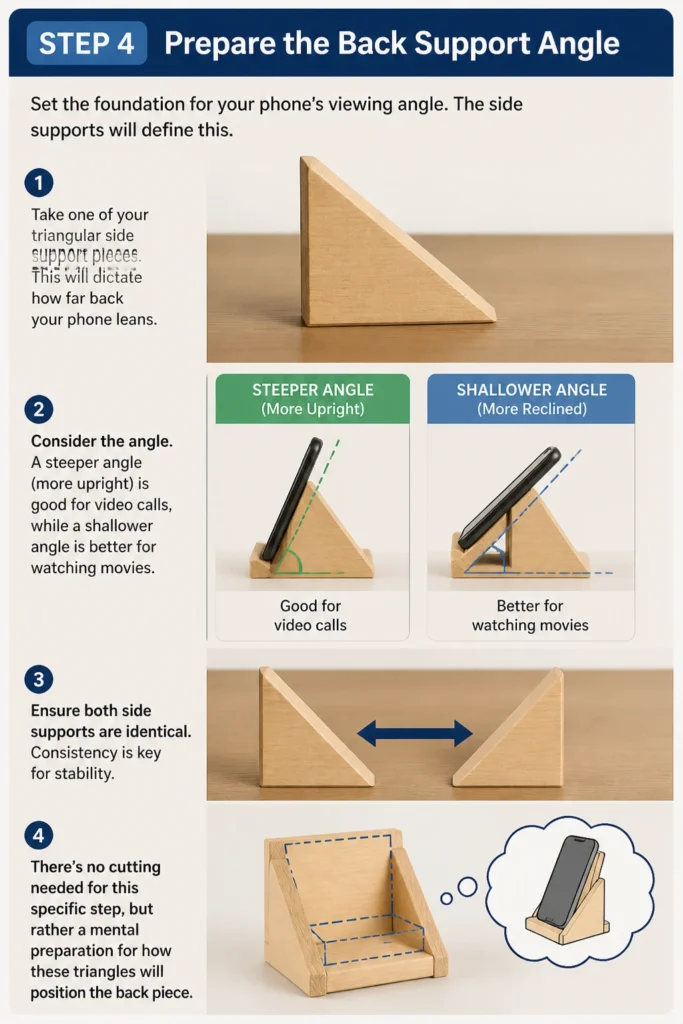
- Take one of your triangular side support pieces. This will dictate how far back your phone leans.
- Consider the angle. A steeper angle (more upright) is good for video calls, while a shallower angle is better for watching movies.
- Ensure both side supports are identical. Consistency is key for stability.
There’s no cutting needed for this specific step, but rather a mental preparation for how these triangles will position the back piece.
Step 5: Assemble the Base and Front Lip
Begin the construction by attaching the first two pieces. This forms the front part of your stand.
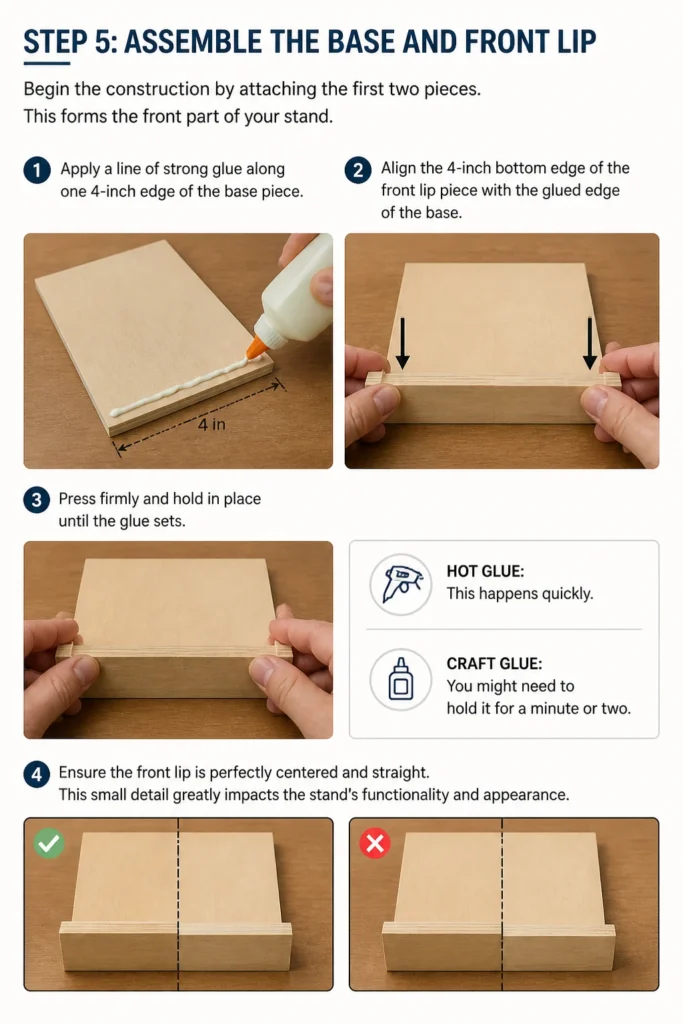
- Apply a line of strong glue along one 4-inch edge of the base piece.
- Align the 4-inch bottom edge of the front lip piece with the glued edge of the base.
- Press firmly and hold in place until the glue sets. If using hot glue, this happens quickly. For craft glue, you might need to hold it for a minute or two.
Ensure the front lip is perfectly centered and straight. This small detail greatly impacts the stand’s functionality and appearance.
Step 6: Attach the Back Support
Connect the main upright piece to the base. This forms the primary structure of your stand.
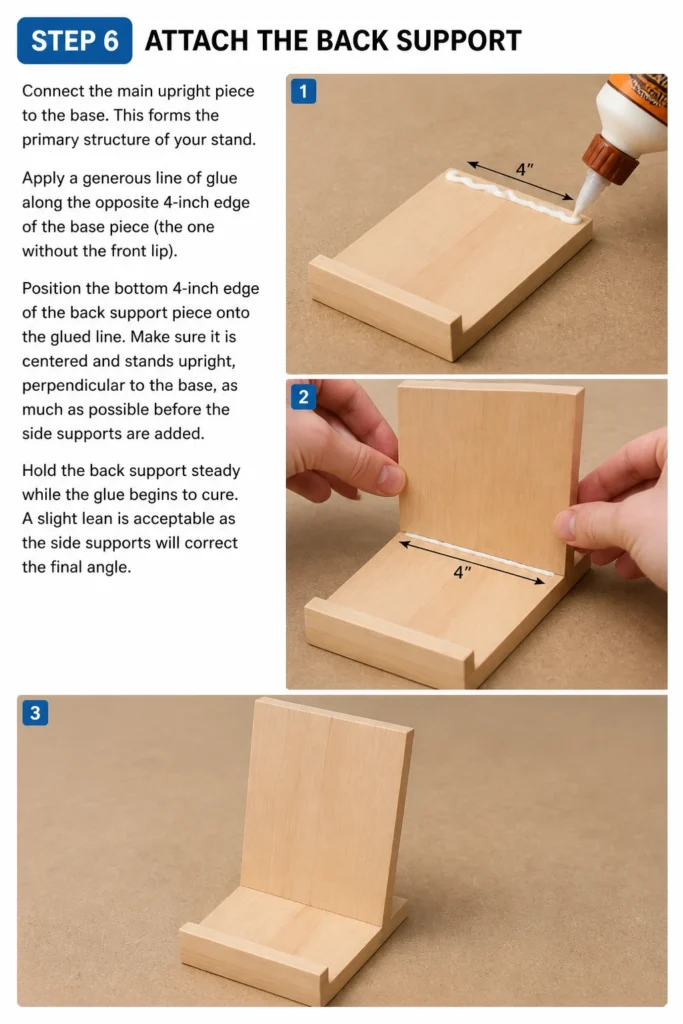
- Apply a generous line of glue along the opposite 4-inch edge of the base piece (the one without the front lip).
- Position the bottom 4-inch edge of the back support piece onto the glued line.
- Make sure it is centered and stands upright, perpendicular to the base, as much as possible before the side supports are added.
Hold the back support steady while the glue begins to cure. A slight lean is acceptable as the side supports will correct the final angle.
Step 7: Secure the Side Supports
Add the crucial elements that provide stability and define your phone’s viewing angle.
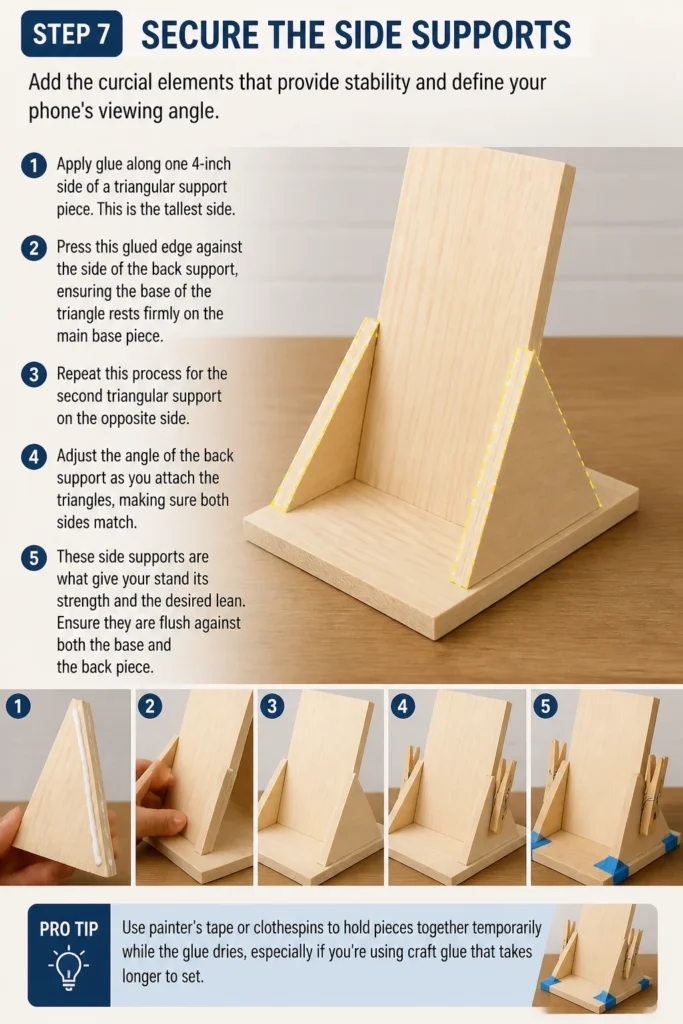
- Apply glue along one 4-inch side of a triangular support piece. This is the tallest side.
- Press this glued edge against the side of the back support, ensuring the base of the triangle rests firmly on the main base piece.
- Repeat this process for the second triangular support on the opposite side.
- Adjust the angle of the back support as you attach the triangles, making sure both sides match.
These side supports are what give your stand its strength and the desired lean. Ensure they are flush against both the base and the back piece.
Pro Tip: Use painter’s tape or clothespins to hold pieces together temporarily while the glue dries, especially if you’re using craft glue that takes longer to set.
Step 8: Reinforce All Joints
Strengthen your stand by adding extra adhesive where pieces meet. This prevents future wobbles.
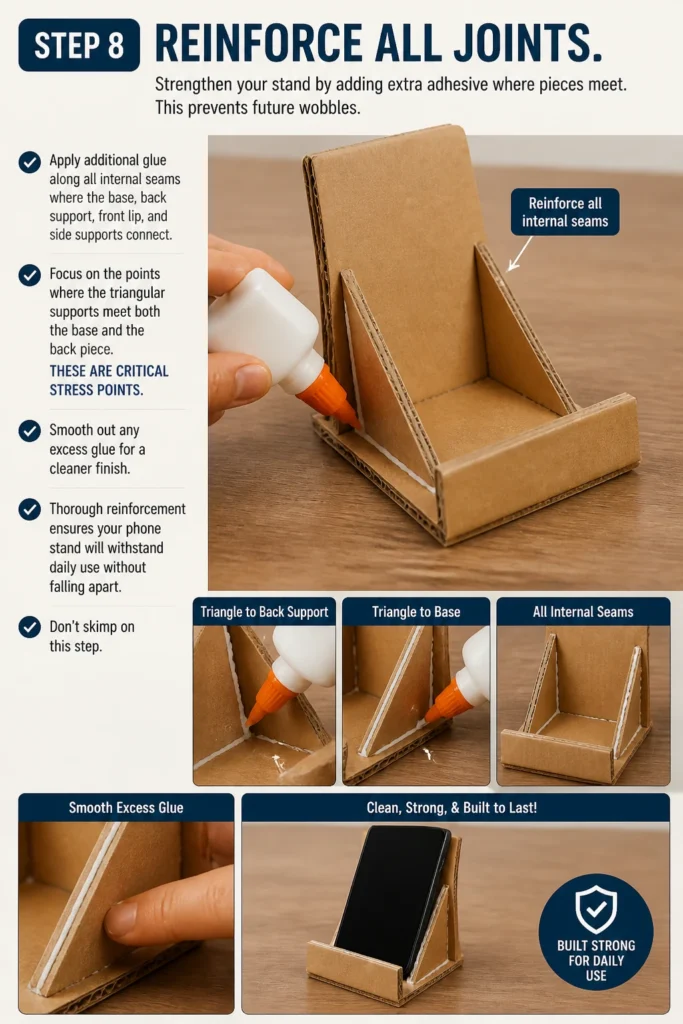
- Apply additional glue along all internal seams where the base, back support, front lip, and side supports connect.
- Focus on the points where the triangular supports meet both the base and the back piece. These are critical stress points.
- Smooth out any excess glue for a cleaner finish.
Thorough reinforcement ensures your phone stand will withstand daily use without falling apart. Don’t skimp on this step.
Step 9: Allow for Curing and Finishing Touches
Finalize your creation by letting the glue completely dry and adding any personal flair.
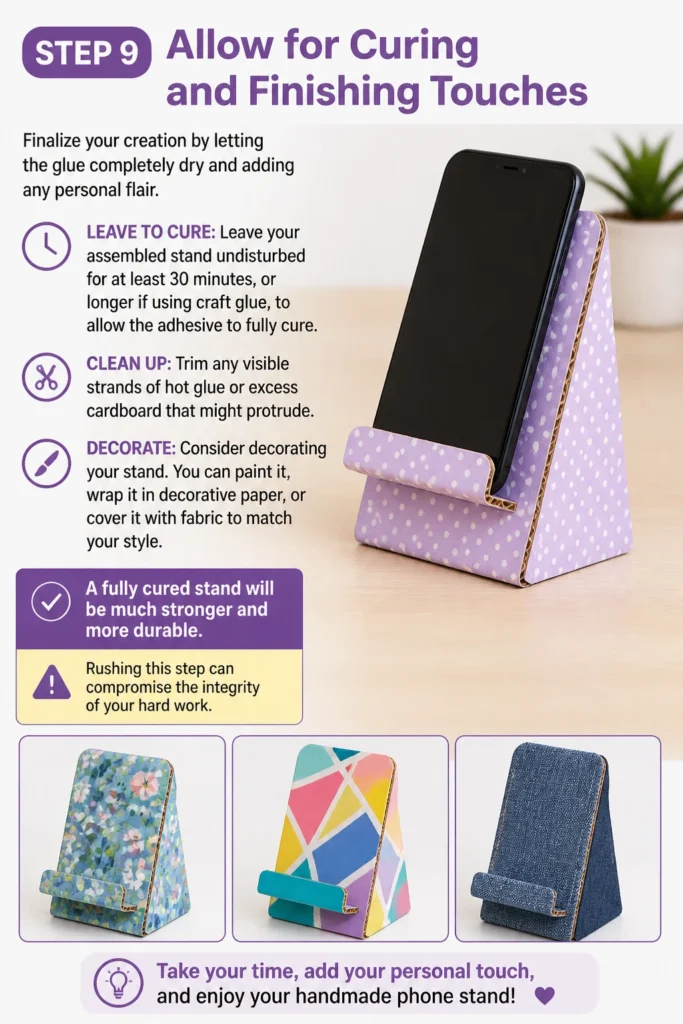
- Leave your assembled stand undisturbed for at least 30 minutes, or longer if using craft glue, to allow the adhesive to fully cure.
- Trim any visible strands of hot glue or excess cardboard that might protrude.
- Consider decorating your stand. You can paint it, wrap it in decorative paper, or cover it with fabric to match your style.
A fully cured stand will be much stronger and more durable. Rushing this step can compromise the integrity of your hard work.
Step 10: Test Your Stand
Verify that your new phone stand performs as expected. This is the moment of truth.
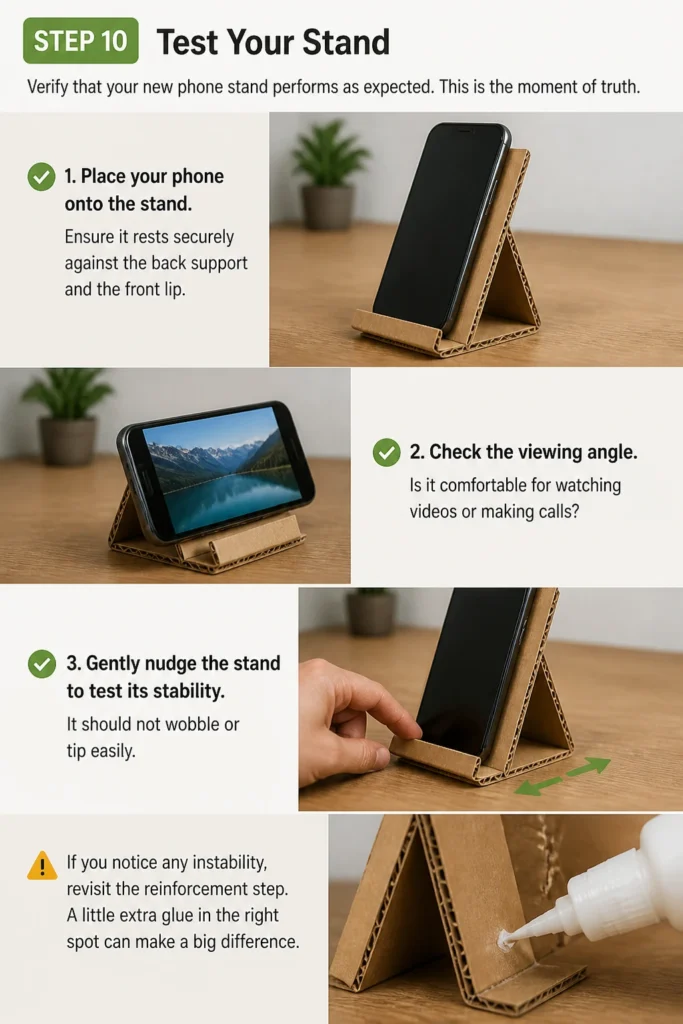
- Place your phone onto the stand. Ensure it rests securely against the back support and the front lip.
- Check the viewing angle. Is it comfortable for watching videos or making calls?
- Gently nudge the stand to test its stability. It should not wobble or tip easily.
If you notice any instability, revisit the reinforcement step. A little extra glue in the right spot can make a big difference.
Common Mistakes to Avoid
Using Flimsy Materials
Many people grab the nearest piece of cardboard, often thin material like a cereal box. This type of cardboard lacks the structural integrity needed to support a phone, leading to a wobbly or collapsed stand.
Always opt for corrugated cardboard, which has a fluted layer between two flat sheets. This design provides significant strength and rigidity, ensuring your stand is durable and stable.
Incorrect Angles or Dimensions
Guessing measurements or not paying attention to the angles of the support pieces can result in a stand that’s either too upright (making it tip backward) or too reclined (making your phone slide forward). Incorrect dimensions can also make the stand too small or unstable for your device.
Use a ruler and pencil for all markings, and double-check your measurements before cutting. The triangular side supports are crucial for the angle, so ensure they are cut precisely and attached correctly to provide optimal balance and viewing.
Insufficient Glue or Weak Adhesion
Applying too little glue, using the wrong type of adhesive, or not allowing enough drying time are common pitfalls. This leads to joints that separate easily, causing the stand to fall apart with minimal pressure.
Always use a strong adhesive like hot glue or a sturdy craft glue designed for cardboard. Apply generous amounts to all contact points and reinforce seams. Most importantly, allow the glue to fully cure as per the product instructions before placing your phone on the stand.
Rushing the Assembly Process
Impatience during the building process can lead to misaligned pieces, crooked cuts, or weak bonds. Rushing through steps often results in a less aesthetically pleasing and less functional stand.
Take your time with each step, from measuring and cutting to gluing and reinforcing. Precision and patience will yield a much better outcome, ensuring your phone stand is both attractive and highly functional.
Troubleshooting
Stand Topples Over Easily
If your stand is unstable and tips backward or forward with your phone, the angle of the back support might be incorrect, or the base might be too narrow. The side supports might not be providing enough leverage.
You can add a wider, heavier base layer to the bottom of your existing stand for increased stability. Alternatively, re-evaluate the angle of your side supports; a slightly more reclined back (larger angle between base and back) often provides better balance. Ensure all glue joints are secure and reinforced.
Phone Slips Off the Lip
A phone sliding off the front lip indicates the lip is too short, or the material is too smooth. This can be frustrating, especially if your phone has a smooth back.
Increase the height of the front lip by gluing an additional strip of cardboard on top of the existing one. For added grip, glue a small piece of non-slip material, like felt, rubber, or even a strip of sandpaper, onto the surface of the front lip where the phone rests.
Stand Wobbly or Unstable
A general wobble suggests that pieces are not perfectly aligned, or the glue joints are not strong enough. This can happen if pieces were cut unevenly or if the glue didn’t fully bond.
Inspect all the joints. Apply additional glue to any seams that appear weak or have gaps. Ensure all pieces are flush where they meet. For persistent wobbles, you might need to add small, internal cardboard braces or gussets in the corners where the side supports meet the back and base for extra rigidity.
Key Takeaways
- Choosing sturdy, corrugated cardboard is fundamental for a durable phone stand.
- Accurate measurements and precise cuts are essential for stability and a professional finish.
- The angle created by the side supports is crucial for optimal viewing and preventing tips.
- Using a strong adhesive and allowing ample drying time ensures lasting structural integrity.
- Reinforcing all joints with extra glue significantly enhances the stand’s strength and longevity.
- Don’t hesitate to personalize your stand with paint or decorative coverings to match your style.
Frequently Asked Questions
Can I make this stand foldable?
Yes, you can modify this design to be foldable, though it adds a layer of complexity. Instead of fixed glue joints, you would need to create interlocking slots or use small hinges at the base and where the back support connects. This allows the stand to collapse flat for easy transport.
What if I don’t have cardboard?
There are many alternative materials. You can make a stand from PVC pipes, old credit cards (interlocking design), binder clips, or even LEGO bricks. Wood is another excellent option for a more permanent and robust stand, requiring different tools and techniques.
How can I make it look nicer?
Personalizing your stand is easy! After the glue has fully dried, you can paint it with acrylic paints, wrap it in decorative paper or fabric, or even cover it with self-adhesive vinyl. Adding small rubber feet to the bottom can also prevent it from sliding on smooth surfaces.
Will it hold a tablet?
This specific cardboard design is best suited for smartphones. For a tablet, you would need to significantly increase all dimensions, especially the width of the base and the height of the back support and front lip. You would also need to use much thicker, stronger cardboard or switch to a more rigid material like wood or thick plastic to support the tablet’s weight.
Our Top Recommended Finds
- Heavy-Duty Utility Knife: Essential for making clean, straight cuts in cardboard and other materials with precision and safety.
- Hot Glue Gun Kit: Provides quick, strong adhesion, allowing for fast assembly and immediate reinforcement of your stand’s joints.
- Self-Healing Cutting Mat: Protects your work surface from knife damage and provides a stable, non-slip base for all your cutting tasks.
Build Your Perfect Viewing Companion Today
You now have all the knowledge and steps to create a functional, sturdy phone stand. No more propping your device against precarious objects or straining your neck during video calls.
The satisfaction of crafting something useful with your own hands is truly rewarding. This project is just the beginning of your DIY journey.
Don’t let a wobbly phone ruin your experience any longer. Gather your materials and start building your custom phone stand today!
Beginner-friendly templates, step-by-step guides,
and weekly project ideas in your inbox.