How To Make A Book Bouquet

Beginner-friendly templates, step-by-step guides,
and weekly project ideas in your inbox.
I remember the first time I presented a book bouquet to a dear friend who was celebrating her debut novel release.
The look of pure wonder on her face as she realized the flowers were made from the pages of a classic story was worth every hour of folding.
Having crafted dozens of these for weddings, anniversaries, and graduations, I have learned that this is more than just a craft; it is a way to make literature tangible and permanent.
Quick Overview
Creating a book bouquet is a meditative process that transforms old paper into a stunning, everlasting arrangement.
This project requires patience and a gentle hand, but the results are far more personal than any store-bought floral arrangement could ever be.
- Time needed: 3 to 5 hours depending on the number of flowers
- Difficulty: Intermediate
- What you’ll need: Damaged or thrifted books, floral wire (18-22 gauge), hot glue gun, floral tape, scissors, wire cutters, and decorative ribbon.
Step 1: Select the Perfect Source Material
Choose a book that has sentimental value or a beautiful aesthetic, but ensure it is a copy that is already damaged or destined for the recycling bin.
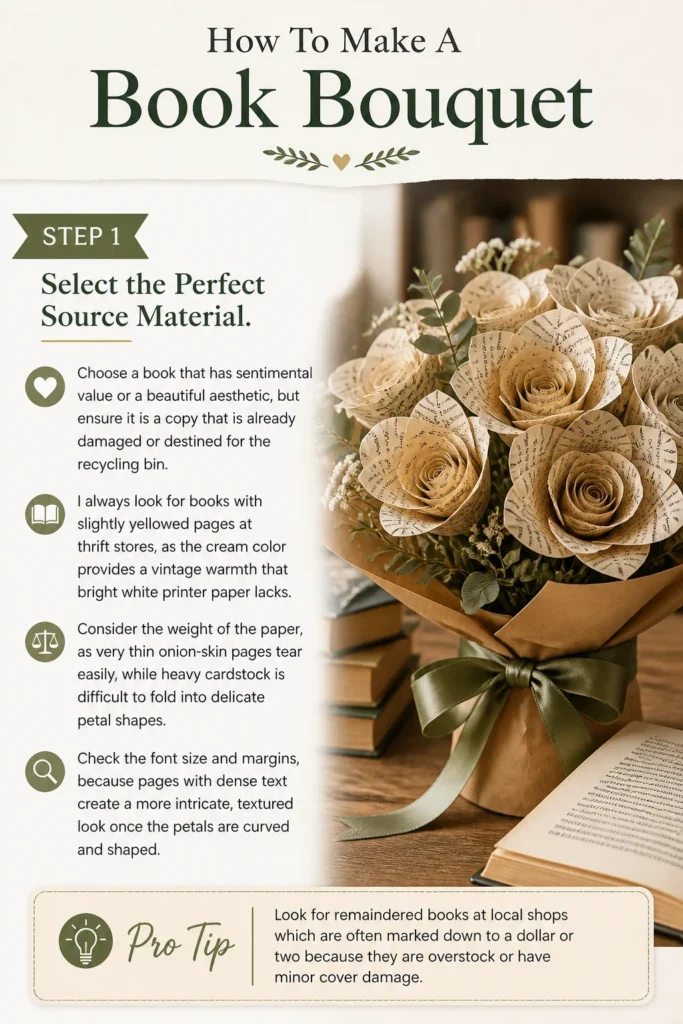
I always look for books with slightly yellowed pages at thrift stores, as the cream color provides a vintage warmth that bright white printer paper lacks.
Consider the weight of the paper, as very thin onion-skin pages tear easily, while heavy cardstock is difficult to fold into delicate petal shapes.
Check the font size and margins, because pages with dense text create a more intricate, textured look once the petals are curved and shaped.
Pro Tip: Look for “remaindered” books at local shops which are often marked down to a dollar or two because they are overstock or have minor cover damage.
Step 2: Prepare Your Work Space and Paper
Clear a large, flat surface where you can spread out your materials and leave them safely if you need to take a break.
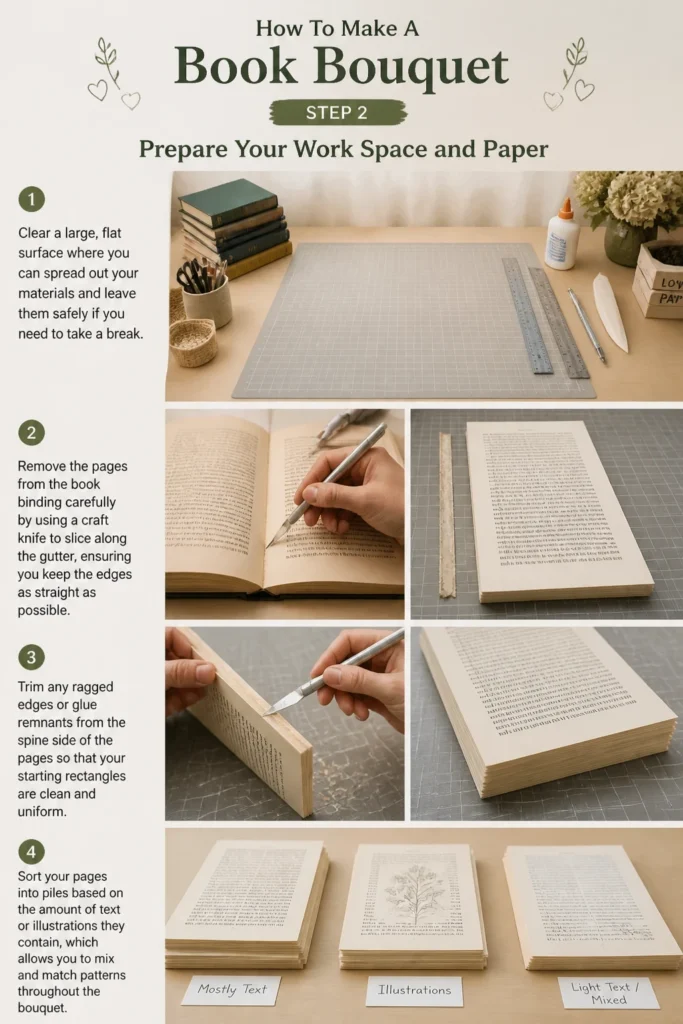
Remove the pages from the book binding carefully by using a craft knife to slice along the gutter, ensuring you keep the edges as straight as possible.
Trim any ragged edges or glue remnants from the spine side of the pages so that your starting rectangles are clean and uniform.
Sort your pages into piles based on the amount of text or illustrations they contain, which allows you to mix and match patterns throughout the bouquet.
Step 3: Cut and Square Your Pages
Measure and cut your pages into perfect squares, as most paper flower techniques require a square base to ensure symmetry.
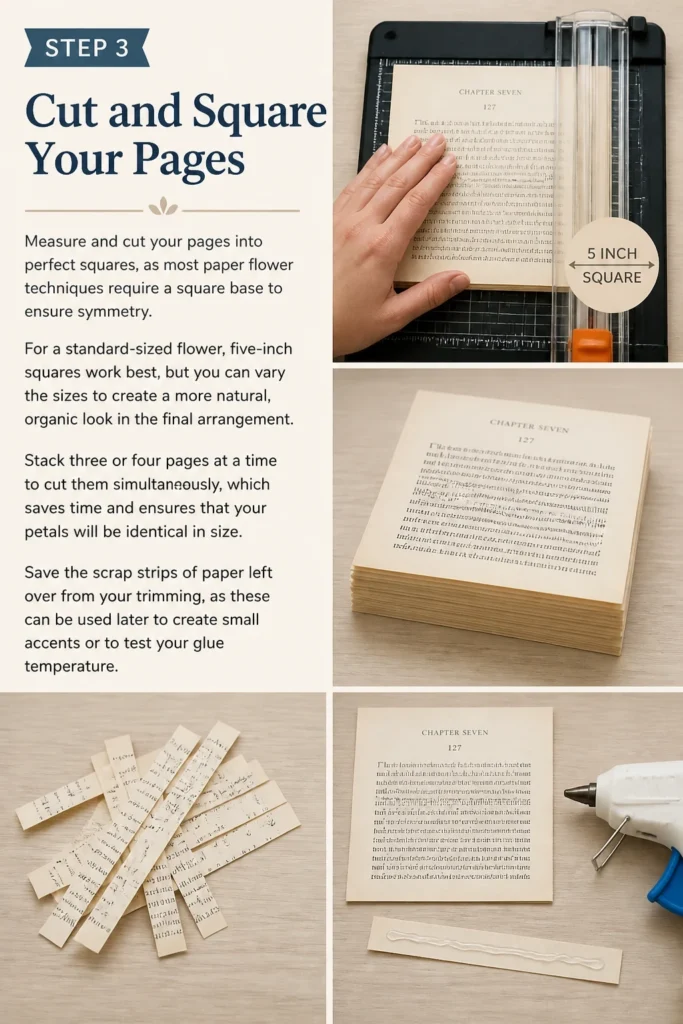
For a standard-sized flower, five-inch squares work best, but you can vary the sizes to create a more natural, organic look in the final arrangement.
Stack three or four pages at a time to cut them simultaneously, which saves time and ensures that your petals will be identical in size.
Save the scrap strips of paper left over from your trimming, as these can be used later to create small accents or to test your glue temperature.
Step 4: Fold the Individual Petals
Fold a square of paper diagonally to create a triangle, then bring the two bottom corners up to the top peak to form a smaller diamond shape.
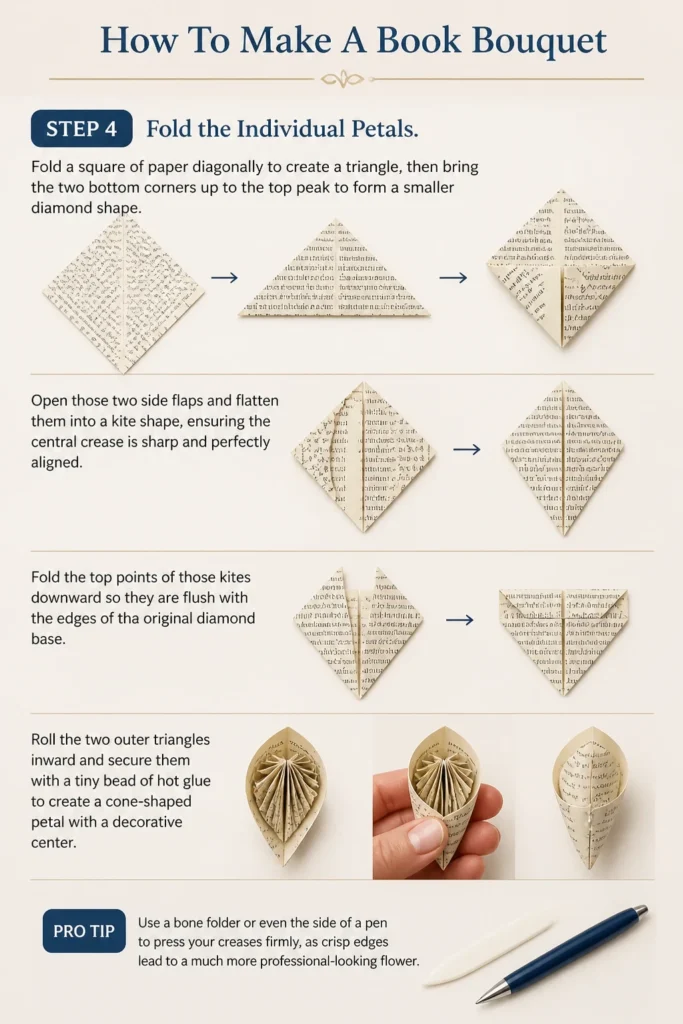
Open those two side flaps and flatten them into a kite shape, ensuring the central crease is sharp and perfectly aligned.
Fold the top points of those kites downward so they are flush with the edges of the original diamond base.
Roll the two outer triangles inward and secure them with a tiny bead of hot glue to create a cone-shaped petal with a decorative center.
Pro Tip: Use a bone folder or even the side of a pen to press your creases firmly, as crisp edges lead to a much more professional-looking flower.
Step 5: Assemble the Flower Head
Repeat the folding process until you have five individual petals for a single Kusudama-style flower.
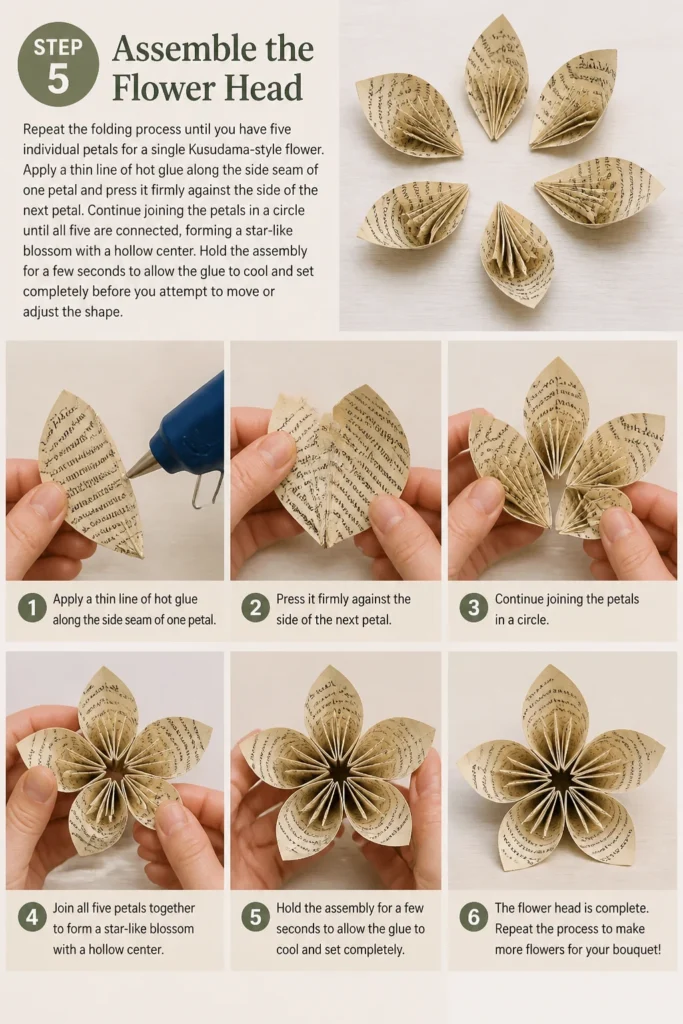
Apply a thin line of hot glue along the side seam of one petal and press it firmly against the side of the next petal.
Continue joining the petals in a circle until all five are connected, forming a star-like blossom with a hollow center.
Hold the assembly for a few seconds to allow the glue to cool and set completely before you attempt to move or adjust the shape.
Step 6: Construct the Stems
Cut your floral wire to your desired length, typically between 10 and 12 inches, using heavy-duty wire cutters.
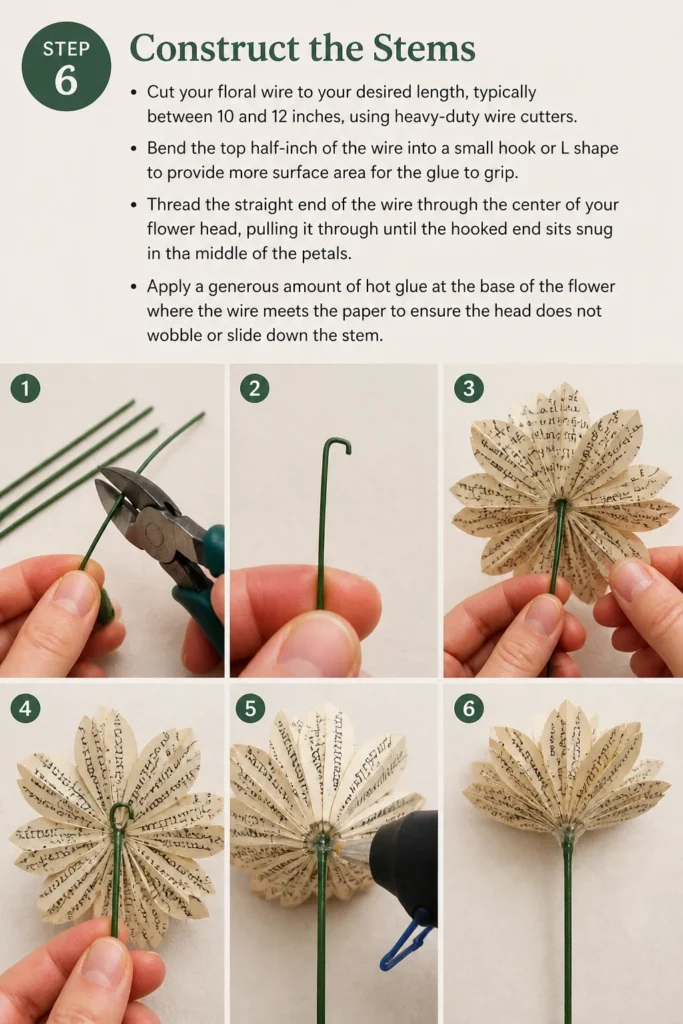
Bend the top half-inch of the wire into a small hook or “L” shape to provide more surface area for the glue to grip.
Thread the straight end of the wire through the center of your flower head, pulling it through until the hooked end sits snugly in the middle of the petals.
Apply a generous amount of hot glue at the base of the flower where the wire meets the paper to ensure the head does not wobble or slide down the stem.
Step 7: Wrap the Stems with Floral Tape
Start at the very top of the wire, just under the paper flower, and wrap the floral tape around the wire several times to create a secure anchor.
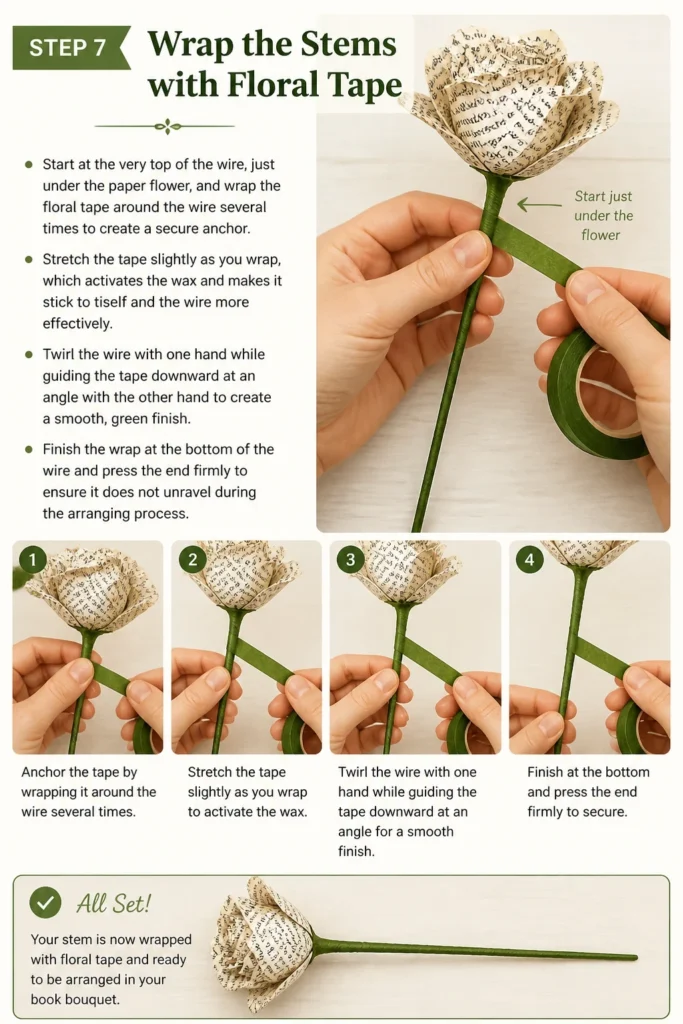
Stretch the tape slightly as you wrap, which activates the wax and makes it stick to itself and the wire more effectively.
Twirl the wire with one hand while guiding the tape downward at an angle with the other hand to create a smooth, green finish.
Finish the wrap at the bottom of the wire and press the end firmly to ensure it does not unravel during the arranging process.
Step 8: Shape and Detail the Petals
Use a pencil or a thin wooden dowel to gently curl the outer edges of the petals outward, giving the flower a more lifelike, blooming appearance.
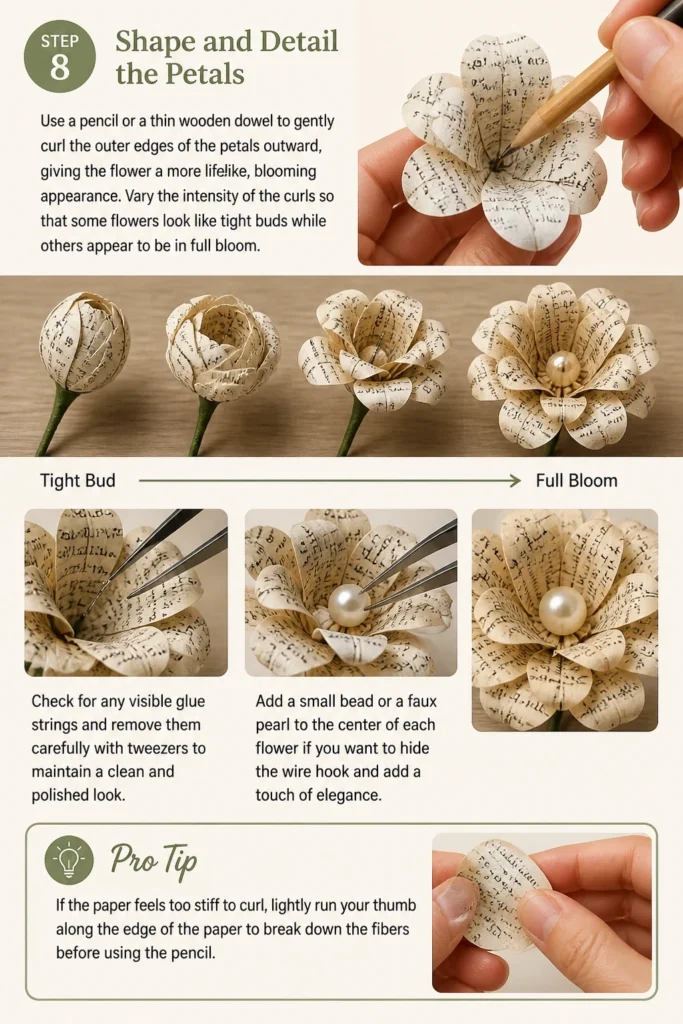
Vary the intensity of the curls so that some flowers look like tight buds while others appear to be in full bloom.
Check for any visible glue strings and remove them carefully with tweezers to maintain a clean and polished look.
Add a small bead or a faux pearl to the center of each flower if you want to hide the wire hook and add a touch of elegance.
Pro Tip: If the paper feels too stiff to curl, lightly run your thumb along the edge of the paper to break down the fibers before using the pencil.
Step 9: Arrange the Bouquet Structure
Gather all of your finished flowers and begin holding them together in your hand, starting with a central flower and adding others around it.
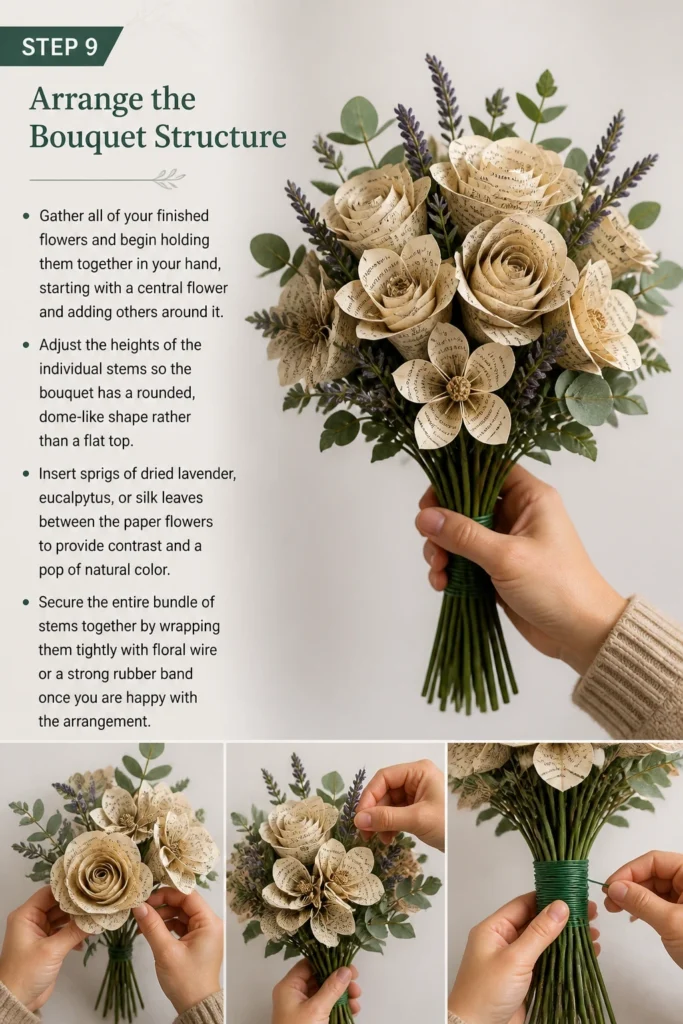
Adjust the heights of the individual stems so the bouquet has a rounded, dome-like shape rather than a flat top.
Insert sprigs of dried lavender, eucalyptus, or silk leaves between the paper flowers to provide contrast and a pop of natural color.
Secure the entire bundle of stems together by wrapping them tightly with floral wire or a strong rubber band once you are happy with the arrangement.
Step 10: Final Wrapping and Finishing Touches
Cover the structural wire or rubber band with a wide satin or grosgrain ribbon that complements the colors of your book pages.
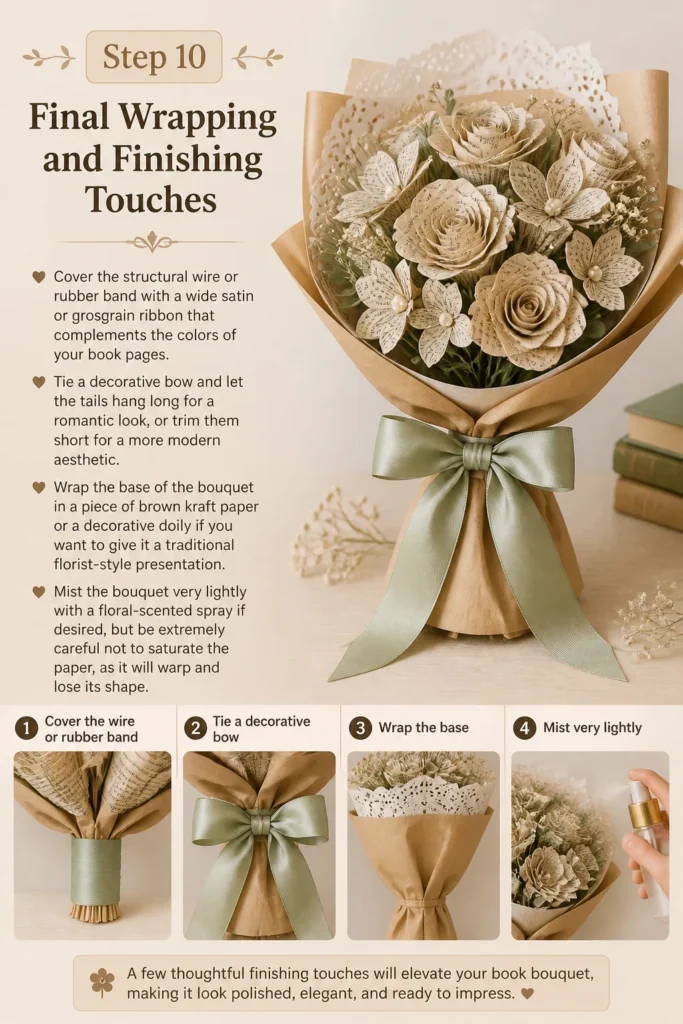
Tie a decorative bow and let the tails hang long for a romantic look, or trim them short for a more modern aesthetic.
Wrap the base of the bouquet in a piece of brown kraft paper or a decorative doily if you want to give it a traditional florist-style presentation.
Mist the bouquet very lightly with a floral-scented spray if desired, but be extremely careful not to saturate the paper, as it will warp and lose its shape.
Common Mistakes to Avoid
Using Excessive Hot Glue
Many beginners believe that more glue equals a stronger bond, but in paper crafting, this often leads to unsightly lumps and visible brown spots. High-temperature glue can also cause the paper to pucker or warp if applied in large quantities, so use only the smallest amount necessary to achieve a hold.
Ignoring the Stem Strength
If you choose wire that is too thin, the weight of the paper flower heads will cause the stems to droop and bend. This results in a bouquet that looks wilted and sad rather than upright and vibrant, so always opt for a thicker gauge wire for the main structural elements.
Symmetrical Perfectionism
Real flowers are rarely perfect, and a book bouquet that is too perfectly aligned can look artificial and stiff. Avoid making every flower the exact same height or angle, and instead, embrace the slight variations in paper color and fold placement to give the piece character.
Troubleshooting
The Paper is Tearing During Folds
This usually happens if the paper is too old and brittle or if you are using too much force with your folding tool. Try misting the air around the paper to add a tiny amount of humidity, or choose a different book with a higher rag content that can withstand multiple creases.
The Floral Tape Isn’t Sticking
Floral tape is not like traditional adhesive tape; it requires tension to become sticky. If it is sliding off the wire, make sure you are pulling it taut as you wrap, and ensure your hands are free of any lotions or oils that might interfere with the wax bond.
The Bouquet Feels Top-Heavy
If the arrangement keeps tipping over in your hand or a vase, the stems may be too long or the flower heads too large. You can add a bit of weight to the bottom of the handle by wrapping it with extra wire before the final ribbon layer, or trim the stems slightly to lower the center of gravity.
Key Takeaways
- Always use books that are already damaged to ensure you are upcycling rather than destroying a readable copy.
- Precision in your initial paper squares is the foundation for a symmetrical and beautiful flower.
- Floral tape requires stretching to activate its adhesive properties and secure the stem.
- Varying the sizes and heights of the flowers creates a more natural and professional-looking arrangement.
- Curling the edges of the petals adds a realistic dimension that transforms flat paper into a 3D work of art.
- Secure the stems tightly before adding decorative ribbons to prevent the bouquet from shifting over time.
Frequently Asked Questions
Can I use pages from a hardback book?
Yes, but you will need to be careful when removing them from the spine. Hardback pages are often higher quality and thicker, which makes for very durable flowers, but they may require a bit more pressure when you are making your initial folds and creases.
How do I keep the bouquet from getting dusty?
Since you cannot wash paper flowers, the best way to maintain them is to use a hair dryer on the lowest, coolest setting to gently blow away dust. Avoid placing the bouquet in direct sunlight for extended periods, as this will cause the paper to become even more brittle and the ink to fade.
Is it possible to color the edges of the paper?
Absolutely, and this is a wonderful way to add depth. You can lightly run a stamp pad or a marker along the edges of the petals before you assemble the flower to give it a “tipped” look that mimics real varieties of roses or carnations.
How many pages do I need for a full bouquet?
A standard bouquet usually consists of 12 to 18 flowers. Since each Kusudama flower uses five squares of paper, and you can usually get two squares out of one standard book page, you will need approximately 30 to 45 pages from your chosen book.
Our Top Recommended Finds
- High-Temperature Glue Gun: A model with a precision tip is essential for applying tiny beads of glue without creating a mess on the delicate paper petals.
- 18-Gauge Green Floral Wire: This thickness provides the perfect balance of flexibility and strength to support the weight of paper flowers without sagging.
- Self-Healing Cutting Mat: This protects your table and provides a grid that makes cutting your initial paper squares much faster and more accurate.
Expand Your Literary Crafting Skills
Once you have mastered the basic book bouquet, you can experiment with different flower styles like spiral roses or multi-layered peonies.
You might even consider incorporating other paper elements like sheet music for a musician or maps for a world traveler to make the gift even more specific to the recipient.
Gather your supplies and start your first flower today; you will find that the rhythm of folding and shaping is one of the most relaxing ways to spend an afternoon.
By the time you finish your first arrangement, you will have a unique piece of decor that tells a story in more ways than one.
Beginner-friendly templates, step-by-step guides,
and weekly project ideas in your inbox.