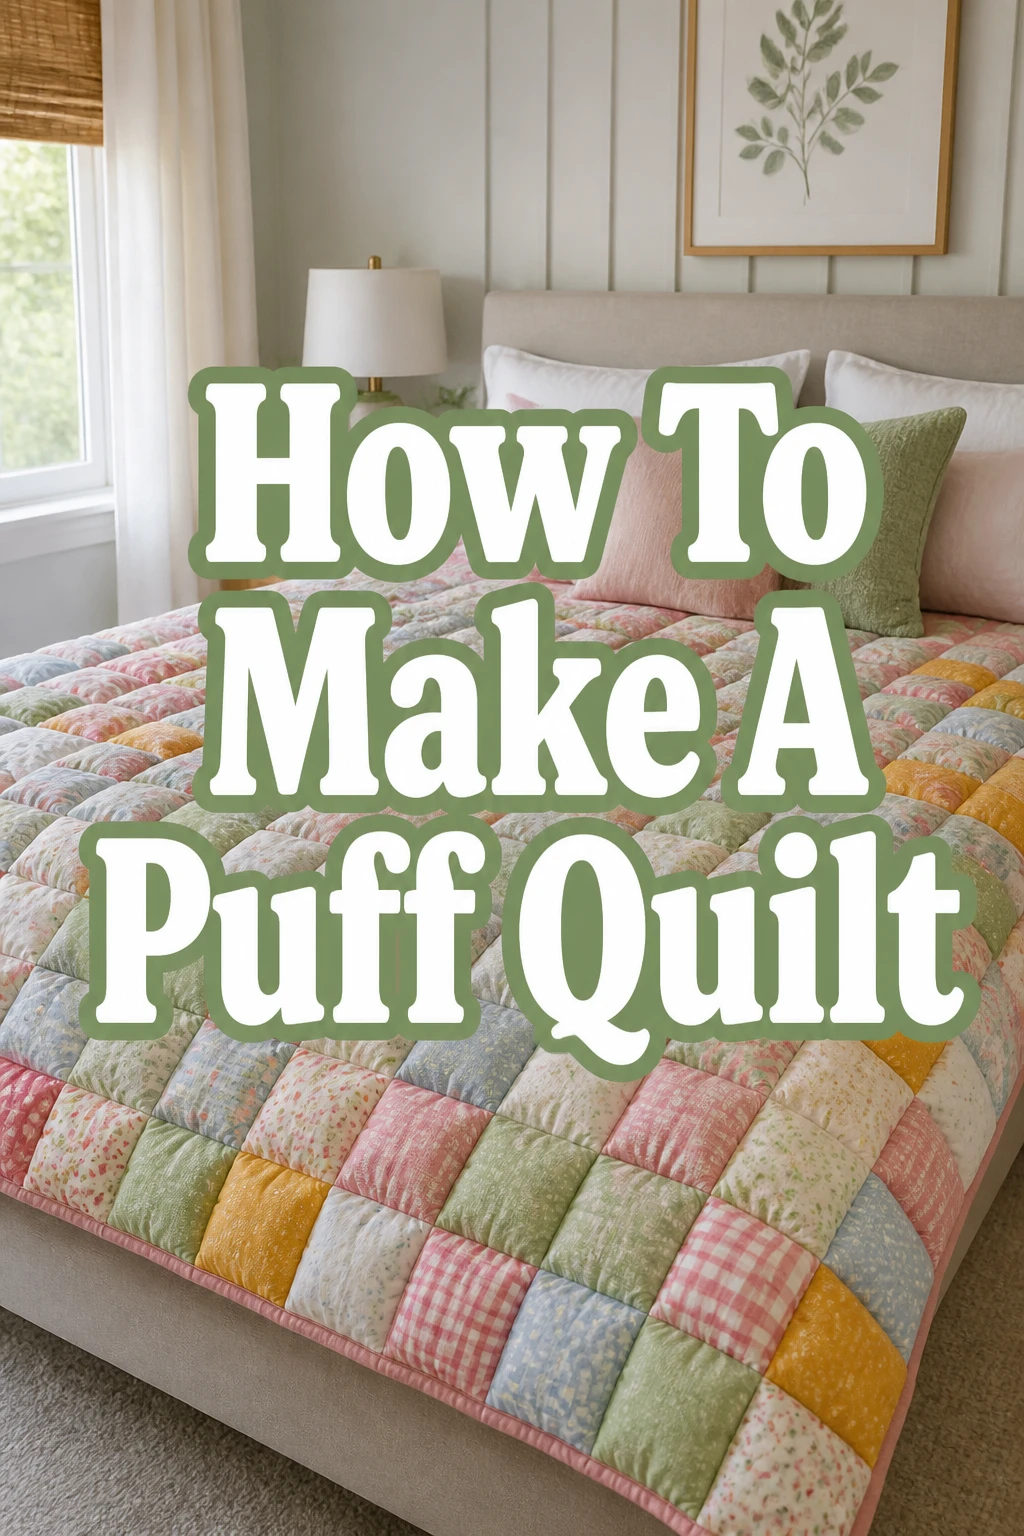
How To Make A Puff Quilt

Beginner-friendly templates, step-by-step guides,
and weekly project ideas in your inbox.
I remember the first time I saw a puff quilt at a local craft fair and felt the immediate urge to sink my hands into its pillowy surface.
It looked incredibly complex, but after sewing dozens of these “biscuit quilts” over the years, I discovered that the process is actually quite rhythmic and meditative.
I have written this guide to share those hard-earned secrets so you can create a cozy heirloom without the frustration of trial and error.
Quick Overview
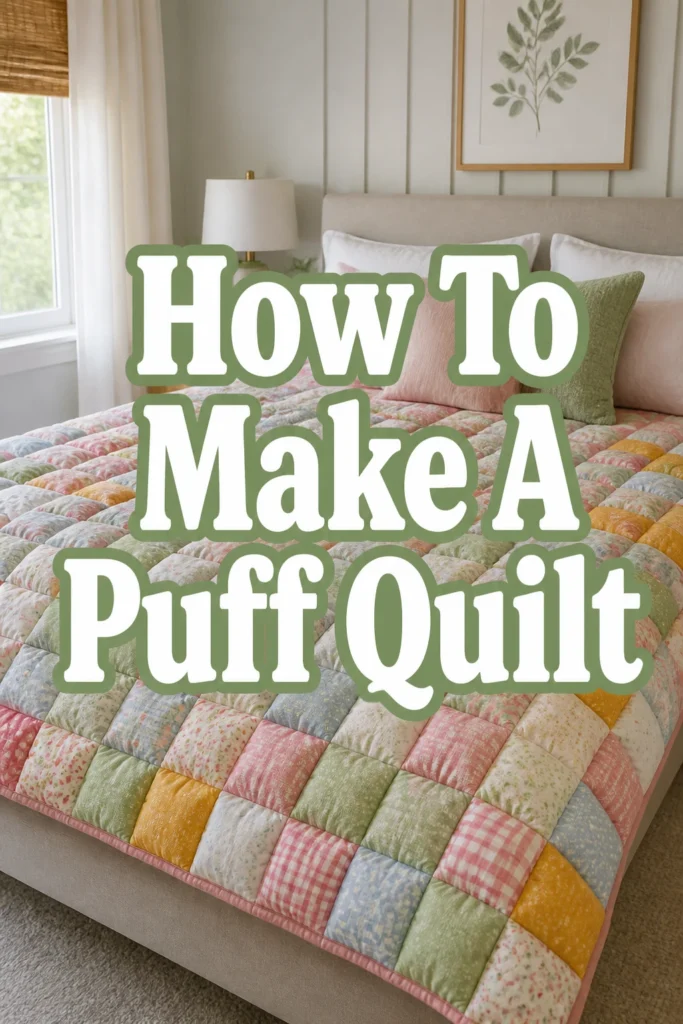
A puff quilt, often called a biscuit quilt, is made by sewing individual fabric pockets, stuffing them with polyester fiberfill, and then joining them together to create a 3D effect.
This project is perfect for using up fabric scraps or showcasing a specific color palette in a nursery or bedroom.
- Time needed: 12 to 18 hours depending on the size of the quilt
- Difficulty: Intermediate (requires basic sewing machine skills and patience)
- What you’ll need: Cotton fabric for the top squares, scrap fabric or muslin for the base squares, polyester fiberfill, a sewing machine, pins or clips, a rotary cutter, and a cutting mat.
Step 1: Calculate and Plan Your Design
Determine the final size of your quilt before you buy any fabric because puff quilts require significantly more material than flat quilts.
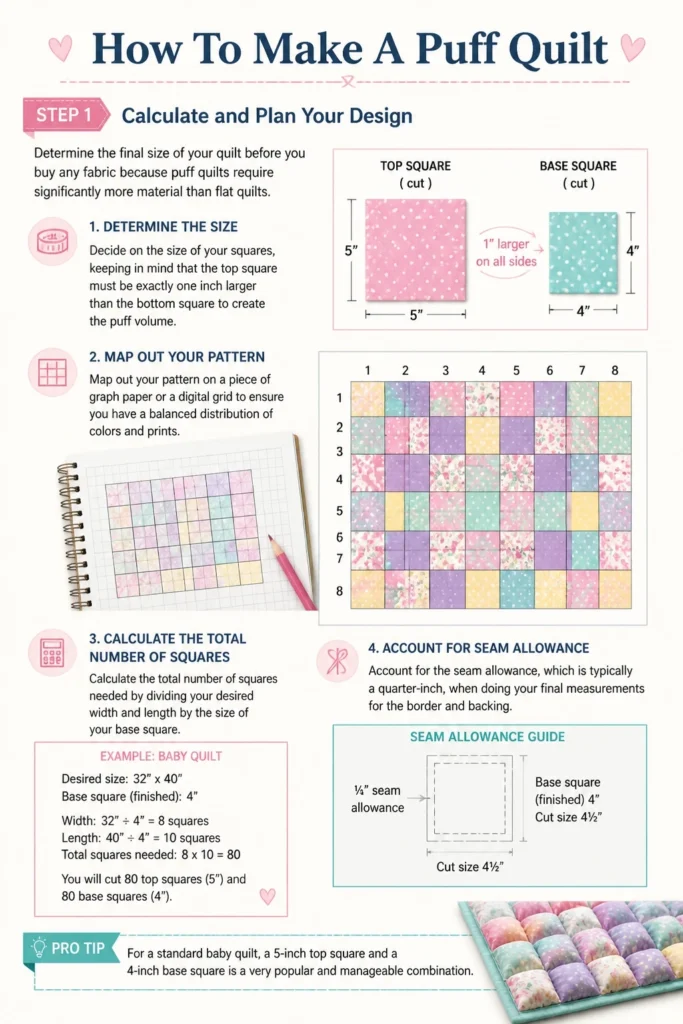
Decide on the size of your squares, keeping in mind that the top square must be exactly one inch larger than the bottom square to create the “puff” volume.
Map out your pattern on a piece of graph paper or a digital grid to ensure you have a balanced distribution of colors and prints.
Pro Tip: For a standard baby quilt, a 5-inch top square and a 4-inch base square is a very popular and manageable combination.
Calculate the total number of squares needed by dividing your desired width and length by the size of your base square.
Account for the seam allowance, which is typically a quarter-inch, when doing your final measurements for the border and backing.
Step 2: Cut Your Fabric Squares
Select a high-quality quilting cotton for the top squares as this fabric will be the most visible part of your project.
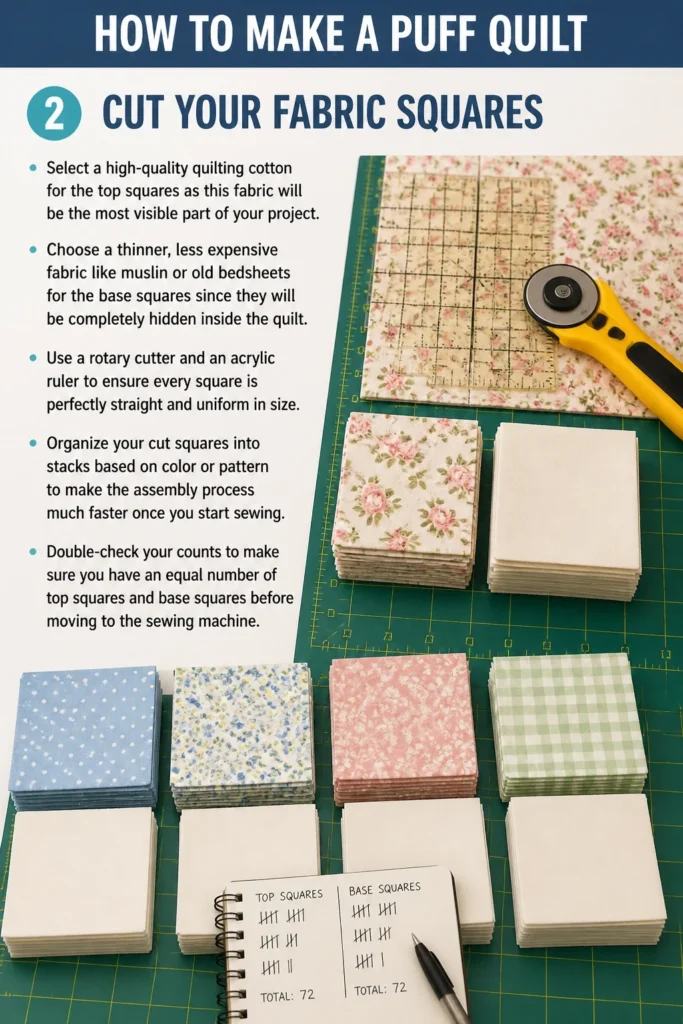
Choose a thinner, less expensive fabric like muslin or old bedsheets for the base squares since they will be completely hidden inside the quilt.
Use a rotary cutter and an acrylic ruler to ensure every square is perfectly straight and uniform in size.
Organize your cut squares into stacks based on color or pattern to make the assembly process much faster once you start sewing.
Double-check your counts to make sure you have an equal number of top squares and base squares before moving to the sewing machine.
Step 3: Pin and Pleat the Pockets
Place one large top square over one smaller base square with the right side of the top fabric facing up.
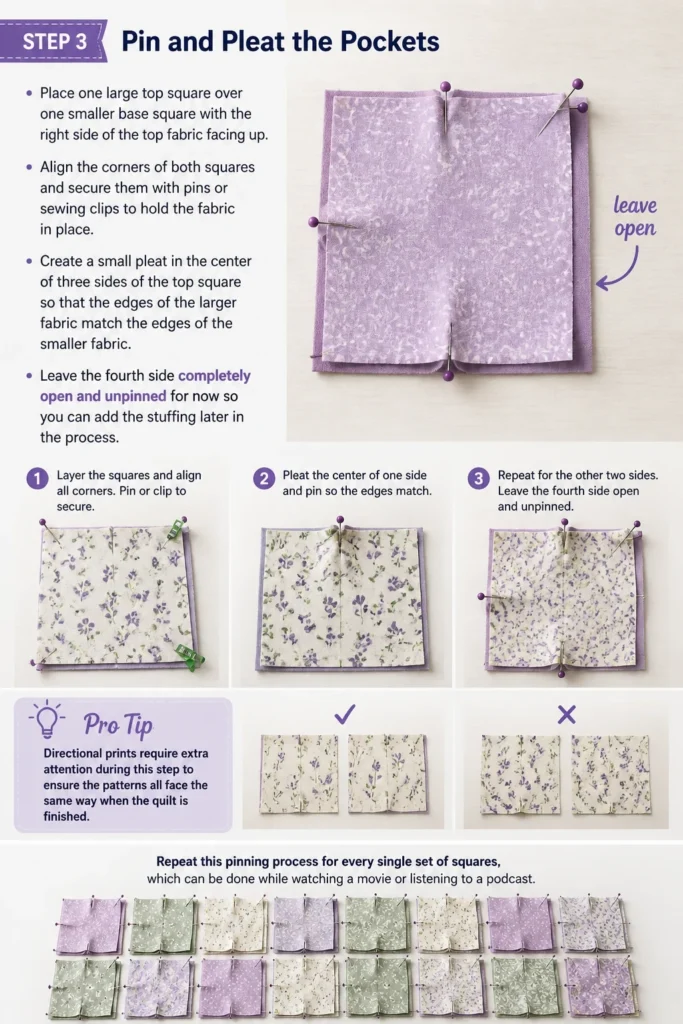
Align the corners of both squares and secure them with pins or sewing clips to hold the fabric in place.
Create a small pleat in the center of three sides of the top square so that the edges of the larger fabric match the edges of the smaller fabric.
Leave the fourth side completely open and unpinned for now so you can add the stuffing later in the process.
Pro Tip: Directional prints require extra attention during this step to ensure the patterns all face the same way when the quilt is finished.
Repeat this pinning process for every single set of squares, which can be done while watching a movie or listening to a podcast.
Step 4: Sew the Three Sides
Set your sewing machine to a standard straight stitch and use a quarter-inch seam allowance for consistency.
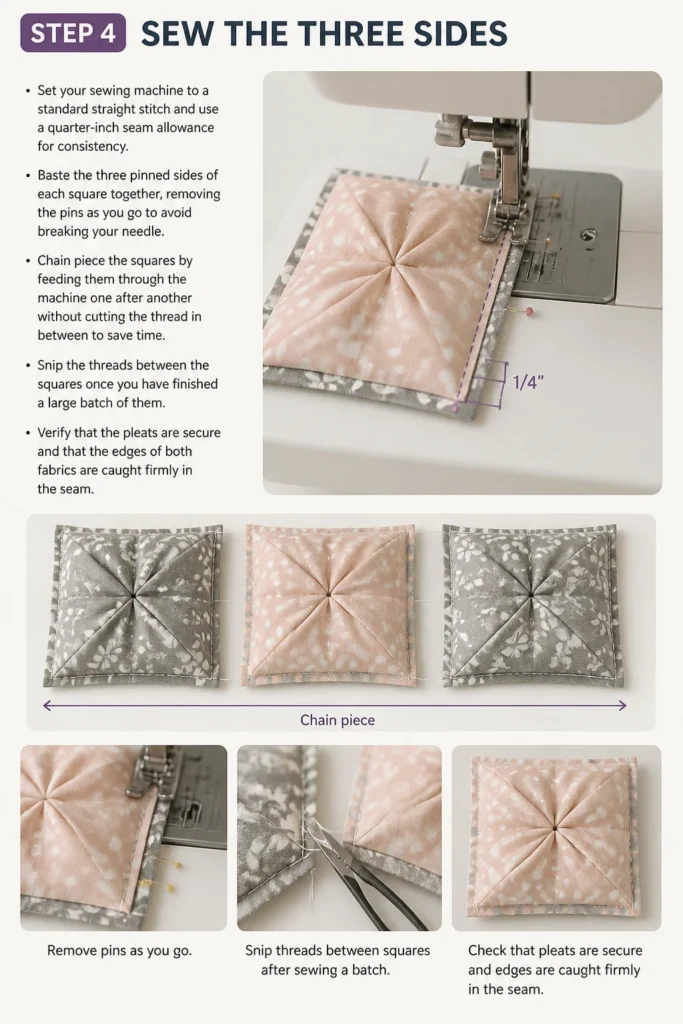
Baste the three pinned sides of each square together, removing the pins as you go to avoid breaking your needle.
Chain piece the squares by feeding them through the machine one after another without cutting the thread in between to save time.
Snip the threads between the squares once you have finished a large batch of them.
Verify that the pleats are secure and that the edges of both fabrics are caught firmly in the seam.
Step 5: Assemble the Rows
Lay out your sewn pockets on a large flat surface or a design wall to finalize the placement of each color.
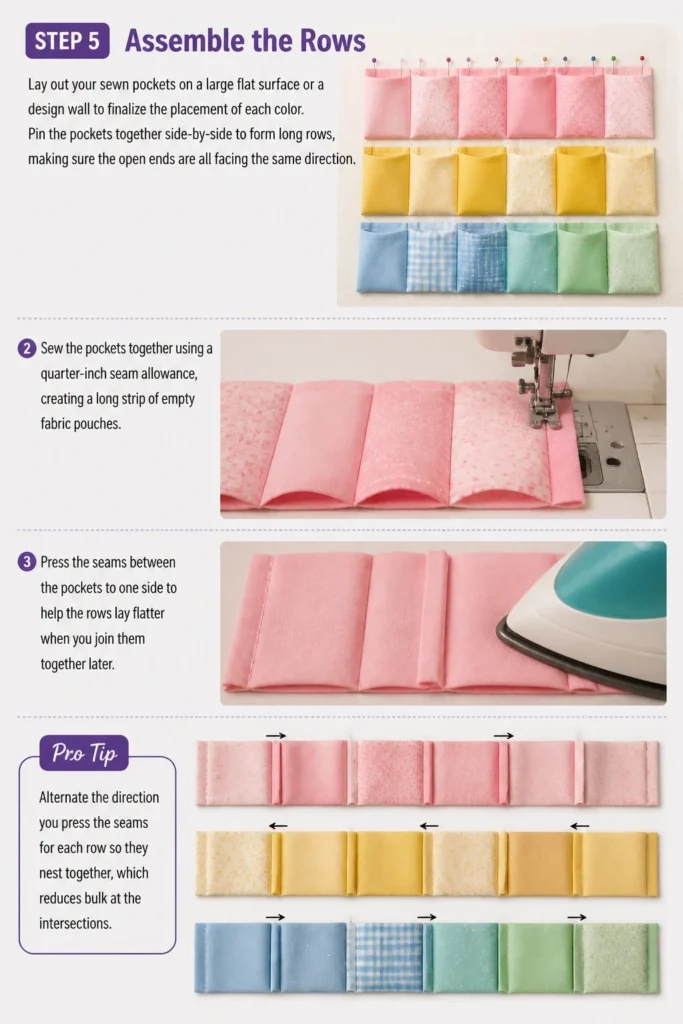
Pin the pockets together side-by-side to form long rows, making sure the open ends are all facing the same direction.
Sew the pockets together using a quarter-inch seam allowance, creating a long strip of empty fabric pouches.
Press the seams between the pockets to one side to help the rows lay flatter when you join them together later.
Pro Tip: Alternate the direction you press the seams for each row so they “nest” together, which reduces bulk at the intersections.
Step 6: Stuff the Pockets
Grab a handful of polyester fiberfill and gently push it into the first pocket of your row through the open side.
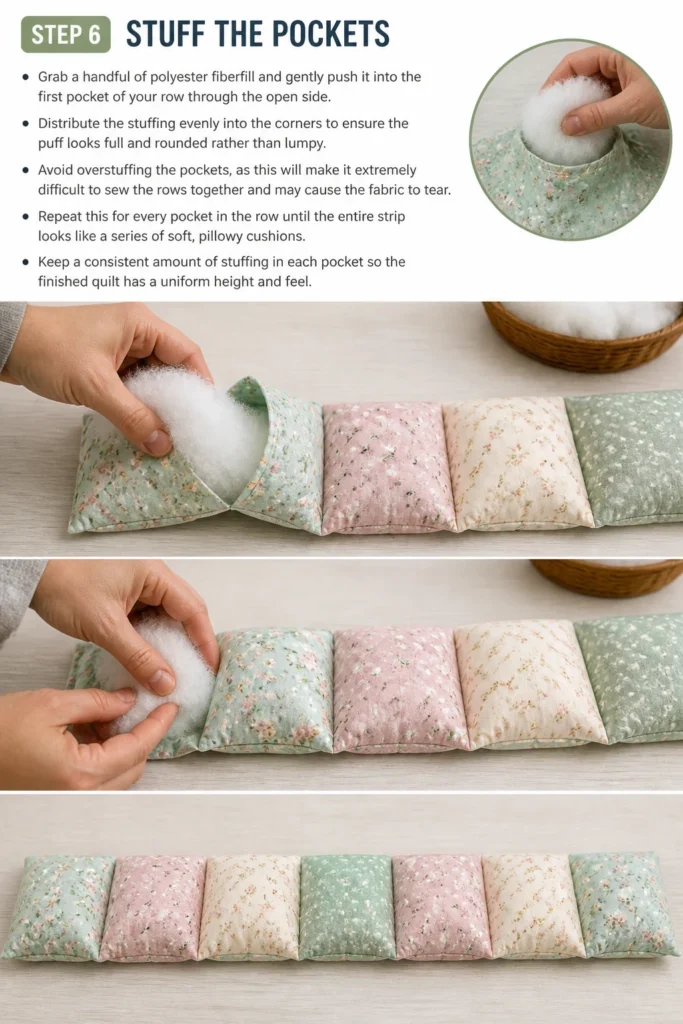
Distribute the stuffing evenly into the corners to ensure the puff looks full and rounded rather than lumpy.
Avoid overstuffing the pockets, as this will make it extremely difficult to sew the rows together and may cause the fabric to tear.
Repeat this for every pocket in the row until the entire strip looks like a series of soft, pillowy cushions.
Keep a consistent amount of stuffing in each pocket so the finished quilt has a uniform height and feel.
Step 7: Close the Rows
Pin the open edge of the stuffed row closed, creating a pleat in the center of the top fabric just like you did on the other sides.
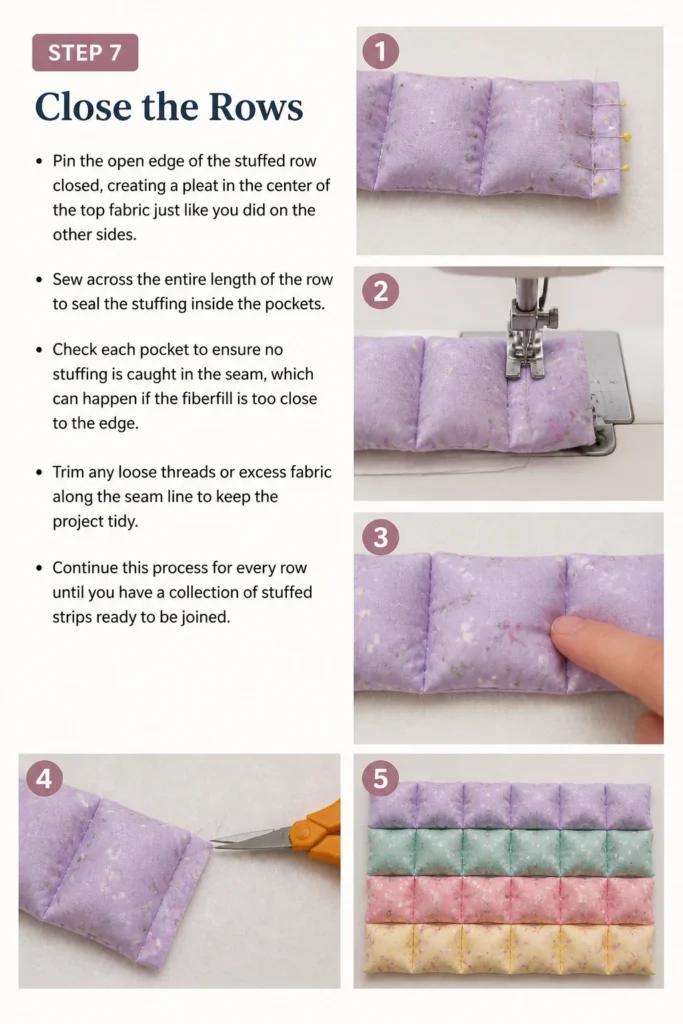
Sew across the entire length of the row to seal the stuffing inside the pockets.
Check each pocket to ensure no stuffing is caught in the seam, which can happen if the fiberfill is too close to the edge.
Trim any loose threads or excess fabric along the seam line to keep the project tidy.
Continue this process for every row until you have a collection of stuffed strips ready to be joined.
Step 8: Join the Rows Together
Place two stuffed rows with their right sides together, aligning the vertical seams between the puffs.
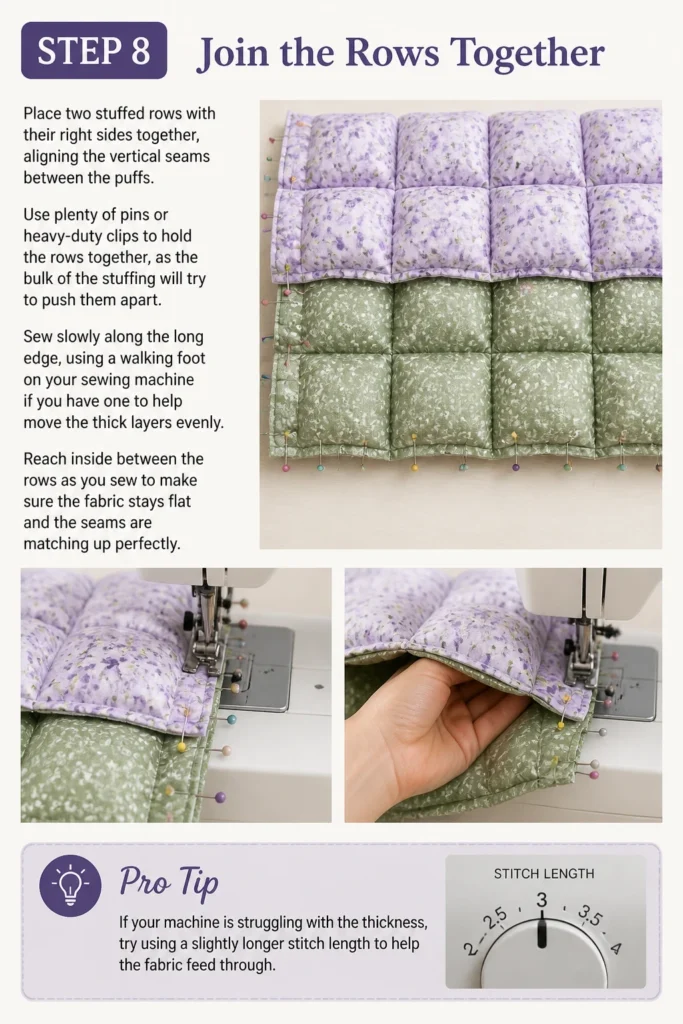
Use plenty of pins or heavy-duty clips to hold the rows together, as the bulk of the stuffing will try to push them apart.
Sew slowly along the long edge, using a walking foot on your sewing machine if you have one to help move the thick layers evenly.
Reach inside between the rows as you sew to make sure the fabric stays flat and the seams are matching up perfectly.
Pro Tip: If your machine is struggling with the thickness, try using a slightly longer stitch length to help the fabric feed through.
Step 9: Add the Backing and Binding
Cut a large piece of fabric for the final backing that is slightly larger than your assembled quilt top.
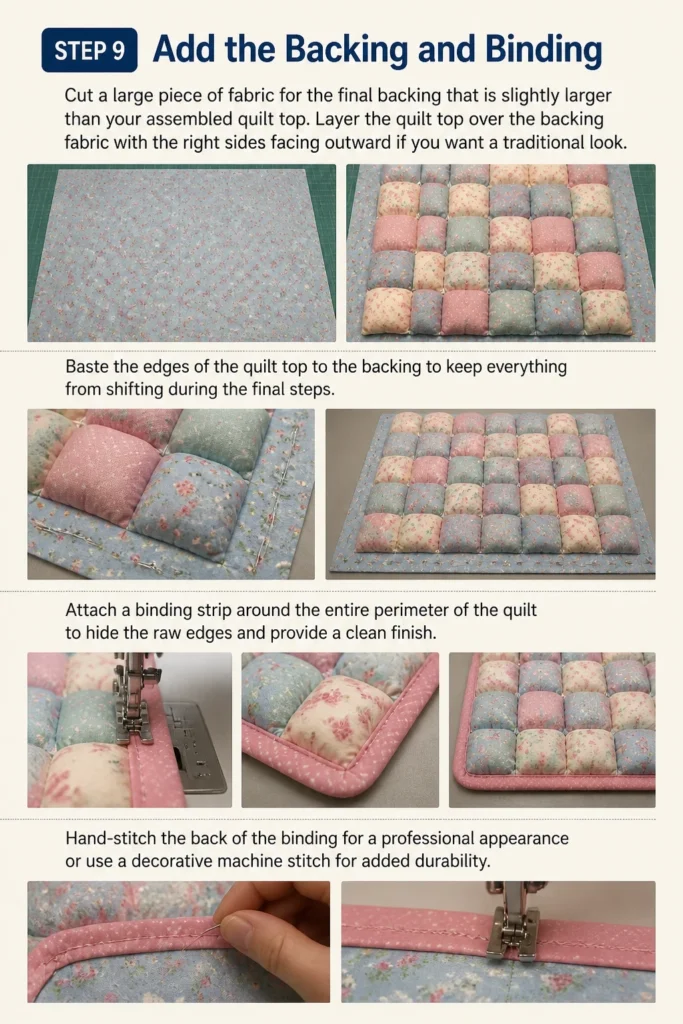
Layer the quilt top over the backing fabric with the right sides facing outward if you want a traditional look.
Baste the edges of the quilt top to the backing to keep everything from shifting during the final steps.
Attach a binding strip around the entire perimeter of the quilt to hide the raw edges and provide a clean finish.
Hand-stitch the back of the binding for a professional appearance or use a decorative machine stitch for added durability.
Common Mistakes to Avoid
Using Heavy Backing Fabric for Internal Squares
Many beginners make the mistake of using thick fabric for the base squares that hold the stuffing. This adds unnecessary weight and makes the quilt extremely difficult to sew through once you start joining the rows. Stick to lightweight muslin or thin scrap fabric for the internal parts to keep the project manageable and soft.
Overstuffing the Pockets
It is tempting to pack as much fiberfill as possible into each square to make it extra “poofy.” However, overstuffed squares create immense tension on the seams and make it nearly impossible for your sewing machine foot to glide over the fabric. Leave a small amount of breathing room in each pocket to ensure you can sew the rows together without broken needles or skipped stitches.
Neglecting to Nest the Seams
If you don’t pay attention to the direction of your seams when joining rows, you will end up with “lumps” where four corners meet. By pressing the seams of Row A to the right and Row B to the left, the fabric folds will lock together like puzzle pieces. This results in much flatter intersections and a more professional-looking finished product.
Troubleshooting
The Sewing Machine is Skipping Stitches
This usually happens when the needle is trying to penetrate too many layers of fabric and stuffing at once. Try switching to a larger needle size, such as a 90/14 or a 100/16 denim needle, which is designed for thicker materials. You should also slow down your sewing speed significantly when crossing over the intersections of the puffs.
The Rows Are Not the Same Length
If you find that one row is an inch longer than the one next to it, you likely have inconsistent pleat sizes or seam allowances. Check to see if your pleats are all the same depth and ensure you are using a consistent quarter-inch seam. You can often “ease” in a small difference by pinning the ends first and stretching the shorter row slightly as you sew.
Stuffing is Leaking Through the Seams
If you see wisps of polyester fiberfill poking out of your seams, your stitch length might be too long or your seam allowance too narrow. Small bits of stuffing can be tucked back in with a blunt tool like a knitting needle before you sew the final rows together. For future squares, ensure the stuffing is pushed well away from the edge before sewing the pocket closed.
Key Takeaways
- Size Difference: Always make the top square one inch larger than the base square to create the necessary volume for the puff.
- Lightweight Base: Use thin fabric for the hidden base squares to reduce bulk and save money on materials.
- Consistent Stuffing: Use the same amount of fiberfill for every pocket to ensure a uniform appearance across the entire quilt.
- Walking Foot: Utilize a walking foot on your sewing machine to help manage the thick, pillowy layers during row assembly.
- Patience with Pleats: Take the time to center your pleats accurately so the puffs look symmetrical and professional.
- Seam Management: Nest your seams by pressing them in opposite directions to make the intersections easier to sew.
Frequently Asked Questions
Can I wash a puff quilt in a standard washing machine?
Yes, you can wash a puff quilt, but you must be gentle to prevent the stuffing from clumping. Use a cold water cycle on a delicate setting and tumble dry on very low heat or air dry. Adding a few clean tennis balls to the dryer can help fluff the pockets back up and prevent the fiberfill from settling in one corner of the squares.
What is the best fabric for a puff quilt?
Quilting cotton is the gold standard because it is breathable, easy to sew, and comes in endless patterns. Some people prefer using flannel for a softer, warmer feel, but keep in mind that flannel is thicker and will make the seams even bulkier. Avoid stretchy fabrics like jersey or minky for your first puff quilt as they can shift and distort during the pleating process.
How much fiberfill do I need for a baby-sized puff quilt?
A standard baby-sized puff quilt usually requires about 16 to 20 ounces of polyester fiberfill. It is always better to buy a larger bag than you think you need, as running out of stuffing halfway through a project is frustrating. You can use the leftovers for other projects like pillows or stuffed animals.
Our Top Recommended Finds
- High-Loft Polyester Fiberfill: Look for a brand that stays springy and does not bunch up after washing, ensuring your quilt stays puffy for years.
- Sewing Clips: These are often better than pins for puff quilts because they can hold thick layers of fabric and stuffing much more securely without bending.
- Walking Foot Attachment: This is a game-changer for sewing thick quilts, as it feeds both the top and bottom layers of fabric through the machine at the same rate.
Embrace the Art of the Biscuit Quilt
Now that you have the foundational knowledge to create your own puff quilt, it is time to start choosing your fabrics.
This project is a wonderful way to experiment with color theory or create a deeply personal gift for a loved one.
Start with a small project like a seat cushion or a doll quilt to practice the pleating and stuffing technique before moving on to a full-sized bed cover.
Once you master the rhythm of the puff quilt, you will find it to be one of the most rewarding and tactile projects in your sewing repertoire.
Beginner-friendly templates, step-by-step guides,
and weekly project ideas in your inbox.