How To Make A Pillow Case

Beginner-friendly templates, step-by-step guides,
and weekly project ideas in your inbox.
Learning to sew a pillow case was one of my very first projects. It felt so rewarding to create something practical from scratch. This simple guide will help you craft your own custom pillow cases, even if you’re new to sewing.
You’ll soon discover how easy it is to add a personal touch to your home decor or create thoughtful gifts. Let’s get started on your sewing journey.
Quick Overview
This guide will walk you through making a standard-sized pillow case, perfect for a queen or standard pillow. You’ll learn basic sewing techniques that are transferable to many other projects. It’s a fantastic way to build confidence with your sewing machine.
- Time needed: 1-2 hours
- Difficulty: Beginner
- What you’ll need: Fabric, thread, sewing machine, scissors, pins, iron, measuring tape
Step-by-Step Instructions
Step 1: Gather Your Materials
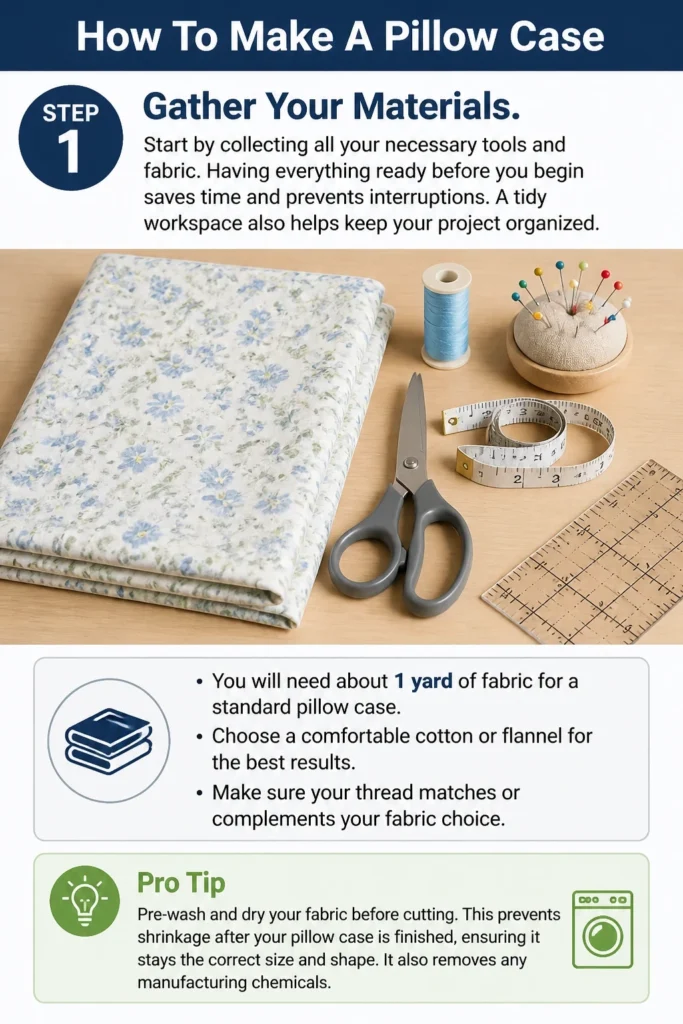
Start by collecting all your necessary tools and fabric. Having everything ready before you begin saves time and prevents interruptions. A tidy workspace also helps keep your project organized.
You will need about 1 yard of fabric for a standard pillow case. Choose a comfortable cotton or flannel for the best results. Make sure your thread matches or complements your fabric choice.
Pro Tip: Pre-wash and dry your fabric before cutting. This prevents shrinkage after your pillow case is finished, ensuring it stays the correct size and shape. It also removes any manufacturing chemicals.
Step 2: Measure and Cut Your Fabric
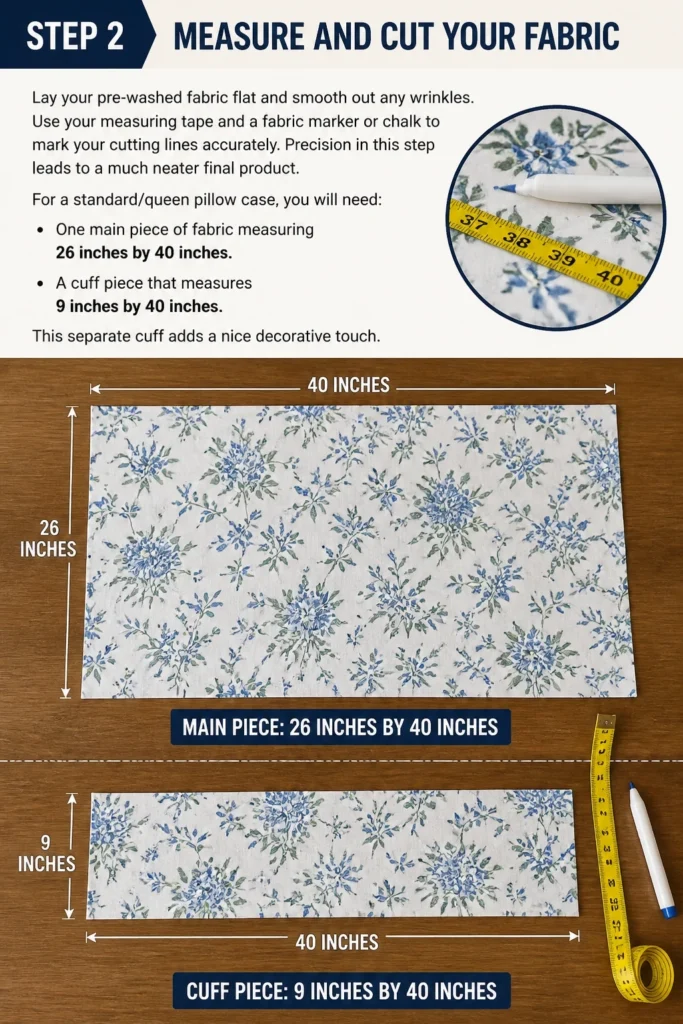
Lay your pre-washed fabric flat and smooth out any wrinkles. Use your measuring tape and a fabric marker or chalk to mark your cutting lines accurately. Precision in this step leads to a much neater final product.
For a standard/queen pillow case, you will need one main piece of fabric measuring 26 inches by 40 inches. You will also need a cuff piece that measures 9 inches by 40 inches. This separate cuff adds a nice decorative touch.
Step 3: Prepare the Cuff Piece
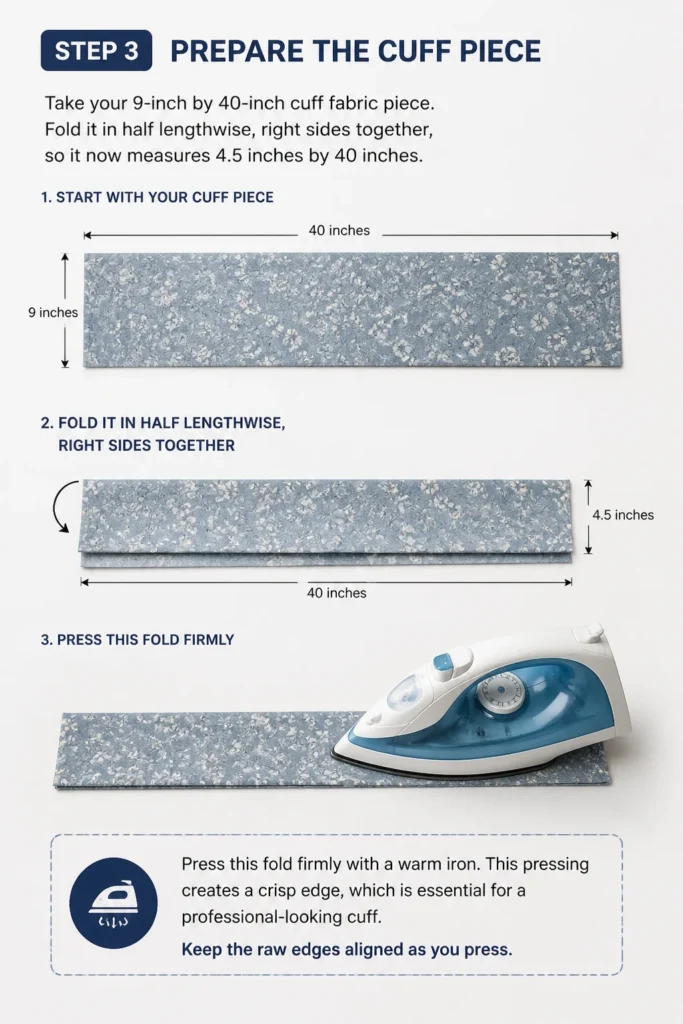
Take your 9-inch by 40-inch cuff fabric piece. Fold it in half lengthwise, right sides together, so it now measures 4.5 inches by 40 inches. Press this fold firmly with a warm iron.
This pressing creates a crisp edge, which is essential for a professional-looking cuff. Keep the raw edges aligned as you press.
Step 4: Attach the Cuff to the Main Fabric
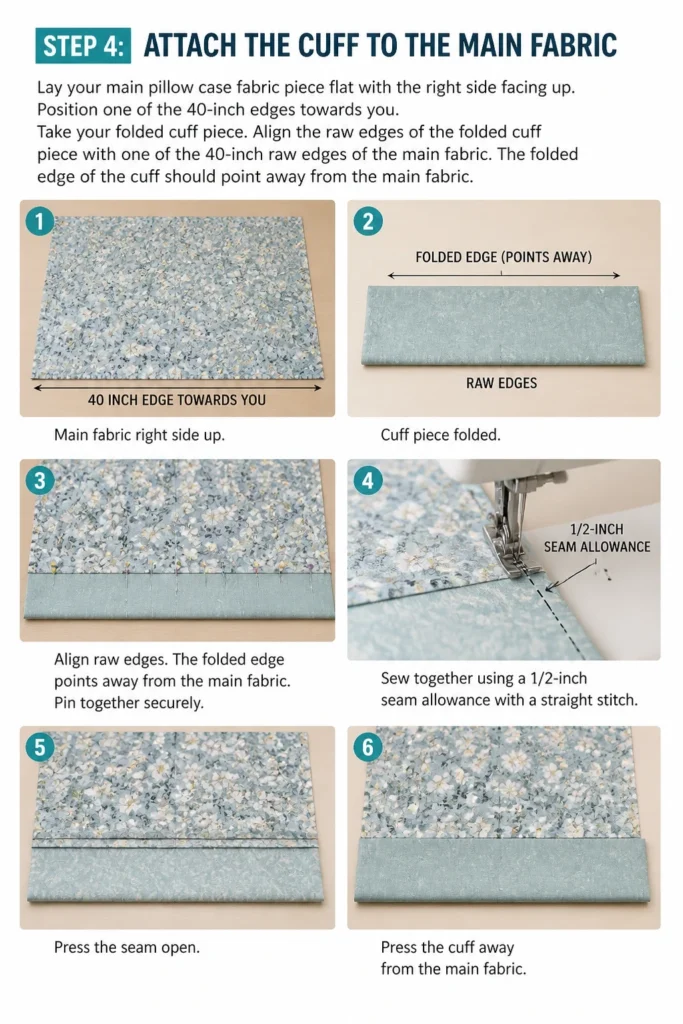
Lay your main pillow case fabric piece flat with the right side facing up. Position one of the 40-inch edges towards you. Take your folded cuff piece.
Align the raw edges of the folded cuff piece with one of the 40-inch raw edges of the main fabric. The folded edge of the cuff should point away from the main fabric. Pin these two pieces together securely along the raw edge.
Sew these two pieces together using a 1/2-inch seam allowance. Use a straight stitch on your sewing machine. Once sewn, press the seam open, then press the cuff away from the main fabric.
Step 5: Fold and Press the Cuff
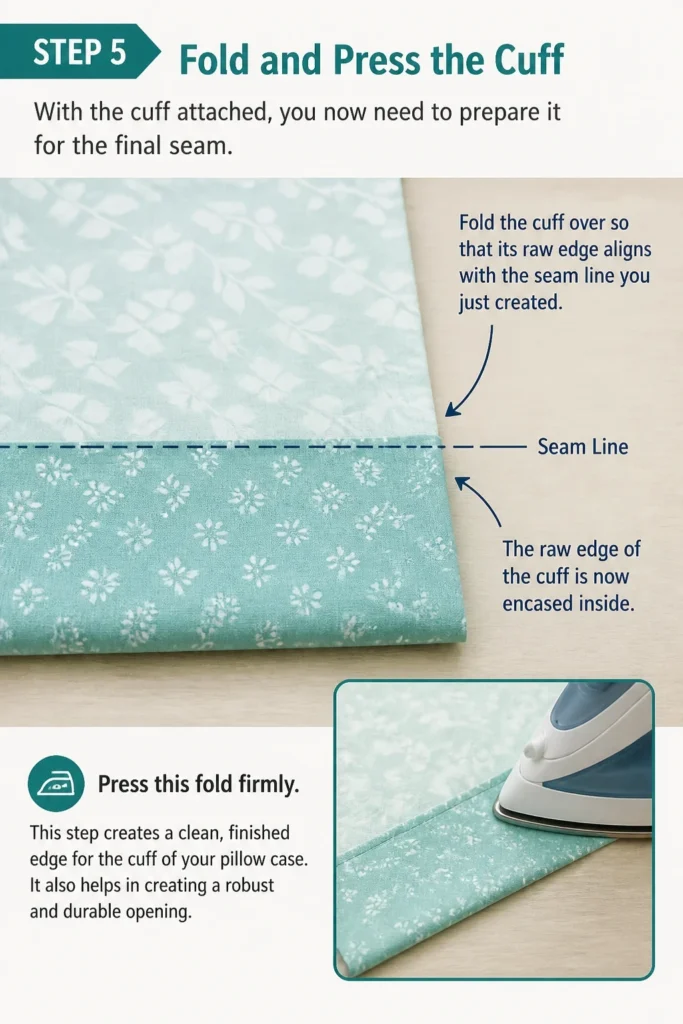
With the cuff attached, you now need to prepare it for the final seam. Fold the cuff over so that its raw edge aligns with the seam line you just created. This encases the raw edge of the cuff.
Press this fold firmly. This step creates a clean, finished edge for the cuff of your pillow case. It also helps in creating a robust and durable opening.
Step 6: Fold the Pillow Case
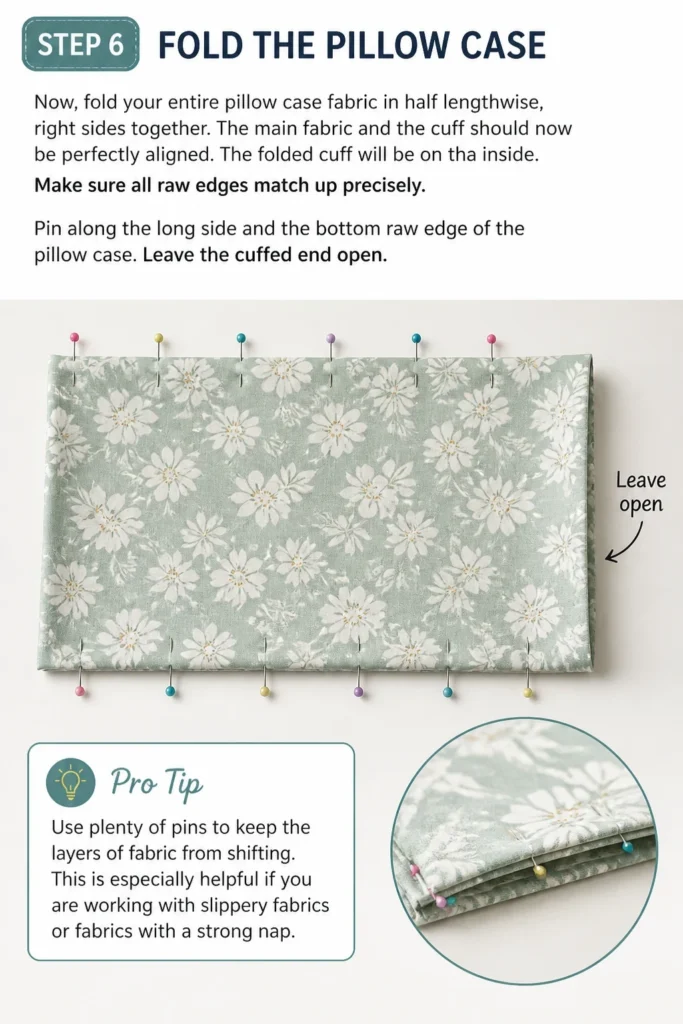
Now, fold your entire pillow case fabric in half lengthwise, right sides together. The main fabric and the cuff should now be perfectly aligned. The folded cuff will be on the inside.
Make sure all raw edges match up precisely. Pin along the long side and the bottom raw edge of the pillow case. Leave the cuffed end open.
Pro Tip: Use plenty of pins to keep the layers of fabric from shifting. This is especially helpful if you are working with slippery fabrics or fabrics with a strong nap.
Step 7: Sew the Side and Bottom Seams
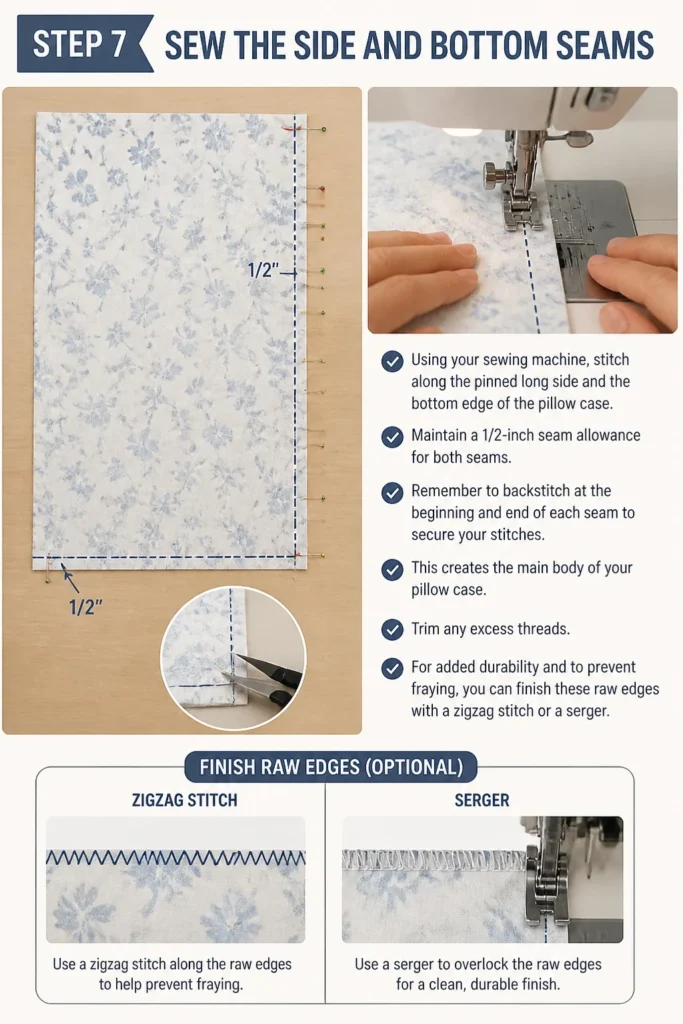
Using your sewing machine, stitch along the pinned long side and the bottom edge of the pillow case. Maintain a 1/2-inch seam allowance for both seams. Remember to backstitch at the beginning and end of each seam to secure your stitches.
This creates the main body of your pillow case. Trim any excess threads. For added durability and to prevent fraying, you can finish these raw edges with a zigzag stitch or a serger.
Step 8: Finish the Seams (Optional but Recommended)
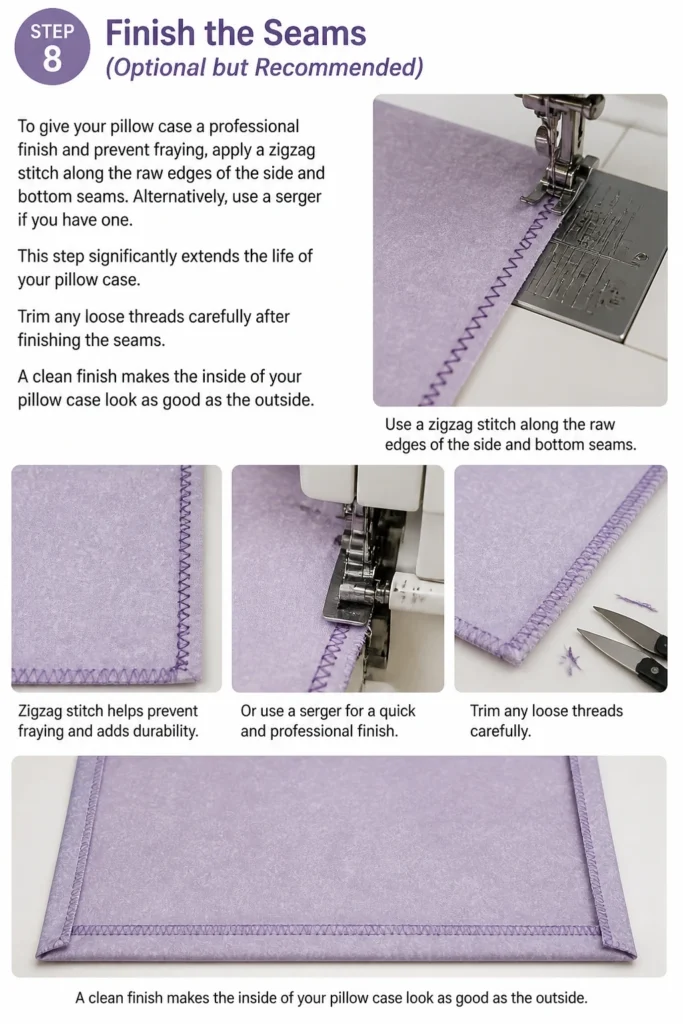
To give your pillow case a professional finish and prevent fraying, apply a zigzag stitch along the raw edges of the side and bottom seams. Alternatively, use a serger if you have one. This step significantly extends the life of your pillow case.
Trim any loose threads carefully after finishing the seams. A clean finish makes the inside of your pillow case look as good as the outside.
Step 9: Turn and Press
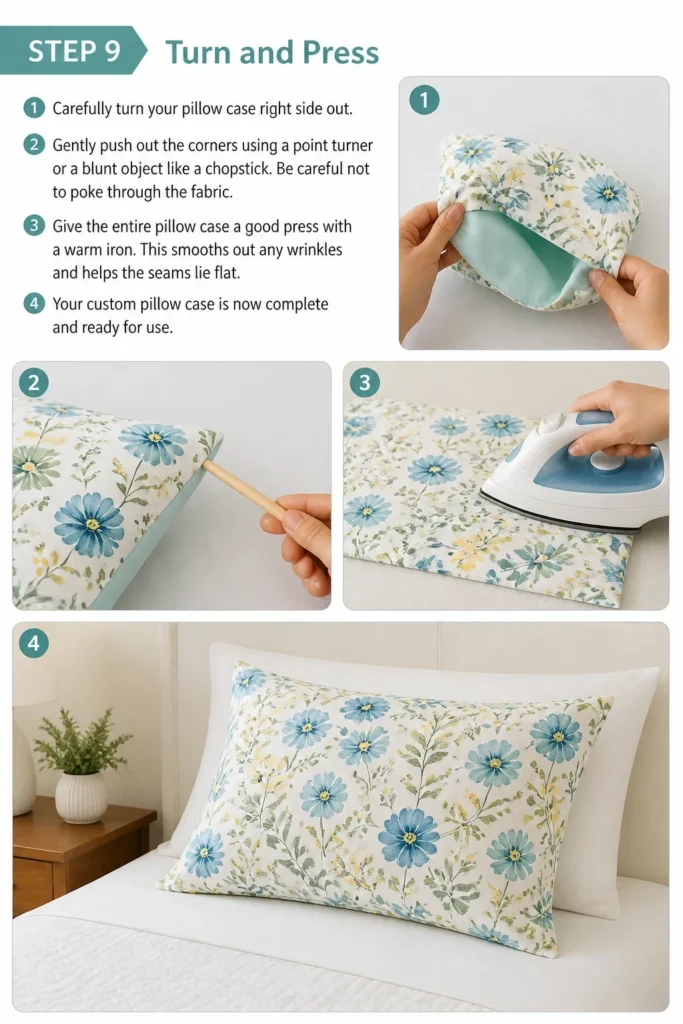
Carefully turn your pillow case right side out. Gently push out the corners using a point turner or a blunt object like a chopstick. Be careful not to poke through the fabric.
Give the entire pillow case a good press with a warm iron. This smooths out any wrinkles and helps the seams lie flat. Your custom pillow case is now complete and ready for use.
Common Mistakes to Avoid
Not Pre-Washing Fabric
Many beginners skip the crucial step of pre-washing their fabric. This can lead to significant problems later on. Fabrics often shrink when first washed, causing your finished pillow case to distort or become too small for its intended pillow. Always wash and dry your fabric exactly as you would wash the finished item before you even start cutting.
Inaccurate Cutting
Cutting your fabric pieces inaccurately will make the entire sewing process much more difficult. If your pieces aren’t perfectly rectangular or are slightly off in size, your seams won’t line up correctly. This results in a lopsided or ill-fitting pillow case. Use a good ruler, a rotary cutter and mat, or sharp fabric scissors to ensure precise measurements and straight cuts.
Uneven Seam Allowances
Maintaining a consistent seam allowance is vital for a neat finish. If your seam allowance varies, your seams can look wobbly, and the final dimensions of your pillow case might be off. Use the guides on your sewing machine’s needle plate to help you sew straight and keep your seams uniform. Practice sewing straight lines on scrap fabric if you’re new to machine sewing.
Skipping Pressing Steps
Pressing is just as important as sewing, but it’s often overlooked. Pressing seams open or to one side at each stage helps to set the stitches, flatten the fabric, and create crisp, professional-looking edges. Skipping pressing can lead to bulky, uneven seams and a generally less polished final product. Always have your iron ready and use it frequently throughout the project.
Troubleshooting
Fabric Puckering While Sewing
If your fabric starts to pucker as you sew, several factors could be at play. First, check your tension settings on your sewing machine; it might be too tight. Also, ensure you are using the correct needle size for your fabric type. A dull or bent needle can also cause puckering.
Another common reason for puckering is pulling the fabric through the machine instead of letting the feed dogs do the work. Gently guide the fabric without forcing it. Adjusting your stitch length slightly can also sometimes resolve this issue.
Uneven Seams
Uneven seams often happen when the fabric shifts during sewing. This can be due to not using enough pins or not aligning the fabric edges carefully. Make sure to pin your fabric frequently, especially around curves or long straight edges.
Using a walking foot attachment on your sewing machine can also help feed multiple layers of fabric evenly. Practice sewing straight lines on scrap fabric to improve your consistency.
Pillow Case is Too Small/Large
If your finished pillow case doesn’t fit your pillow correctly, the initial measurements or seam allowances were likely off. Double-check your fabric cutting dimensions against the standard pillow case sizes. Ensure you consistently used the specified seam allowance throughout the project.
Remember that pre-washing fabric also prevents unexpected shrinkage. If it’s too large, you can often sew new, larger seam allowances on the sides and bottom. If it’s too small, unfortunately, you may need to start over with larger fabric pieces.
Key Takeaways
- Always pre-wash and dry your fabric to prevent shrinkage and ensure accurate sizing.
- Precise measuring and cutting are fundamental for a professional-looking pillow case.
- Consistent seam allowances are crucial for neat, straight seams and overall project success.
- Utilize an iron frequently to press seams and folds, creating a crisp and polished finish.
- Don’t be afraid to use plenty of pins to keep fabric layers aligned and prevent shifting.
- Finishing raw seams with a zigzag stitch or serger significantly enhances durability and appearance.
Frequently Asked Questions
What type of fabric is best for a pillow case?
Cotton fabrics like quilting cotton, flannel, or percale are excellent choices for pillow cases. They are breathable, soft, durable, and easy to work with for beginners. Avoid stretchy fabrics like knits, as they can be challenging to sew straight.
Can I make a pillow case without a sewing machine?
Yes, you can hand-sew a pillow case, but it will take considerably longer. You would use a backstitch for strong seams. A sewing machine is highly recommended for efficiency and durability.
How do I make a pillow case for a king-sized pillow?
For a king-sized pillow, adjust your fabric dimensions. The main fabric piece should be approximately 26 inches by 46 inches, and the cuff piece would be 9 inches by 46 inches. The construction steps remain the same.
How do I care for my handmade pillow case?
Care for your handmade pillow case according to the fabric’s instructions. Most cotton pillow cases can be machine washed in cold or warm water with like colors and tumble dried on low. Iron as needed. Pre-washing the fabric beforehand ensures it can withstand regular washing without shrinking.
Our Top Recommended Finds
- Rotary Cutter and Mat: This combination makes cutting fabric incredibly quick and precise. It’s a game-changer for straight lines.
- Fabric Shears: A good pair of sharp fabric scissors is essential for clean cuts, especially for trimming threads and smaller pieces.
- Quilting Ruler: A clear acrylic ruler with grid lines helps you measure and cut accurately, ensuring your fabric pieces are perfectly square.
Start Your Next Sewing Adventure Today
You now have the skills to create beautiful, custom pillow cases for yourself or as gifts. This project is a fantastic foundation for more complex sewing endeavors. Imagine the possibilities for personalizing your living space.
Don’t let your new skills sit idle. Pick out some fun fabric and transform your bedroom decor. You’ve taken the first step on a rewarding creative journey.
Beginner-friendly templates, step-by-step guides,
and weekly project ideas in your inbox.