How To Make A Binder Ftm

Beginner-friendly templates, step-by-step guides,
and weekly project ideas in your inbox.
Making your own binder can feel like a powerful step in your journey.
I know the desire for chest affirmation can be strong, and sometimes a DIY approach is the most accessible option.
This guide shares practical steps and important safety considerations, drawing from experience and community advice to help you create something effective and secure.
Quick Overview
This guide will walk you through crafting a custom binder designed for comfort and effective chest compression. You will learn about material selection, precise measurements, and fundamental sewing techniques to create your own chest binder.
- Time needed: 3-5 hours (depending on sewing experience)
- Difficulty: Intermediate
- What you’ll need: Compression fabric, breathable lining fabric, strong thread, sewing machine, measuring tape, fabric scissors, pins.
Step-by-Step Instructions
Step 1: Gather Your Materials
Collect all necessary supplies before you begin. Having everything ready saves time and prevents interruptions during the sewing process.
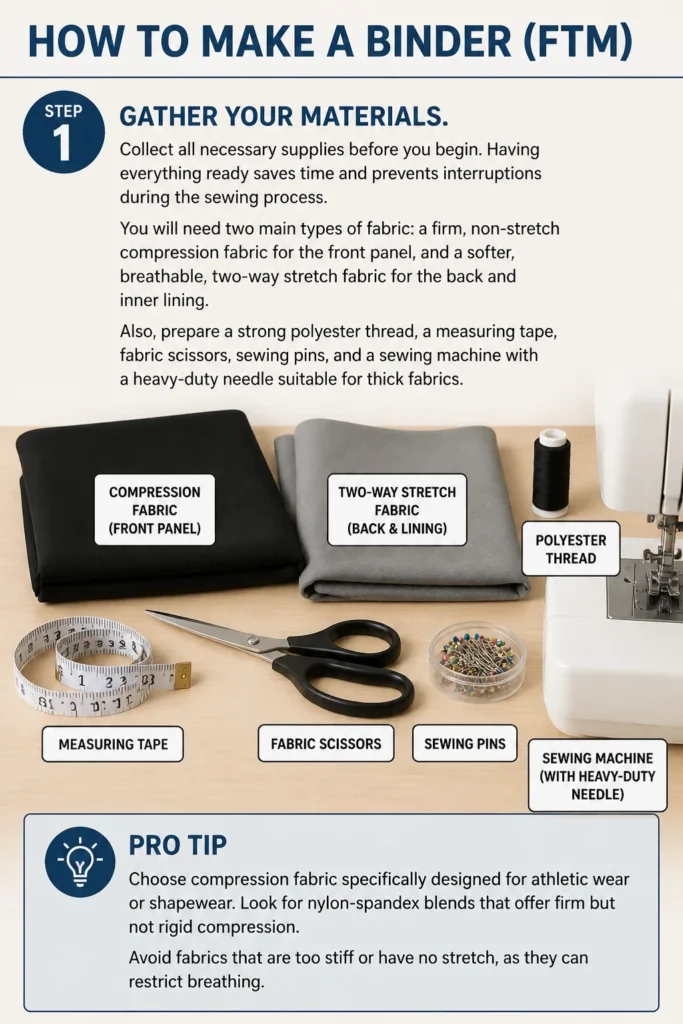
You will need two main types of fabric: a firm, non-stretch compression fabric for the front panel, and a softer, breathable, two-way stretch fabric for the back and inner lining.
Also, prepare a strong polyester thread, a measuring tape, fabric scissors, sewing pins, and a sewing machine with a heavy-duty needle suitable for thick fabrics.
Pro Tip: Choose compression fabric specifically designed for athletic wear or shapewear. Look for nylon-spandex blends that offer firm but not rigid compression. Avoid fabrics that are too stiff or have no stretch, as they can restrict breathing.
Step 2: Take Accurate Measurements
Measure your body precisely to ensure a comfortable and safe fit. An ill-fitting binder can be ineffective or, worse, harmful.
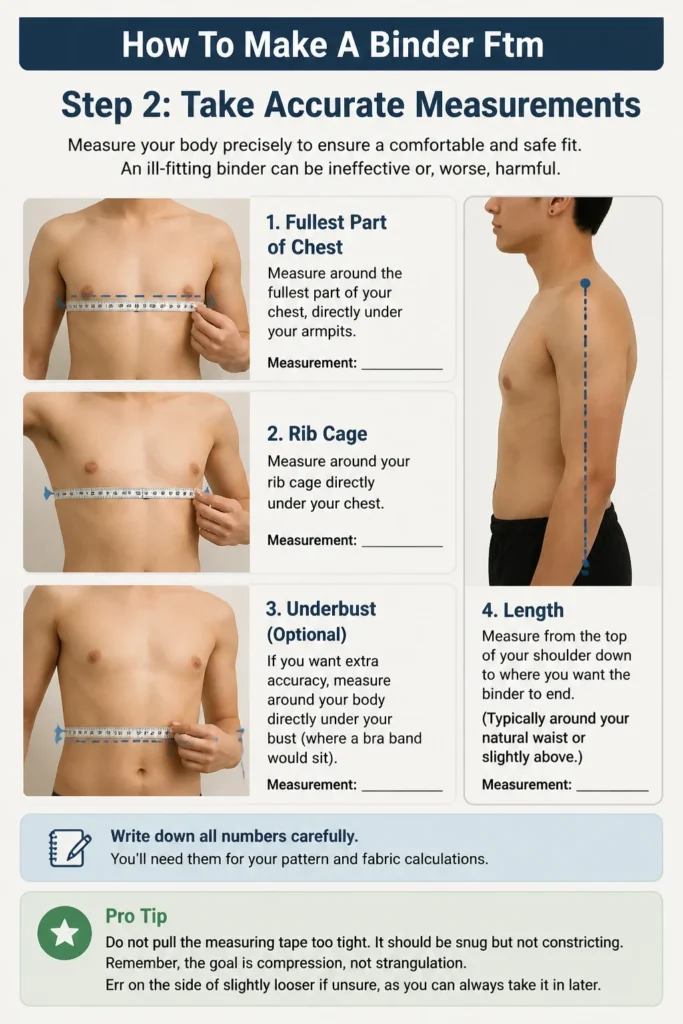
Measure around the fullest part of your chest, directly under your armpits, and around your rib cage directly under your chest. Also, measure from the top of your shoulder down to where you want the binder to end (typically around your natural waist or slightly above).
Take these measurements while wearing a non-padded bra or no top at all for the most accurate results. Write down all numbers carefully.
Pro Tip: Do not pull the measuring tape too tight. It should be snug but not constricting. Remember, the goal is compression, not strangulation. Err on the side of slightly looser if unsure, as you can always take it in later.
Step 3: Create Your Pattern
Draft a custom pattern based on your measurements. You can use large sheets of paper, newspaper, or even old bedsheets for this.
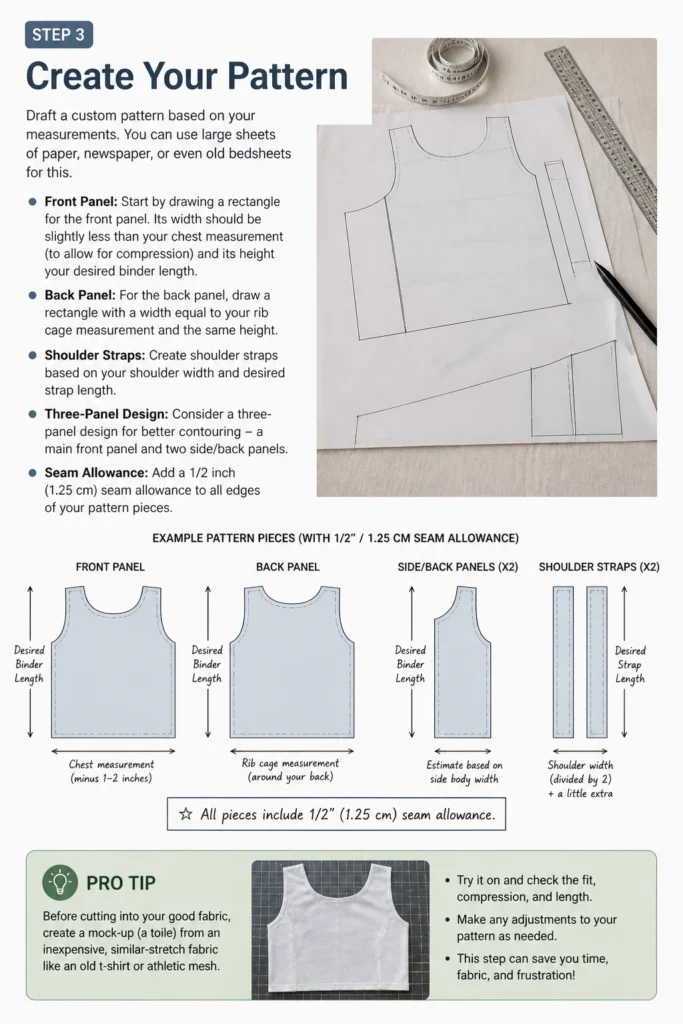
Start by drawing a rectangle for the front panel. Its width should be slightly less than your chest measurement (to allow for compression) and its height your desired binder length.
For the back panel, draw a rectangle with a width equal to your rib cage measurement and the same height. Create shoulder straps based on your shoulder width and desired strap length.
Consider a three-panel design for better contouring: a main front panel and two side/back panels. Add a 1/2 inch (1.25 cm) seam allowance to all edges of your pattern pieces.
Pro Tip: Before cutting into your good fabric, create a mock-up (a “toile”) from an inexpensive, similar-stretch fabric like an old t-shirt. This allows you to test the fit and make adjustments without wasting your primary materials.
Step 4: Cut Your Fabric
Lay your chosen fabrics flat and smooth out any wrinkles. Pin your paper pattern pieces securely onto the fabric.
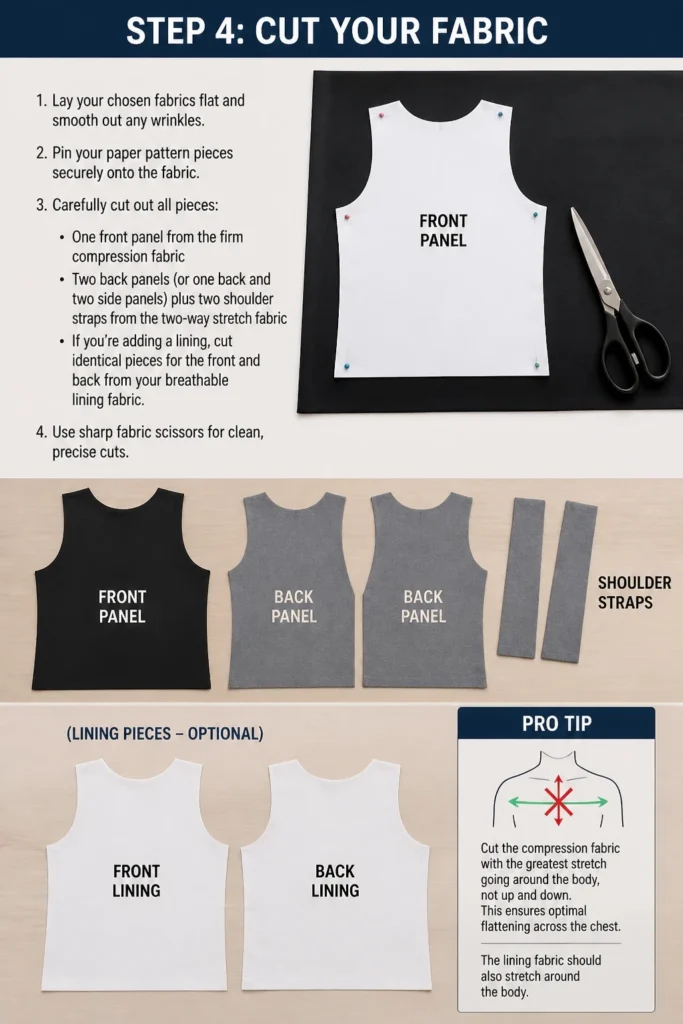
Carefully cut out all pieces: one front panel from the firm compression fabric, and two back panels (or one back and two side panels) plus two shoulder straps from the two-way stretch fabric.
If you’re adding a lining, cut identical pieces for the front and back from your breathable lining fabric. Use sharp fabric scissors for clean, precise cuts.
Pro Tip: Cut the compression fabric with the greatest stretch going around the body, not up and down. This ensures optimal flattening across the chest. The lining fabric should also stretch around the body.
Step 5: Prepare the Fabric Layers
Layer your fabric pieces for the front panel. If you are using a lining, place the compression fabric on top of the lining fabric, right sides facing out.
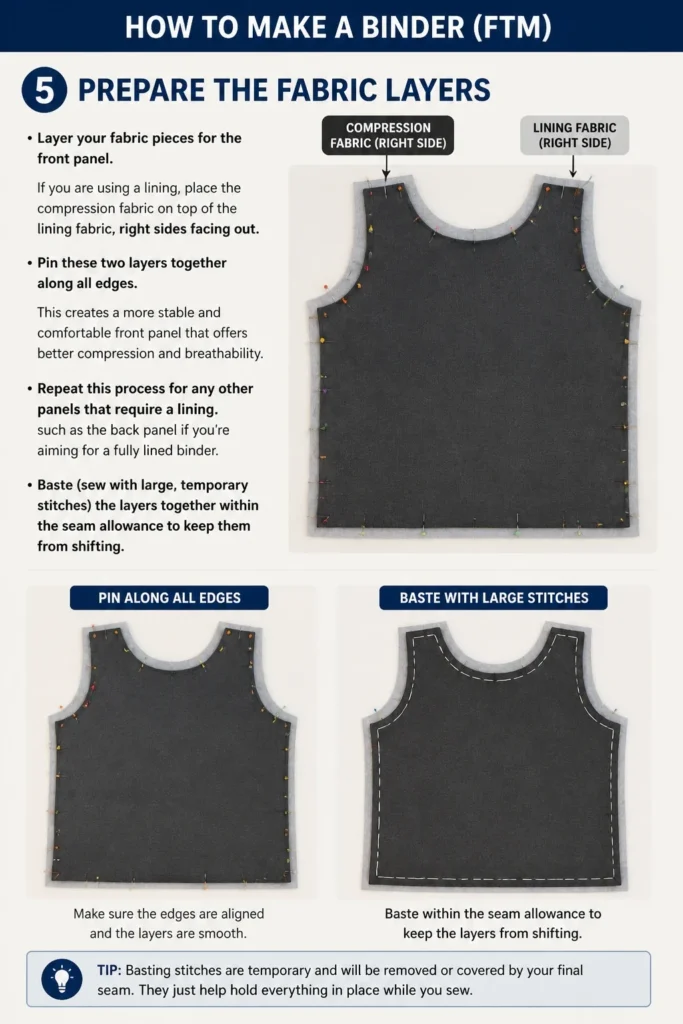
Pin these two layers together along all edges. This creates a more stable and comfortable front panel that offers better compression and breathability.
Repeat this process for any other panels that require a lining, such as the back panel if you’re aiming for a fully lined binder. Baste (sew with large, temporary stitches) the layers together within the seam allowance to keep them from shifting.
Step 6: Sew the Main Body
Join the front and back (or side) panels together. Place the front panel and one back/side panel right sides together, aligning the side edges.
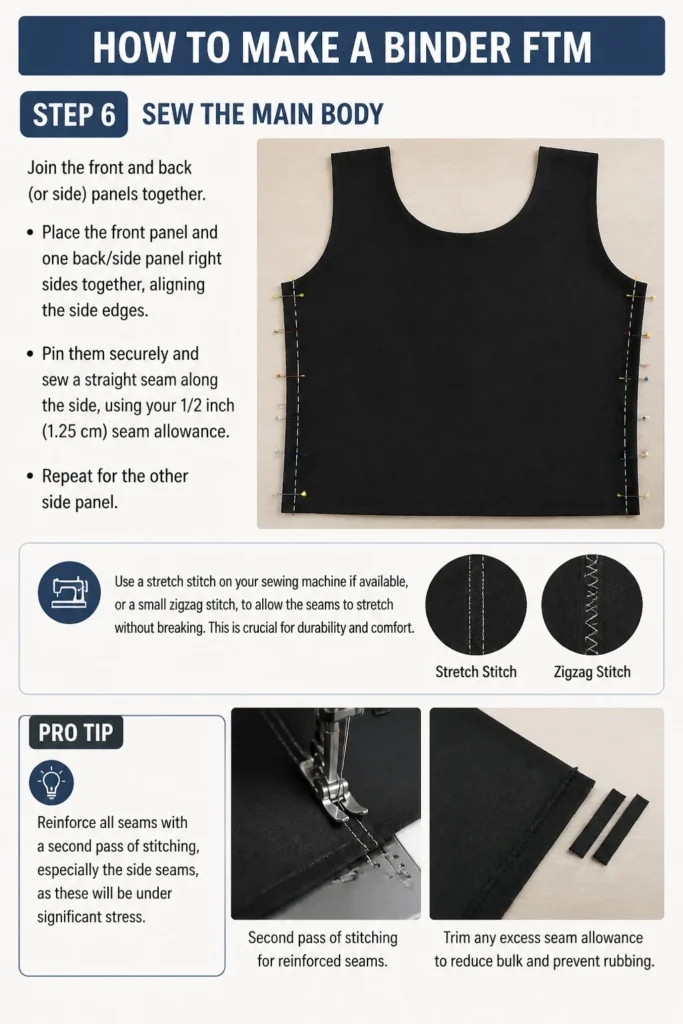
Pin them securely and sew a straight seam along the side, using your 1/2 inch (1.25 cm) seam allowance. Repeat for the other side panel.
Use a stretch stitch on your sewing machine if available, or a small zigzag stitch, to allow the seams to stretch without breaking. This is crucial for durability and comfort.
Pro Tip: Reinforce all seams with a second pass of stitching, especially the side seams, as these will be under significant stress. Trim any excess seam allowance to reduce bulk and prevent rubbing.
Step 7: Add Straps and Edges
Attach the shoulder straps and finish all raw edges. Take your shoulder strap pieces and fold them lengthwise, right sides together.
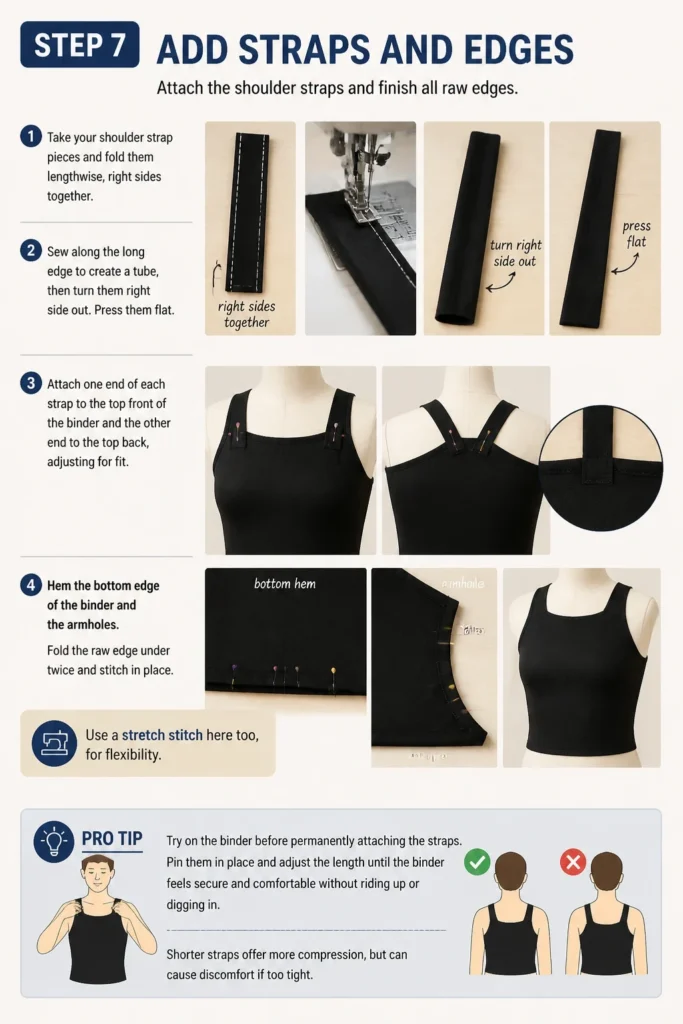
Sew along the long edge to create a tube, then turn them right side out. Press them flat. Attach one end of each strap to the top front of the binder and the other end to the top back, adjusting for fit.
Hem the bottom edge of the binder and the armholes. Fold the raw edge under twice and stitch in place. Use a stretch stitch here too, for flexibility.
Pro Tip: Try on the binder before permanently attaching the straps. Pin them in place and adjust the length until the binder feels secure and comfortable without riding up or digging in. Shorter straps offer more compression, but can cause discomfort if too tight.
Step 8: Final Adjustments and Testing
Inspect your binder thoroughly for any loose threads, missed stitches, or rough edges. Trim all excess threads.
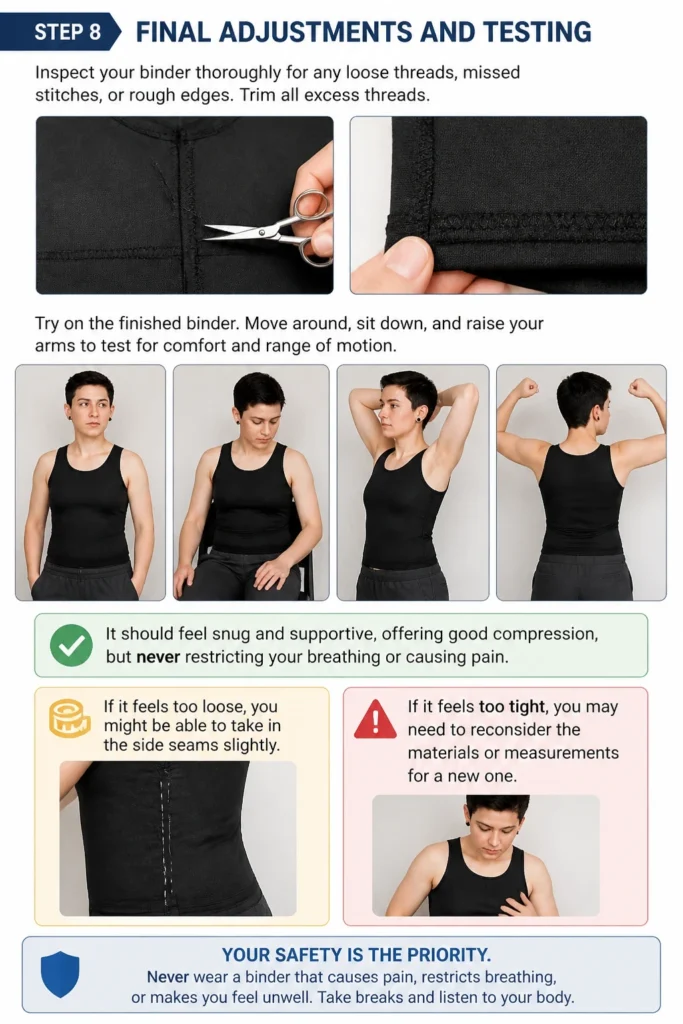
Try on the finished binder. Move around, sit down, and raise your arms to test for comfort and range of motion. It should feel snug and supportive, offering good compression, but never restricting your breathing or causing pain.
If it feels too loose, you might be able to take in the side seams slightly. If it feels too tight, you may need to reconsider the materials or measurements for a new one. Your safety is the priority.
Common Mistakes to Avoid
Using the Wrong Fabric
Many people mistakenly use non-stretch fabrics like denim or canvas, or fabrics that are too stretchy like thin jersey. These materials either offer no effective compression or are rigid and dangerous, restricting breathing and movement. Always opt for a firm, athletic compression fabric for the main front panel and a two-way stretch for the back and lining.
Binding Too Tightly
A common error is making the binder too small in an attempt to achieve maximum flatness. This is extremely dangerous. Overly tight binding can lead to breathing difficulties, rib pain, skin irritation, and even long-term damage to ribs and connective tissue. Always prioritize comfort and safety over extreme flatness. Your binder should feel snug, not painful or restrictive.
Incorrect Measurements
Rushing measurements or not measuring accurately can lead to a binder that doesn’t fit properly. A binder that is too large won’t provide adequate compression, while one that is too small will be unsafe. Take your time, measure multiple times, and consider making a fabric mock-up to test the fit before cutting into your final materials.
Poor Seam Construction
Using a regular straight stitch on stretchy fabric can cause seams to pop or tear when stretched. Neglecting to reinforce high-stress areas, like side seams and strap attachments, also leads to a less durable binder. Always use a stretch stitch or a small zigzag stitch, and consider double-stitching critical seams for added strength and longevity.
Troubleshooting
Binder feels too tight or restrictive
If your binder feels uncomfortably tight, causes pain, or restricts your breathing, remove it immediately. The most likely cause is incorrect measurements or using a fabric with insufficient stretch. You may need to create a new binder with slightly larger dimensions, or choose a fabric that offers firm compression without being rigid. Safety always comes first.
Binder rides up or bunches
This often happens if the binder is too short or if the bottom hem isn’t elastic enough. Ensure your initial length measurement extended far enough down your torso. You might be able to add a small piece of elastic to the bottom hem, or widen the binder slightly at the bottom to prevent it from rolling up. Adjusting strap length can also help stabilize the fit.
Fabric edges roll or fray
Rolling edges usually indicate that the fabric isn’t properly hemmed or that the stitch used doesn’t accommodate the fabric’s stretch. Ensure all raw edges are properly folded under twice and sewn with a stretch stitch. For fabrics prone to fraying, an overlock stitch or serger can provide a cleaner, more durable finish, but a zigzag stitch works well too.
Key Takeaways
- Prioritize safety and comfort above all else when making and wearing a binder.
- Accurate measurements are crucial for a well-fitting and safe binder.
- Select appropriate fabrics: firm compression for the front, breathable stretch for other panels.
- Utilize a stretch stitch or zigzag stitch for durable seams on stretchy fabric.
- Always test the fit and range of motion, making adjustments as needed.
- Never bind too tightly; pain or breathing restriction means the binder is unsafe.
Frequently Asked Questions
Is a DIY binder safe?
A DIY binder can be safe if made with appropriate materials, accurate measurements, and careful construction techniques. However, it carries inherent risks if not done correctly. Always prioritize safety over extreme flatness and listen to your body. If you experience any pain or difficulty breathing, remove the binder immediately.
What fabric is best for a DIY binder?
For the primary compression panel, a firm, non-stretch or low-stretch athletic compression fabric (like a heavy-duty nylon-spandex blend) is best. For the back and lining, a breathable, two-way stretch fabric like a lighter spandex blend or athletic mesh is ideal. Avoid rigid fabrics, ace bandages, or duct tape, as these are extremely dangerous.
How long can I wear a DIY binder?
Similar to commercial binders, a DIY binder should not be worn for more than 8-10 hours at a time. It’s important to take breaks, especially during physical activity. Never sleep in a binder, and always remove it if you experience any discomfort, pain, or difficulty breathing.
Can I use an old t-shirt to make a binder?
While an old t-shirt can be used for a mock-up pattern, it is generally not suitable for a functional binder. T-shirt fabric typically lacks the necessary compression properties to effectively flatten the chest and will likely stretch out or bunch up. It will not provide the support or safety of purpose-designed compression fabrics.
Our Top Recommended Finds
- Heavy-Duty Compression Fabric: Look for a high-quality nylon/spandex blend with at least 20% spandex, often found in athletic wear or swimwear sections.
- Strong Polyester Thread: Essential for durable seams that can withstand tension and stretching without breaking.
- Stretch Needle for Sewing Machine: A specific needle type designed for knit and stretchy fabrics prevents skipped stitches and fabric damage.
Embracing Your Authentic Self
Creating your own binder is more than just a craft project; it’s a step towards feeling more comfortable and confident in your own skin.
Remember that self-care and safety are paramount throughout this process. Take your time, be patient with yourself, and celebrate each small victory.
Consider exploring resources on safe binding practices or even researching commercial binder options if a DIY approach doesn’t feel right for you. Start today, and empower your journey.
Beginner-friendly templates, step-by-step guides,
and weekly project ideas in your inbox.