How To Make Barbie Clothes DIY

Beginner-friendly templates, step-by-step guides,
and weekly project ideas in your inbox.
Creating custom outfits for dolls has been a passion of mine since I first picked up a needle and thread at age seven.
I have spent years perfecting simple techniques that turn old socks and fabric scraps into runway-ready miniature fashion.
This guide shares those exact methods so you can build a full wardrobe for your dolls without spending a fortune.
Quick Overview
Making your own doll clothes allows you to express your creativity while recycling materials you already have at home.
- Time needed: 45 to 90 minutes per outfit
- Difficulty: Beginner
- What you’ll need: Fabric scraps, sharp scissors, needle and thread, fabric glue, and thin velcro strips.
Step 1: Selecting the Right Fabric for Scale
The success of a miniature garment depends heavily on the weight and drape of the fabric you choose.
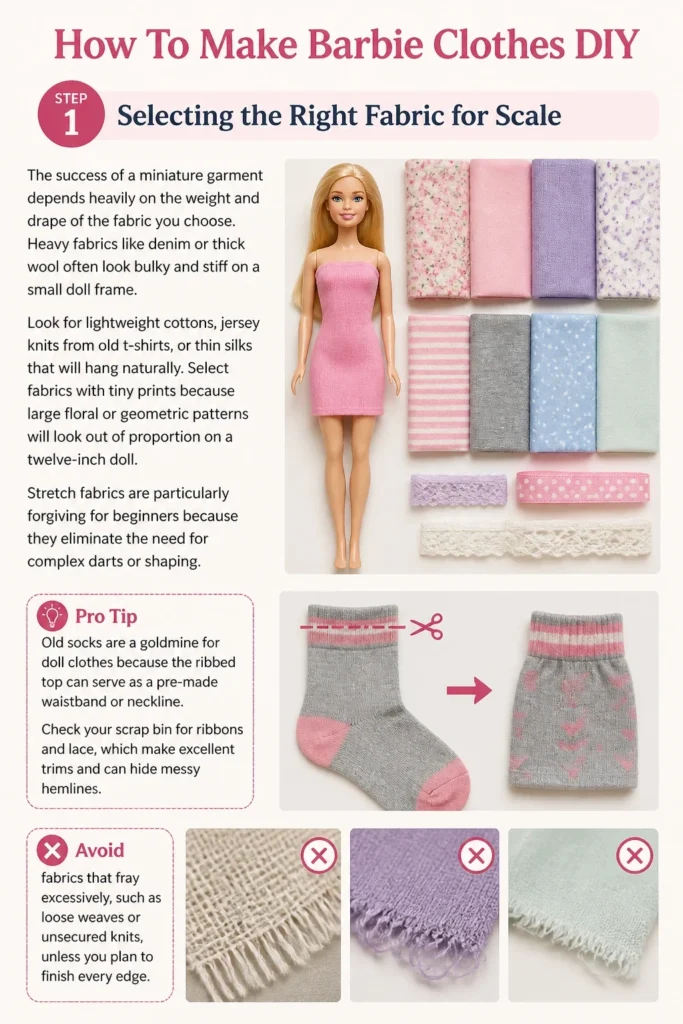
Heavy fabrics like denim or thick wool often look bulky and stiff on a small doll frame.
Look for lightweight cottons, jersey knits from old t-shirts, or thin silks that will hang naturally.
Select fabrics with tiny prints because large floral or geometric patterns will look out of proportion on a twelve-inch doll.
Stretch fabrics are particularly forgiving for beginners because they eliminate the need for complex darts or shaping.
Pro Tip: Old socks are a goldmine for doll clothes because the ribbed top can serve as a pre-made waistband or neckline.
Check your scrap bin for ribbons and lace, which make excellent trims and can hide messy hemlines.
Avoid fabrics that fray excessively, such as loose-weave linens, unless you plan to use a lot of fabric sealant.
Step 2: Preparing Your Essential Tool Kit
Working in miniature requires tools that offer precision and control over small surface areas.
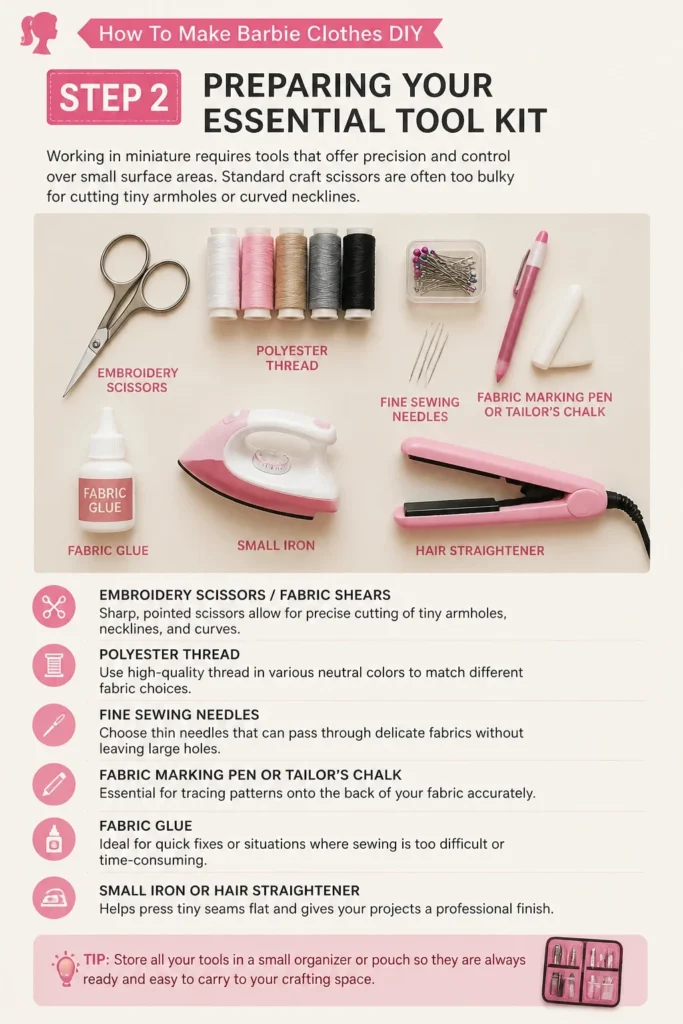
Standard craft scissors are often too bulky for cutting tiny armholes or curved necklines.
Invest in a pair of small embroidery scissors or specialized fabric shears with a sharp point.
Gather high-quality polyester thread in a variety of neutral colors to match your fabric choices.
You will also need fine sewing needles that can pass through delicate fabrics without leaving large holes.
A fabric marking pen or a piece of tailor’s chalk is necessary for tracing patterns onto the back of your material.
Keep a small container of fabric glue nearby for instances where sewing is too difficult or time-consuming.
Having a small iron or a hair straightener can help you press tiny seams flat for a professional look.
Step 3: Measuring Your Doll for a Custom Fit
Standard dolls often have varying body shapes, so taking custom measurements ensures the clothes fit perfectly.
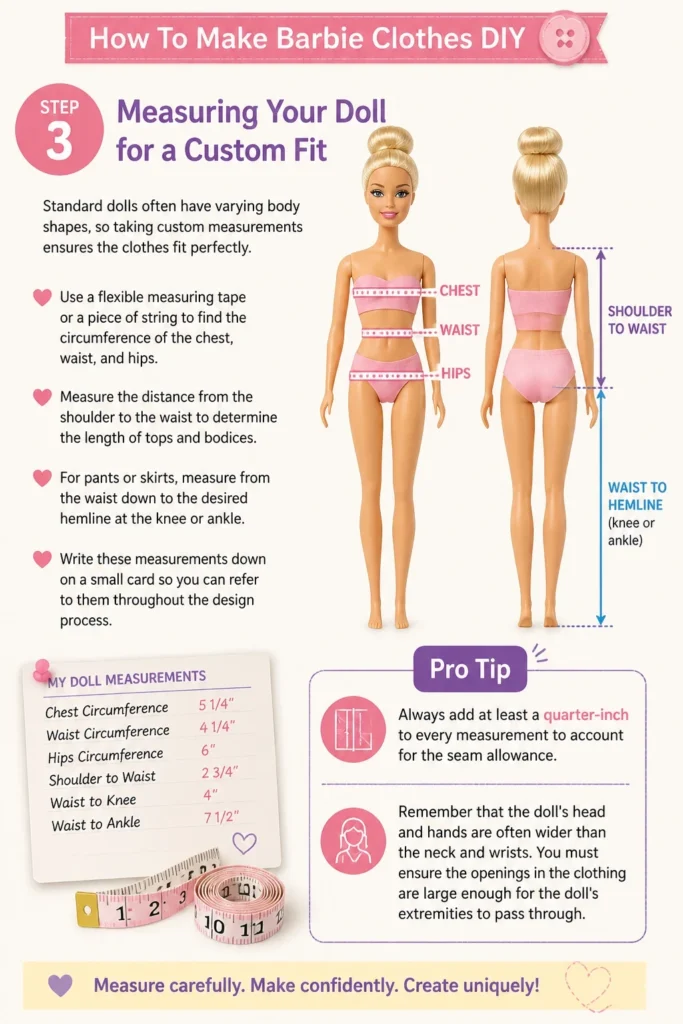
Use a flexible measuring tape or a piece of string to find the circumference of the chest, waist, and hips.
Measure the distance from the shoulder to the waist to determine the length of tops and bodices.
For pants or skirts, measure from the waist down to the desired hemline at the knee or ankle.
Write these measurements down on a small card so you can refer to them throughout the design process.
Pro Tip: Always add at least a quarter-inch to every measurement to account for the seam allowance.
Remember that the doll’s head and hands are often wider than the neck and wrists.
You must ensure the openings in the clothing are large enough for the doll’s extremities to pass through easily.
Step 4: Creating a Simple Paper Template
Drafting a pattern on paper before cutting your fabric prevents wasting your best materials.
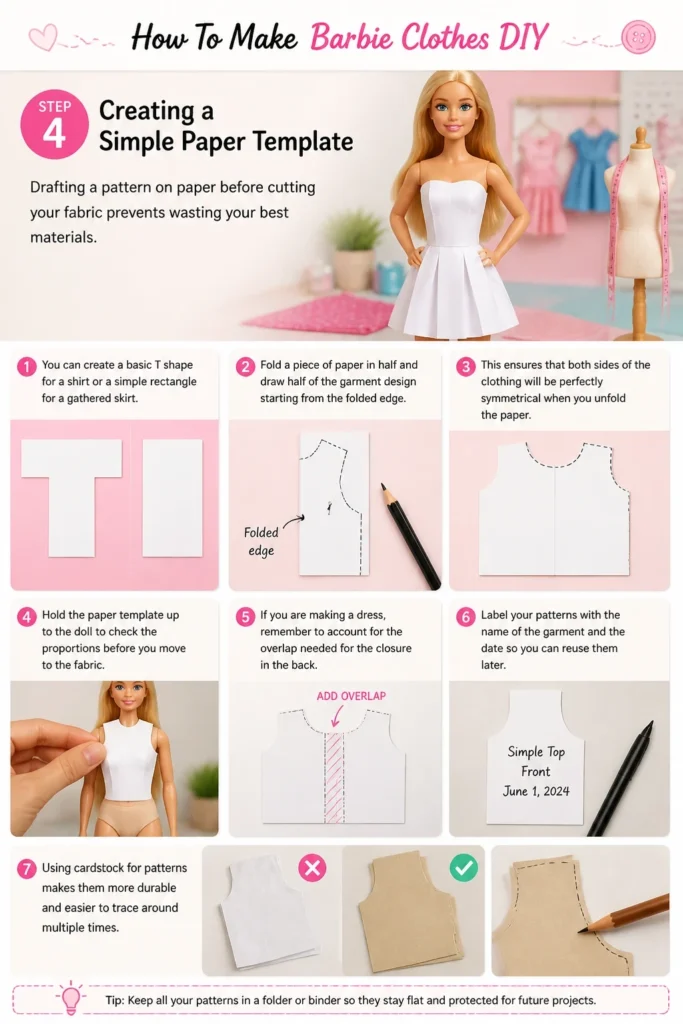
You can create a basic “T” shape for a shirt or a simple rectangle for a gathered skirt.
Fold a piece of paper in half and draw half of the garment design starting from the folded edge.
This ensures that both sides of the clothing will be perfectly symmetrical when you unfold the paper.
Hold the paper template up to the doll to check the proportions before you move to the fabric.
If you are making a dress, remember to account for the overlap needed for the closure in the back.
Label your patterns with the name of the garment and the date so you can reuse them later.
Using cardstock for patterns makes them more durable and easier to trace around multiple times.
Step 5: Cutting and Aligning the Grain
Lay your fabric flat on a hard surface and ensure there are no wrinkles or folds in the material.
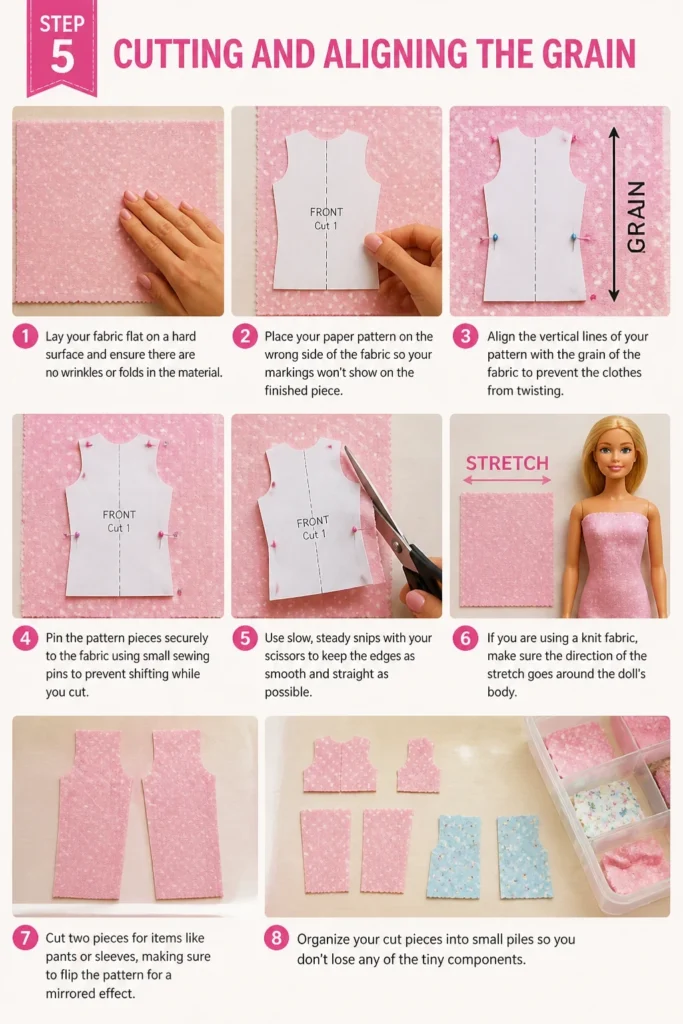
Place your paper pattern on the “wrong” side of the fabric so your markings won’t show on the finished piece.
Align the vertical lines of your pattern with the grain of the fabric to prevent the clothes from twisting.
Pin the pattern pieces securely to the fabric using small sewing pins to prevent shifting while you cut.
Use slow, steady snips with your scissors to keep the edges as smooth and straight as possible.
If you are using a knit fabric, make sure the direction of the stretch goes around the doll’s body.
Cut two pieces for items like pants or sleeves, making sure to flip the pattern for a mirrored effect.
Organize your cut pieces into small piles so you don’t lose any of the tiny components.
Step 6: Mastering Basic Hand Stitches
Most doll clothes are small enough to be sewn by hand, which gives you greater control over the tiny details.
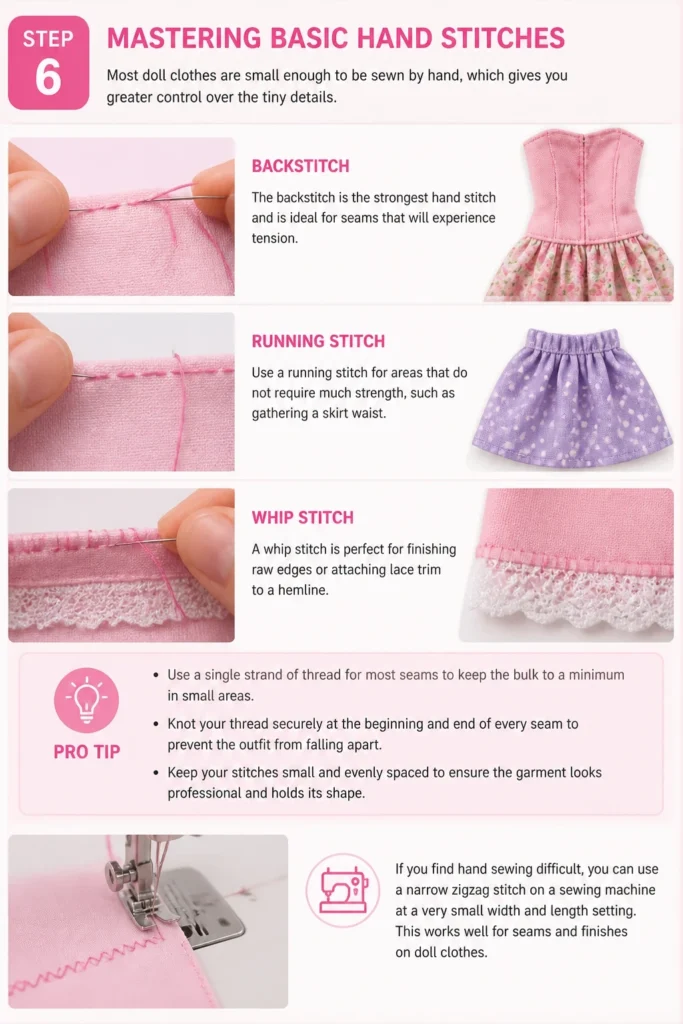
The backstitch is the strongest hand stitch and is ideal for seams that will experience tension.
Use a running stitch for areas that do not require much strength, such as gathering a skirt waist.
Keep your stitches small and evenly spaced to ensure the garment looks professional and holds its shape.
A whip stitch is perfect for finishing raw edges or attaching lace trim to a hemline.
Pro Tip: Use a single strand of thread for most seams to keep the bulk to a minimum in small areas.
Knot your thread securely at the beginning and end of every seam to prevent the outfit from falling apart.
If you find hand sewing difficult, you can use a narrow zigzag stitch on a sewing machine at a very slow speed.
Step 7: Constructing the Main Body
Start by joining the shoulder seams if you are making a top or the side seams for a skirt.
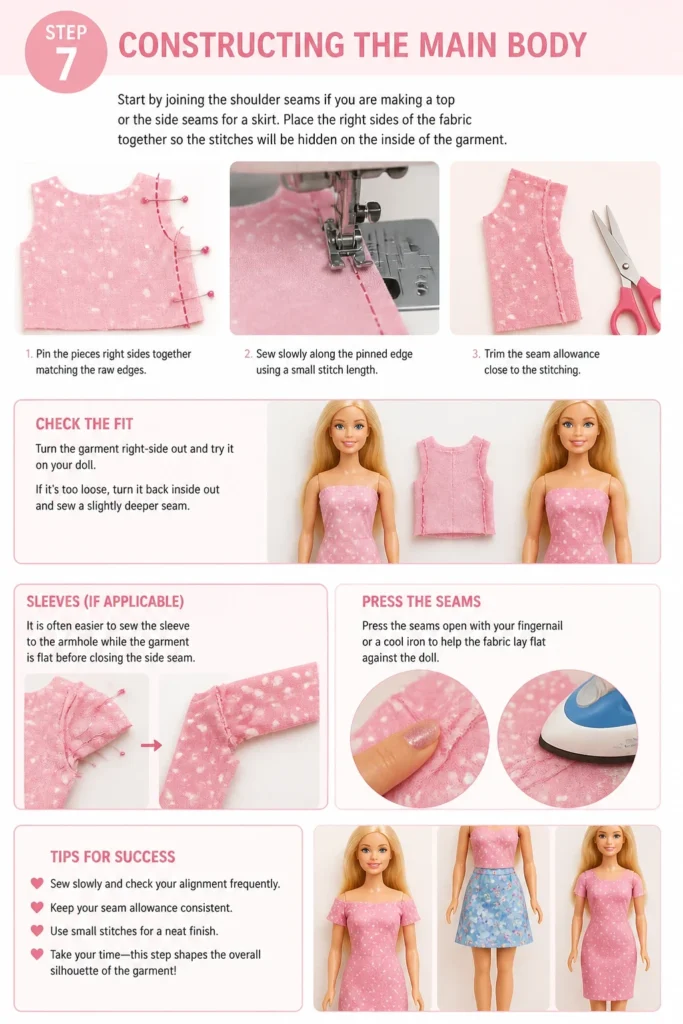
Place the “right” sides of the fabric together so the stitches will be hidden on the inside of the garment.
Sew slowly and check your alignment frequently to ensure the pieces are matching up correctly.
Once the main seams are finished, turn the garment right-side out to check the fit on the doll.
If the item is too loose, you can turn it back inside out and sew a slightly deeper seam.
For sleeves, it is often easier to sew the sleeve to the armhole while the garment is flat before closing the side seam.
Press the seams open with your fingernail or a cool iron to help the fabric lay flat against the doll.
Take your time with this step, as the construction phase determines the overall silhouette of the outfit.
Step 8: Adding Professional Closures
Closures are essential for making the clothes easy to put on and take off without damaging the doll.
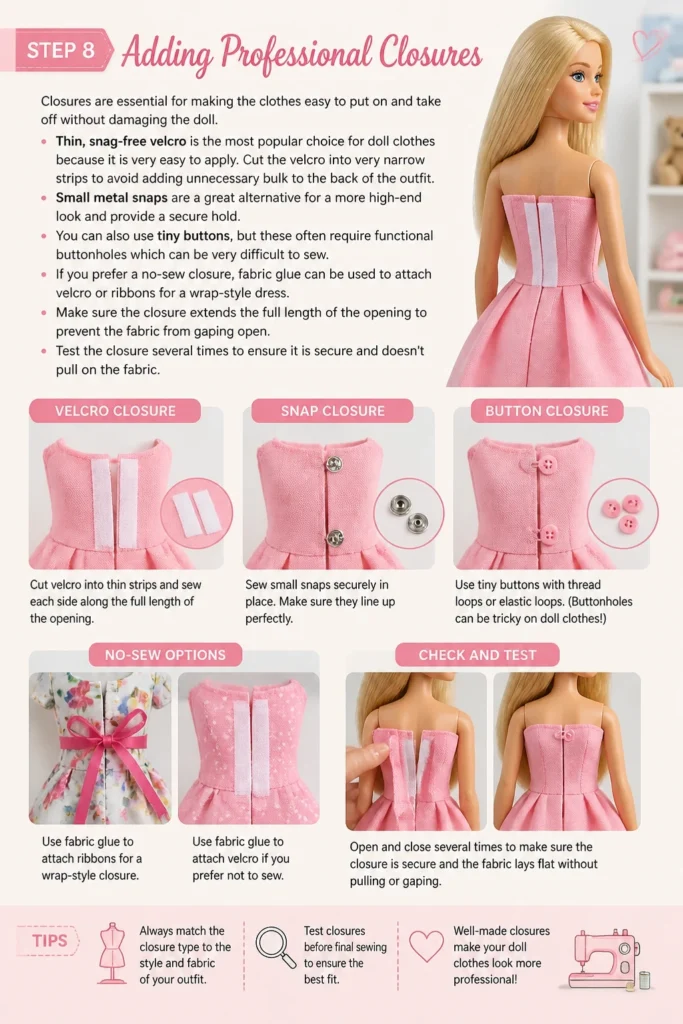
Thin, snag-free velcro is the most popular choice for doll clothes because it is very easy to apply.
Cut the velcro into very narrow strips to avoid adding unnecessary bulk to the back of the outfit.
Small metal snaps are a great alternative for a more high-end look and provide a secure hold.
You can also use tiny buttons, but these often require functional buttonholes which can be very difficult to sew.
If you prefer a no-sew closure, fabric glue can be used to attach velcro or ribbons for a wrap-style dress.
Make sure the closure extends the full length of the opening to prevent the fabric from gaping open.
Test the closure several times to ensure it is secure and doesn’t pull on the fabric too harshly.
Step 9: Finishing Touches and Embellishments
The final details are what transform a simple piece of fabric into a stylish fashion statement.
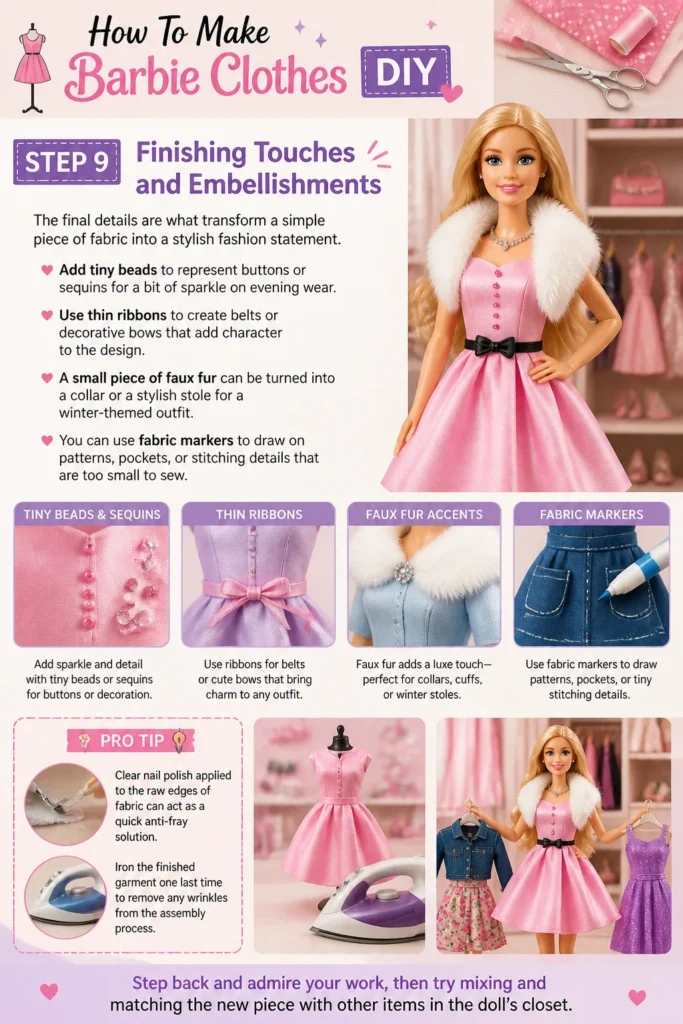
Add tiny beads to represent buttons or sequins for a bit of sparkle on evening wear.
Use thin ribbons to create belts or decorative bows that add character to the design.
A small piece of faux fur can be turned into a collar or a stylish stole for a winter-themed outfit.
You can use fabric markers to draw on patterns, pockets, or stitching details that are too small to sew.
Pro Tip: Clear nail polish applied to the raw edges of fabric can act as a quick anti-fray solution.
Iron the finished garment one last time to remove any wrinkles from the assembly process.
Step back and admire your work, then try mixing and matching the new piece with other items in the doll’s closet.
Common Mistakes to Avoid
Ignoring the Scale of Prints
Using fabric with large patterns is a frequent error that makes the finished garment look awkward. A flower that is three inches wide on a human-sized shirt would cover the entire torso of a doll. Always opt for micro-prints or solid colors to maintain a realistic appearance in miniature fashion.
Forgetting the Seam Allowance
Many beginners trace the doll’s body exactly and forget that the stitches take up space. If you do not add extra room for the seams, the clothes will be far too tight to fit over the doll’s hips or shoulders. Always include an extra quarter-inch of fabric around every edge of your pattern pieces.
Using Too Much Fabric Glue
While fabric glue is a helpful tool, using an excessive amount can make the fabric stiff and crunchy. It can also seep through the fibers and leave visible dark spots on the front of the garment. Use a toothpick to apply glue in very small, controlled amounts only where necessary.
Neglecting to Finish the Edges
Small garments are handled frequently, and raw edges will fray quickly if they are not treated. Unfinished hemlines can make a beautiful dress look messy after only a few uses. Always fold and sew your hems or use a fray-checking liquid to keep the edges looking sharp and clean.
Troubleshooting
The Clothes Are Too Tight to Put On
If you find that the outfit won’t slide over the doll’s limbs, the issue is likely a lack of stretch or a narrow opening. You can fix this by extending the back opening further down the garment or by adding a small “V” slit in the side seams. For future projects, try using knit fabrics that offer more flexibility during the dressing process.
The Fabric Is Fraying Rapidly
Some fabrics begin to fall apart the moment they are cut, which can ruin your progress. If your fabric is unraveling, immediately apply a thin line of clear glue or fray sealant along the cut edges. You can also use a whip stitch to “overcast” the edges, which binds the loose threads together and prevents further damage.
The Seams Are Bulky and Bumpy
Bulky seams usually happen when the fabric is too thick or the stitches are too large. Try trimming the seam allowance very close to the stitching line after you have finished the seam. You can also use a warm iron to press the seams flat, which helps the garment contour more naturally to the doll’s body shape.
Key Takeaways
- Choose lightweight fabrics and tiny prints to keep the clothing in scale with the doll.
- Always add a seam allowance to your measurements to ensure a comfortable fit.
- Use small, precise tools like embroidery scissors and fine needles for better control.
- Recycle household items like old socks and ribbons to save money on materials.
- Press your seams with an iron or hair straightener for a professional, crisp finish.
- Secure all raw edges with stitches or sealant to prevent the fabric from fraying.
Frequently Asked Questions
What is the best fabric for making doll clothes?
Lightweight cotton, also known as quilting cotton, is the most popular choice because it is easy to handle and comes in many patterns. Jersey knit from old t-shirts is also excellent because it stretches, making it easier to fit the clothes onto the doll. Avoid heavy fabrics like thick denim or corduroy which do not drape well in small sizes.
Do I need a sewing machine to make Barbie clothes?
No, a sewing machine is not necessary and can sometimes be more difficult to use on such small items. Hand sewing allows for much greater precision when navigating tiny curves like armholes and necklines. Most professional doll clothes designers prefer hand-stitching for the intricate details of miniature fashion.
How can I make doll clothes without any sewing?
You can create no-sew doll clothes by using high-quality fabric glue or iron-on hem tape to join your pieces. Another popular no-sew method involves using old socks; you can cut a hole for the head and arms to create a simple sweater or dress. Ribbons can also be tied or glued to create skirts and tops without a single stitch.
How do I make the clothes easy to wash?
If you plan on washing the doll clothes, make sure to use colorfast fabrics that won’t bleed onto the doll’s plastic skin. Use a gentle hand-wash method with mild soap and air-dry the items to prevent shrinking. Always reinforce your knots and seams if the clothes will be handled or washed frequently by children.
Our Top Recommended Finds
- Precision Fabric Shears: Small, sharp scissors are essential for cutting tiny patterns without jagged edges.
- Miniature Hook and Loop Strips: These thin fasteners are much less bulky than standard velcro and perfect for doll-scale closures.
- Fabric Fray Sealant: A liquid adhesive that stops edges from unraveling, which is a lifesaver when working with delicate fabrics.
Expanding Your Doll Fashion Collection
Now that you have mastered the basics of construction, you can start experimenting with more complex designs like jackets and hats.
Consider looking at high-fashion magazines for inspiration and try to replicate those looks in miniature form.
You can also explore making accessories like tiny handbags or fabric shoes to complete each outfit.
The most important thing is to keep practicing and let your personal style shine through in every piece you create.
Gather your fabric scraps today and start building a unique wardrobe that no one else has.
Beginner-friendly templates, step-by-step guides,
and weekly project ideas in your inbox.