
How To Felt A Therian Mask

Beginner-friendly templates, step-by-step guides,
and weekly project ideas in your inbox.
There’s a special magic in crafting something with your own hands, especially when it connects to your inner self.
I remember the quiet joy of finishing my first therian mask; it felt like a piece of my spirit made tangible.
This guide shares the practical steps I learned, helping you create your own unique felted masterpiece.

Quick Overview
This guide will walk you through the essential techniques of wet felting to create a durable, expressive therian mask. You’ll learn how to shape wool fibers into a wearable piece that truly reflects your spirit.
- Time needed: 8-15 hours (spread over 2-3 days for drying)
- Difficulty: Intermediate
- What you’ll need: Wool roving, soap, water, a resist template, mesh, and a towel
Step-by-Step Instructions
Step 1: Design Your Mask and Create a Resist Template
Start by sketching your mask design. Consider the animal’s features, eye placement, and how it will sit on your face.
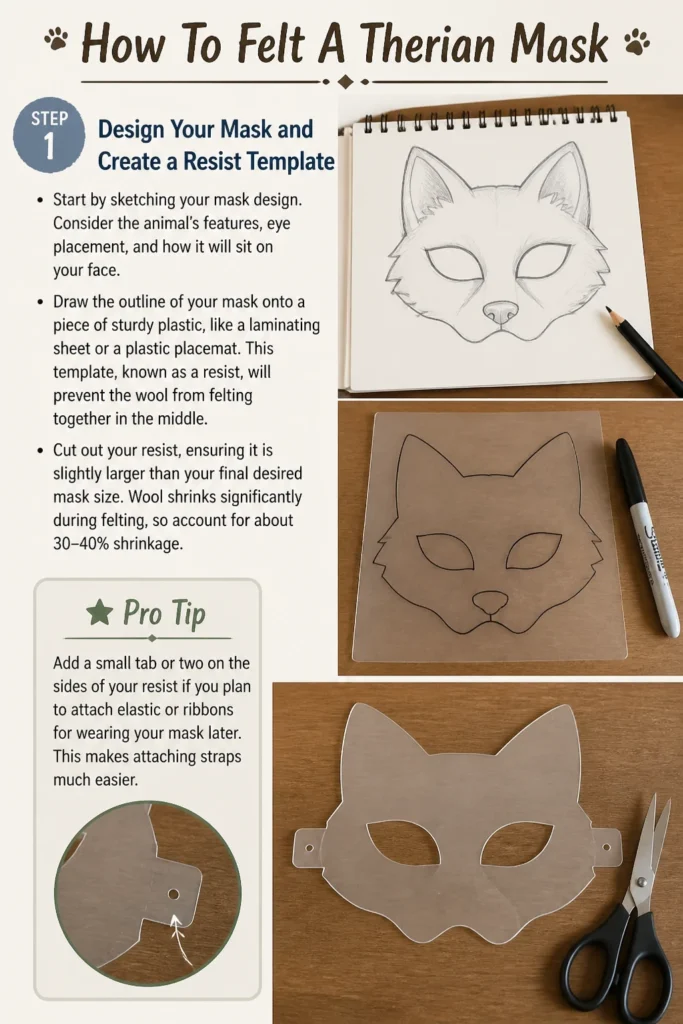
Draw the outline of your mask onto a piece of sturdy plastic, like a laminating sheet or a plastic placemat. This template, known as a resist, will prevent the wool from felting together in the middle.
Cut out your resist, ensuring it is slightly larger than your final desired mask size. Wool shrinks significantly during felting, so account for about 30-40% shrinkage.
Pro Tip: Add a small tab or two on the sides of your resist if you plan to attach elastic or ribbons for wearing your mask later. This makes attaching straps much easier.
Step 2: Prepare Your Workspace and Materials
Lay down a waterproof mat or several old towels on your work surface. Felting involves a lot of water and soap, so protect your table.
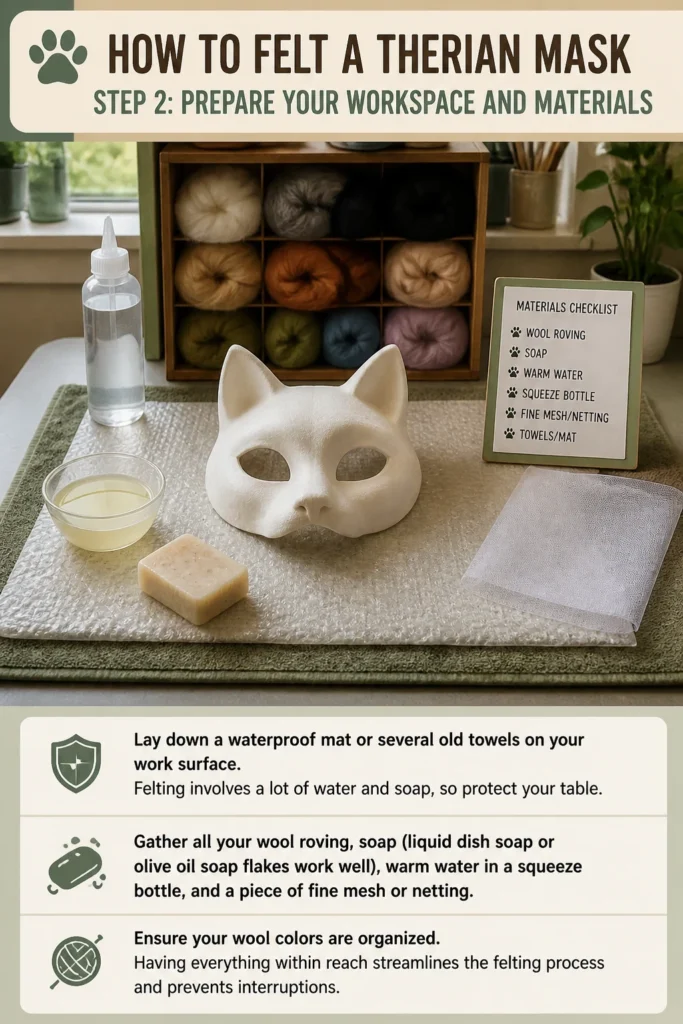
Gather all your wool roving, soap (liquid dish soap or olive oil soap flakes work well), warm water in a squeeze bottle, and a piece of fine mesh or netting.
Ensure your wool colors are organized. Having everything within reach streamlines the felting process and prevents interruptions.
Step 3: Lay Out the First Layer of Wool
Place your plastic resist template in the center of your prepared work surface.
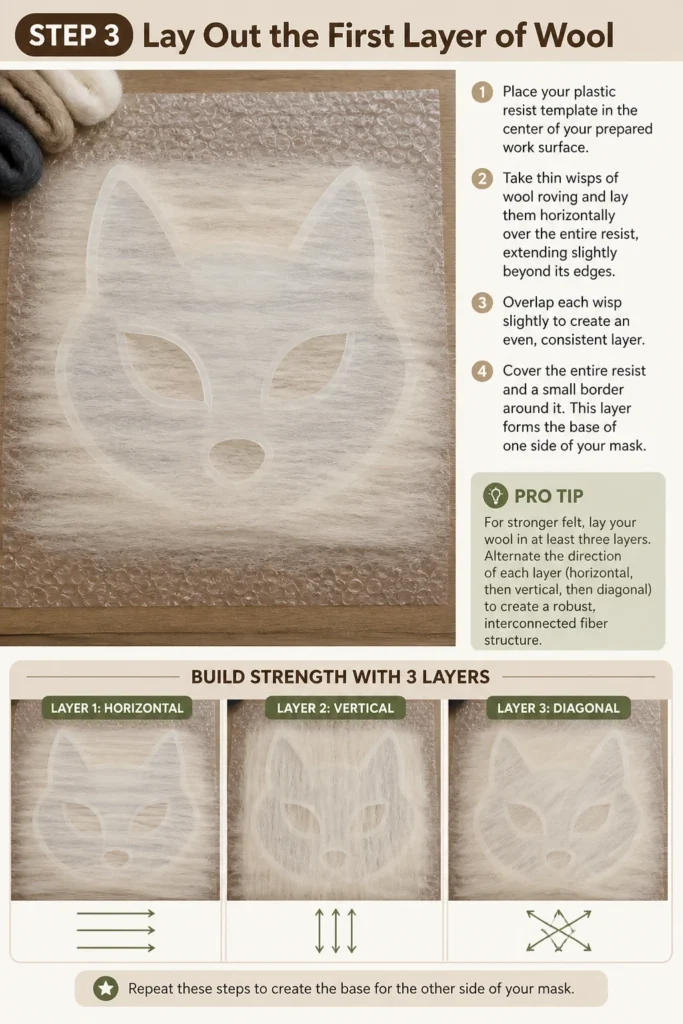
Take thin wisps of wool roving and lay them horizontally over the entire resist, extending slightly beyond its edges. Overlap each wisp slightly to create an even, consistent layer.
Cover the entire resist and a small border around it. This layer forms the base of one side of your mask.
Pro Tip: For stronger felt, lay your wool in at least three layers. Alternate the direction of each layer (horizontal, then vertical, then diagonal) to create a robust, interconnected fiber structure.
Step 4: Wet and Soap the First Side
Gently place your mesh screen over the laid-out wool. This prevents the fibers from shifting too much when you add water.
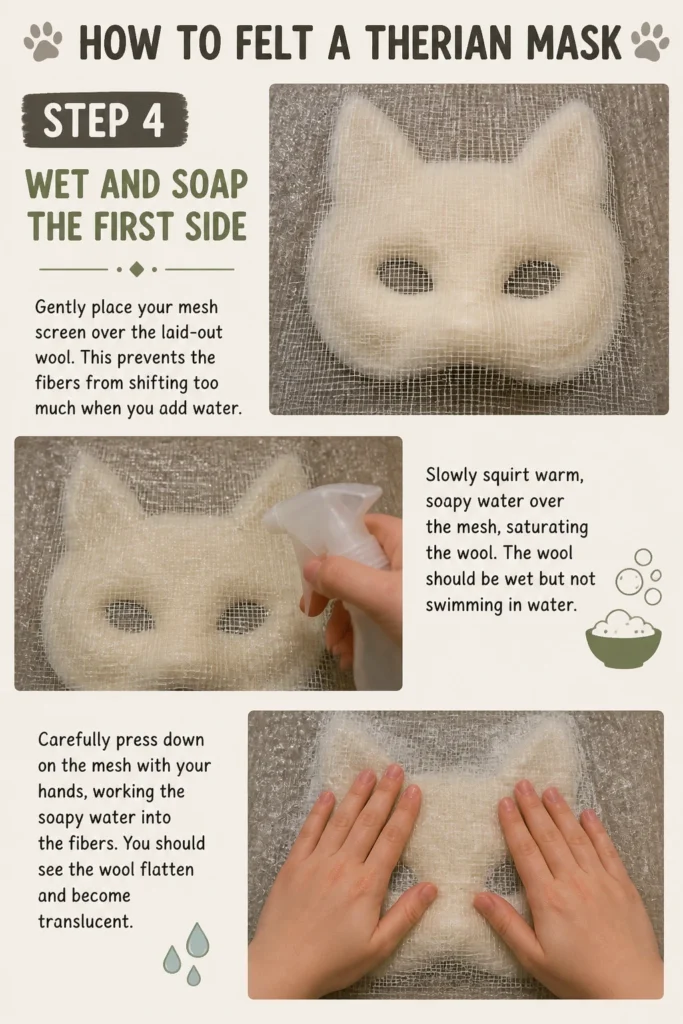
Slowly squirt warm, soapy water over the mesh, saturating the wool. The wool should be wet but not swimming in water.
Carefully press down on the mesh with your hands, working the soapy water into the fibers. You should see the wool flatten and become translucent.
Step 5: Lay Out the Second Side and Continue Felting
Remove the mesh and carefully flip the entire wool and resist assembly over. The edges of the wool should now be visible underneath the resist.
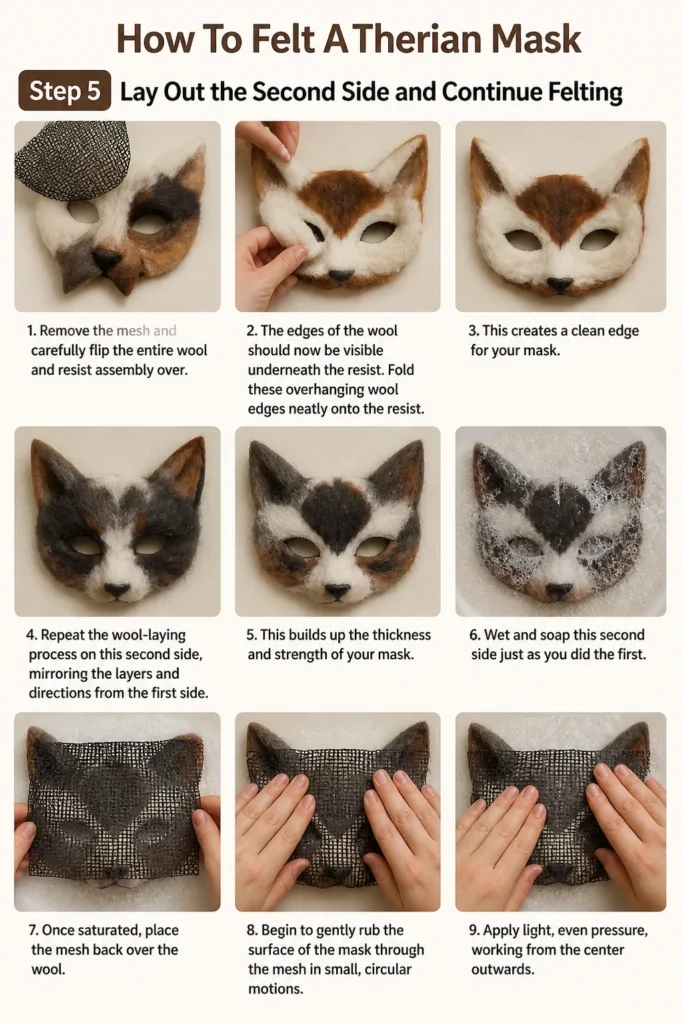
Fold these overhanging wool edges neatly onto the resist. This creates a clean edge for your mask.
Repeat the wool-laying process on this second side, mirroring the layers and directions from the first side. This builds up the thickness and strength of your mask.
Wet and soap this second side just as you did the first. Once saturated, place the mesh back over the wool.
Begin to gently rub the surface of the mask through the mesh in small, circular motions. Apply light, even pressure, working from the center outwards.
Step 6: Fulling the Felt
Continue rubbing and massaging the mask, gradually increasing pressure as the wool begins to felt. You’ll notice the fibers becoming more cohesive and less fuzzy.
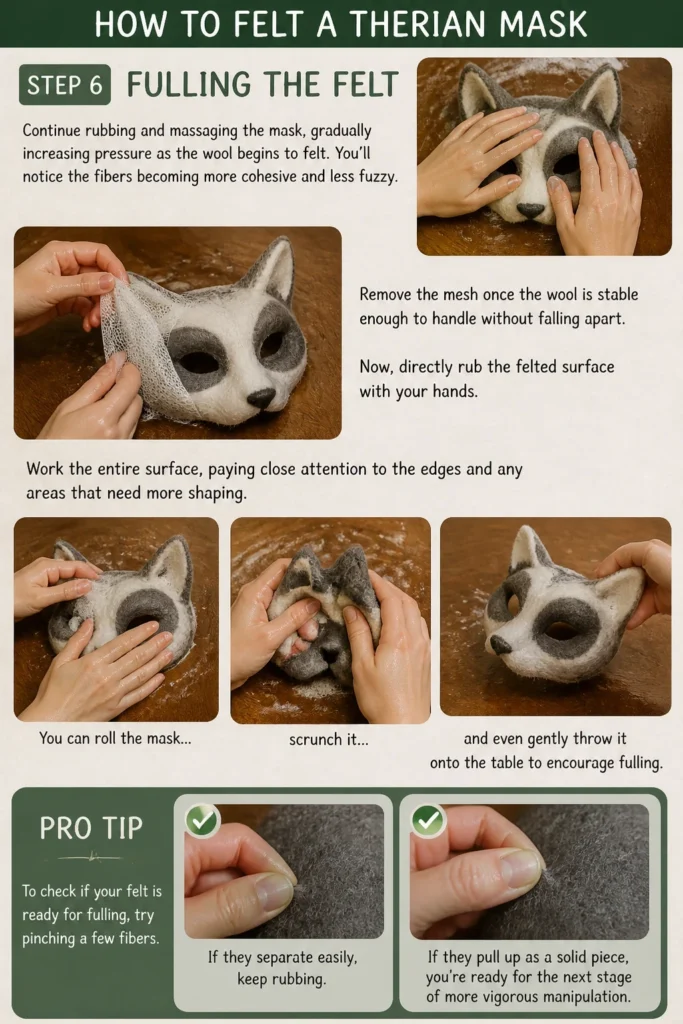
Remove the mesh once the wool is stable enough to handle without falling apart. Now, directly rub the felted surface with your hands.
Work the entire surface, paying close attention to the edges and any areas that need more shaping. You can roll the mask, scrunch it, and even gently throw it onto the table to encourage fulling.
Pro Tip: To check if your felt is ready for fulling, try pinching a few fibers. If they separate easily, keep rubbing. If they pull up as a solid piece, you’re ready for the next stage of more vigorous manipulation.
Step 7: Remove the Resist and Shape the Mask
Carefully cut a slit in the center of the mask where the eyes will be, or along the bottom edge, just enough to access and remove the plastic resist.
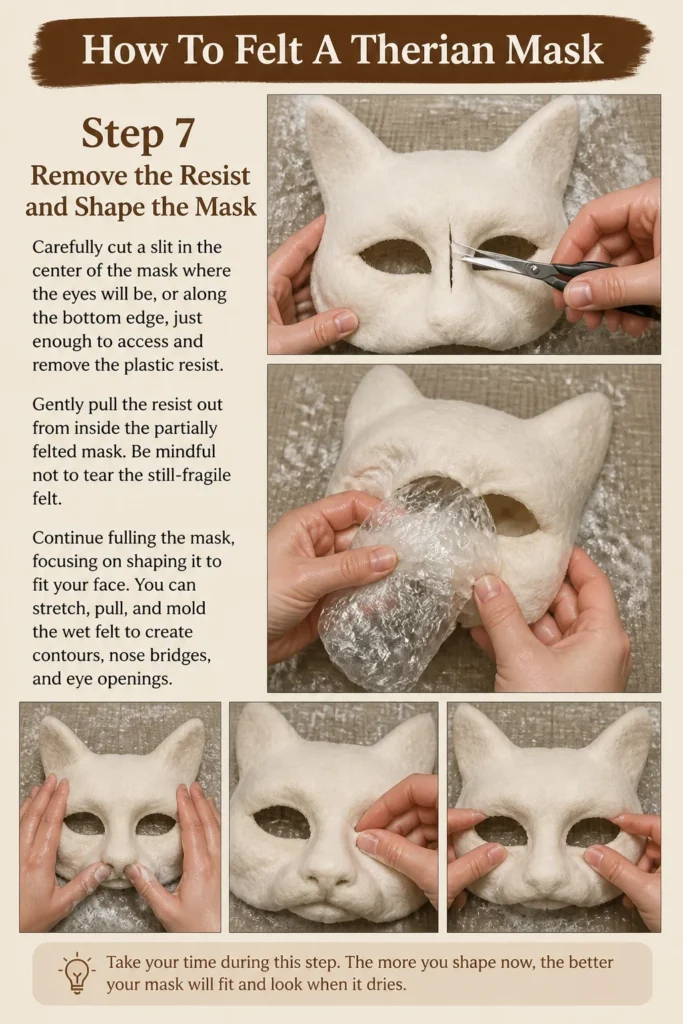
Gently pull the resist out from inside the partially felted mask. Be mindful not to tear the still-fragile felt.
Continue fulling the mask, focusing on shaping it to fit your face. You can stretch, pull, and mold the wet felt to create contours, nose bridges, and eye openings.
Step 8: Rinse, Dry, and Finish
Rinse the mask thoroughly under cool running water until all soap residue is gone. Squeeze out as much excess water as possible.
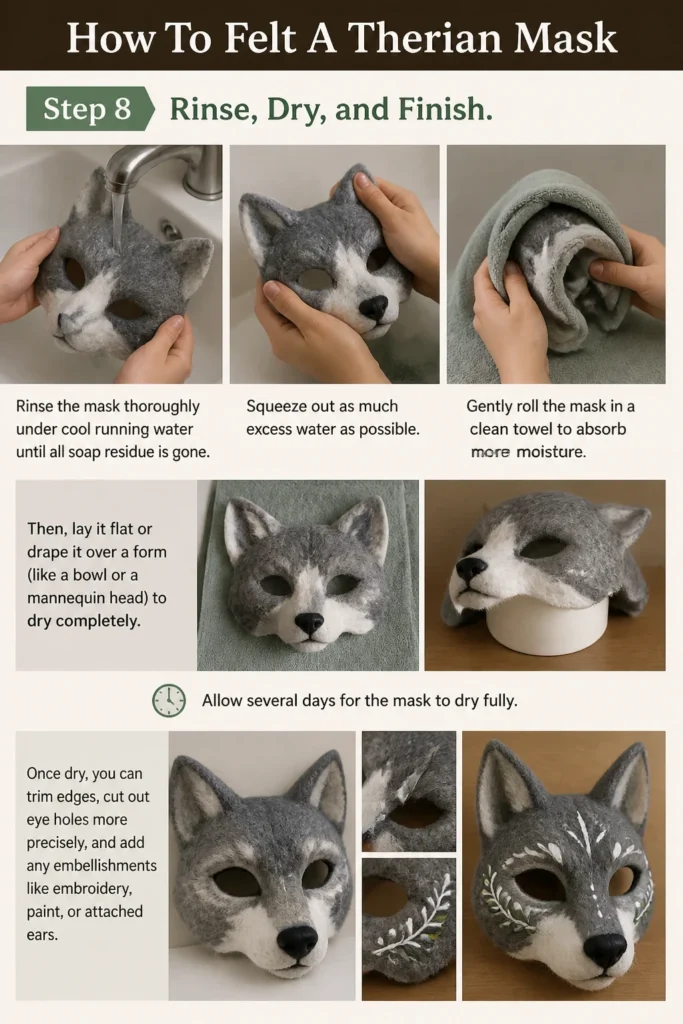
Gently roll the mask in a clean towel to absorb more moisture. Then, lay it flat or drape it over a form (like a bowl or a mannequin head) to dry completely.
Allow several days for the mask to dry fully. Once dry, you can trim edges, cut out eye holes more precisely, and add any embellishments like embroidery, paint, or attached ears.
Common Mistakes to Avoid
Not Enough Wool
Using too little wool is a common pitfall for beginners. This results in a thin, weak, and easily torn mask that won’t hold its shape well.
Always err on the side of using more wool than you think you need. Multiple thin layers create a much stronger and more durable felt.
Too Much Soap
While soap is essential for felting, an excessive amount can make the wool slimy and difficult to work with. It also makes rinsing a much longer and more tedious process.
Use just enough soap to make the water feel slightly slippery. You can always add more if needed, but it’s hard to remove excess without extensive rinsing.
Uneven Pressure
Applying uneven pressure during the rubbing stage can lead to areas that felt faster or slower than others. This results in an inconsistent thickness and texture throughout your mask.
Aim for consistent, gentle pressure across the entire surface of the mask. Work in small, even circular motions to ensure all fibers are felting at a similar rate.
Impatience During Fulling
Felting requires patience, especially during the fulling stage. Stopping too early means your mask won’t be as strong or as well-defined as it could be.
Continue fulling until the felt is firm, dense, and holds its shape when wet. The more you full, the more durable and sculptural your mask will become.
Troubleshooting
My Wool Isn’t Felting Together
If your wool isn’t bonding, it’s likely due to insufficient soap, not enough rubbing, or the water isn’t warm enough. Warm water helps open up the wool scales, allowing them to interlock.
Ensure your water is comfortably warm, add a little more soap, and increase the intensity and duration of your rubbing. Make sure all layers are thoroughly saturated.
My Mask is Too Flat/Lacks Dimension
A flat mask often results from not enough aggressive fulling or insufficient shaping during the wet stage. The fibers need to be manipulated to create contours.
Once the resist is removed, actively sculpt the wet felt. You can stretch and push the wool to create a nose bridge, cheekbones, or eye sockets. Use a form like a bowl to help it dry with a curved shape.
My Mask Shrunk Too Much
Excessive shrinkage is a common issue. It usually happens if you’ve done too much aggressive fulling or didn’t account for enough shrinkage in your initial resist size.
Unfortunately, significant shrinkage is hard to reverse. For future projects, make your resist template larger. You can also try gently stretching the wet felt back into shape immediately after fulling.
Key Takeaways
- Always create a resist template that is significantly larger than your desired final mask size to account for wool shrinkage.
- Lay multiple thin layers of wool in alternating directions to create a strong, durable felt.
- Use warm, soapy water and apply consistent, even pressure during the initial felting stages.
- Don’t be afraid to full vigorously once the fibers have started to bond; this creates a dense, sculptural mask.
- Carefully remove the resist and actively shape your mask while it is still wet to achieve desired contours and features.
- Allow the mask to dry completely on a form to maintain its shape and ensure longevity.
Frequently Asked Questions
Can I use any type of wool for felting?
Not all wool is suitable for felting. You need wool roving or batting made from sheep’s wool, specifically varieties that are “felting wool” or “non-superwash.” Superwash wool has been treated to prevent felting, so it won’t work for this project.
How do I make my mask stiffer?
To make your mask stiffer, ensure you full it thoroughly during the wet felting process. The more tightly the fibers are interlocked, the stiffer the felt will be. You can also apply a thin layer of fabric stiffener or textile hardener once the mask is completely dry, though this changes the texture.
Can I add details like stripes or spots?
Absolutely! You can lay down smaller pieces of different colored wool roving on top of your base layers to create patterns. These will felt into the main body of the mask. For very fine details, you might consider needle felting them on after the wet felting process is complete and the mask is dry.
How do I clean a felted mask?
Felted masks should be spot cleaned gently with cool water and a mild soap. Avoid machine washing or harsh scrubbing, as this can cause further felting and distortion. Allow it to air dry completely, ideally on a form to preserve its shape.
Our Top Recommended Finds
- Merino Wool Roving: Soft, vibrant, and excellent for felting, available in many colors for expressive designs.
- Olive Oil Soap Flakes: A gentle, natural soap that creates good suds for felting without harsh chemicals.
- Bamboo Rolling Mat: A flexible, textured surface that helps with the rubbing and fulling stages, making the process easier on your hands.
Embrace Your Inner Artist
Crafting a therian mask is a deeply personal journey, a way to manifest a part of yourself into the physical world.
Each step in this process brings you closer to creating something truly unique and meaningful.
Gather your materials and begin your felting adventure today; your spirit animal awaits its form.
Beginner-friendly templates, step-by-step guides,
and weekly project ideas in your inbox.