
How To Make A Kandi Mask

Beginner-friendly templates, step-by-step guides,
and weekly project ideas in your inbox.
Creating your own kandi mask is an incredibly rewarding experience.
It lets you express your unique style and become part of a vibrant culture.
I’ve made countless masks for friends and myself, and I’m excited to share the journey of crafting a piece that truly reflects you.

Quick Overview
You’re about to embark on a creative project that results in a personalized, wearable piece of art.
This guide will walk you through every step, from selecting your materials to proudly wearing your finished mask.
- Time needed: 3-6 hours (depending on design complexity and experience)
- Difficulty: Intermediate
- What you’ll need: Pony beads, elastic string, scissors, a ruler, and a creative spirit
Step-by-Step Instructions
Step 1: Gather Your Materials
The foundation of any great kandi mask starts with the right supplies.
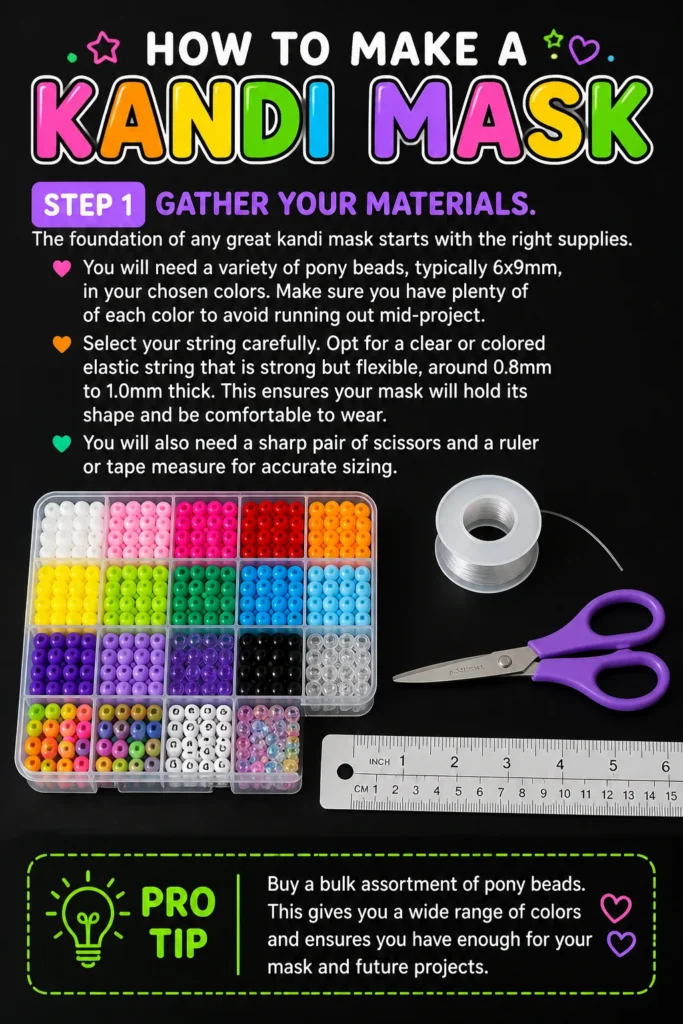
You will need a variety of pony beads, typically 6x9mm, in your chosen colors.
Make sure you have plenty of each color to avoid running out mid-project.
Select your string carefully. Opt for a clear or colored elastic string that is strong but flexible, around 0.8mm to 1.0mm thick.
This ensures your mask will hold its shape and be comfortable to wear.
You will also need a sharp pair of scissors and a ruler or tape measure for accurate sizing.
Pro Tip: Buy a bulk assortment of pony beads. This gives you a wide range of colors and ensures you have enough for your mask and future projects.
Step 2: Plan Your Design
Before you string a single bead, visualize your mask.
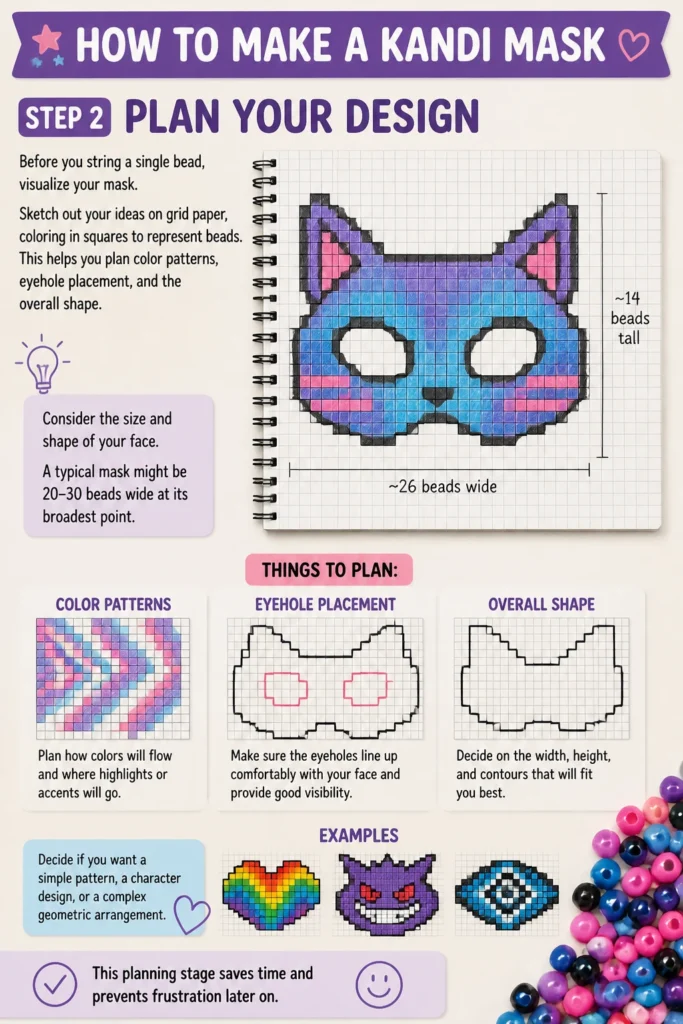
Sketch out your ideas on grid paper, coloring in squares to represent beads.
This helps you plan color patterns, eyehole placement, and the overall shape.
Consider the size and shape of your face. A typical mask might be 20-30 beads wide at its broadest point.
Decide if you want a simple pattern, a character design, or a complex geometric arrangement.
This planning stage saves time and prevents frustration later on.
Step 3: Start the Base Row
Most kandi masks begin with a flat peyote stitch or a ladder stitch base.
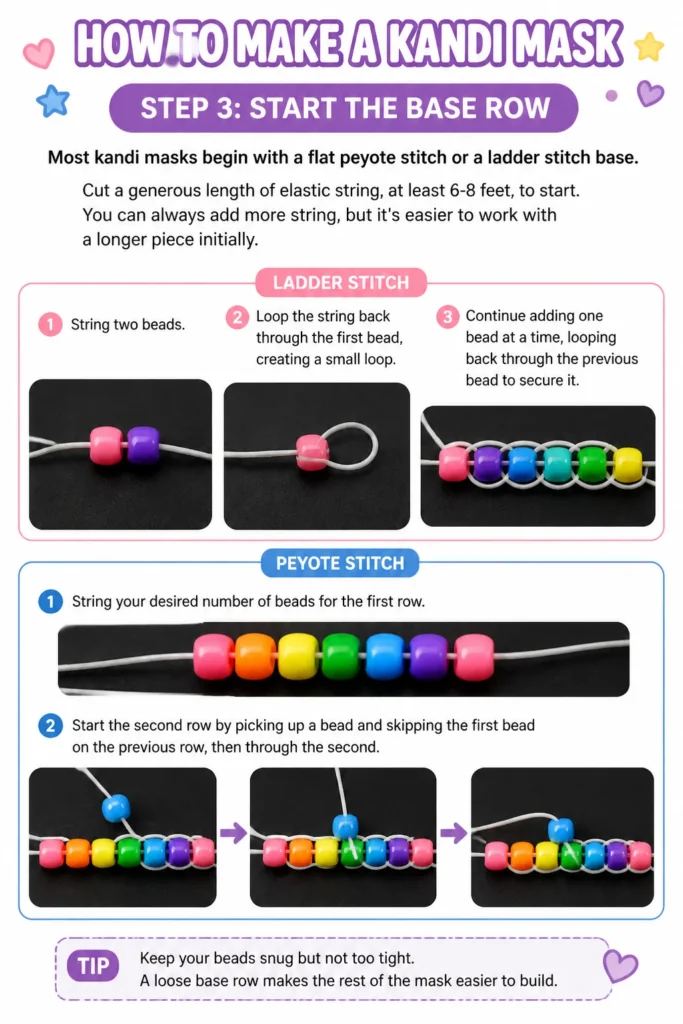
Cut a generous length of elastic string, at least 6-8 feet, to start.
You can always add more string, but it’s easier to work with a longer piece initially.
For a ladder stitch, string two beads, then loop the string back through the first bead, creating a small loop.
Continue adding one bead at a time, looping back through the previous bead to secure it.
For peyote stitch, string your desired number of beads for the first row, then start the second row by picking up a bead and skipping the first bead on the previous row, then through the second.
Step 4: Build Up the Mask Body
Once your base row is established, you will continue building the mask upwards.
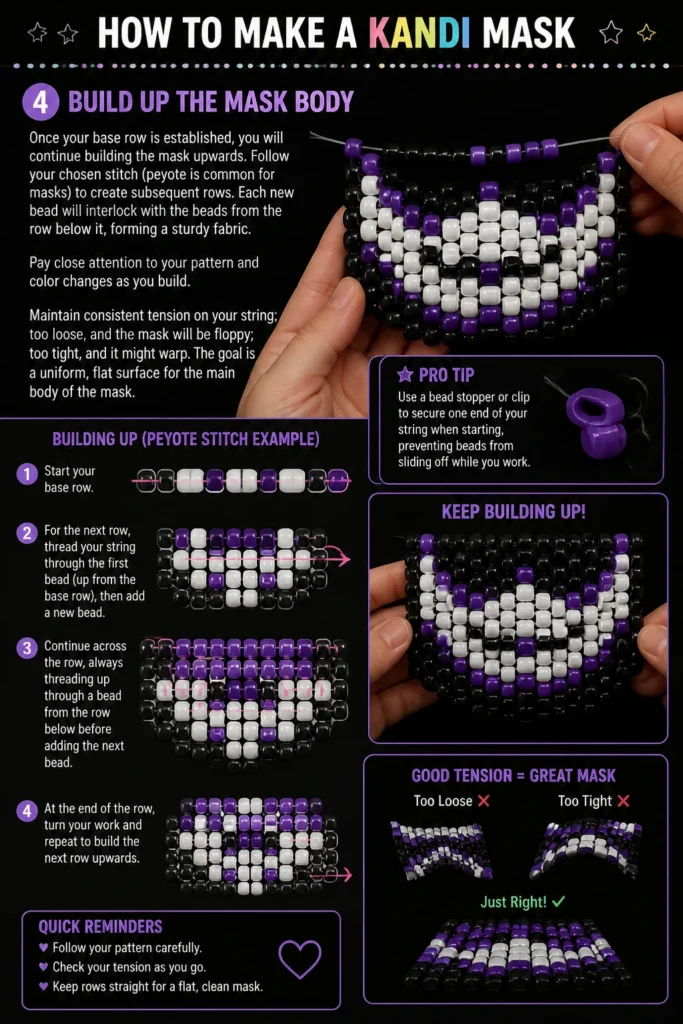
Follow your chosen stitch (peyote is common for masks) to create subsequent rows.
Each new bead will interlock with the beads from the row below it, forming a sturdy fabric.
Pay close attention to your pattern and color changes as you build.
Maintain consistent tension on your string; too loose, and the mask will be floppy; too tight, and it might warp.
The goal is a uniform, flat surface for the main body of the mask.
Pro Tip: Use a bead stopper or clip to secure one end of your string when starting, preventing beads from sliding off while you work.
Step 5: Create the Eye Holes
This is a crucial step for functionality and comfort.
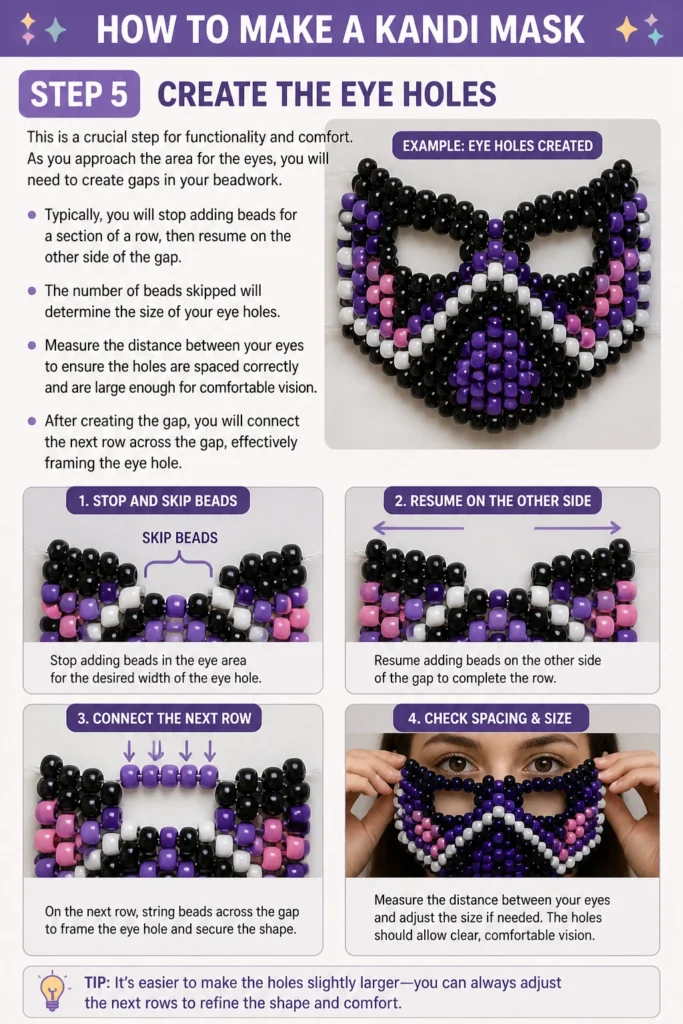
As you approach the area for the eyes, you will need to create gaps in your beadwork.
Typically, you will stop adding beads for a section of a row, then resume on the other side of the gap.
The number of beads skipped will determine the size of your eye holes.
Measure the distance between your eyes to ensure the holes are spaced correctly and are large enough for comfortable vision.
After creating the gap, you will connect the next row across the gap, effectively framing the eye hole.
Step 6: Shape the Mask
A flat rectangle won’t fit a face well, so you need to shape your mask.
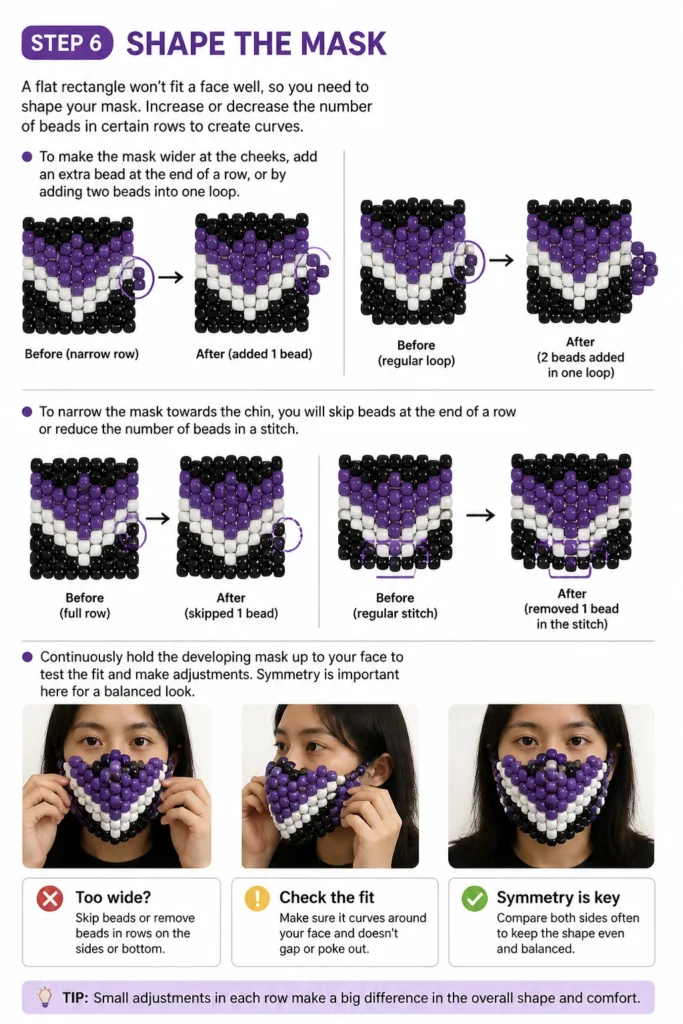
Increase or decrease the number of beads in certain rows to create curves.
For instance, to make the mask wider at the cheeks, add an extra bead at the end of a row, or by adding two beads into one loop.
To narrow the mask towards the chin, you will skip beads at the end of a row or reduce the number of beads in a stitch.
Continuously hold the developing mask up to your face to test the fit and make adjustments.
Symmetry is important here for a balanced look.
Step 7: Add Ear Straps
Once the main body of your mask is complete, it’s time to add the ear straps.
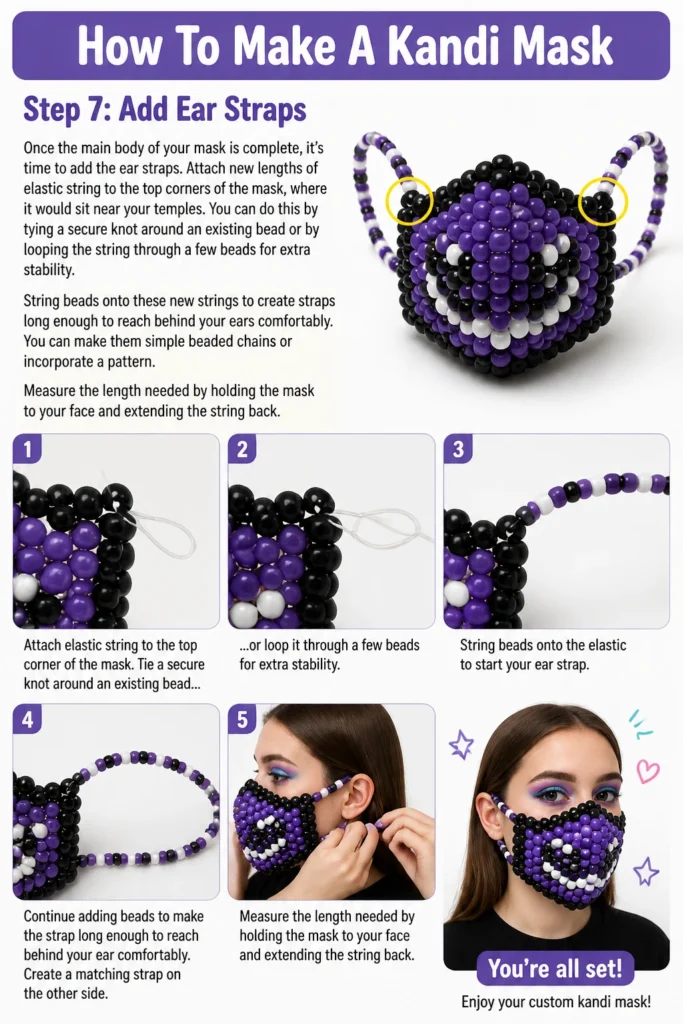
Attach new lengths of elastic string to the top corners of the mask, where it would sit near your temples.
You can do this by tying a secure knot around an existing bead or by looping the string through a few beads for extra stability.
String beads onto these new strings to create straps long enough to reach behind your ears comfortably.
You can make them simple beaded chains or incorporate a pattern.
Measure the length needed by holding the mask to your face and extending the string back.
Step 8: Embellish and Personalize
Now comes the fun part: making your mask uniquely yours.
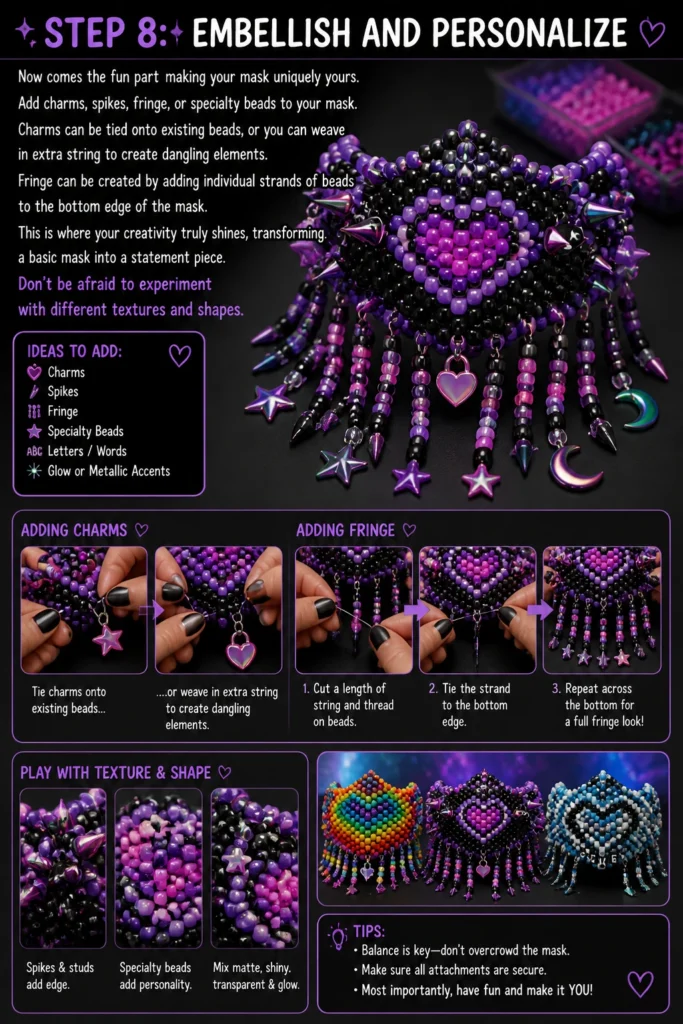
Add charms, spikes, fringe, or specialty beads to your mask.
Charms can be tied onto existing beads, or you can weave in extra string to create dangling elements.
Fringe can be created by adding individual strands of beads to the bottom edge of the mask.
This is where your creativity truly shines, transforming a basic mask into a statement piece.
Don’t be afraid to experiment with different textures and shapes.
Step 9: Secure All Ends
Properly securing your string ends is vital for the mask’s durability.
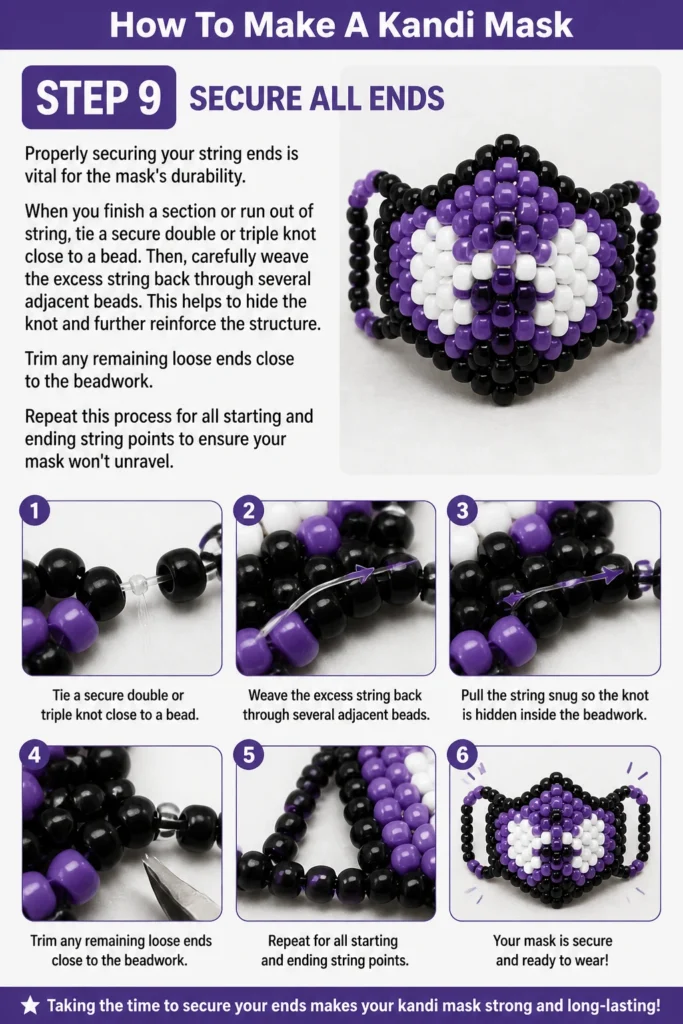
When you finish a section or run out of string, tie a secure double or triple knot close to a bead.
Then, carefully weave the excess string back through several adjacent beads.
This helps to hide the knot and further reinforce the structure.
Trim any remaining loose ends close to the beadwork.
Repeat this process for all starting and ending string points to ensure your mask won’t unravel.
Step 10: Test Fit and Adjust
The final step is to try on your completed mask.
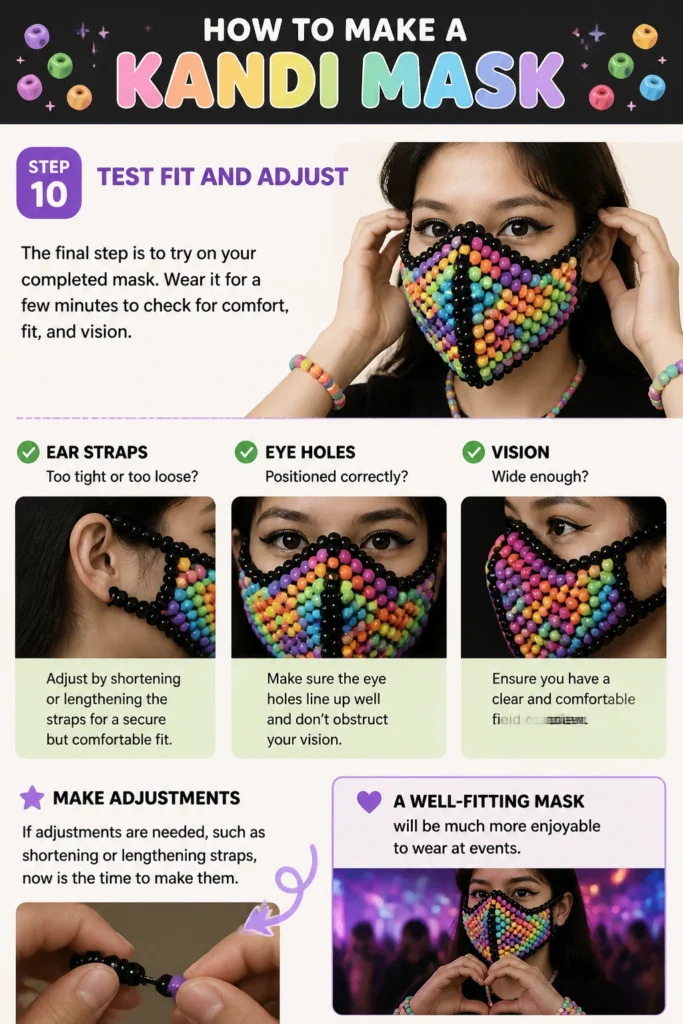
Wear it for a few minutes to check for comfort, fit, and vision.
Are the ear straps too tight or too loose?
Are the eye holes positioned correctly and wide enough?
If adjustments are needed, such as shortening or lengthening straps, now is the time to make them.
A well-fitting mask will be much more enjoyable to wear at events.
Common Mistakes to Avoid
Inconsistent Tension
Many beginners struggle with keeping their beadwork even. If your tension is too loose in some areas and too tight in others, your mask will appear lumpy or warped.
Aim for a consistent pull on your string throughout the entire project. This creates a flat, professional-looking surface.
Using the Wrong String Type
Using non-elastic thread or string that is too thin can lead to a flimsy mask that doesn’t hold its shape or breaks easily.
Always use a good quality elastic string, typically 0.8mm to 1.0mm, specifically designed for beadwork. This provides the necessary flexibility and durability.
Ignoring Sizing and Fit
Failing to periodically hold the mask up to your face for a fit check can result in a mask that is too small, too large, or has poorly placed eye holes.
Measure your face and compare it to your beadwork as you go. Adjust the width and height of the mask, as well as the eyehole placement, to ensure a comfortable and functional fit.
Overly Complex Designs for Beginners
Jumping into a highly intricate design with many color changes and complex shaping on your first mask can be overwhelming and discouraging.
Start with a simpler pattern and a basic shape for your first project. Once you master the fundamental techniques, you can gradually tackle more complex and elaborate designs.
Troubleshooting
Mask is Floppy or Doesn’t Hold Shape
If your mask feels too flimsy, it’s likely due to loose tension or insufficient string passes.
To fix this, you can reinforce the mask by carefully weaving extra lengths of string through existing rows of beads, pulling taut as you go. This adds rigidity without drastically altering the appearance.
Eye Holes Are Crooked or Uneven
Uneven eye holes can happen if you miscount beads or don’t maintain symmetry during their creation.
Carefully unpick the rows around the affected eye hole, counting beads precisely as you re-do them. Use a mirror or grid paper to ensure both eye holes are symmetrical and correctly positioned.
String Keeps Breaking During Construction
Frequent string breakage can be caused by using a string that is too thin, pulling too tightly, or sharp edges on certain beads.
Switch to a thicker, stronger elastic string. Try to ease up on your tension slightly. If a specific bead is causing issues, replace it or carefully file down any sharp edges before use.
Key Takeaways
- Plan Your Design: Sketching helps visualize and prevent mistakes.
- Maintain Consistent Tension: This is crucial for a sturdy, even mask.
- Use Quality Materials: Good elastic string and uniform beads make a difference.
- Measure and Test Fit: Periodically check the mask against your face for comfort and proper sizing.
- Secure All Ends Thoroughly: Knots and hidden string ensure durability.
- Embrace Creativity: Personalize your mask with charms and unique patterns.
Frequently Asked Questions
What kind of beads are best for a kandi mask?
Pony beads (typically 6x9mm) are the most common and ideal choice for kandi masks. They are inexpensive, come in a vast array of colors, and their size makes them easy to work with for intricate patterns.
How do I make sure the mask fits my face properly?
Measure the width of your face from temple to temple, and from the bridge of your nose to your chin. Use these measurements as a guide, frequently holding the beadwork up to your face as you build. Adjust the number of beads in rows to increase or decrease the mask’s overall size and shape.
Can I wash my kandi mask?
Yes, you can gently hand wash your kandi mask. Use mild soap and cool water, carefully swishing the mask. Rinse thoroughly and then lay it flat on a towel to air dry completely. Avoid using hot water or machine washing, as this can damage the elastic string and beads.
How long does it typically take to make a kandi mask?
The time needed varies greatly depending on the complexity of your design and your experience level. A simple mask might take 3-4 hours, while a more intricate design with many color changes or embellishments could take 6 hours or even longer. Patience is key!
Our Top Recommended Finds
- Large Assortment of Pony Beads: Provides a wide color palette and ample supply for multiple projects.
- High-Quality Elastic Kandi String (0.8mm-1.0mm): Essential for durability and preventing breakage during creation and wear.
- Beading Mat with Lip: Keeps your beads organized and prevents them from rolling off your workspace.
Your Next Creative Adventure Awaits
You’ve successfully crafted your very own kandi mask, a true testament to your creativity and patience.
This mask is more than just an accessory; it’s a piece of wearable art, imbued with the spirit of PLUR.
Wear it proudly at your next event, or display it as a reminder of your artistic journey.
Now that you’ve mastered the mask, consider exploring other kandi creations like cuffs, necklaces, or even full body pieces.
The world of beadwork is vast and full of possibilities.
Keep creating, keep sharing, and let your imagination lead the way.
Beginner-friendly templates, step-by-step guides,
and weekly project ideas in your inbox.