How To Make A Top Hat

Beginner-friendly templates, step-by-step guides,
and weekly project ideas in your inbox.
Have you ever wanted to craft something truly unique for a special occasion or just for the joy of making? My first attempt at a top hat was for a steampunk convention, and while challenging, the satisfaction of wearing something handmade was immense. This guide draws from that hands-on experience, making the process clear and achievable for you.
You’ll discover how to construct a classic top hat from scratch, building a sturdy, stylish accessory. We will cover everything from precise measurements to the final decorative touches. Get ready to bring a touch of timeless elegance into your crafting repertoire.
Quick Overview
This project will guide you through creating a durable and elegant top hat, perfect for costumes, events, or display. You’ll gain practical skills in pattern making, precise cutting, and fabric application.
- Time needed: 8-12 hours (spread over a few days for drying time)
- Difficulty: Intermediate
- What you’ll need: Cardboard, fabric, glue, basic sewing supplies, measuring tools
Step-by-Step Instructions
Step 1: Gather Your Materials and Tools
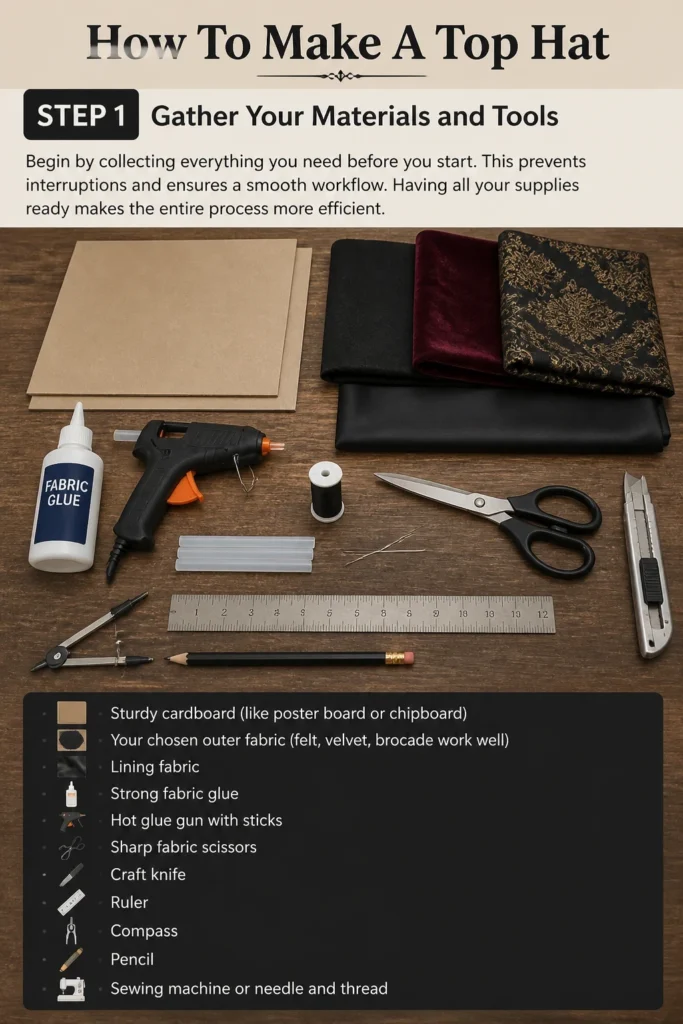
Begin by collecting everything you need before you start. This prevents interruptions and ensures a smooth workflow. Having all your supplies ready makes the entire process more efficient.
You will need sturdy cardboard (like poster board or chipboard), your chosen outer fabric (felt, velvet, brocade work well), and lining fabric. Also prepare strong fabric glue, a hot glue gun with sticks, sharp fabric scissors, a craft knife, a ruler, a compass, a pencil, and a sewing machine or needle and thread.
Step 2: Measure and Design Your Hat
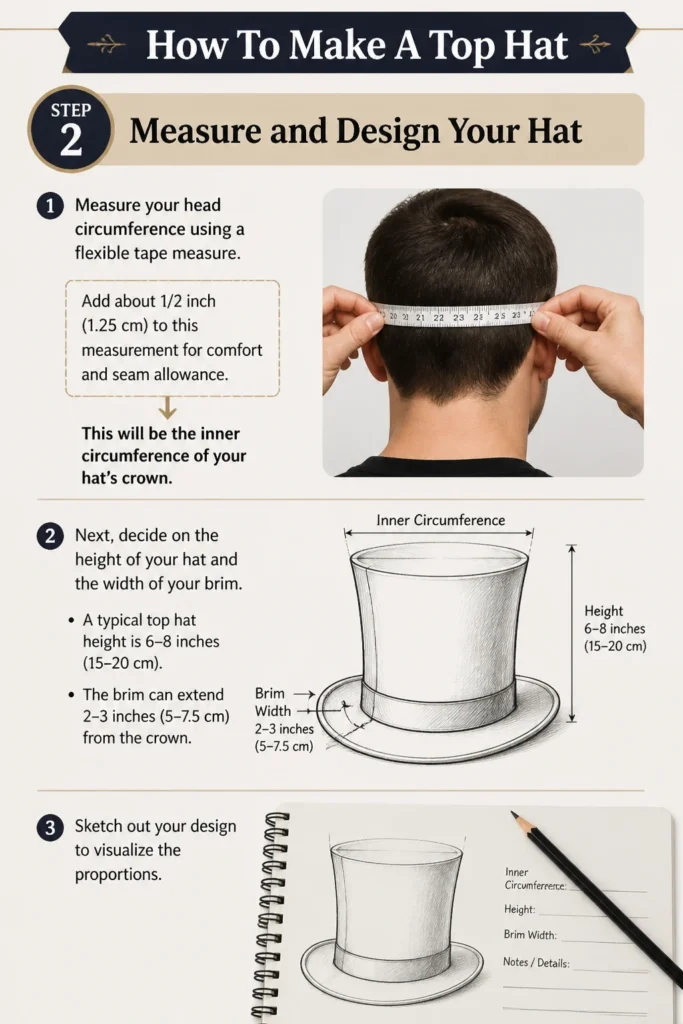
Measure your head circumference using a flexible tape measure. Add about 1/2 inch (1.25 cm) to this measurement for comfort and seam allowance. This will be the inner circumference of your hat’s crown.
Next, decide on the height of your hat and the width of your brim. A typical top hat height is 6-8 inches (15-20 cm), and the brim can extend 2-3 inches (5-7.5 cm) from the crown. Sketch out your design to visualize the proportions.
Step 3: Create Your Pattern Pieces
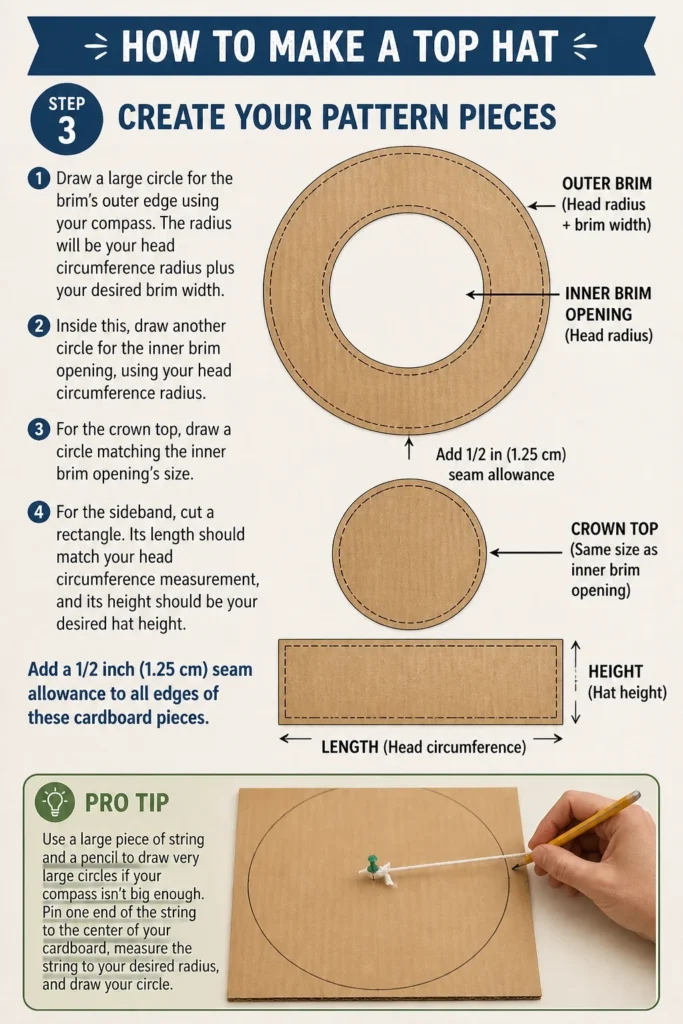
Draw a large circle for the brim’s outer edge using your compass. The radius will be your head circumference radius plus your desired brim width. Inside this, draw another circle for the inner brim opening, using your head circumference radius.
For the crown top, draw a circle matching the inner brim opening’s size. For the sideband, cut a rectangle. Its length should match your head circumference measurement, and its height should be your desired hat height. Add a 1/2 inch (1.25 cm) seam allowance to all edges of these cardboard pieces.
Pro Tip: Use a large piece of string and a pencil to draw very large circles if your compass isn’t big enough. Pin one end of the string to the center of your cardboard, measure the string to your desired radius, and draw your circle.
Step 4: Cut and Prepare Cardboard Foundations
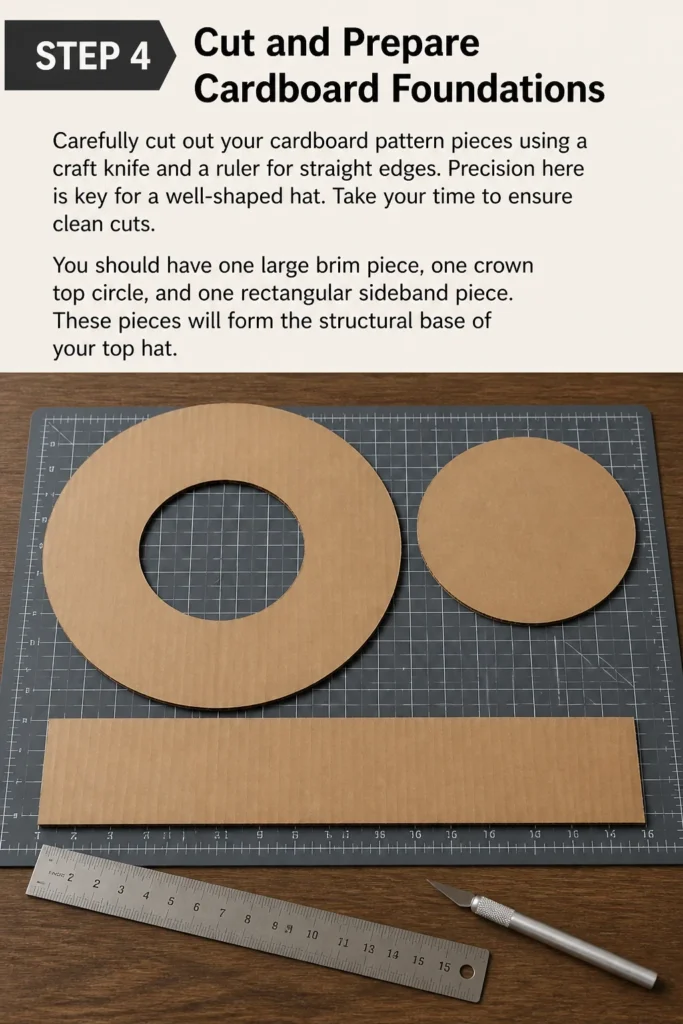
Carefully cut out your cardboard pattern pieces using a craft knife and a ruler for straight edges. Precision here is key for a well-shaped hat. Take your time to ensure clean cuts.
You should have one large brim piece, one crown top circle, and one rectangular sideband piece. These pieces will form the structural base of your top hat.
Step 5: Assemble the Cardboard Frame
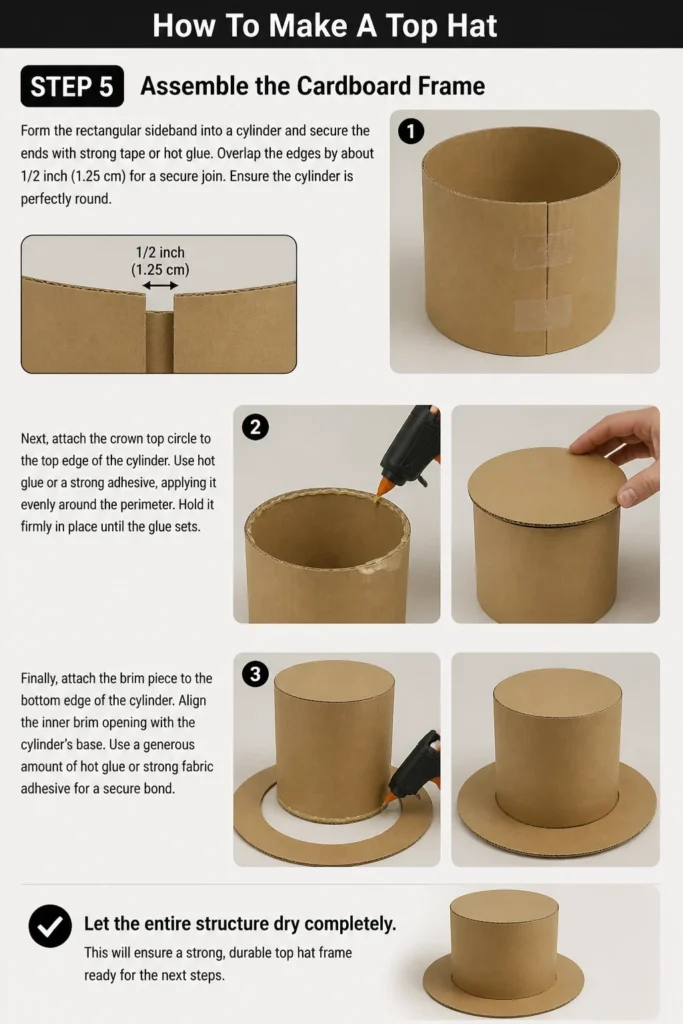
Form the rectangular sideband into a cylinder and secure the ends with strong tape or hot glue. Overlap the edges by about 1/2 inch (1.25 cm) for a secure join. Ensure the cylinder is perfectly round.
Next, attach the crown top circle to the top edge of the cylinder. Use hot glue or a strong adhesive, applying it evenly around the perimeter. Hold it firmly in place until the glue sets.
Finally, attach the brim piece to the bottom edge of the cylinder. Align the inner brim opening with the cylinder’s base. Use a generous amount of hot glue or strong fabric adhesive for a secure bond. Let the entire structure dry completely.
Step 6: Cut and Apply Outer Fabric
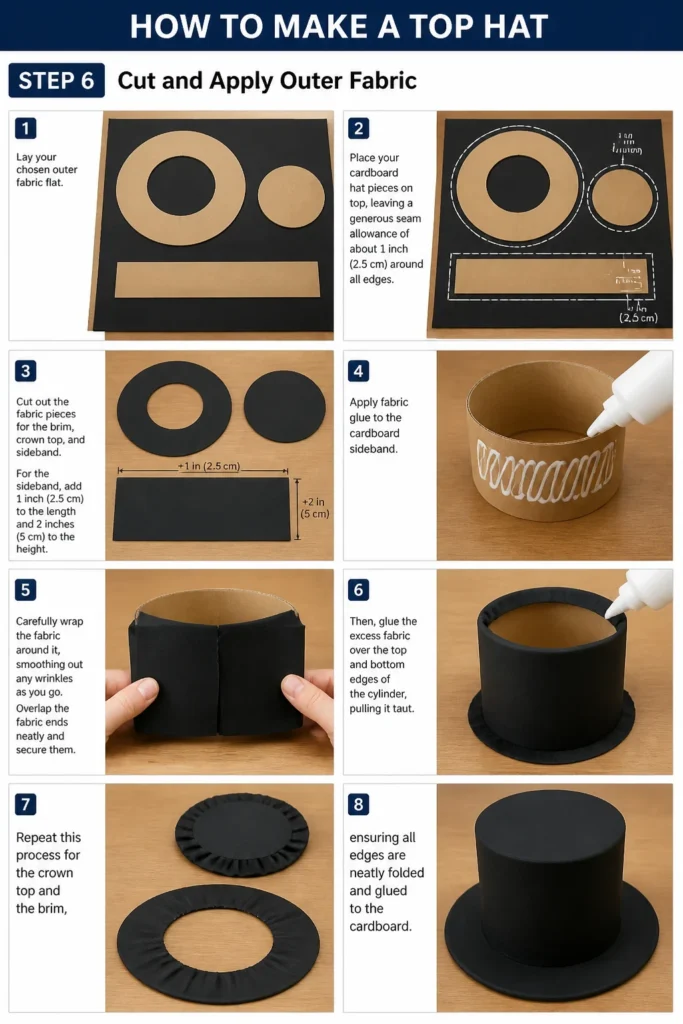
Lay your chosen outer fabric flat. Place your cardboard hat pieces on top, leaving a generous seam allowance of about 1 inch (2.5 cm) around all edges. This extra fabric will wrap around the cardboard.
Cut out the fabric pieces for the brim, crown top, and sideband. For the sideband, add 1 inch (2.5 cm) to the length and 2 inches (5 cm) to the height. This allows for wrapping over the top and bottom edges of the cardboard cylinder.
Apply fabric glue to the cardboard sideband. Carefully wrap the fabric around it, smoothing out any wrinkles as you go. Overlap the fabric ends neatly and secure them. Then, glue the excess fabric over the top and bottom edges of the cylinder, pulling it taut. Repeat this process for the crown top and the brim, ensuring all edges are neatly folded and glued to the inside of the cardboard.
Pro Tip: For curved edges like the brim, make small snips in the fabric’s seam allowance before folding and gluing. This helps the fabric lay flat without puckering.
Step 7: Add the Inner Lining
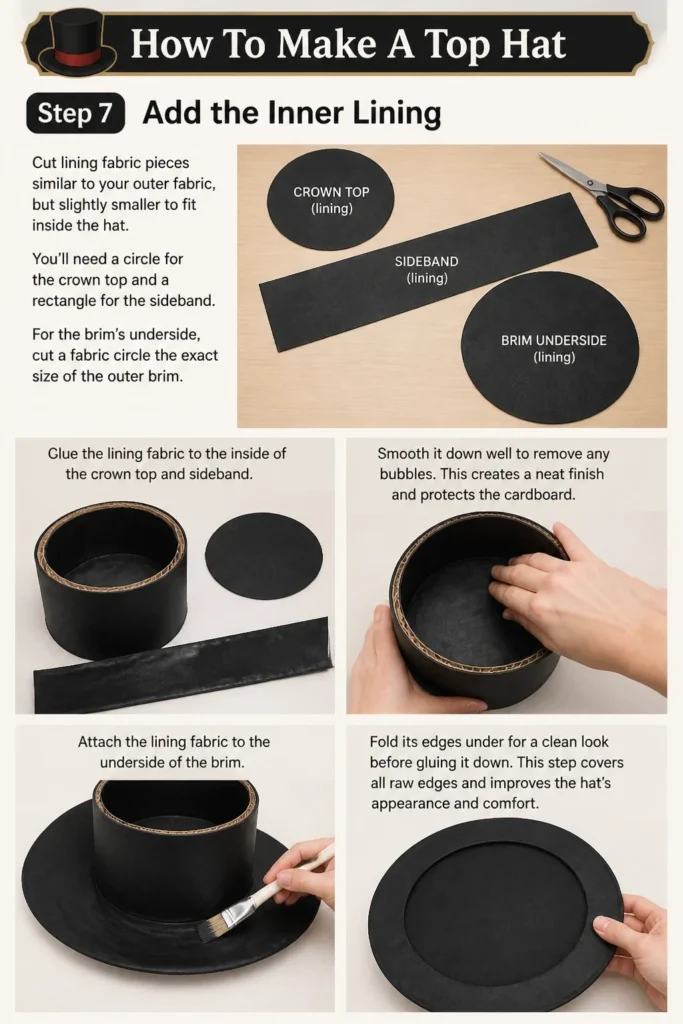
Cut lining fabric pieces similar to your outer fabric, but slightly smaller to fit inside the hat. You’ll need a circle for the crown top and a rectangle for the sideband. For the brim’s underside, cut a fabric circle the exact size of the outer brim.
Glue the lining fabric to the inside of the crown top and sideband. Smooth it down well to remove any bubbles. This creates a neat finish and protects the cardboard.
Attach the lining fabric to the underside of the brim. Fold its edges under for a clean look before gluing it down. This step covers all raw edges and improves the hat’s appearance and comfort.
Step 8: Reinforce and Finish Edges
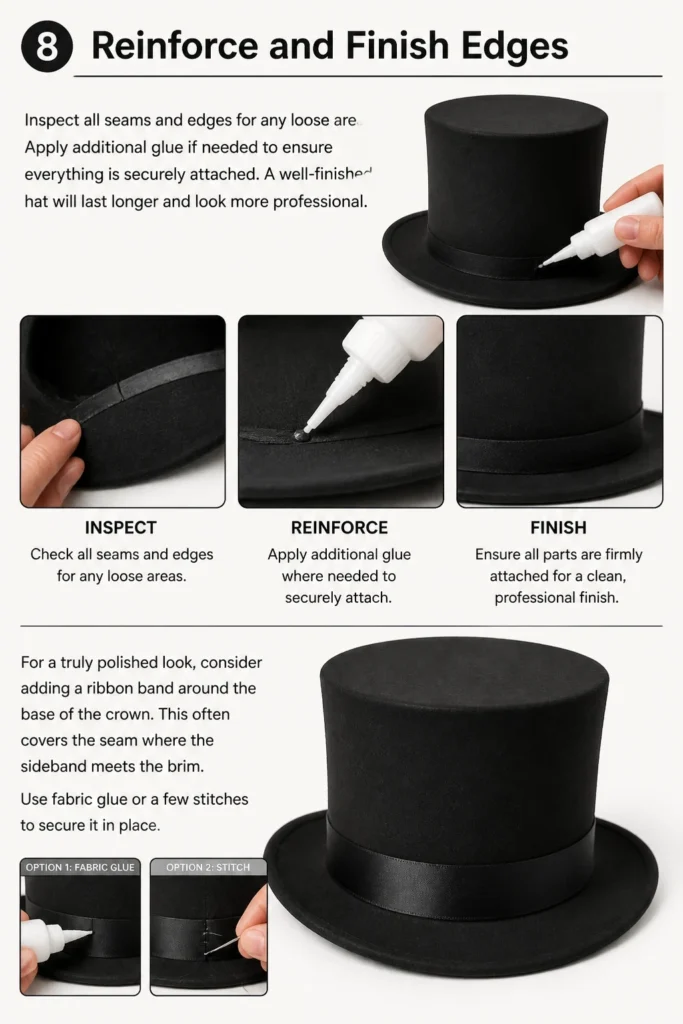
Inspect all seams and edges for any loose areas. Apply additional glue if needed to ensure everything is securely attached. A well-finished hat will last longer and look more professional.
For a truly polished look, consider adding a ribbon band around the base of the crown. This often covers the seam where the sideband meets the brim. Use fabric glue or a few stitches to secure it in place.
Step 9: Add Decorative Touches (Optional)
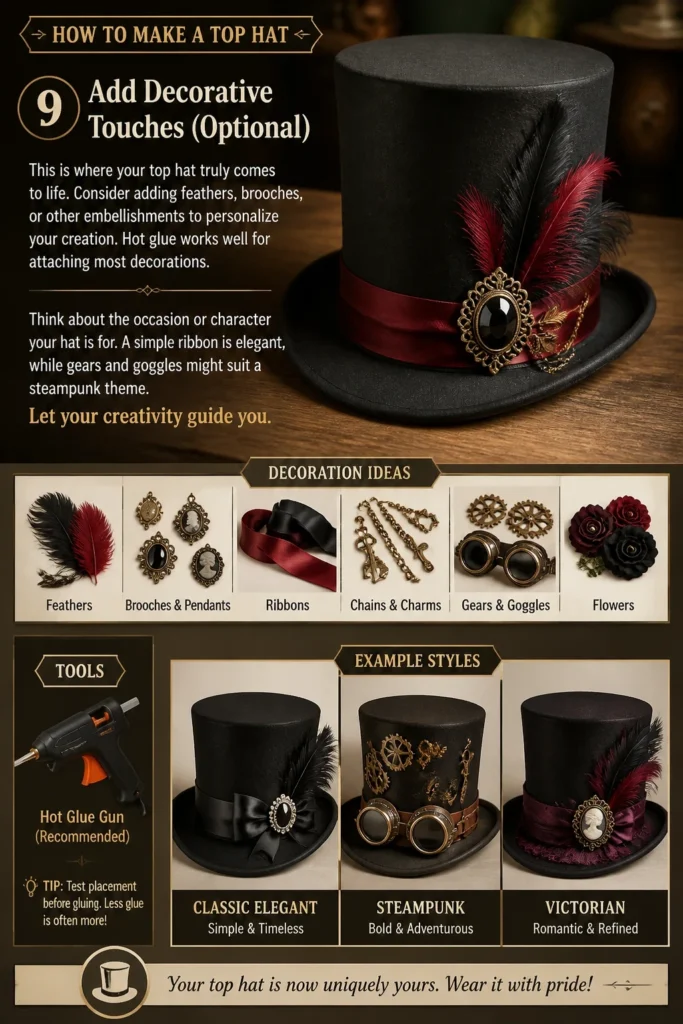
This is where your top hat truly comes to life. Consider adding feathers, brooches, or other embellishments to personalize your creation. Hot glue works well for attaching most decorations.
Think about the occasion or character your hat is for. A simple ribbon is elegant, while gears and goggles might suit a steampunk theme. Let your creativity guide you.
Common Mistakes to Avoid
Rushing the Drying Process
Many crafters are eager to see their project finished and move too quickly. Not allowing glue to fully cure can lead to weak seams, bubbling fabric, or even the hat falling apart. Always follow the glue manufacturer’s recommended drying times, even if it means waiting overnight between steps. Patience ensures a durable and professional result.
Inaccurate Measurements
A top hat relies heavily on precise circles and straight lines for its classic shape. Small errors in measuring your head or cutting your pattern pieces can result in a hat that doesn’t fit, looks lopsided, or has an uneven brim. Double-check all measurements before cutting, and use a ruler and compass diligently.
Insufficient Glue Application
It’s tempting to use minimal glue to avoid mess, but this often leads to fabric peeling away or structural instability. Apply a generous, even layer of strong fabric adhesive, especially on edges and seams. Ensure full contact between the fabric and cardboard, and press firmly.
Choosing Flimsy Cardboard
The structural integrity of your top hat depends on the stiffness of your cardboard. Using thin or flexible cardboard will result in a floppy, easily damaged hat that won’t hold its shape. Opt for sturdy chipboard, thick poster board, or even illustration board for a robust foundation.
Troubleshooting
Hat Feels Flimsy or Wobbly
If your hat lacks rigidity, the cardboard might be too thin, or the glue joints aren’t strong enough. You can reinforce the inside of the hat by gluing an additional layer of cardboard to the sideband and crown top. For the brim, glue a second, identical cardboard brim piece to the underside of the first, sandwiching the outer fabric’s raw edges.
Fabric Bubbling or Wrinkling
This often happens when glue is applied unevenly or the fabric isn’t smoothed properly during application. To fix this, you might gently lift the affected area, apply more glue if needed, and firmly press and smooth the fabric from the center outwards. For stubborn wrinkles, a fabric steamer used carefully can sometimes help, but test on an inconspicuous area first.
Brim is Uneven or Lopsided
An uneven brim usually stems from inaccurate cutting or improper attachment to the sideband. If the issue is minor, you might be able to trim the brim slightly to even it out, but be cautious not to remove too much. For significant issues, it might be necessary to carefully detach the brim, recut a new one, and reattach it with greater precision, ensuring it’s centered before the glue fully dries.
Key Takeaways
- Precision is paramount: Accurate measurements and careful cutting are vital for a well-shaped hat.
- Strong foundation: Use sturdy cardboard for the hat’s structure to ensure durability.
- Adhesive matters: Choose a strong fabric glue and apply it generously and evenly.
- Patience pays off: Allow ample drying time for glues to cure completely.
- Smooth finish: Take time to smooth fabric and neatly finish edges for a professional look.
- Personalize it: Embellishments are an excellent way to make your top hat uniquely yours.
Frequently Asked Questions
Can I use hot glue for the entire project?
While hot glue is excellent for quickly securing cardboard structures and for some embellishments, it’s not ideal for all fabric applications. It can create bumpy textures and may not provide the long-lasting bond of a dedicated fabric or craft glue, especially on large fabric surfaces. Use it strategically for initial holds and structural connections, but rely on fabric glue for smooth fabric adhesion.
What kind of fabric is best for a top hat?
Felt, velvet, and brocade are popular choices because they have a luxurious look and some inherent stiffness. Wool felt is particularly forgiving and easy to work with. Avoid very thin or stretchy fabrics unless you plan to back them with a stiffer interfacing, as they can be difficult to smooth perfectly onto the cardboard.
How do I make a top hat waterproof?
A fabric top hat is generally not designed to be fully waterproof. However, you can add a degree of water resistance by applying a fabric protector spray specifically designed for upholstery or outdoor fabrics. Always test the spray on a scrap piece of your chosen fabric first to ensure it doesn’t alter the color or texture. This will help repel light moisture, but it won’t make the hat suitable for heavy rain.
Can this method be adapted for other hat styles?
Absolutely! The principles of creating a cardboard frame, covering it with fabric, and adding a lining are fundamental to many hat-making projects. By altering the shapes and sizes of your pattern pieces—for example, making a shorter sideband or a wider, softer brim—you can create fedoras, derby hats, or even whimsical costume hats using similar techniques.
Our Top Recommended Finds
- Heavy-Duty Chipboard Sheets: Provides an excellent, sturdy foundation that will hold its shape for years.
- Aleene’s Tacky Glue or Fabric-Tac: These are reliable, strong fabric glues that dry clear and offer a lasting bond.
- Sharp Fabric Scissors: Investing in a good pair of scissors makes a huge difference in cutting precision and ease, especially with thicker fabrics.
Craft Your Own Statement Piece
Creating your own top hat is a rewarding endeavor that combines precision with personal expression. You now have a comprehensive guide to construct a stylish and sturdy hat from start to finish. This project builds practical skills and results in a truly unique accessory.
Why not start gathering your materials today? You might discover a new passion for millinery or simply enjoy the process of bringing a classic design to life. Consider exploring different fabric textures or intricate embellishments for your next creation.
Beginner-friendly templates, step-by-step guides,
and weekly project ideas in your inbox.