How To Train Your Dragon DIY

Beginner-friendly templates, step-by-step guides,
and weekly project ideas in your inbox.
I spent three weeks in my garage covered in foam dust and black paint to perfect my first Night Fury build.
This guide comes from hours of trial and error making sure those wings actually stay upright during a convention or a long afternoon of backyard play.
You can bring the world of Berk to life without needing a Viking forge or a dragon hoard of gold.
Quick Overview
This project guides you through the process of creating a wearable, realistic dragon costume and prop set. You will focus on the wings, the tail, and the iconic headpiece to transform yourself or a lucky friend into a Night Fury.
- Time needed: 12 to 18 hours
- Difficulty: Intermediate
- What you’ll need: EVA foam, PVC piping, black spandex fabric, contact cement, a heat gun, acrylic paint, and nylon webbing for the harness.
Step 1: Prepare Your Workshop and Materials
Gather all your supplies before you start cutting into your expensive materials. You will need a large, flat workspace where you can leave projects to dry overnight without being disturbed.
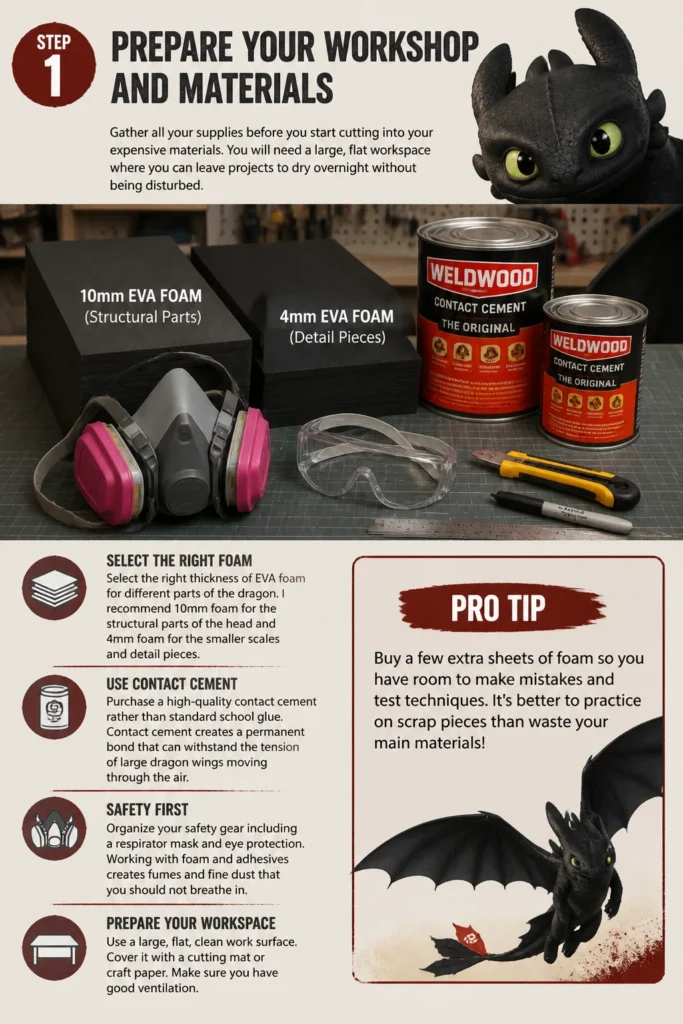
Select the right thickness of EVA foam for different parts of the dragon. I recommend 10mm foam for the structural parts of the head and 4mm foam for the smaller scales and detail pieces.
Purchase a high-quality contact cement rather than standard school glue. Contact cement creates a permanent bond that can withstand the tension of large dragon wings moving through the air.
Organize your safety gear including a respirator mask and eye protection. Working with foam and adhesives creates fumes and fine dust that you should not breathe in.
Pro Tip: Buy a few extra sheets of foam so you have room to make mistakes on your first few scale patterns.
Step 2: Design and Scale Your Templates
Draw your wing and tail shapes on large sheets of butcher paper or cardboard first. This allows you to check the scale against the person who will be wearing the costume before you cut your final materials.
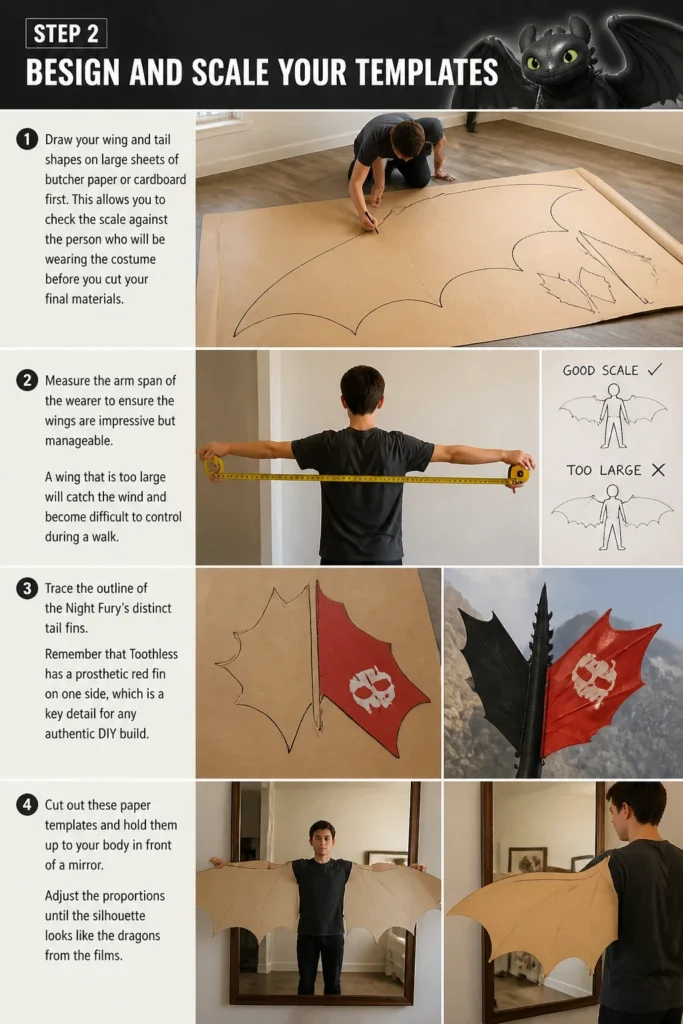
Measure the arm span of the wearer to ensure the wings are impressive but manageable. A wing that is too large will catch the wind and become difficult to control during a walk.
Trace the outline of the Night Fury’s distinct tail fins. Remember that Toothless has a prosthetic red fin on one side, which is a key detail for any authentic DIY build.
Cut out these paper templates and hold them up to your body in front of a mirror. Adjust the proportions until the silhouette looks like the dragons from the films.
Step 3: Construct the Wing Skeleton
Build a lightweight frame using 1/2 inch PVC piping or heavy-gauge wire. This skeleton provides the strength needed to keep the wings from sagging or flopping over.
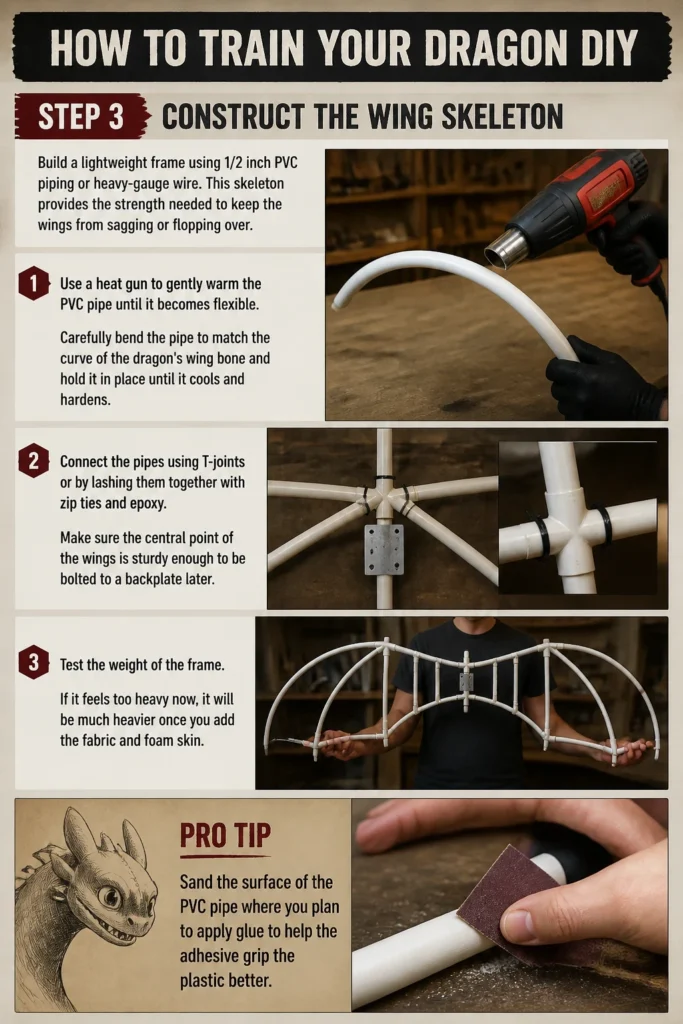
Use a heat gun to gently warm the PVC pipe until it becomes flexible. Carefully bend the pipe to match the curve of the dragon’s wing bone and hold it in place until it cools and hardens.
Connect the pipes using T-joints or by lashing them together with zip ties and epoxy. Make sure the central point of the wings is sturdy enough to be bolted to a backplate later.
Test the weight of the frame. If it feels too heavy now, it will be much heavier once you add the fabric and foam skin.
Pro Tip: Sand the surface of the PVC pipe where you plan to apply glue to help the adhesive grip the plastic better.
Step 4: Create the Dragon Skin
Stretch your black spandex or faux leather over the PVC frame. Spandex is excellent because it mimics the look of a thin, leathery wing membrane while allowing for a full range of motion.
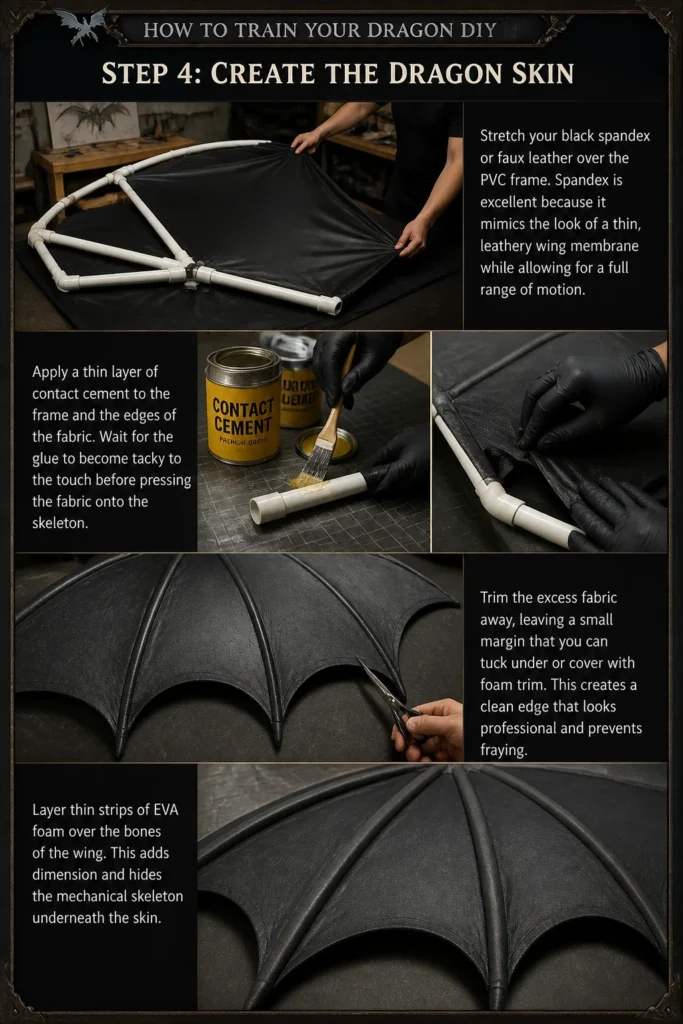
Apply a thin layer of contact cement to the frame and the edges of the fabric. Wait for the glue to become tacky to the touch before pressing the fabric onto the skeleton.
Trim the excess fabric away, leaving a small margin that you can tuck under or cover with foam trim. This creates a clean edge that looks professional and prevents fraying.
Layer thin strips of EVA foam over the “bones” of the wing. This adds dimension and hides the mechanical skeleton underneath the skin.
Step 5: Sculpt the Head and Ears
Form the base of the dragon head using a basic helmet shape or a foam “bucket” build. Use your templates to cut out the large ear-like appendages and the smaller nubs found on a Night Fury’s head.
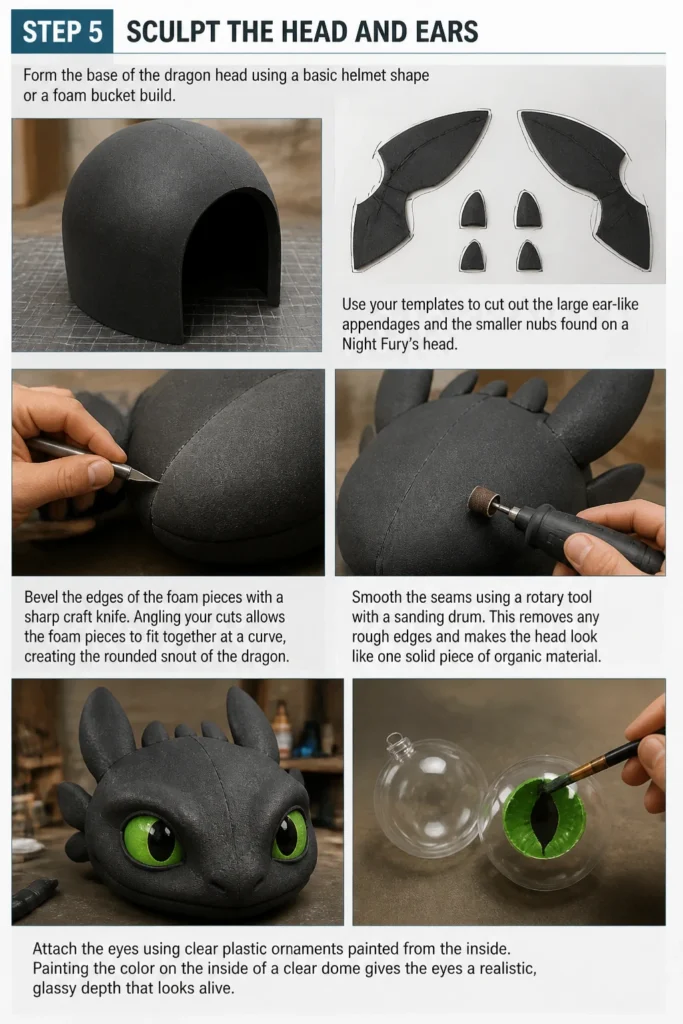
Bevel the edges of the foam pieces with a sharp craft knife. Angling your cuts allows the foam pieces to fit together at a curve, creating the rounded snout of the dragon.
Smooth the seams using a rotary tool with a sanding drum. This removes any rough edges and makes the head look like one solid piece of organic material.
Attach the eyes using clear plastic ornaments painted from the inside. Painting the color on the inside of a clear dome gives the eyes a realistic, glassy depth that looks alive.
Step 6: Build the Tail and Prosthetic Fin
Construct a long, tapered foam tube for the tail. You can use a pool noodle as a base and wrap it in foam to give it more structure and a better shape.
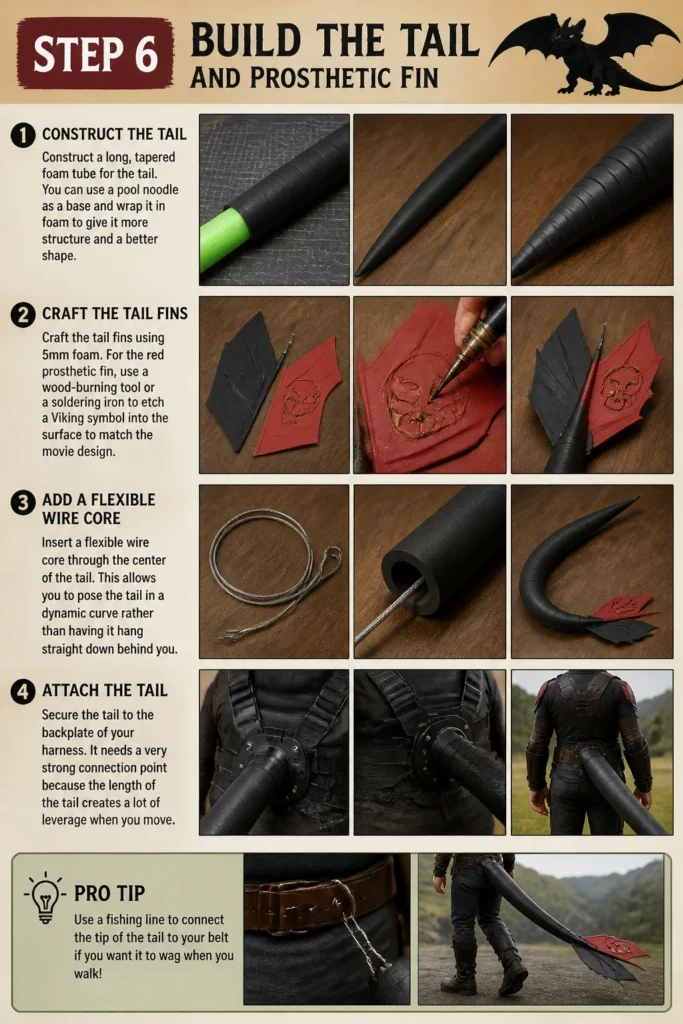
Craft the tail fins using 5mm foam. For the red prosthetic fin, use a wood-burning tool or a soldering iron to etch a “Viking” symbol into the surface to match the movie design.
Insert a flexible wire core through the center of the tail. This allows you to pose the tail in a dynamic curve rather than having it hang straight down behind you.
Secure the tail to the backplate of your harness. It needs a very strong connection point because the length of the tail creates a lot of leverage when you move.
Pro Tip: Use a fishing line to connect the tip of the tail to your belt if you want it to wag when you walk.
Step 7: Detail the Scales and Texture
Press a heated piece of crumpled aluminum foil onto the foam surface. This creates a random, organic texture that looks like dragon skin instead of flat plastic.
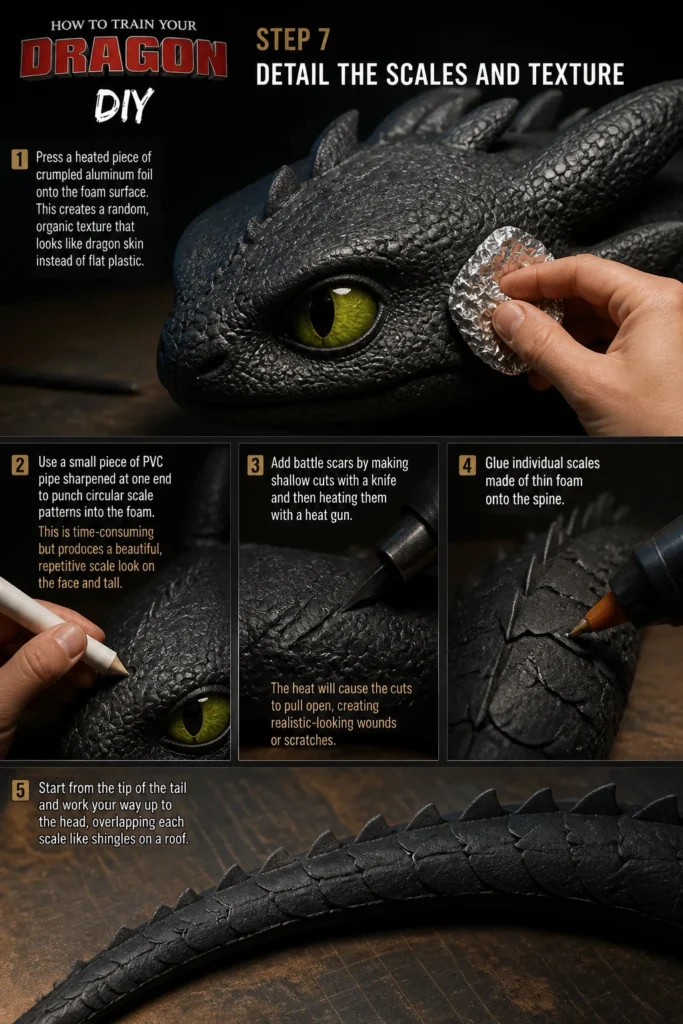
Use a small piece of PVC pipe sharpened at one end to punch circular scale patterns into the foam. This is time-consuming but produces a beautiful, repetitive scale look on the face and tail.
Add “battle scars” by making shallow cuts with a knife and then heating them with a heat gun. The heat will cause the cuts to pull open, creating realistic-looking wounds or scratches.
Glue individual scales made of thin foam onto the spine. Start from the tip of the tail and work your way up to the head, overlapping each scale like shingles on a roof.
Step 8: Paint and Weather Your Dragon
Prime the entire project with a flexible rubber coating like Plasti Dip. This seals the foam and prevents your final paint job from soaking in or cracking when the foam flexes.
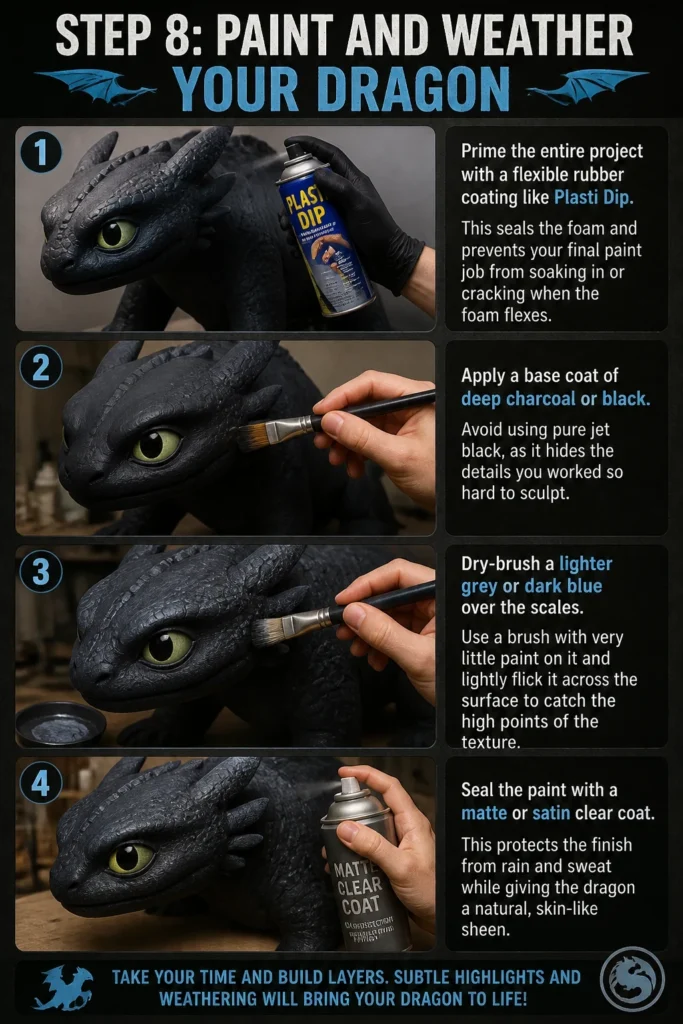
Apply a base coat of deep charcoal or black. Avoid using pure jet black, as it hides the details you worked so hard to sculpt.
Dry-brush a lighter grey or dark blue over the scales. Use a brush with very little paint on it and lightly flick it across the surface to catch the high points of the texture.
Seal the paint with a matte or satin clear coat. This protects the finish from rain and sweat while giving the dragon a natural, skin-like sheen.
Common Mistakes to Avoid
Using the Wrong Adhesive
Many beginners try to use hot glue for the entire project. While hot glue is great for small details, it will melt if left in a hot car and is not strong enough for structural joints. Stick to contact cement for any part of the dragon that will experience stress or movement.
Ignoring the Weight Balance
It is easy to get carried away with adding foam and accessories. If the wings and tail are too heavy, they will pull the harness back and choke the wearer. Always check the balance of the costume as you go and add counterweights to the front if necessary.
Skipping the Primer
Painting directly onto EVA foam usually results in a dull finish that flakes off after one use. The foam is porous and will drink up the moisture in the paint. Always use a flexible primer to create a barrier between the foam and your colors.
Troubleshooting
The Wings are Drooping
If your wings won’t stay upright, your skeleton is likely too weak or your harness is too loose. Try adding a diagonal support wire from the center of the backplate to the mid-point of the wing bone. You can also tighten the shoulder straps to pull the backplate closer to your spine.
The Paint is Cracking at the Joints
This happens when the paint is too brittle for the flexible foam. To fix this, sand the area lightly and apply a mixture of acrylic paint and fabric medium. This makes the paint more like rubber, allowing it to bend without snapping.
The Headpiece is Sliding Forward
Dragon heads are often front-heavy due to the snout. Glue a piece of upholstery foam or a baseball cap inside the dragon head to create a snug fit. You can also add a chin strap hidden under the jaw to keep the head locked in place.
Key Takeaways
- Use a PVC skeleton to provide the necessary strength for large, impressive wings.
- Always prioritize contact cement over hot glue for structural integrity and longevity.
- Scale your templates to the wearer’s body before cutting any expensive foam or fabric.
- Apply a flexible primer like Plasti Dip to ensure your paint job does not crack or peel.
- Add texture using heat and crumpled foil to make the foam look like real dragon skin.
- Incorporate a red prosthetic fin to capture the iconic look of Toothless from the films.
Frequently Asked Questions
What is the best fabric for dragon wings?
Spandex blends are usually the best choice because they offer four-way stretch. This allows the wings to open and close without the fabric bunching up or tearing. It also has a slight sheen that looks like a biological membrane.
How do I make the dragon eyes glow?
You can install small LED puck lights behind the painted plastic domes. Make sure to use a thin layer of paint so the light can shine through. Keep the battery pack in a hidden pocket inside the headpiece for easy access.
Can I make this project without a heat gun?
A heat gun is almost essential for shaping EVA foam and bending PVC. You can try using a high-heat hair dryer, but it will take much longer and may not get hot enough for thick foam. It is worth the small investment for a professional result.
How do I clean the costume after wearing it?
Since the costume is made of foam and fabric, you cannot put it in a washing machine. Use a damp cloth with mild soap to wipe down the exterior. For the inside, use a mixture of water and isopropyl alcohol in a spray bottle to kill bacteria and remove odors.
Our Top Recommended Finds
- High-Density EVA Foam Rolls: These provide the perfect balance of weight and durability for large-scale props.
- Industrial Strength Contact Cement: This is the gold standard for foam smithing and ensures your dragon stays together.
- Variable Temperature Heat Gun: A tool that allows you to precisely shape foam and PVC without scorching the material.
Taking Flight With Your Creation
Now that you have the foundation for your dragon build, you can start customizing the details to make the character your own. Consider adding a saddle if you plan on having a small rider prop, or experiment with different paint colors to create a completely new species of dragon.
The most important part of any DIY project is the patience you show during the assembly process. Take your time with the sanding and the scaling, as these small touches are what turn a simple craft into a piece of movie magic. Put on your harness, adjust your wings, and get ready to show the world your handiwork today.
Beginner-friendly templates, step-by-step guides,
and weekly project ideas in your inbox.