How To Make Frame At Home

Beginner-friendly templates, step-by-step guides,
and weekly project ideas in your inbox.
Creating your own picture frames at home offers a rewarding blend of personal expression and practical skill.
I remember my first attempt, a slightly wonky frame for a cherished photo, but the satisfaction was immense.
This guide will walk you through each step, ensuring you build beautiful, sturdy frames with confidence.
Quick Overview
You’re about to embark on a creative journey, transforming raw materials into a custom display for your art or photographs. This project will equip you with fundamental woodworking skills and a sense of accomplishment.
- Time needed: 3-5 hours (including drying time for glue and finish)
- Difficulty: Beginner to Intermediate
- What you’ll need: Wood stock, saw, miter box or miter saw, wood glue, clamps, sandpaper, wood finish, backing board, hanging hardware.
Step-by-Step Instructions
Step 1: Gather Your Materials and Tools
Begin by selecting the right wood for your frame. Hardwoods like oak or maple offer durability, while softer woods like pine are easier to work with for beginners.
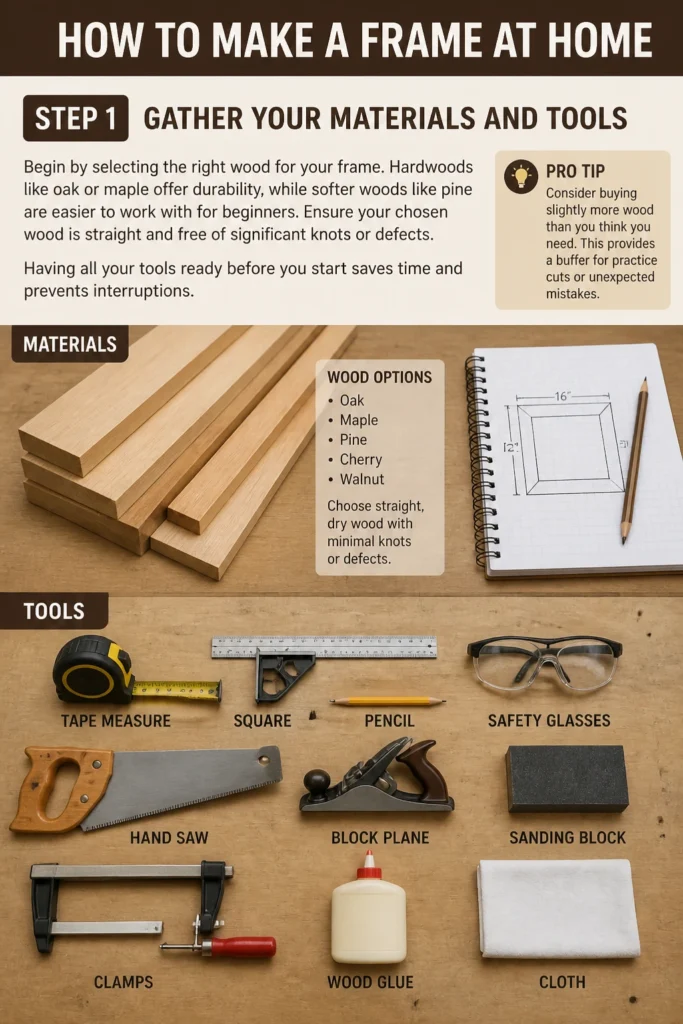
Ensure your chosen wood is straight and free of significant knots or defects. Having all your tools ready before you start saves time and prevents interruptions.
Pro Tip: Consider buying slightly more wood than you think you need. This provides a buffer for practice cuts or unexpected mistakes.
Step 2: Measure and Plan Your Design
Accurate measurements are the bedrock of a successful frame. Measure the exact dimensions of the artwork or photo you intend to frame.
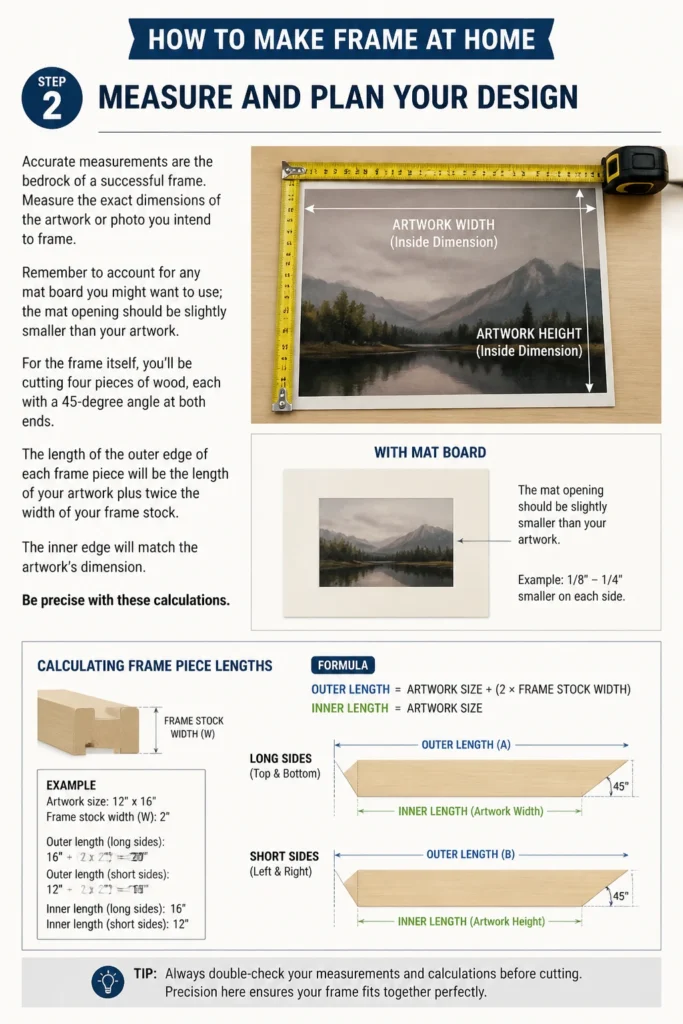
Remember to account for any mat board you might want to use; the mat opening should be slightly smaller than your artwork. For the frame itself, you’ll be cutting four pieces of wood, each with a 45-degree angle at both ends.
The length of the outer edge of each frame piece will be the length of your artwork plus twice the width of your frame stock. The inner edge will match the artwork’s dimension. Be precise with these calculations.
Step 3: Cut Your Frame Stock
Set your miter saw or miter box to a 45-degree angle. Carefully cut one end of your first piece of wood.
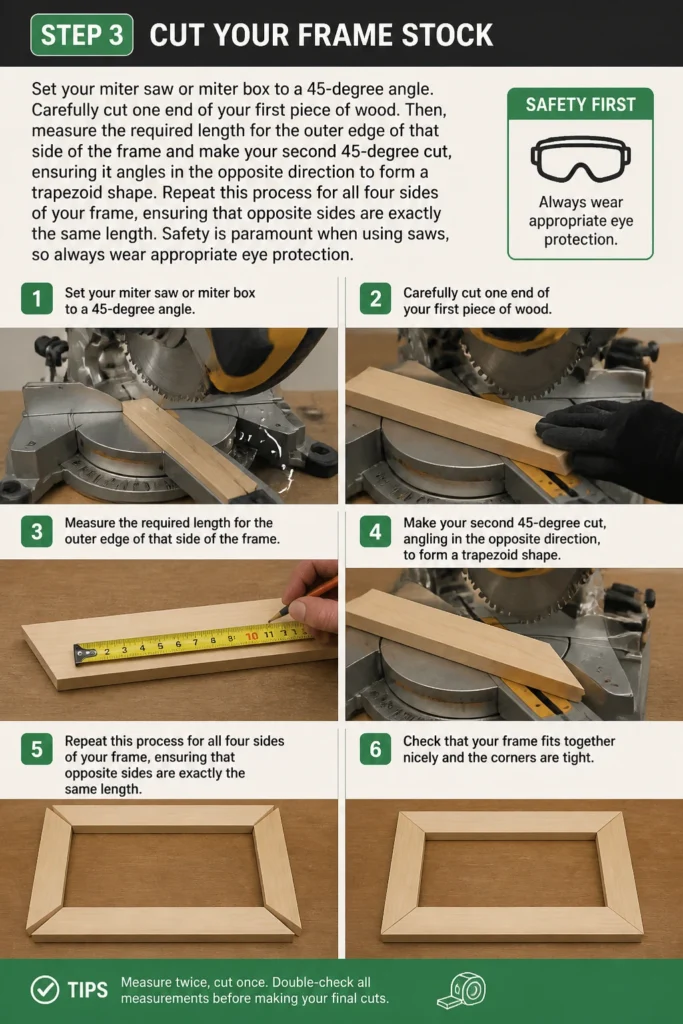
Then, measure the required length for the outer edge of that side of the frame and make your second 45-degree cut, ensuring it angles in the opposite direction to form a trapezoid shape.
Repeat this process for all four sides of your frame, ensuring that opposite sides are exactly the same length. Safety is paramount when using saws, so always wear appropriate eye protection.
Step 4: Test Fit and Sand
Before applying any glue, dry-fit your four frame pieces together. Check that all corners meet perfectly, forming tight, 90-degree angles.
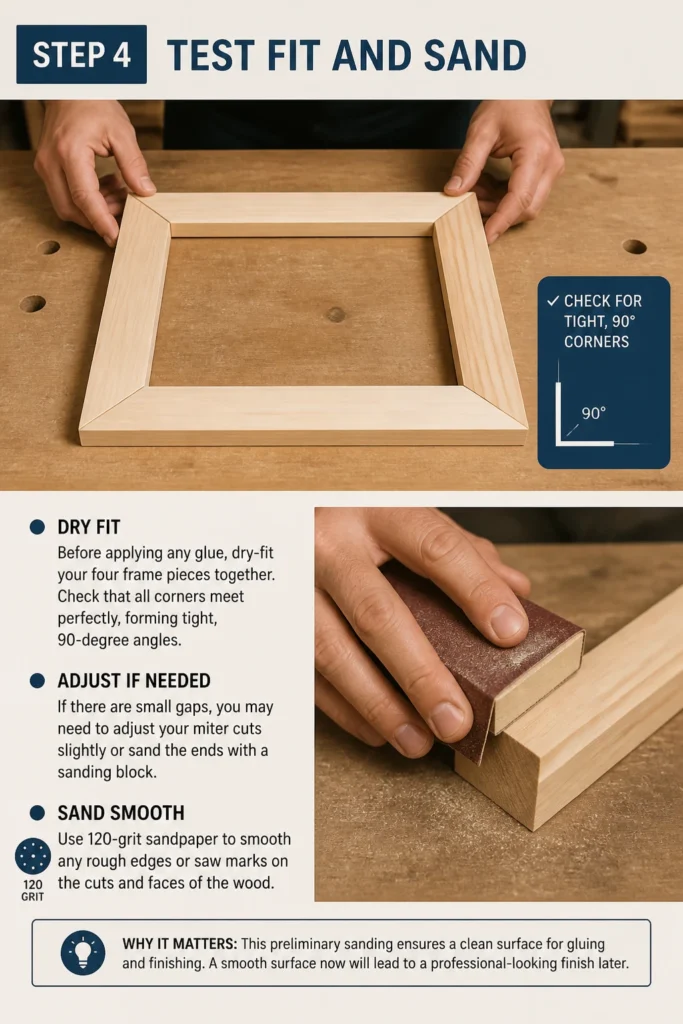
If there are small gaps, you may need to adjust your miter cuts slightly or sand the ends with a sanding block. Use 120-grit sandpaper to smooth any rough edges or saw marks on the cuts and faces of the wood.
This preliminary sanding ensures a clean surface for gluing and finishing. A smooth surface now will lead to a professional-looking finish later.
Step 5: Assemble the Frame
Apply a thin, even layer of wood glue to both 45-degree cut surfaces of one corner joint. Press the two pieces together firmly.
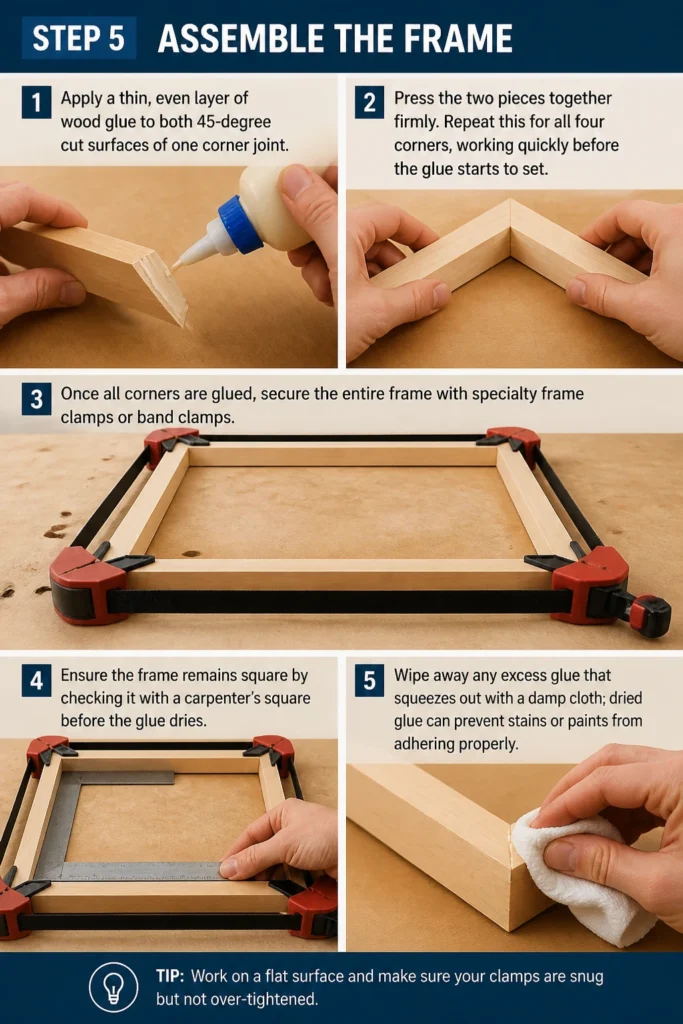
Repeat this for all four corners, working quickly before the glue starts to set. Once all corners are glued, secure the entire frame with specialty frame clamps or band clamps.
Ensure the frame remains square by checking it with a carpenter’s square before the glue dries. Wipe away any excess glue that squeezes out with a damp cloth; dried glue can prevent stains or paints from adhering properly.
Step 6: Finish the Wood
After the glue has fully cured (refer to your glue’s instructions, typically 24 hours), remove the clamps. Give the entire frame a final sanding, starting with 150-grit and finishing with 220-grit sandpaper, to achieve a perfectly smooth surface.
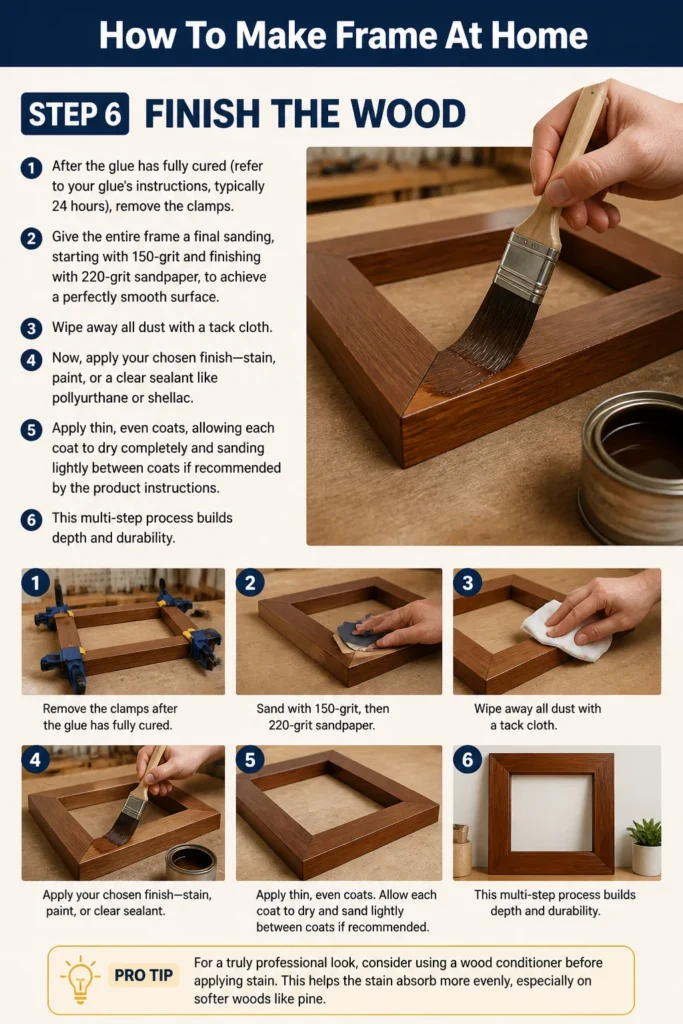
Wipe away all dust with a tack cloth. Now, apply your chosen finish: stain, paint, or a clear sealant like polyurethane or shellac.
Apply thin, even coats, allowing each coat to dry completely and sanding lightly between coats if recommended by the product instructions. This multi-step process builds depth and durability.
Pro Tip: For a truly professional look, consider using a wood conditioner before applying stain. This helps the stain absorb more evenly, especially on softer woods like pine.
Step 7: Prepare the Backing and Glazing
Measure the inside dimensions of your finished frame. Cut a piece of mat board or foam core to serve as the backing for your artwork.
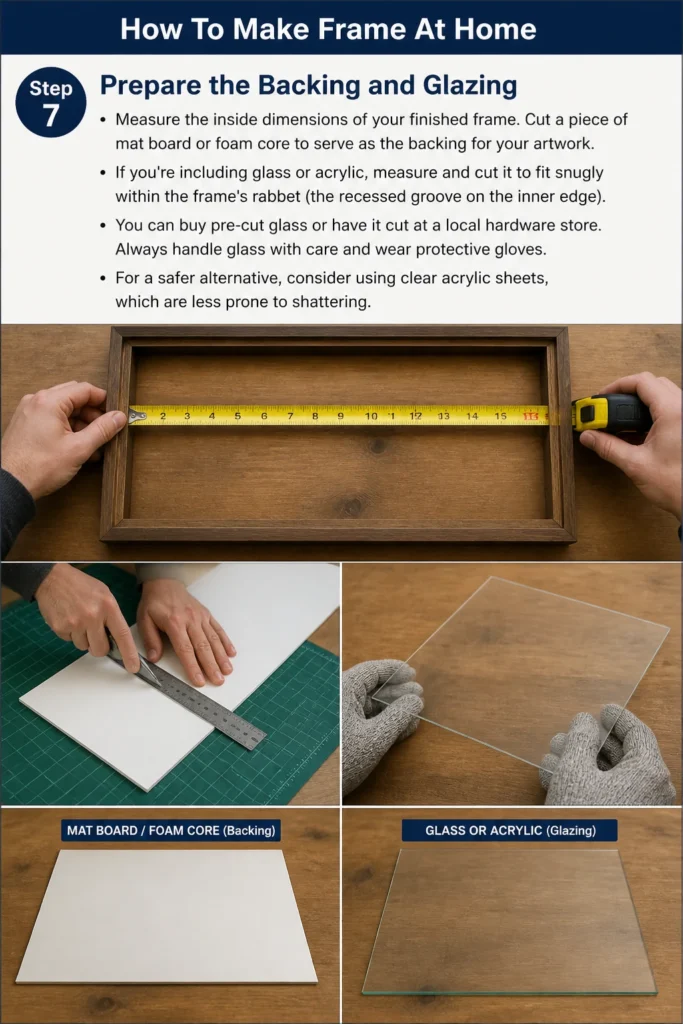
If you’re including glass or acrylic, measure and cut it to fit snugly within the frame’s rabbet (the recessed groove on the inner edge). You can buy pre-cut glass or have it cut at a local hardware store.
Always handle glass with care and wear protective gloves. For a safer alternative, consider using clear acrylic sheets, which are less prone to shattering.
Step 8: Insert Art and Secure Backing
Carefully clean the glass or acrylic insert on both sides. Place it into the frame’s rabbet first.
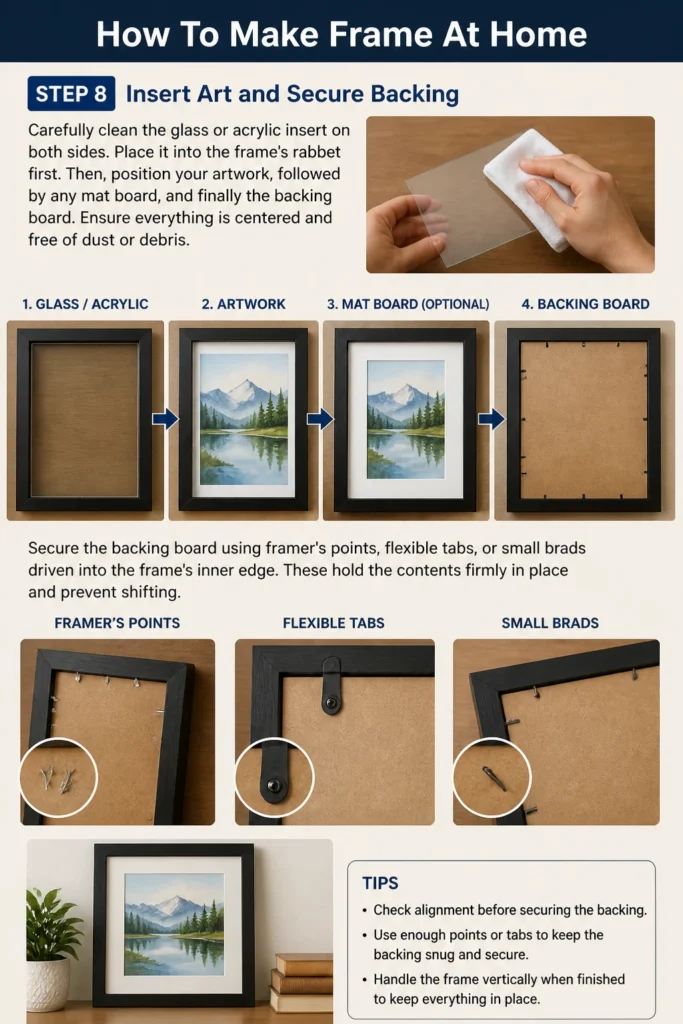
Then, position your artwork, followed by any mat board, and finally the backing board. Ensure everything is centered and free of dust or debris.
Secure the backing board using framer’s points, flexible tabs, or small brads driven into the frame’s inner edge. These hold the contents firmly in place and prevent shifting.
Step 9: Attach Hanging Hardware
Determine the best placement for your hanging hardware. D-rings or picture wire are common choices.
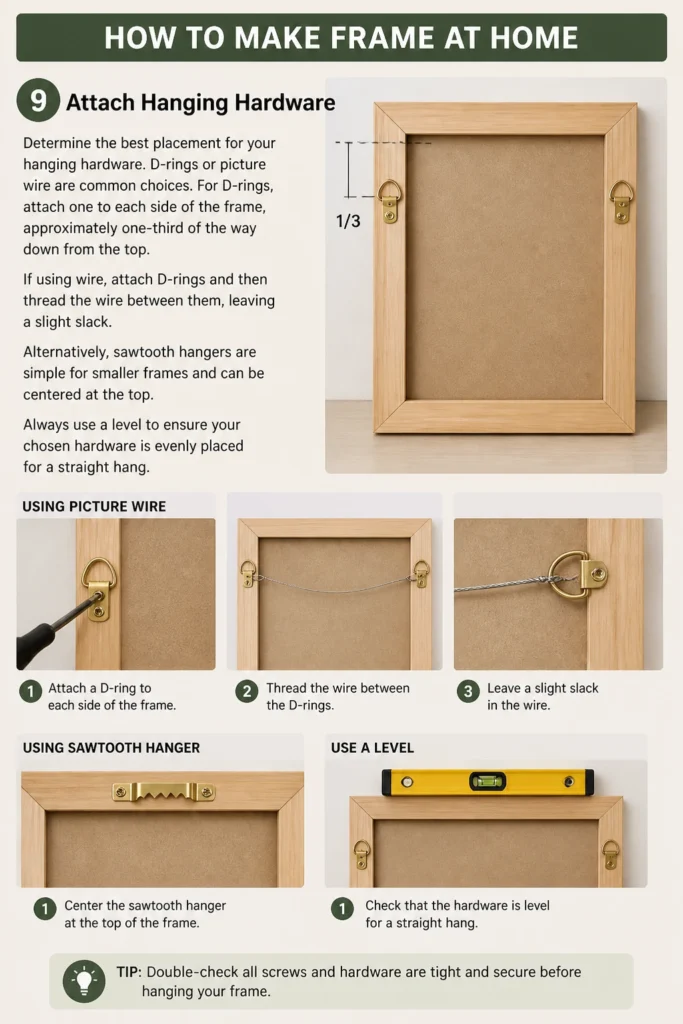
For D-rings, attach one to each side of the frame, approximately one-third of the way down from the top. If using wire, attach D-rings and then thread the wire between them, leaving a slight slack.
Alternatively, sawtooth hangers are simple for smaller frames and can be centered at the top. Always use a level to ensure your chosen hardware is evenly placed for a straight hang.
Common Mistakes to Avoid
Inaccurate Measurements
One of the most frequent errors in frame making is not taking precise measurements. Even a millimeter off can result in noticeable gaps at the corners, compromising the frame’s aesthetic and structural integrity.
Always double-check your measurements before making any cuts. Use a reliable tape measure and a sharp pencil to mark your lines clearly. Remember the “measure twice, cut once” mantra.
Poor Miter Cuts
Miter cuts need to be exactly 45 degrees to create perfect 90-degree corners. If your saw isn’t perfectly calibrated or you’re not holding the wood securely, your cuts might be slightly off.
This leads to open gaps at the corners that are difficult to hide. Practice on scrap wood, ensure your saw is calibrated, and use a miter box or miter saw for consistent, clean angles.
Insufficient Clamping
Many beginners remove clamps too soon or don’t apply enough pressure during the gluing process. Wood glue needs adequate time and consistent pressure to form a strong bond.
Weak clamping can result in joints that pull apart over time or are not perfectly flush. Invest in good quality frame clamps and leave them on for the full curing time recommended by the glue manufacturer, typically 24 hours.
Rushing the Finishing Process
Applying stain or paint too quickly, or not allowing sufficient drying time between coats, can lead to an uneven, blotchy, or sticky finish. This detracts significantly from the frame’s overall appearance.
Patience is key here. Apply thin, even coats, sand lightly between coats as instructed, and allow each layer to fully dry. A rushed finish can ruin hours of careful woodworking.
Troubleshooting
Gaps in Corners
If you find small gaps at your frame’s corners after assembly, don’t despair. For minor gaps, wood filler matched to your wood’s color can be carefully applied and sanded smooth once dry.
If the gaps are significant, it might indicate inaccurate cuts. In such cases, carefully disassemble the frame if the glue hasn’t fully cured, or consider recutting the affected pieces for a tighter fit.
Warped Wood
Sometimes, wood can warp slightly, making it difficult to achieve flat, even joints. If you notice slight warping before assembly, try to straighten it with clamps and gentle pressure over a few days.
For severe warping, it’s often best to replace the piece of wood. Ensure you store your wood flat in a stable environment to prevent warping before you even start cutting.
Uneven Finish
An uneven finish usually stems from inconsistent application, improper surface preparation, or not allowing enough drying time. If your stain or paint looks blotchy, sand the affected area gently with fine-grit sandpaper (e.g., 220-grit) until smooth.
Then, reapply the finish in thin, even coats. For staining, ensure you wipe off excess stain thoroughly. Always prepare the wood surface properly by sanding and cleaning before applying any finish.
Key Takeaways
- Precision is Paramount: Accurate measurements and perfect 45-degree cuts are essential for professional-looking corners.
- Patience Pays Off: Allow ample time for glue to cure and finishes to dry between coats for durable, beautiful results.
- Quality Tools Matter: A sharp saw, reliable clamps, and good quality sandpaper significantly improve the outcome.
- Practice Makes Perfect: Don’t be afraid to practice cuts on scrap wood before working on your final pieces.
- Safety First: Always wear eye protection and follow safety guidelines when using power tools.
- Personalize Your Art: Custom frames add unique character and value to your cherished photographs and artwork.
Frequently Asked Questions
What kind of wood is best for a beginner?
Pine or poplar are excellent choices for beginners. They are relatively soft, inexpensive, and easy to cut and sand. While they might show dings more easily, their workability makes them ideal for learning the basics of frame making.
Can I use alternative materials instead of wood?
Absolutely! While wood is traditional, you can also create frames from PVC trim, composite decking materials, or even upcycled items. The principles of cutting and joining at 45-degree angles generally remain the same, but you might need different adhesives or fastening methods.
How do I cut glass safely at home?
Cutting glass at home requires specific tools and precautions. You’ll need a glass cutter, a straight edge, and protective gloves and eyewear. Score the glass firmly along your desired line, then carefully snap it. For safety and accuracy, many prefer to have glass professionally cut at a hardware store or art supply shop.
What type of glue should I use for frame assembly?
For wood frames, a high-quality wood glue like Titebond Original or Titebond III is highly recommended. These glues create very strong bonds and are easy to work with. For other materials, consult the material manufacturer for appropriate adhesive recommendations.
Our Top Recommended Finds
- Miter Saw or Miter Box Kit: A quality miter saw provides precise, repeatable 45-degree cuts, crucial for tight frame corners. A good miter box with a hand saw is an affordable and effective alternative.
- Wood Glue (e.g., Titebond III): This waterproof wood glue offers exceptional strength and durability, ensuring your frame joints hold up for years. It sets firmly and sands well.
- Band Clamp or Picture Frame Clamps: These specialized clamps apply even pressure around all four sides of the frame simultaneously, ensuring tight, square joints during the glue’s curing time.
Craft Your Vision Today
You now possess the knowledge and confidence to create stunning, personalized frames right in your own workshop. Each frame you build will not only protect your cherished memories but also reflect your unique style and craftsmanship.
Consider experimenting with different wood types, stains, and paint colors to match various decor styles. Perhaps your next project could involve adding a decorative routered edge or incorporating a fabric mat.
Don’t wait to bring your vision to life. Gather your tools, select your materials, and begin transforming your favorite artwork into display-ready masterpieces today.
Beginner-friendly templates, step-by-step guides,
and weekly project ideas in your inbox.