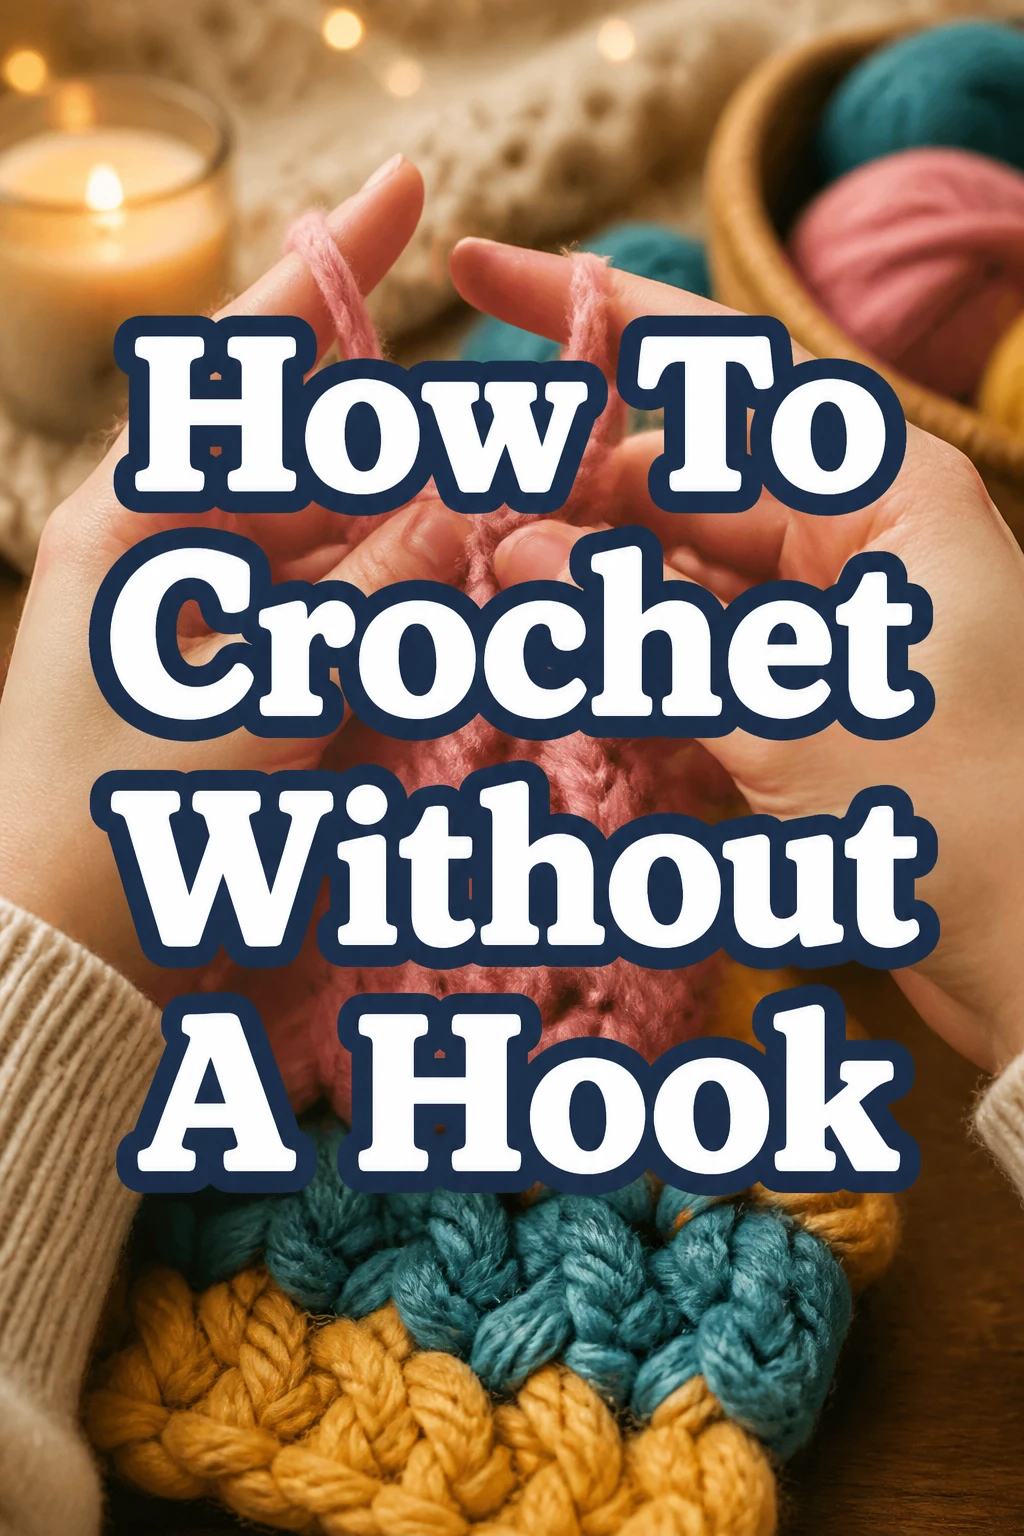
How To Crochet Without A Hook

Beginner-friendly templates, step-by-step guides,
and weekly project ideas in your inbox.
I remember one rainy afternoon, stuck indoors with a sudden urge to create, only to find my crochet hooks were nowhere to be seen.
That’s when I discovered the magic of using just my hands.
This guide comes from that very hands-on experience, showing you how simple and satisfying it is to craft beautiful pieces with nothing but yarn and your fingers.
Quick Overview
You’re about to learn a surprisingly intuitive method of crocheting that requires no special tools, just your two hands and some yarn. You’ll master fundamental stitches and create your first fabric swatch.
- Time needed: 45-90 minutes for initial learning and practice
- Difficulty: Beginner
- What you’ll need: A ball of yarn, your fingers
Step-by-Step Instructions
Step 1: Gather Your Materials
Your primary material is yarn. Choose a medium-weight yarn, often labeled as worsted weight or Aran, for your first attempts.
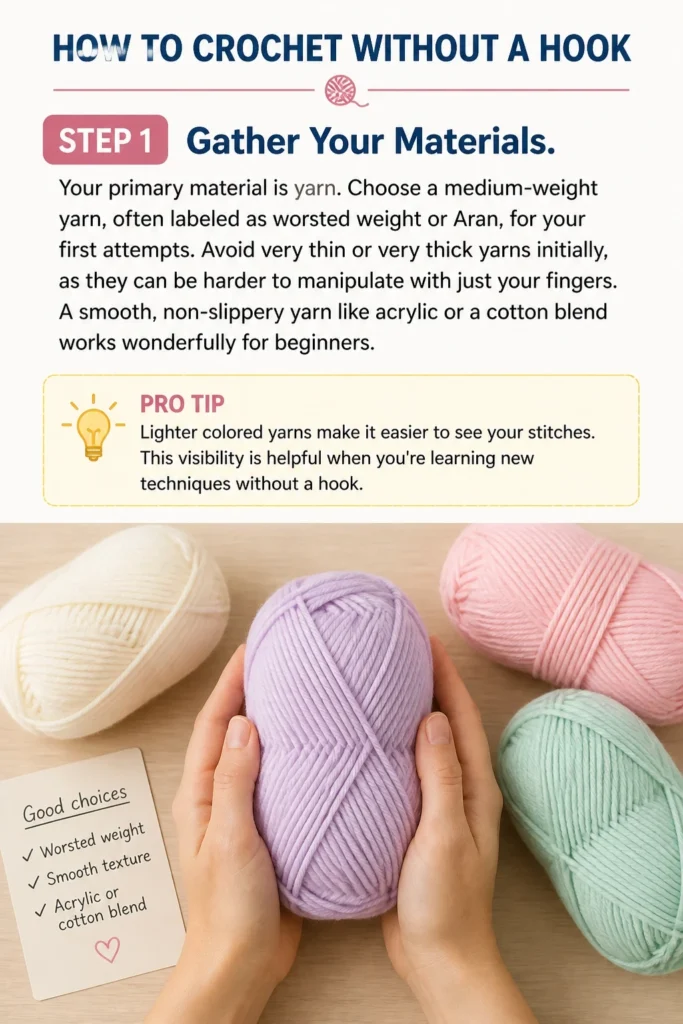
Avoid very thin or very thick yarns initially, as they can be harder to manipulate with just your fingers. A smooth, non-slippery yarn like acrylic or a cotton blend works wonderfully for beginners.
Pro Tip: Lighter colored yarns make it easier to see your stitches. This visibility is helpful when you’re learning new techniques without a hook.
Step 2: Create a Slip Knot
Start by making a slip knot, just as you would for traditional crochet. Drape the yarn over your palm, leaving a tail of about six inches.
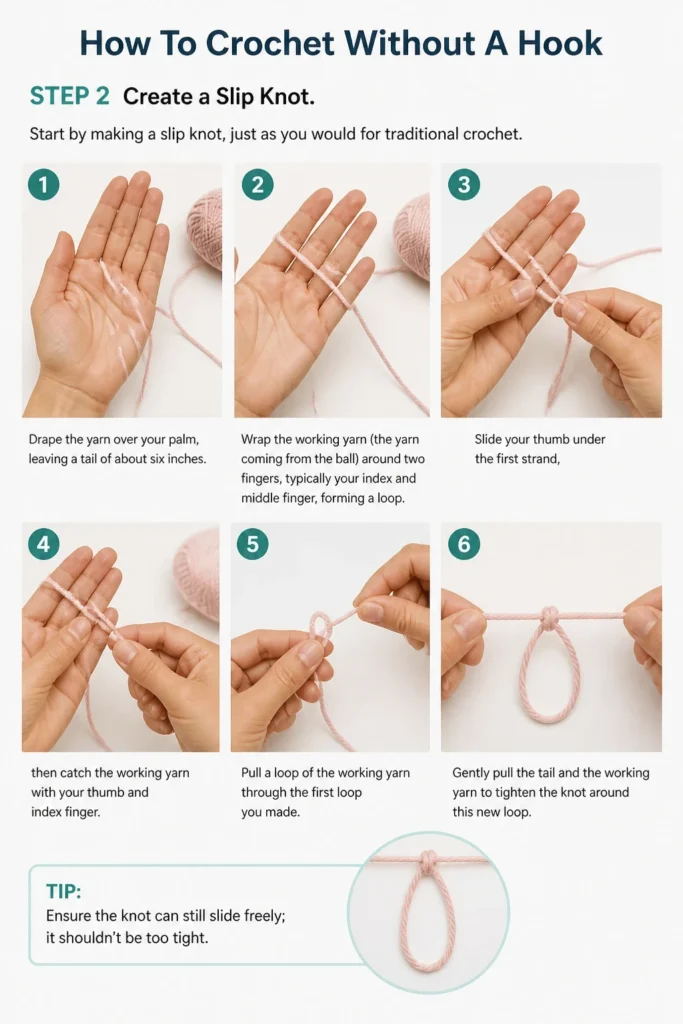
Wrap the working yarn (the yarn coming from the ball) around two fingers, typically your index and middle finger, forming a loop.
Slide your thumb under the first strand, then catch the working yarn with your thumb and index finger. Pull a loop of the working yarn through the first loop you made.
Gently pull the tail and the working yarn to tighten the knot around this new loop. Ensure the knot can still slide freely; it shouldn’t be too tight.
Step 3: Master the Chain Stitch
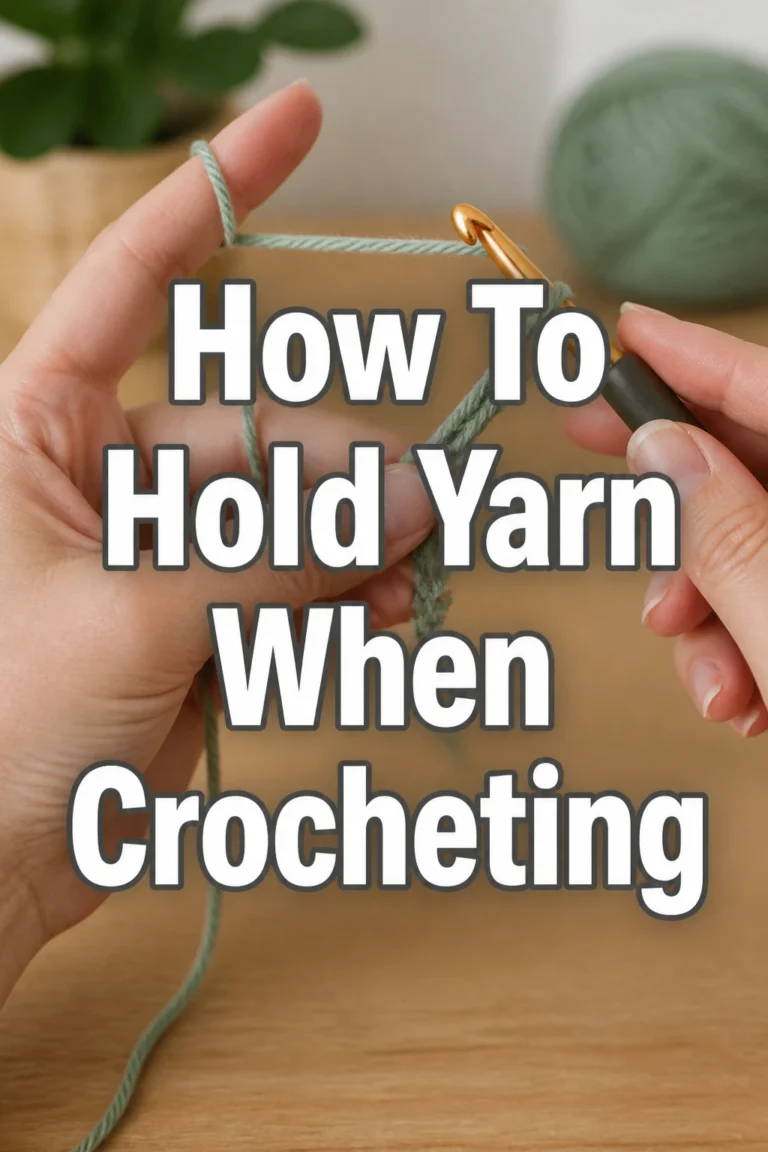
The chain stitch forms the foundation of most crochet projects. Hold the slip knot loop on your non-dominant hand’s index finger, securing the tail with your thumb.
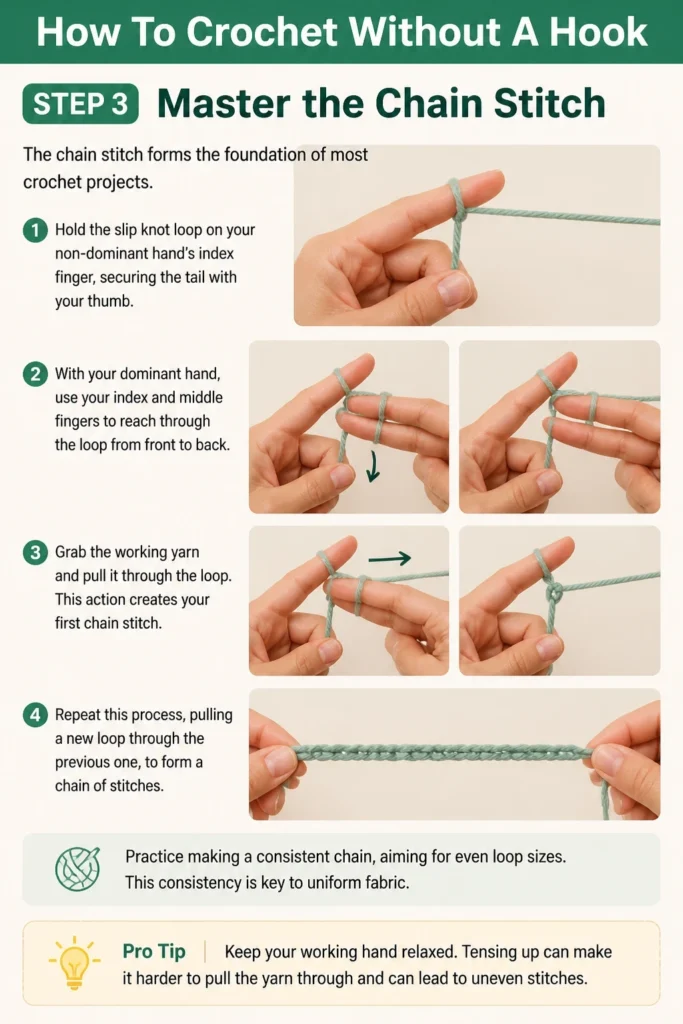
With your dominant hand, use your index and middle fingers to reach through the loop from front to back. Grab the working yarn and pull it through the loop.
This action creates your first chain stitch. Repeat this process, pulling a new loop through the previous one, to form a chain of stitches.
Practice making a consistent chain, aiming for even loop sizes. This consistency is key to uniform fabric.
Pro Tip: Keep your working hand relaxed. Tensing up can make it harder to pull the yarn through and can lead to uneven stitches.
Step 4: Learn the Single Crochet (SC)
The single crochet stitch is fundamental. Begin with a chain of at least 10-15 stitches, then skip the first chain stitch from your “hook” (your finger).
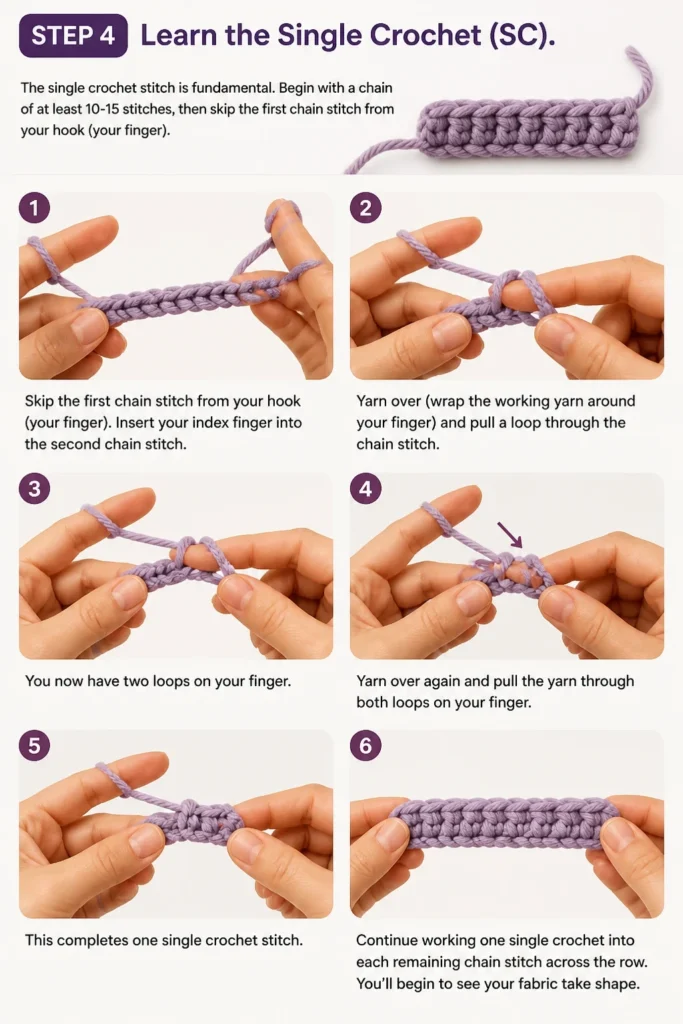
Insert your index finger into the second chain stitch. Yarn over (wrap the working yarn around your finger) and pull a loop through the chain stitch.
You now have two loops on your finger. Yarn over again and pull the yarn through both loops on your finger. This completes one single crochet stitch.
Continue working one single crochet into each remaining chain stitch across the row. You’ll begin to see your fabric take shape.
Step 5: Practice the Half Double Crochet (HDC)
The half double crochet offers a slightly taller stitch than the single crochet. Start with a chain, then yarn over (wrap yarn around your finger) before inserting your finger into the third chain stitch from your “hook.”
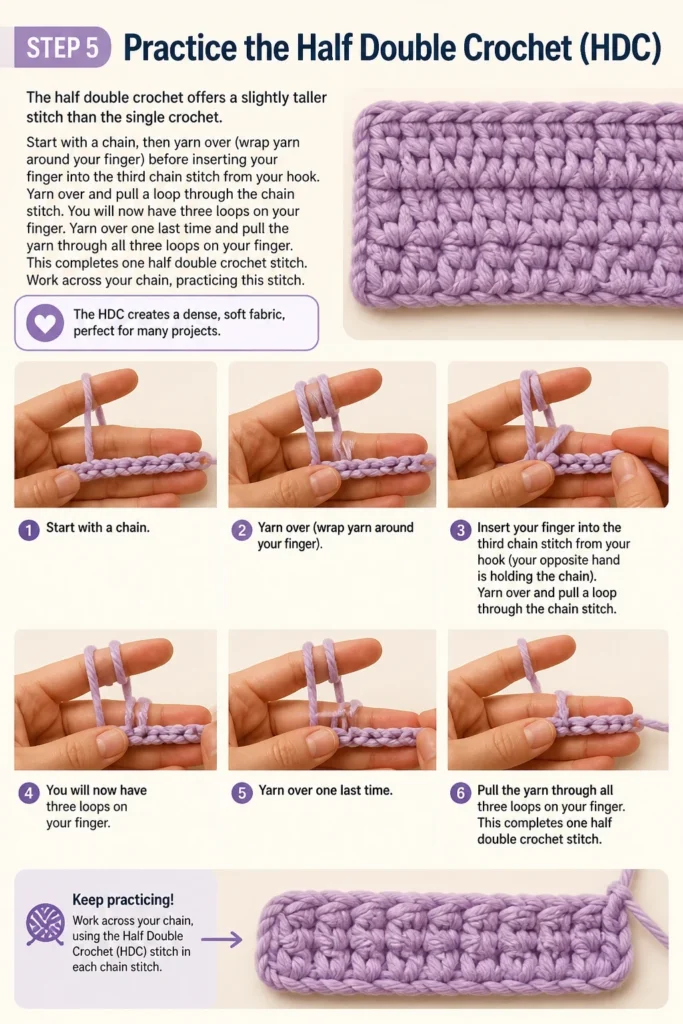
Yarn over and pull a loop through the chain stitch. You will now have three loops on your finger.
Yarn over one last time and pull the yarn through all three loops on your finger. This completes one half double crochet stitch.
Work across your chain, practicing this stitch. The HDC creates a dense, soft fabric, perfect for many projects.
Step 6: Master the Double Crochet (DC)
The double crochet is a taller, airier stitch. Begin with a chain and yarn over before inserting your finger into the fourth chain stitch from your “hook.”
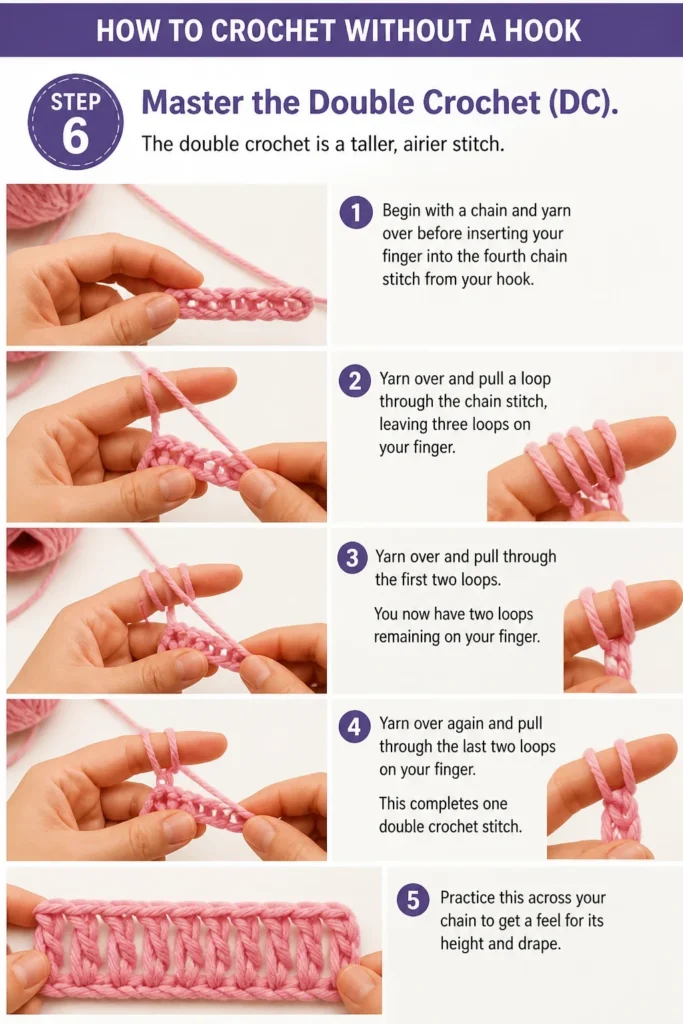
Yarn over and pull a loop through the chain stitch, leaving three loops on your finger. Yarn over and pull through the first two loops.
You now have two loops remaining on your finger. Yarn over again and pull through the last two loops on your finger.
This completes one double crochet stitch. Practice this across your chain to get a feel for its height and drape.
Step 7: Turning Your Work and Building Rows
Once you reach the end of a row, you need to turn your work to start the next one. For single crochet, chain one stitch (this is your turning chain) and then turn your fabric.
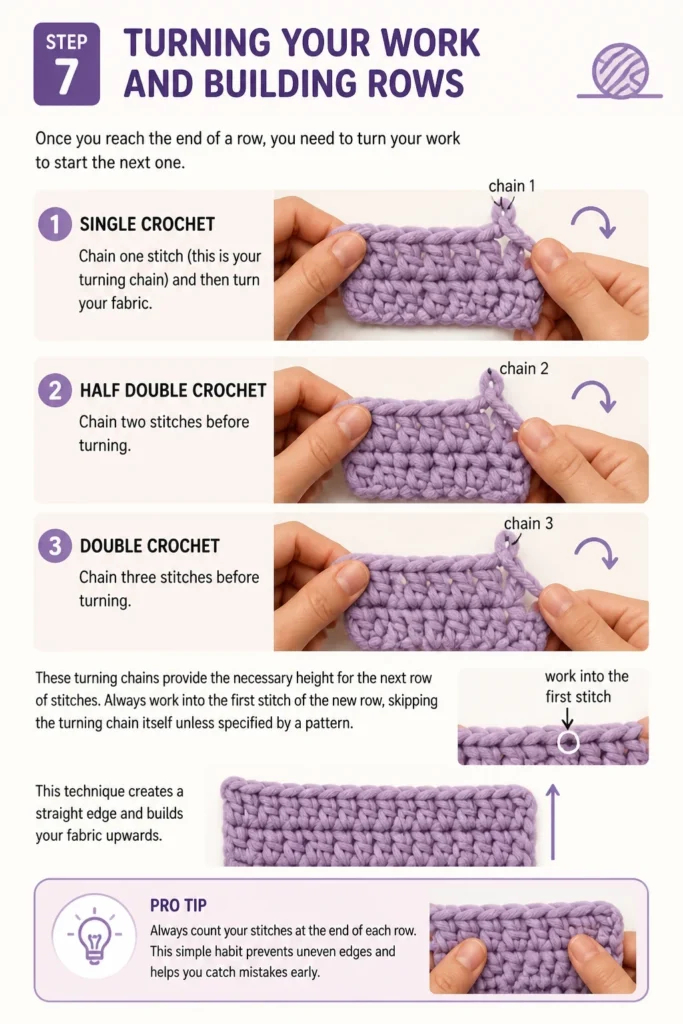
For half double crochet, chain two stitches before turning. For double crochet, chain three stitches.
These turning chains provide the necessary height for the next row of stitches. Always work into the first stitch of the new row, skipping the turning chain itself unless specified by a pattern.
This technique creates a straight edge and builds your fabric upwards.
Pro Tip: Always count your stitches at the end of each row. This simple habit prevents uneven edges and helps you catch mistakes early.
Step 8: Finishing Off Your Work
When your piece is the desired size, it’s time to secure the last stitch. Cut your working yarn, leaving a tail of about six inches.
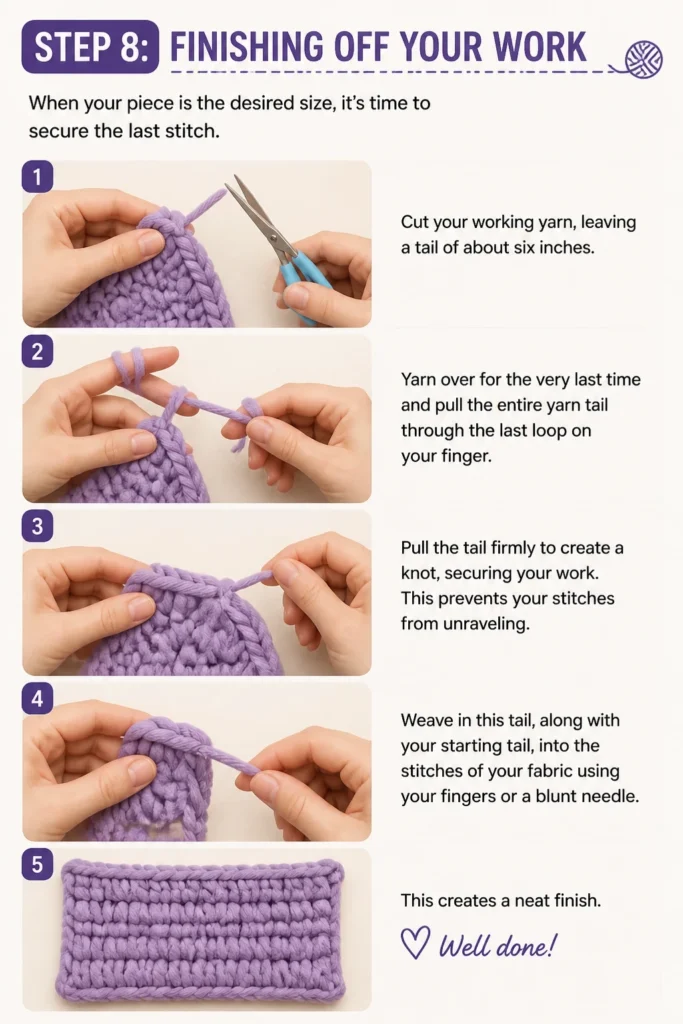
Yarn over for the very last time and pull the entire yarn tail through the last loop on your finger.
Pull the tail firmly to create a knot, securing your work. This prevents your stitches from unraveling.
Weave in this tail, along with your starting tail, into the stitches of your fabric using your fingers or a blunt needle. This creates a neat finish.
Step 9: Practicing Tension
Tension refers to how tightly or loosely you hold your yarn and form your stitches. Consistent tension is vital for an even, professional-looking fabric.
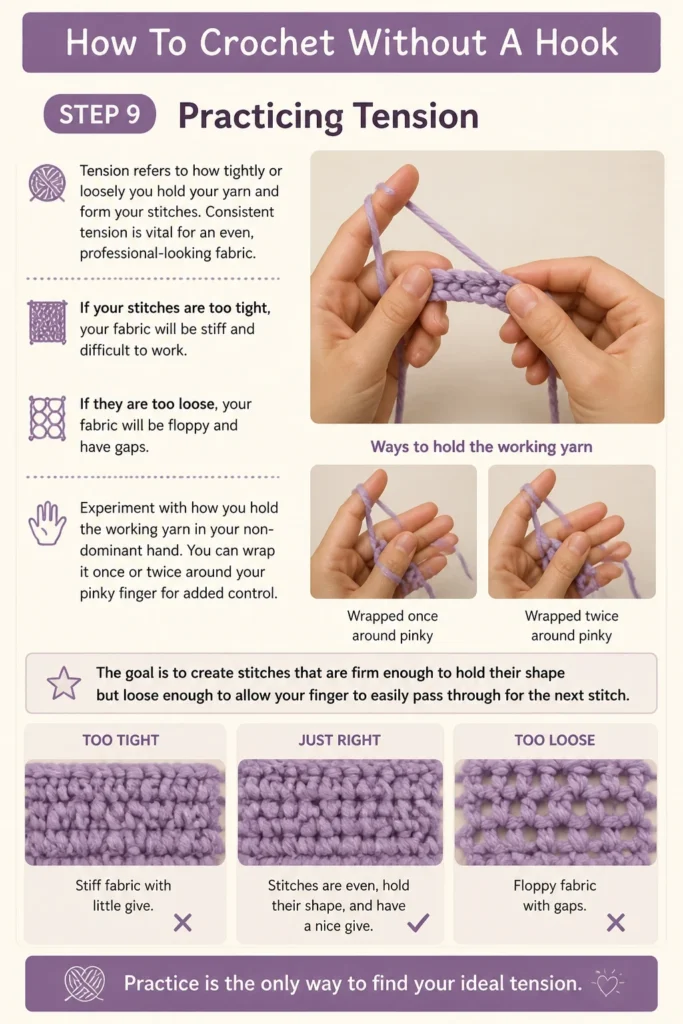
If your stitches are too tight, your fabric will be stiff and difficult to work. If they are too loose, your fabric will be floppy and have gaps.
Experiment with how you hold the working yarn in your non-dominant hand. You can wrap it once or twice around your pinky finger for added control.
The goal is to create stitches that are firm enough to hold their shape but loose enough to allow your finger to easily pass through for the next stitch. Practice is the only way to find your ideal tension.
Step 10: Experiment with Yarn Types
Once you’re comfortable with the basic stitches, try different yarn weights and textures. Bulky or super bulky yarns are fantastic for quick, chunky projects like scarves or blankets using just your hands.
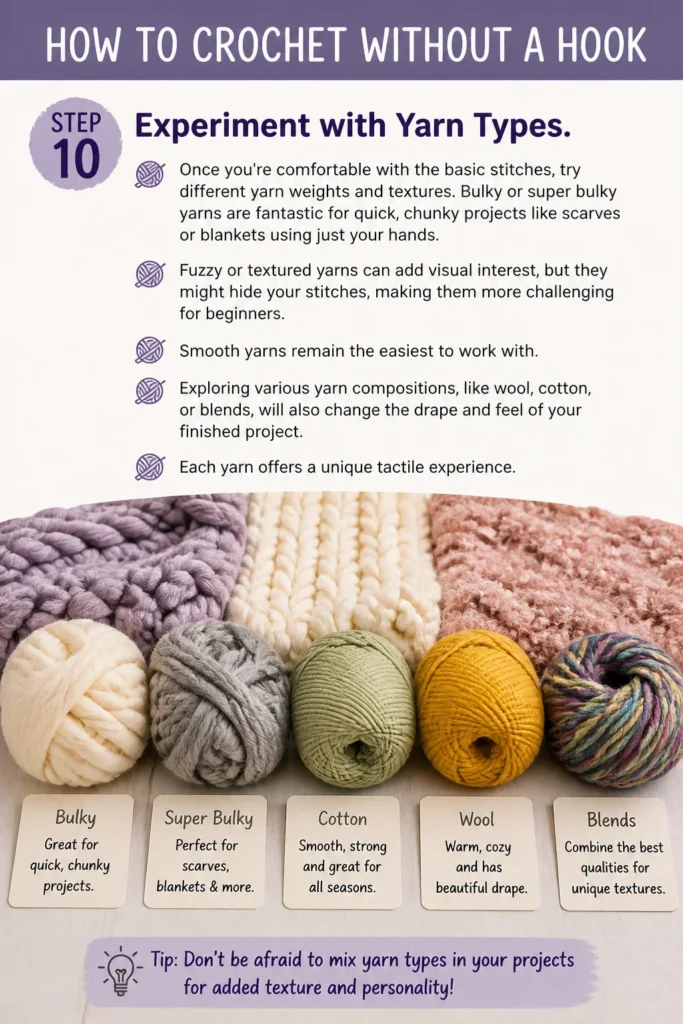
Fuzzy or textured yarns can add visual interest, but they might hide your stitches, making them more challenging for beginners. Smooth yarns remain the easiest to work with.
Exploring various yarn compositions, like wool, cotton, or blends, will also change the drape and feel of your finished project. Each yarn offers a unique tactile experience.
Common Mistakes to Avoid
Inconsistent Tension
One of the most frequent issues for new crocheters, especially without a hook, is uneven tension. This leads to fabric that is tight in some areas and loose in others, making your project look lumpy or misshapen.
Focus on maintaining a steady grip on your yarn and forming each loop with similar pressure. Practice making swatch after swatch until your stitches feel consistent.
Skipping Stitches or Adding Extra Stitches
It’s easy to accidentally skip a stitch at the end of a row or work an extra stitch into a turning chain. This results in your fabric getting narrower or wider than intended.
Always count your stitches at the end of every row. Use your fingers to clearly identify each stitch and where to insert your “hook” finger for the next one.
Working Too Tightly
Many beginners tend to crochet too tightly, making it difficult to insert their fingers into stitches for subsequent rows. This can cause hand strain and a stiff, unyielding fabric.
Consciously try to relax your grip on the yarn and on the stitches you’re forming. Your finger should be able to slide into the previous stitch without excessive force.
Wrong Turning Chain Height
Using the incorrect number of chain stitches for your turning chain will lead to uneven edges. Your fabric will either curve inwards or bulge outwards at the sides.
Remember the correct turning chain height for each stitch: one for single crochet, two for half double crochet, and three for double crochet. Always ensure your turning chain matches the stitch you’re about to work.
Troubleshooting
My stitches are too loose and gappy.
Loose stitches often indicate that your tension is not tight enough. The yarn is being pulled through too generously, creating large loops.
Try wrapping the working yarn around your non-dominant pinky finger once or twice. This provides a bit more resistance and helps you maintain a firmer grip, resulting in tighter, more consistent stitches.
My edges are uneven and won’t stay straight.
Uneven edges are typically a sign of either skipping stitches at the beginning or end of a row, or accidentally adding extra stitches. It can also happen if your turning chain is inconsistent.
Always count your stitches at the end of each row to ensure you have the correct number. Make sure you’re inserting your finger into the very first and very last stitch of each row, and using the correct turning chain for your stitch type.
My yarn keeps splitting when I try to work a stitch.
Yarn splitting can be frustrating and usually means your finger isn’t cleanly passing through the entire stitch. Instead, it’s catching only some of the plies that make up the yarn strand.
Slow down and be deliberate when inserting your finger. Ensure your finger goes completely under both loops of the ‘V’ of the previous stitch. Sometimes, a different yarn type with a tighter twist can also help.
Key Takeaways
- Crocheting without a hook makes the craft accessible anywhere, anytime, using only yarn and your hands.
- Mastering the slip knot and chain stitch forms the essential foundation for all subsequent work.
- Single crochet, half double crochet, and double crochet are core stitches that build different fabric textures and heights.
- Consistent tension and accurate stitch counting are crucial for creating even, professional-looking fabric.
- Always use the correct turning chain height for each stitch to maintain straight, tidy edges.
- Practice is paramount; repetition helps build muscle memory and improve your speed and consistency.
Frequently Asked Questions
Is this considered “real” crochet?
Absolutely! While it uses a different tool (your fingers instead of a hook), the fundamental techniques, stitch structures, and resulting fabric are identical to traditional crochet. It’s simply a variation of the craft.
What kinds of projects can I make without a hook?
You can make a surprising variety of items, especially with chunkier yarns. Scarves, cowls, blankets, placemats, and even simple bags are all achievable. Smaller, more intricate items might be challenging due to finger size, but larger projects are very satisfying.
Is it harder to crochet without a hook than with one?
For some, it might feel slightly more awkward initially because your fingers are larger than a hook. However, many find it incredibly intuitive and natural once they get the hang of it. It removes the need to learn how to hold a hook correctly, simplifying the start.
What type of yarn is best for finger crochet?
For beginners, a smooth, medium-weight (worsted/Aran) yarn is ideal for learning. Once comfortable, bulky or super bulky yarns are excellent for quick projects, as they fill up your fingers more easily and create a wonderfully chunky fabric.
Our Top Recommended Finds
- Chunky Acrylic Yarn: Perfect for quick projects and easy to see your stitches, making learning simple.
- Cotton Blend Yarn: Offers a nice drape and stitch definition, great for practicing different stitch textures.
- Stitch Markers: Even without a hook, these help mark the beginning of a round or specific stitches, keeping you on track.
Your Hands, Your Canvas: Start Creating Today
You’ve now got the knowledge and the steps to embark on a truly accessible crafting journey. The ability to crochet without a hook means you can create beautiful textiles anywhere, using just what you have.
Don’t hesitate to start your first swatch. Embrace the process, enjoy the feel of the yarn, and celebrate each stitch you make.
Perhaps your next adventure could be exploring finger knitting or even venturing into arm knitting for even larger projects. The world of hookless fiber art is wide open for you to explore.
Beginner-friendly templates, step-by-step guides,
and weekly project ideas in your inbox.