How To Read A Crochet Pattern

Beginner-friendly templates, step-by-step guides,
and weekly project ideas in your inbox.
Learning to crochet can feel like deciphering a secret code at first.
I remember my early days, staring at lines of abbreviations, wondering if I’d ever create anything more than a tangled mess.
This guide draws from years of experience to help you confidently understand any crochet pattern.
Quick Overview
By the end of this guide, you will be able to confidently read and interpret standard crochet patterns, allowing you to create beautiful projects with ease.
- Time needed: 30-60 minutes for initial understanding, ongoing practice for mastery
- Difficulty: Beginner
- What you’ll need: A crochet pattern, a hook, some yarn, and a stitch dictionary (optional)
Step-by-Step Instructions
Step 1: Find the Pattern Information
Every good crochet pattern starts with a section detailing important project information. Locate this section first.
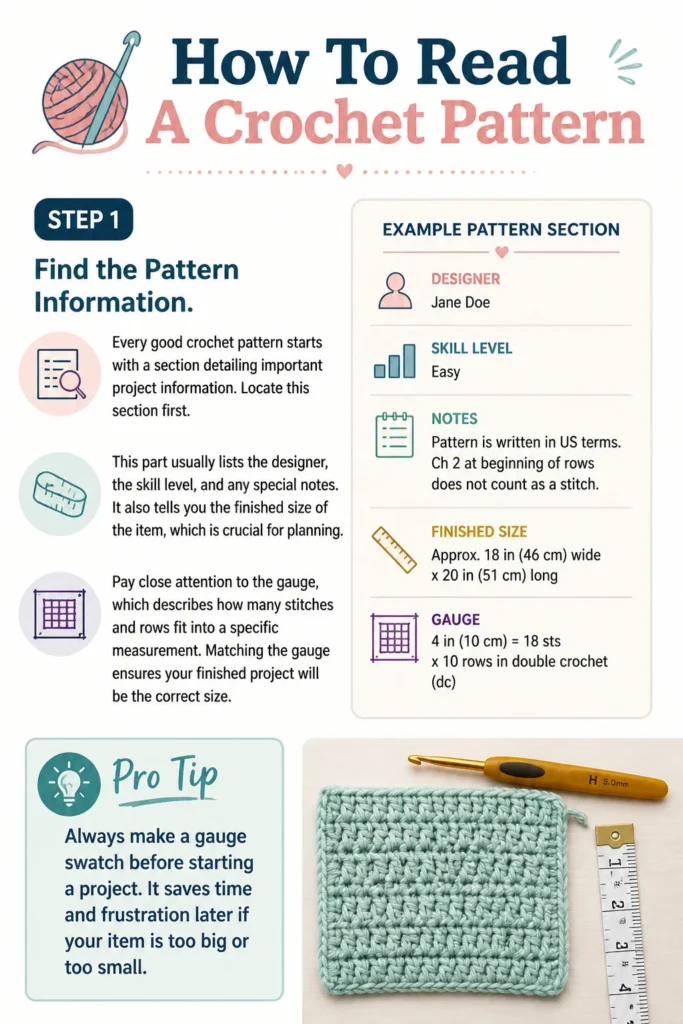
This part usually lists the designer, the skill level, and any special notes.
It also tells you the finished size of the item, which is crucial for planning.
Pay close attention to the gauge, which describes how many stitches and rows fit into a specific measurement.
Matching the gauge ensures your finished project will be the correct size.
Pro Tip: Always make a gauge swatch before starting a project. It saves time and frustration later if your item is too big or too small.
Step 2: Understand the Materials List
The materials section is your shopping list. Check what yarn is recommended.
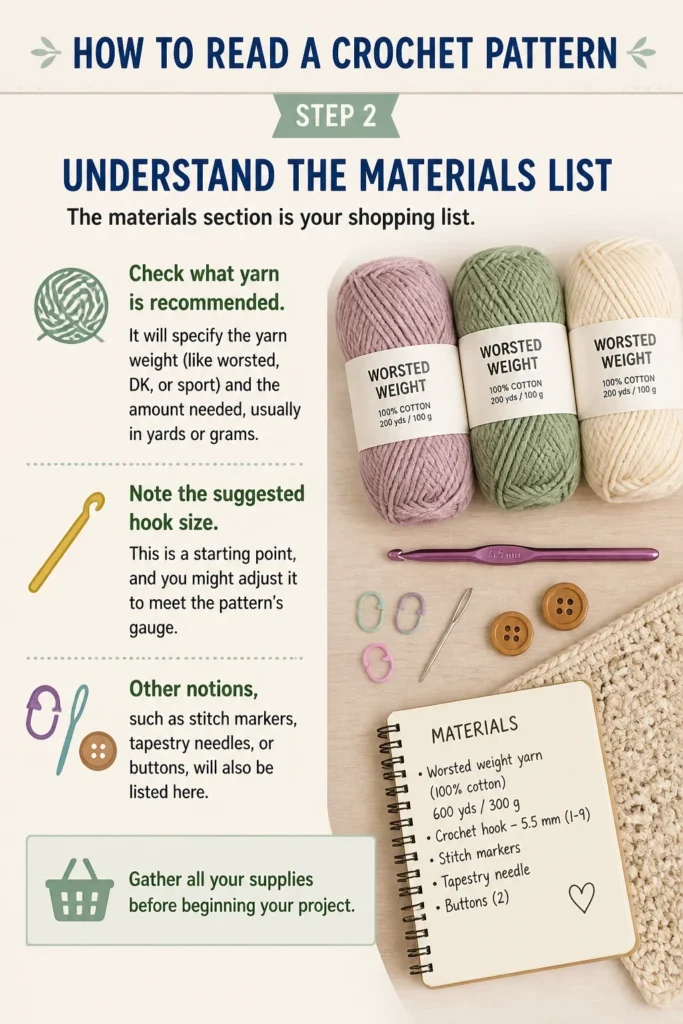
It will specify the yarn weight (like worsted, DK, or sport) and the amount needed, usually in yards or grams.
Note the suggested hook size. This is a starting point, and you might adjust it to meet the pattern’s gauge.
Other notions, such as stitch markers, tapestry needles, or buttons, will also be listed here.
Gather all your supplies before beginning your project.
Step 3: Decipher Abbreviations
Crochet patterns use a shorthand language of abbreviations. Find the abbreviation key within the pattern.
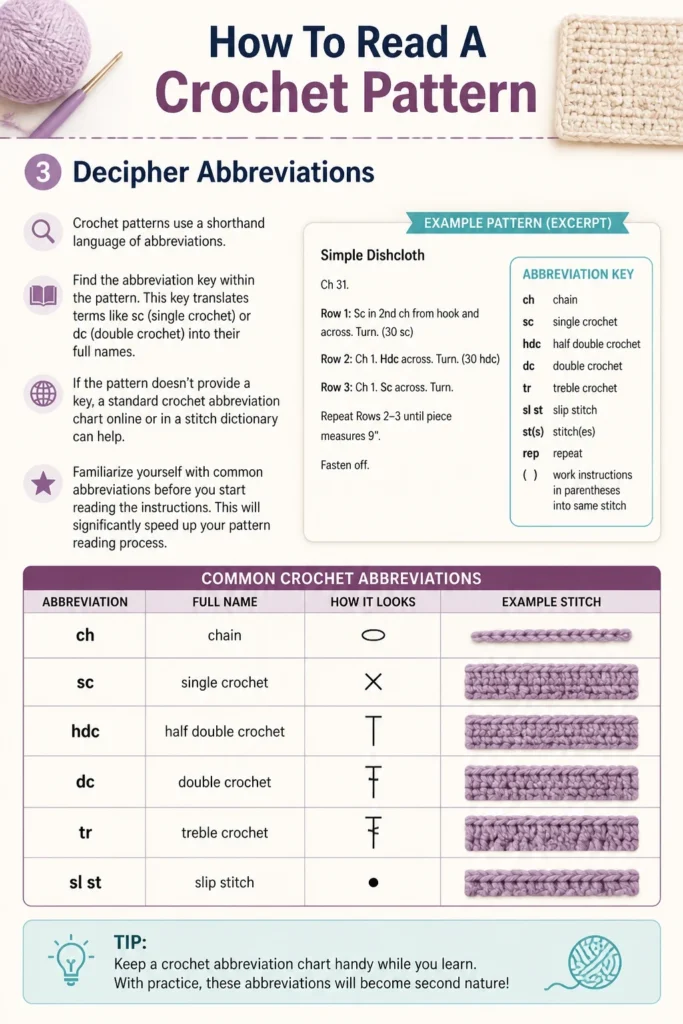
This key translates terms like “sc” (single crochet) or “dc” (double crochet) into their full names.
If the pattern doesn’t provide a key, a standard crochet abbreviation chart online or in a stitch dictionary can help.
Familiarize yourself with common abbreviations before you start reading the instructions.
This will significantly speed up your pattern reading process.
Step 4: Read Special Stitches and Techniques
Some patterns incorporate unique stitches or techniques. Look for a section dedicated to “Special Stitches” or “Notes.”
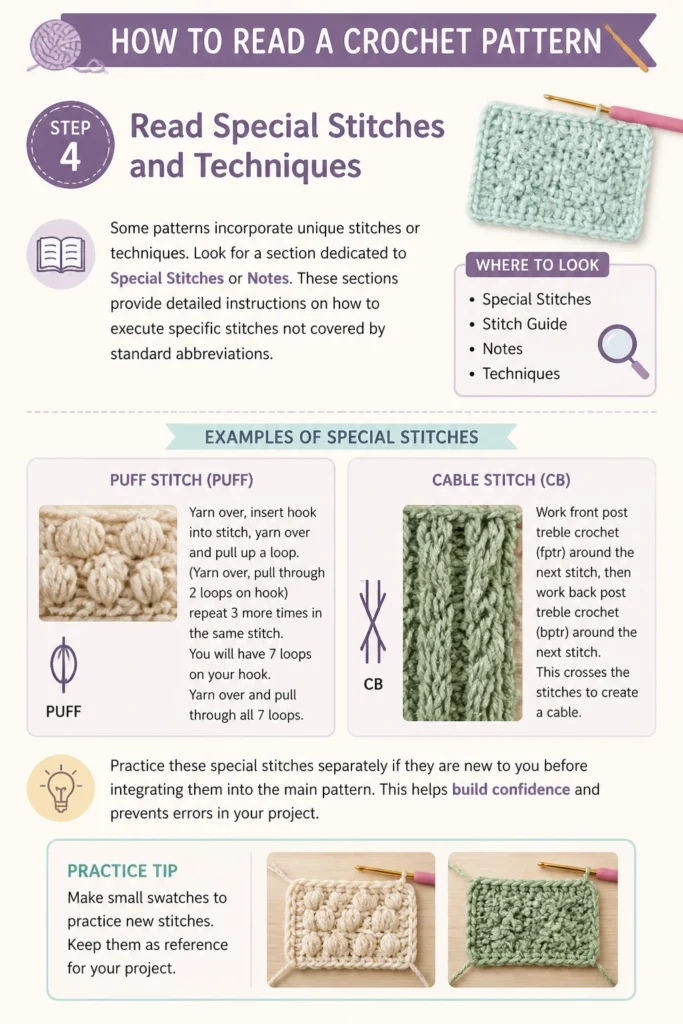
These sections provide detailed instructions on how to execute specific stitches not covered by standard abbreviations.
An example might be a “puff stitch” or a “cable stitch.”
Practice these special stitches separately if they are new to you before integrating them into the main pattern.
This helps build confidence and prevents errors in your project.
Step 5: Navigate the Pattern Instructions
The core of the pattern is the instruction section, often broken down by rows or rounds. Begin reading from the start.
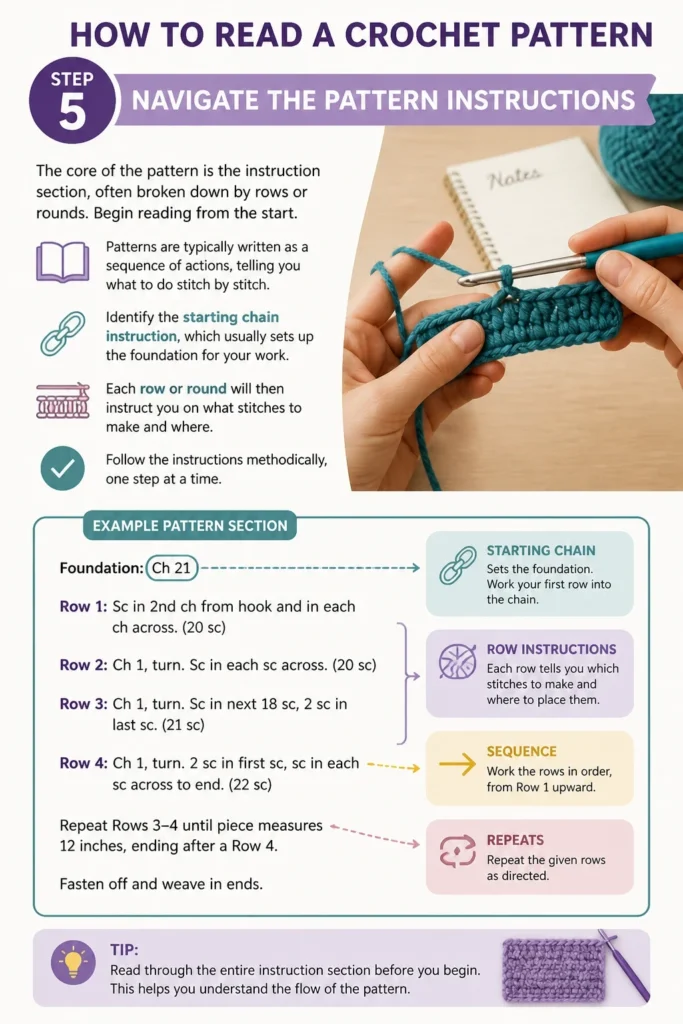
Patterns are typically written as a sequence of actions, telling you what to do stitch by stitch.
Identify the starting chain instruction, which usually sets up the foundation for your work.
Each row or round will then instruct you on what stitches to make and where.
Follow the instructions methodically, one step at a time.
Step 6: Understand Parentheses and Asterisks
Parentheses () and asterisks * are used to indicate repeated sections within a pattern. Recognize their purpose.
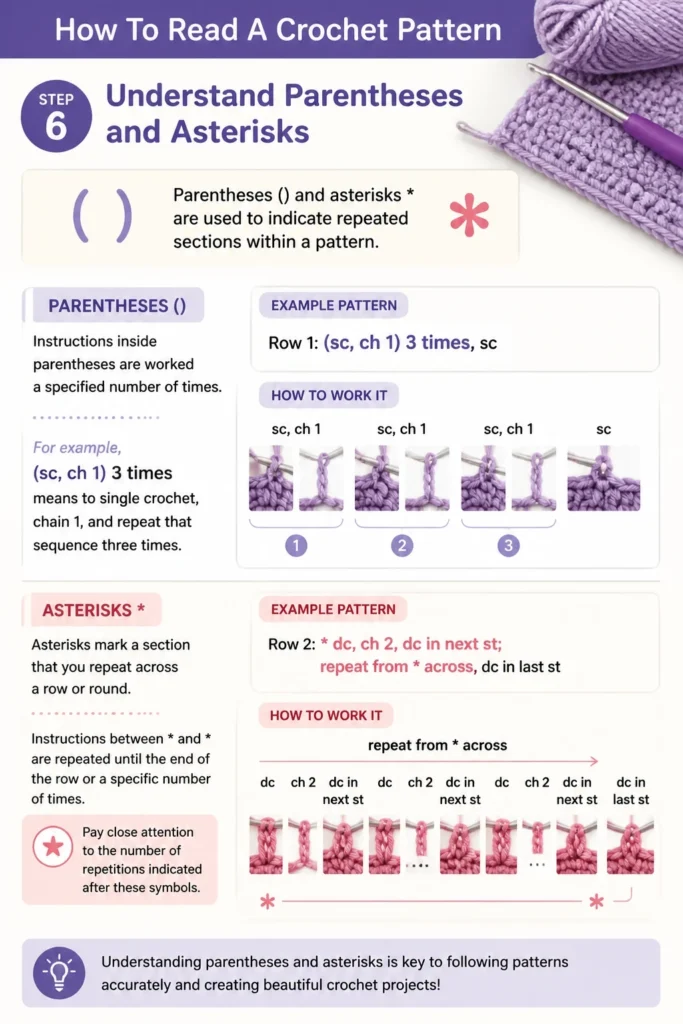
Instructions inside parentheses are worked a specified number of times.
For example, (sc, ch 1) 3 times means to single crochet, chain 1, and repeat that sequence three times.
Asterisks mark a section that you repeat across a row or round.
Instructions between and are repeated until the end of the row or a specific number of times.
Pay close attention to the number of repetitions indicated after these symbols.
Step 7: Count Your Stitches
Most patterns will tell you the stitch count at the end of each row or round. Verify your stitch count frequently.
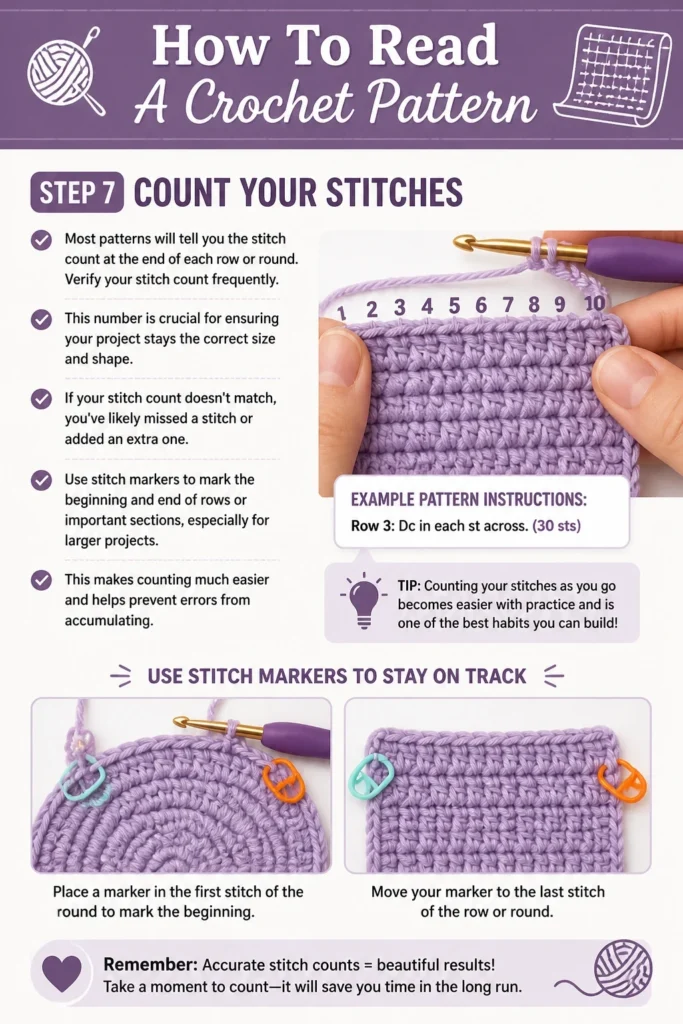
This number is crucial for ensuring your project stays the correct size and shape.
If your stitch count doesn’t match, you’ve likely missed a stitch or added an extra one.
Use stitch markers to mark the beginning and end of rows or important sections, especially for larger projects.
This makes counting much easier and helps prevent errors from accumulating.
Step 8: Read Ahead for Clarity
Sometimes a step might seem confusing. Read the next few lines or the entire section before crocheting.
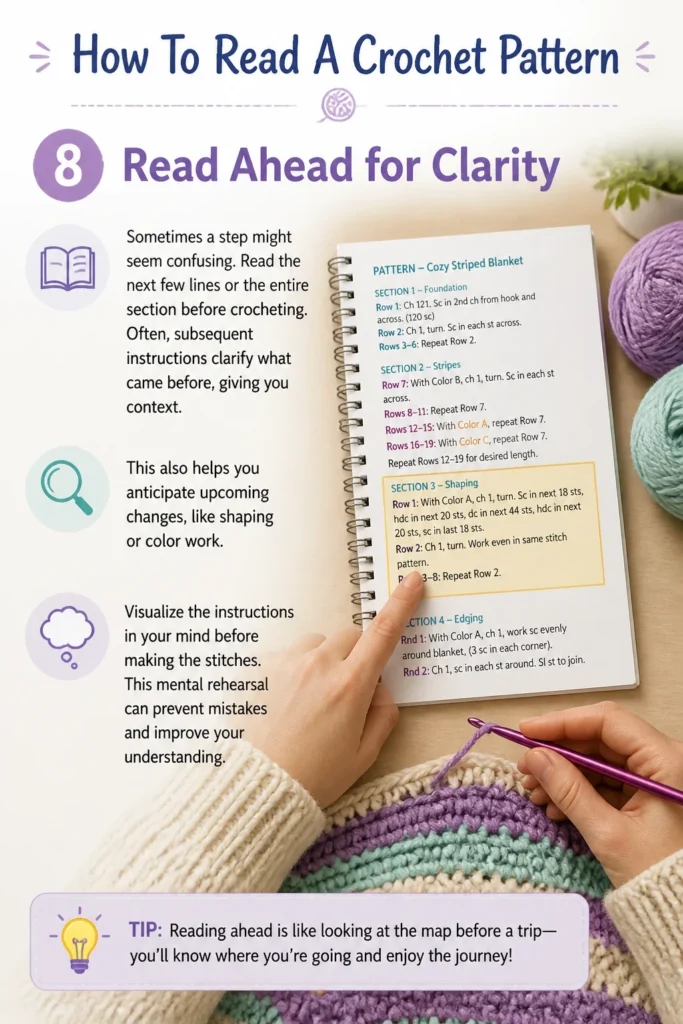
Often, subsequent instructions clarify what came before, giving you context.
This also helps you anticipate upcoming changes, like shaping or color work.
Visualize the instructions in your mind before making the stitches.
This mental rehearsal can prevent mistakes and improve your understanding.
Step 9: Utilize Charts and Diagrams
Many patterns include charts or diagrams alongside written instructions. Consult these visual aids.
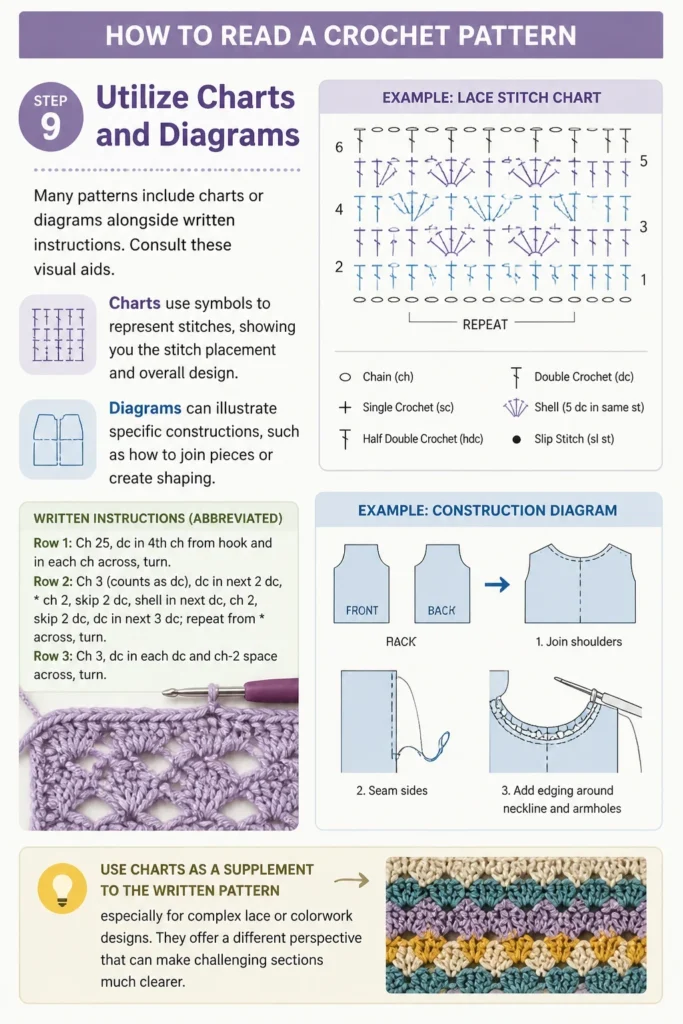
Charts use symbols to represent stitches, showing you the stitch placement and overall design.
Diagrams can illustrate specific constructions, such as how to join pieces or create shaping.
Use charts as a supplement to the written pattern, especially for complex lace or colorwork designs.
They offer a different perspective that can make challenging sections much clearer.
Common Mistakes to Avoid
Skipping the Gauge Swatch
Many crocheters are eager to start and skip making a gauge swatch. This often leads to projects that are the wrong size.
Your finished item might be too large or too small, wasting your time and yarn.
Always take the time to create a swatch and adjust your hook size if needed to match the pattern’s gauge.
Ignoring the Abbreviation Key
Assuming you know all the abbreviations can lead to misinterpretations. Different designers might use slightly different terms.
For instance, “hdc” might mean half double crochet in one pattern and something else in another.
Always refer to the specific abbreviation key provided with your pattern to ensure accuracy.
Not Counting Stitches Regularly
Failing to count your stitches at the end of each row or round is a common pitfall. Errors accumulate quickly.
You might not notice a missed or extra stitch until several rows later, requiring you to undo a lot of work.
Make it a habit to count after every completed row or round, or at least every few rows, to catch mistakes early.
Rushing Through Special Instructions
When a pattern introduces a new or special stitch, it’s tempting to try to power through it. This can result in incorrect execution.
Special stitches often require specific techniques that need careful attention.
Take your time, read the special instructions thoroughly, and practice the stitch until you feel comfortable before continuing with the main project.
Troubleshooting
My Project Is Too Big/Small
This is almost always a gauge issue. Your tension might be tighter or looser than the pattern designer’s.
If your project is too big, try using a smaller crochet hook. If it’s too small, use a larger hook.
Make another gauge swatch with the new hook size to confirm it matches before continuing your project.
I Have the Wrong Number of Stitches
If your stitch count is off, you likely missed a stitch or added an extra one in the previous row or round.
Carefully retrace your steps, counting each stitch as you go, to find the error.
Using stitch markers to mark the first and last stitch of each row can help prevent this problem.
I Don’t Understand a Specific Instruction
Sometimes a particular phrase or stitch instruction might be unclear. Don’t be afraid to seek help.
Search online for video tutorials of the specific stitch or technique. Many crochet communities and forums are also available to answer questions.
Referring to a comprehensive crochet stitch dictionary can also provide alternative explanations and visual aids.
Key Takeaways
- Always review the pattern’s introduction for gauge, materials, and skill level.
- Consult the abbreviation key to understand the pattern’s unique shorthand.
- Understand special stitches by reading their detailed instructions before beginning.
- Pay attention to parentheses and asterisks for repeating sections in the instructions.
- Count your stitches regularly to maintain accuracy and the correct project size.
- Don’t hesitate to read ahead or use visual charts for better comprehension.
Frequently Asked Questions
What if my yarn is a different weight than the pattern suggests?
Using a different yarn weight will likely change the finished size of your project. If the pattern calls for worsted weight and you use DK weight, your project will be smaller.
You can try to adjust your hook size significantly or accept that the final dimensions will vary. For best results, try to match the yarn weight as closely as possible.
Do I have to use the exact brand of yarn listed?
No, you do not have to use the exact brand. You can substitute with any yarn of the same weight and fiber content.
Just ensure your chosen substitute meets the gauge requirement of the pattern to achieve the intended size and drape.
What does “turn” mean in a pattern?
“Turn” means to rotate your work so the back side faces you, ready to begin the next row. This is common in patterns worked in rows.
If you are working in rounds, you typically do not turn unless specifically instructed to do so, as you continue working on the right side of the fabric.
How do I know if I’m working in rows or rounds?
Patterns will usually specify this clearly in the introduction or the first instruction. If it says “Chain X, then Row 1…” you are working in rows.
If it says “Make a magic ring, then Round 1…” or “Join with a slip stitch to first sc,” you are working in rounds.
Our Top Recommended Finds
- A good quality set of ergonomic crochet hooks: Reduces hand strain and makes crocheting more comfortable for longer periods.
- Locking stitch markers: Essential for marking stitches, especially the beginning of rounds or critical points in shaping, preventing errors.
- A comprehensive crochet stitch dictionary: An invaluable reference for understanding various stitches and techniques, especially if a pattern doesn’t fully explain them.
Your Crochet Journey Begins Now
You now have the tools to approach any crochet pattern with confidence.
Reading patterns moves from a mystery to a clear pathway for your creativity.
Don’t just read about it; pick up a pattern today and begin your next project.
The more you practice, the more intuitive pattern reading will become.
Beginner-friendly templates, step-by-step guides,
and weekly project ideas in your inbox.