How To Build A Shoe Rack

Beginner-friendly templates, step-by-step guides,
and weekly project ideas in your inbox.
Tired of tripping over shoes cluttering your entryway or closet floor?
Building your own shoe rack is a rewarding project that brings order and a sense of accomplishment.
I’ve built several of these over the years, learning the best methods for a sturdy and functional result, and I’m here to guide you through each part of the process.
Quick Overview
This guide will walk you through creating a sturdy, multi-tiered shoe rack designed to organize your footwear efficiently. You’ll learn essential woodworking techniques and finish with a practical piece for your home.
- Time needed: 4-8 hours (depending on experience and drying times)
- Difficulty: Beginner to Intermediate
- What you’ll need: Lumber, basic hand/power tools, fasteners, and a finish of your choice
Step-by-Step Instructions
Step 1: Plan Your Design and Measure
Before cutting any wood, decide where your shoe rack will live and how many pairs of shoes it needs to hold. This will dictate its dimensions.
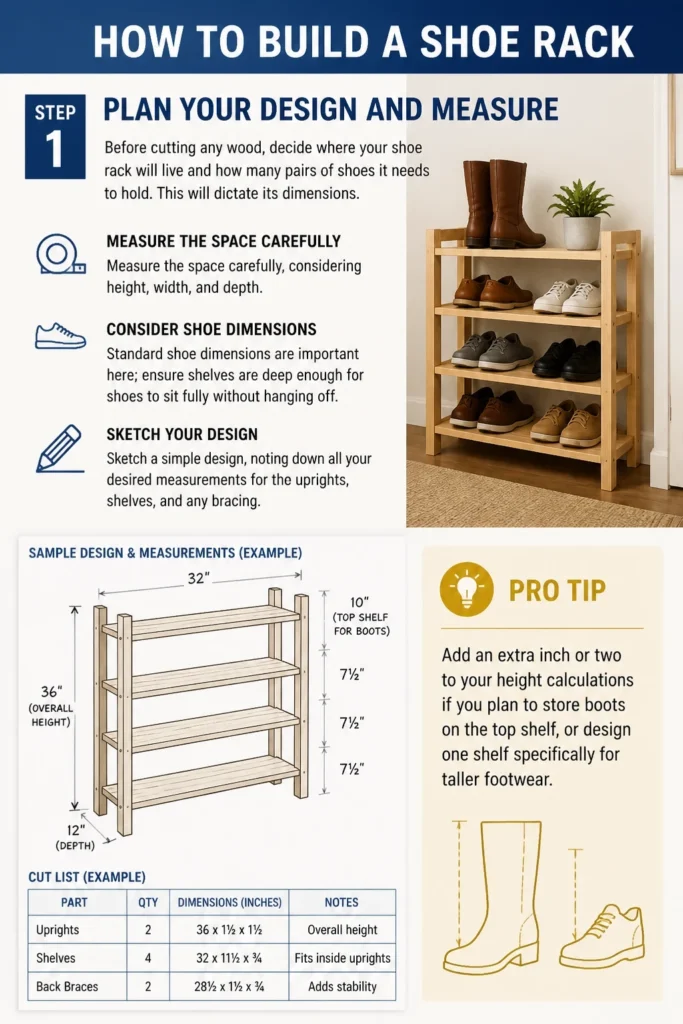
Measure the space carefully, considering height, width, and depth. Standard shoe dimensions are important here; ensure shelves are deep enough for shoes to sit fully without hanging off.
Sketch a simple design, noting down all your desired measurements for the uprights, shelves, and any bracing. A common design involves two uprights with multiple horizontal shelves.
Pro Tip: Add an extra inch or two to your height calculations if you plan to store boots on the top shelf, or design one shelf specifically for taller footwear.
Step 2: Gather Your Materials and Tools
With your plan in hand, it’s time to collect everything you’ll need. This preparation saves time and prevents interruptions during the build.
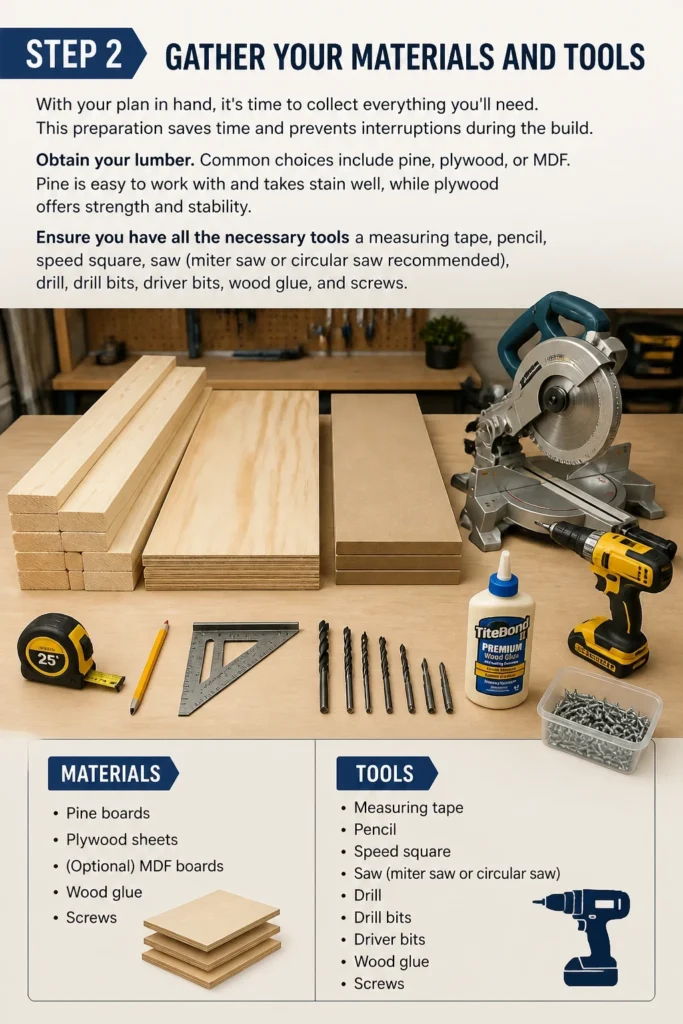
Obtain your lumber. Common choices include pine, plywood, or MDF. Pine is easy to work with and takes stain well, while plywood offers strength and stability.
Ensure you have all the necessary tools: a measuring tape, pencil, speed square, saw (miter saw or circular saw recommended), drill, drill bits, driver bits, wood glue, and screws.
Step 3: Cut Your Lumber to Size
Accuracy here is paramount for a professional-looking finish. Measure each piece of wood precisely according to your design.
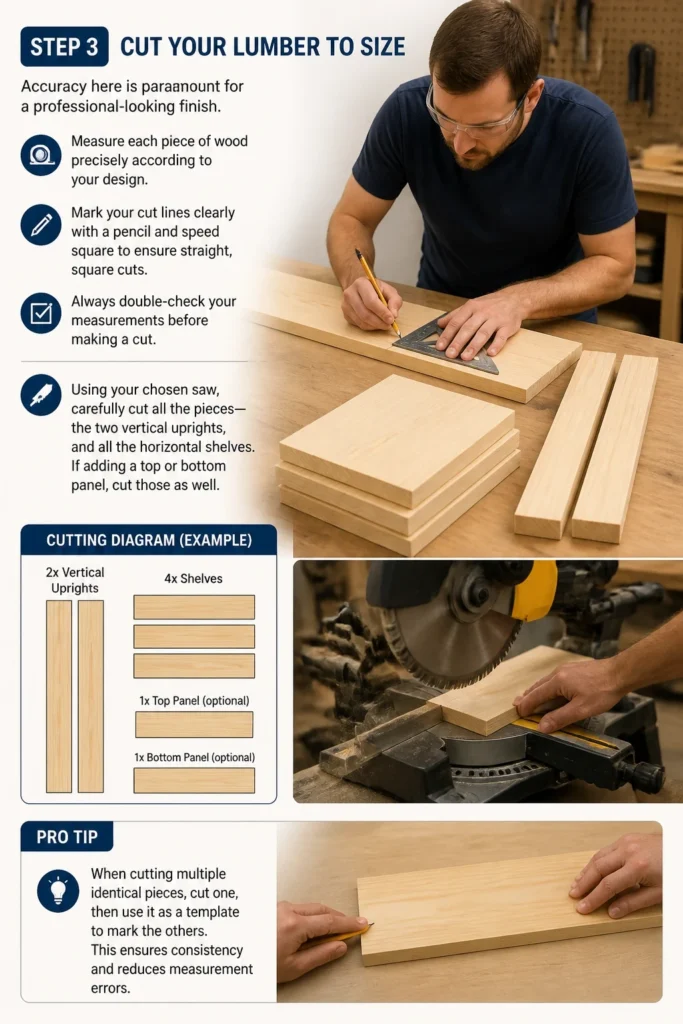
Mark your cut lines clearly with a pencil and speed square to ensure straight, square cuts. Always double-check your measurements before making a cut.
Using your chosen saw, carefully cut all the pieces: the two vertical uprights, and all the horizontal shelves. If adding a top or bottom panel, cut those as well.
Pro Tip: When cutting multiple identical pieces, cut one, then use it as a template to mark the others. This ensures consistency and reduces measurement errors.
Step 4: Sand All Surfaces Smooth
This step is often overlooked but greatly improves the final look and feel of your shoe rack. Sand all cut edges and flat surfaces.
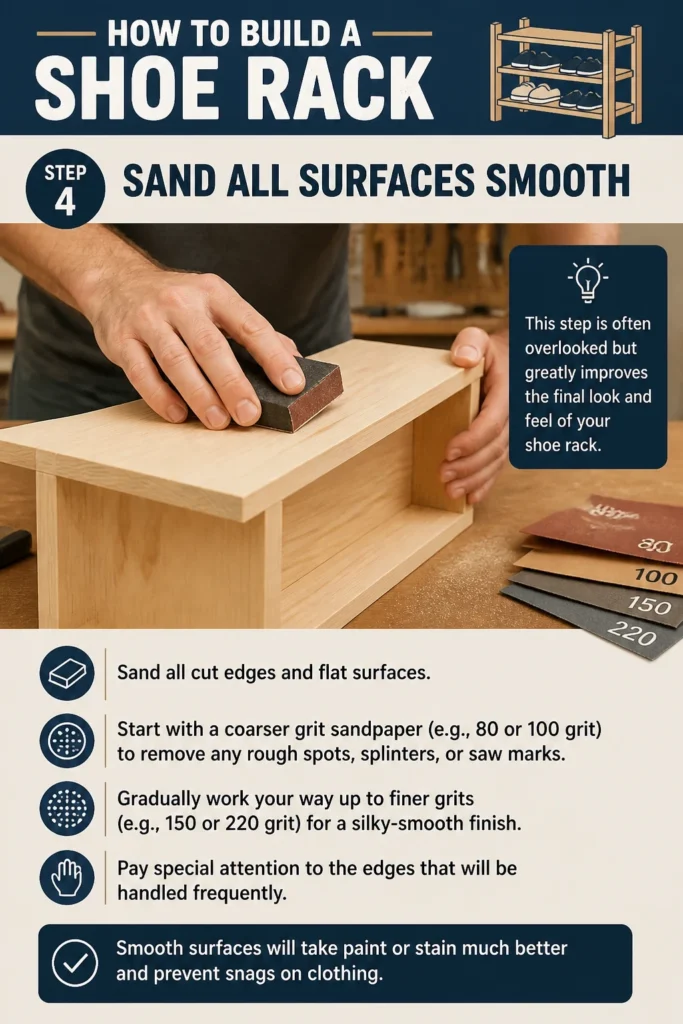
Start with a coarser grit sandpaper (e.g., 80 or 100 grit) to remove any rough spots, splinters, or saw marks. Gradually work your way up to finer grits (e.g., 150 or 220 grit) for a silky-smooth finish.
Pay special attention to the edges that will be handled frequently. Smooth surfaces will take paint or stain much better and prevent snags on clothing.
Step 5: Mark Shelf Positions
To ensure your shelves are level and evenly spaced, mark their positions on the inside faces of your two uprights.
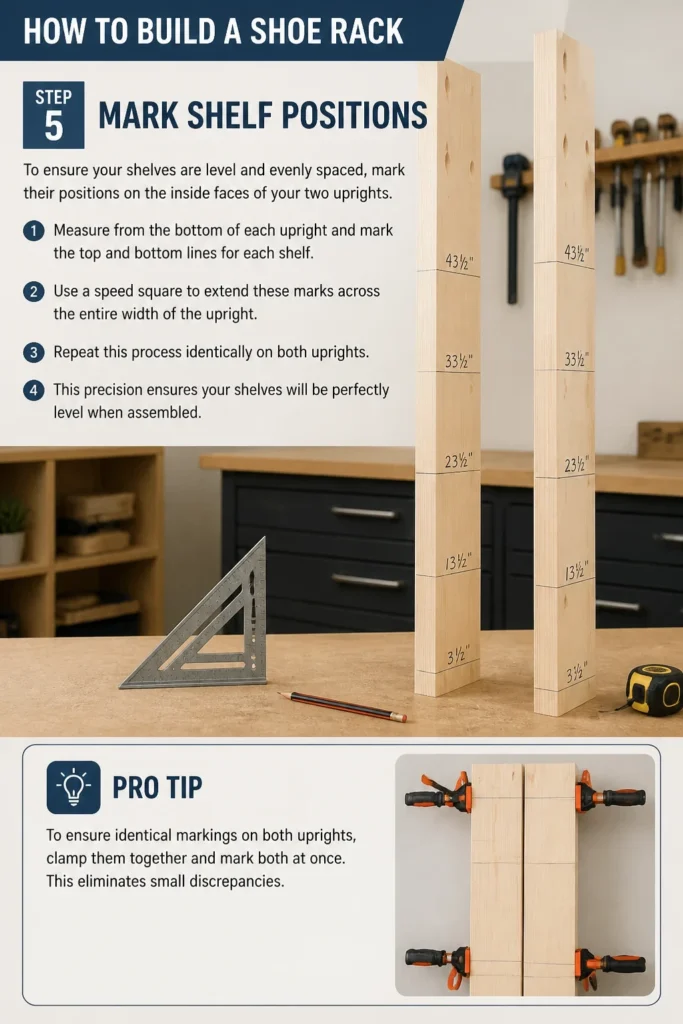
Measure from the bottom of each upright and mark the top and bottom lines for each shelf. Use a speed square to extend these marks across the entire width of the upright.
Repeat this process identically on both uprights. This precision ensures your shelves will be perfectly level when assembled.
Pro Tip: To ensure identical markings on both uprights, clamp them together and mark both at once. This eliminates small discrepancies.
Step 6: Drill Pilot Holes
Drilling pilot holes prevents your wood from splitting, especially near edges or when using harder woods. It also makes driving screws much easier.
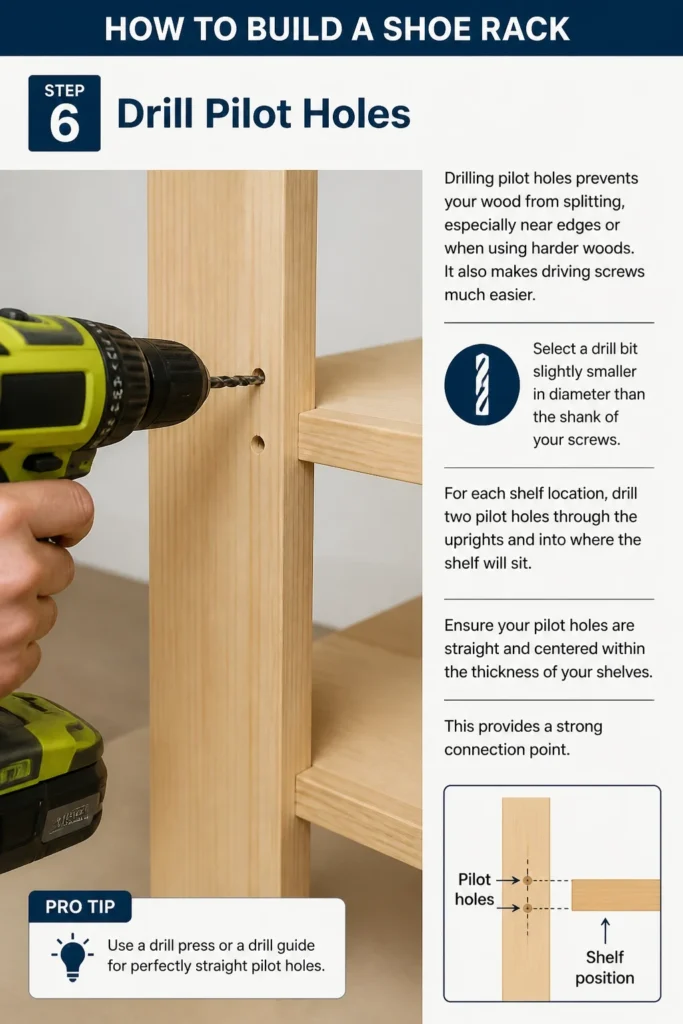
Select a drill bit slightly smaller in diameter than the shank of your screws. For each shelf location, drill two pilot holes through the uprights and into where the shelf will sit.
Ensure your pilot holes are straight and centered within the thickness of your shelves. This provides a strong connection point.
Step 7: Assemble the Frame and Shelves
Now the shoe rack starts to take shape. Apply a thin, even bead of wood glue along the edges of the shelves where they will meet the uprights.
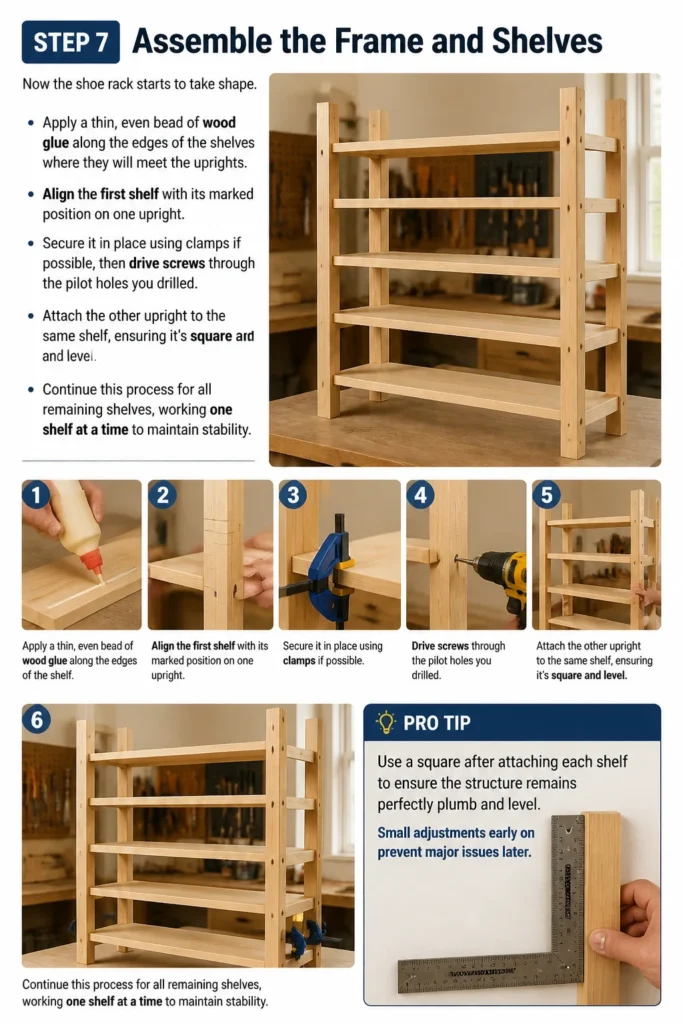
Align the first shelf with its marked position on one upright. Secure it in place using clamps if possible, then drive screws through the pilot holes you drilled.
Attach the other upright to the same shelf, ensuring it’s square and level. Continue this process for all remaining shelves, working one shelf at a time to maintain stability.
Pro Tip: Use a square after attaching each shelf to ensure the structure remains perfectly plumb and level. Small adjustments early on prevent major issues later.
Step 8: Add Optional Bracing or Back Panel
For extra stability, especially if your rack is tall or holds many heavy shoes, consider adding bracing. A simple back panel made from thin plywood or hardboard can prevent wobbling.
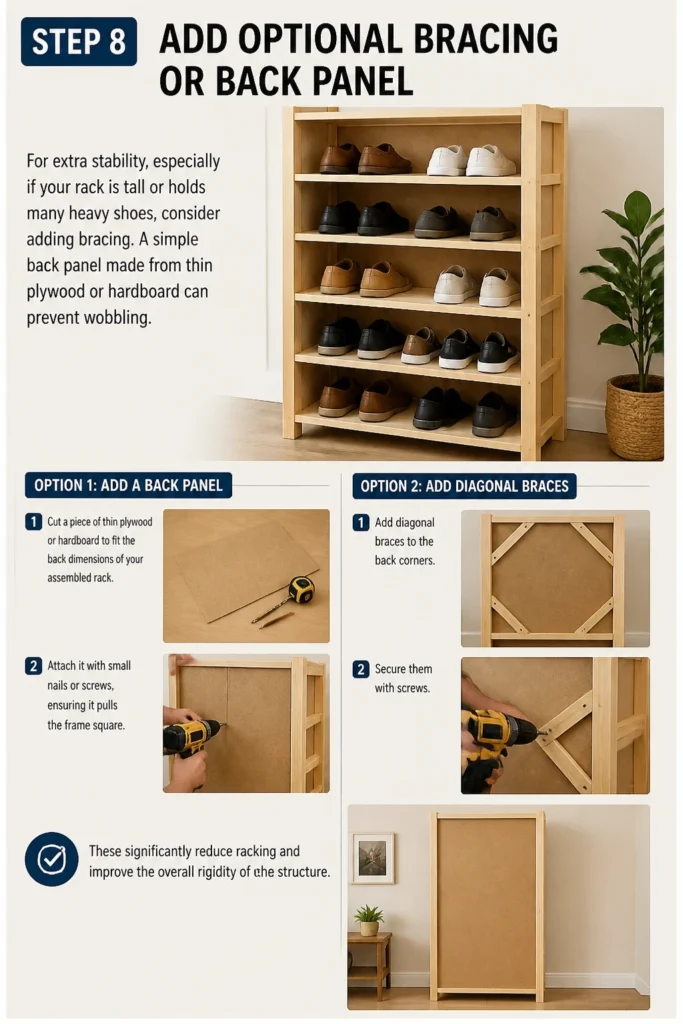
Cut a piece of thin plywood or hardboard to fit the back dimensions of your assembled rack. Attach it with small nails or screws, ensuring it pulls the frame square.
Alternatively, add diagonal braces to the back corners, securing them with screws. These significantly reduce racking and improve the overall rigidity of the structure.
Step 9: Apply Your Chosen Finish
With the structure complete, it’s time to protect and beautify your shoe rack. Choose a finish that matches your home decor and desired durability.
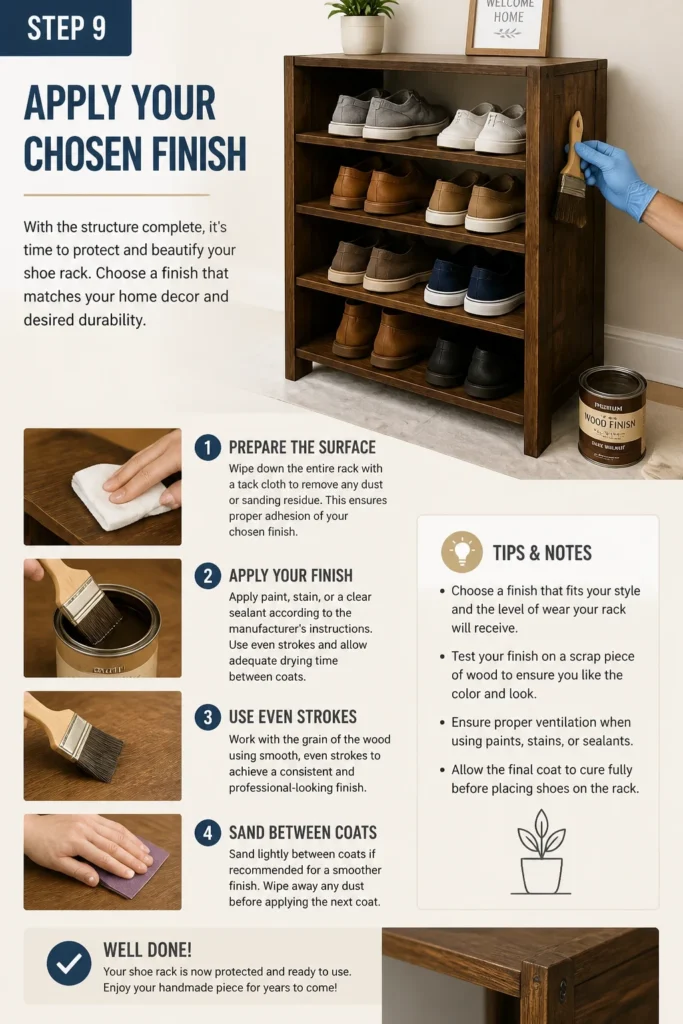
Wipe down the entire rack with a tack cloth to remove any dust or sanding residue. This ensures proper adhesion of your chosen finish.
Apply paint, stain, or a clear sealant according to the manufacturer’s instructions. Use even strokes and allow adequate drying time between coats. Sand lightly between coats if recommended for a smoother finish.
Common Mistakes to Avoid
Skipping Pilot Holes
Failing to drill pilot holes is a common error that can lead to frustrating results. Without them, screws can cause the wood to split, especially near edges or in harder woods. Always use a drill bit slightly smaller than your screw’s shank to create a guiding path and prevent damage to your carefully cut pieces.
Inaccurate Measurements and Cuts
A shoe rack with crooked shelves or wobbly uprights is often the result of rushing the measuring and cutting steps. Take your time with the tape measure and pencil, double-checking every mark. Use a speed square to ensure all your cuts are perfectly square, which is crucial for a stable and aesthetically pleasing final product.
Neglecting to Sand
While sanding might seem tedious, skipping it will leave your shoe rack with rough surfaces and potential splinters. Unfinished wood also absorbs paint or stain unevenly, leading to a patchy appearance. Thorough sanding, progressing from coarse to fine grit, creates a smooth surface that not only looks better but also feels nicer and takes finishes beautifully.
Over-tightening Screws
When driving screws, it’s easy to overtighten them, especially with power drills. This can strip the screw hole, weaken the joint, or even crack the wood. Drive screws until they are snug and the screw head is flush with the surface. If using a power drill, set the clutch to a lower torque setting to prevent over-tightening.
Troubleshooting
Wobbly Shoe Rack
If your assembled shoe rack feels unstable or wobbles, the most common cause is that the frame is not perfectly square. First, check all your joints to ensure screws are tight. If the wobble persists, try adding diagonal bracing to the back corners, or install a thin plywood back panel. These additions significantly stiffen the structure and pull it into square.
Shelves Are Not Level
Uneven shelves are usually a result of inconsistent marking or assembly. Carefully re-measure the distance from the bottom of the uprights to each shelf. If a shelf is noticeably off, you may need to remove its screws, adjust its position, and re-drill pilot holes before re-attaching. Small shims can sometimes correct minor discrepancies.
Wood Splitting During Assembly
Wood splitting when screws are driven is almost always due to not drilling pilot holes, or using a pilot bit that is too large or too small. Ensure your pilot drill bit matches the shank diameter of your screw, not the threads. If a split occurs, you can try filling it with wood glue and clamping it, or using a slightly longer screw if the split is minor and doesn’t compromise the joint’s integrity.
Key Takeaways
- Planning is essential: Carefully measure your space and design your rack before cutting any wood.
- Precision matters: Accurate cuts and consistent marking ensure a square, stable, and attractive finished product.
- Don’t skip sanding: Thorough sanding improves both the aesthetics and durability of your shoe rack.
- Pilot holes prevent damage: Always drill pilot holes to avoid splitting wood and make assembly smoother.
- Finishing protects your work: Applying a good finish extends the life of your shoe rack and enhances its appearance.
- Safety first: Always wear appropriate safety gear, such as safety glasses, when working with power tools.
Frequently Asked Questions
What type of wood is best for a shoe rack?
Pine is a popular choice for shoe racks because it’s affordable, easy to work with, and takes paint or stain well. Plywood is also excellent for shelves due to its stability and strength. For a more durable or outdoor rack, consider cedar or treated lumber, though these are typically more expensive.
How much space should I leave between shelves?
The ideal spacing depends on the type of shoes you plan to store. For most standard shoes, 6-8 inches between shelves works well. If you have many high heels or boots, consider making one or two shelves with 10-12 inches of clearance. Always measure your tallest shoes to ensure they fit comfortably.
Can I build this without power tools?
Absolutely. While power tools like a miter saw and drill make the process faster and often more precise, you can certainly build a shoe rack with hand tools. A hand saw, a coping saw for curves, a manual drill, and a screwdriver can accomplish all the necessary tasks, though it will require more time and effort.
How can I make my shoe rack more decorative?
To enhance the look of your shoe rack, consider adding decorative trim to the edges of the shelves or uprights. You can also use a contrasting paint color for the shelves versus the frame, or apply a unique stain. Adding small caster wheels can make it mobile, while decorative knobs or hooks on the sides can add functionality.
Our Top Recommended Finds
- Wood Glue: Titebond III Ultimate Wood Glue provides strong, waterproof bonds, perfect for enduring daily use.
- Orbital Sander: A random orbital sander makes quick work of smoothing surfaces and ensures an even finish.
- Kreg Jig Pocket-Hole System: For incredibly strong, concealed joints, a pocket-hole jig is a game-changer for woodworking projects.
Bring Order to Your Entryway Today
You now have a clear roadmap to building a functional and attractive shoe rack for your home. This project is more than just organizing footwear; it’s about creating something useful with your own hands.
Imagine your space neat and tidy, with every pair of shoes having its designated spot. This simple woodworking project offers immense satisfaction and a practical solution to everyday clutter.
Don’t let another day pass with shoes scattered across the floor. Gather your materials and start building your custom shoe rack this weekend. You’ll be amazed at what you can achieve.
Beginner-friendly templates, step-by-step guides,
and weekly project ideas in your inbox.