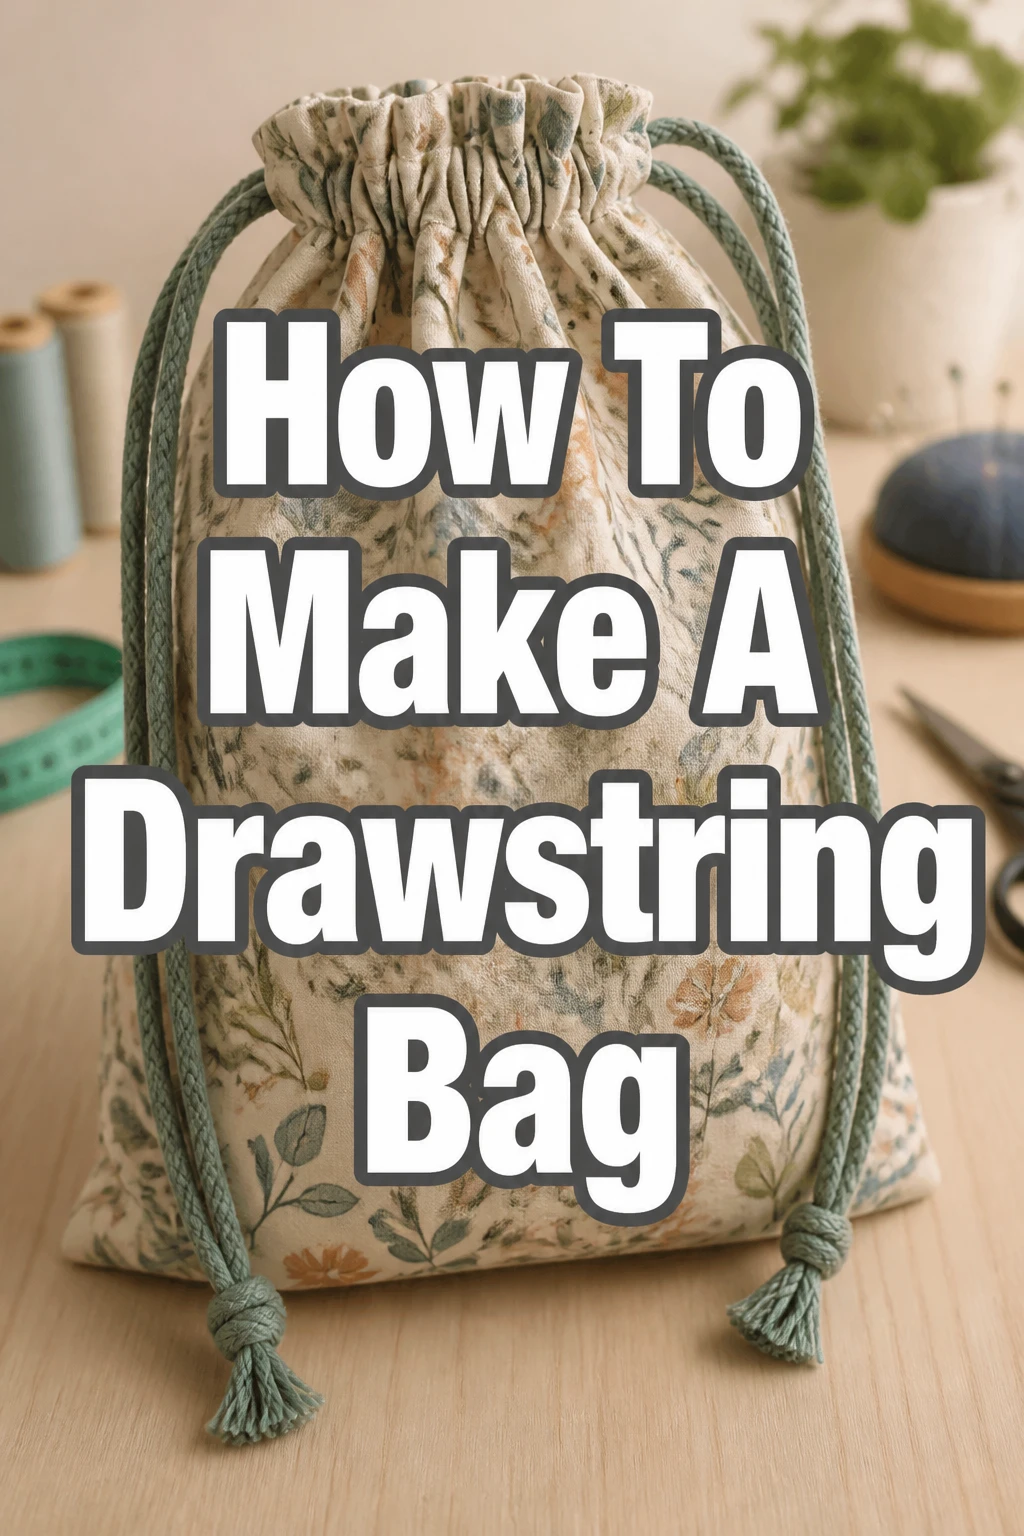
How To Make A Drawstring Bag

Beginner-friendly templates, step-by-step guides,
and weekly project ideas in your inbox.
Making your own drawstring bag is a wonderfully rewarding project.
I still remember the satisfaction of finishing my very first one, realizing how versatile these simple bags can be.
This guide will walk you through each step, ensuring you create a sturdy and stylish bag you’ll love.
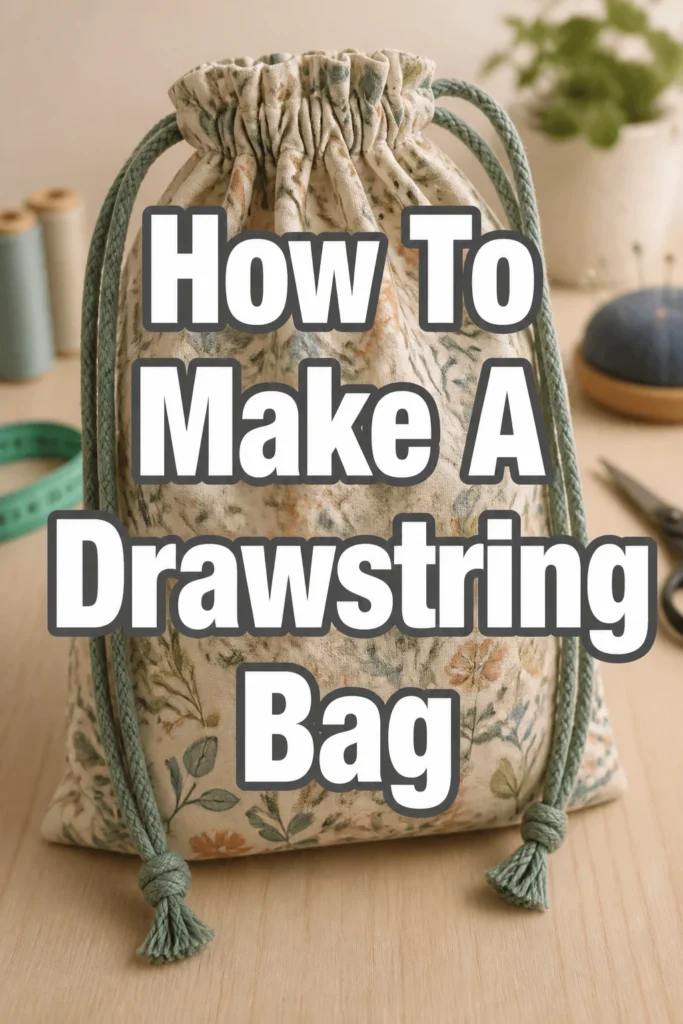
Quick Overview
You’re about to create a functional and customizable drawstring bag, perfect for gifts, organizing, or everyday use. This project is designed to be accessible for beginners, providing a solid foundation in basic sewing techniques.
- Time needed: 2-4 hours (for beginners)
- Difficulty: Beginner
- What you’ll need: Fabric, matching thread, sewing machine, fabric scissors, ruler or measuring tape, safety pin, iron, pins or fabric clips.
Step-by-Step Instructions
Step 1: Gather Your Materials
Before you begin, make sure you have everything laid out. Having all your supplies ready prevents interruptions and makes the process smoother.
Choose a medium-weight cotton fabric for your first bag. This type of fabric is easy to work with and holds its shape well.
Select a thread color that matches or complements your fabric. Polyester thread is a good all-purpose choice.
Pro Tip: Pre-wash and iron your fabric before cutting. This prevents shrinkage after your bag is made and ensures crisp, accurate cuts.
Step 2: Prepare Your Fabric
First, you need to cut your fabric to the correct dimensions. For a standard bag, a good starting size is two rectangles, each 14 inches wide by 16 inches tall.
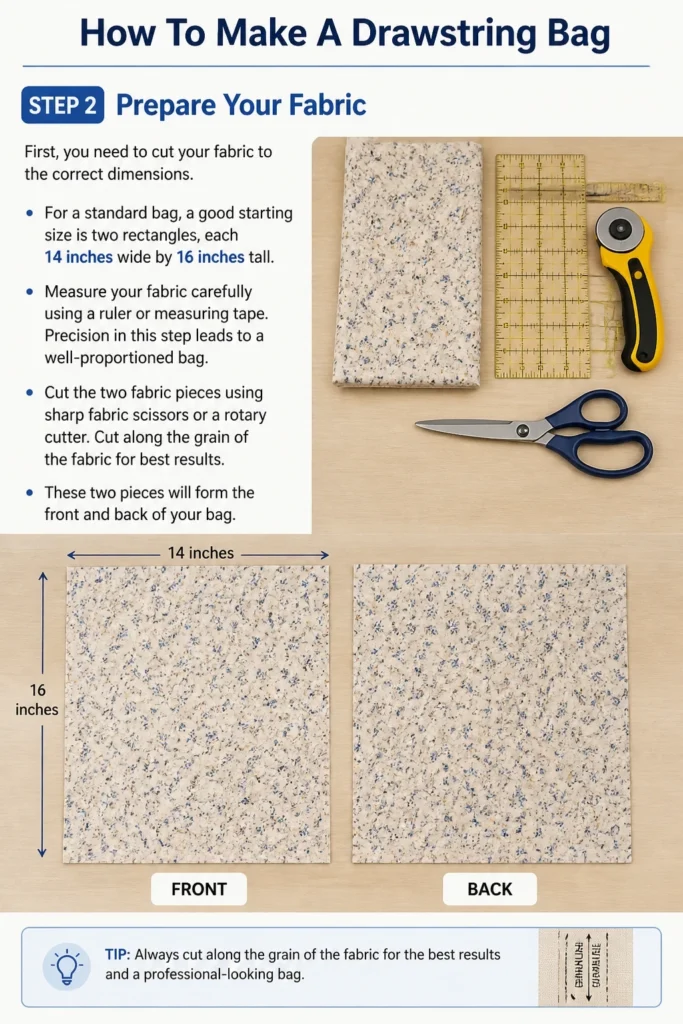
Measure your fabric carefully using a ruler or measuring tape. Precision in this step leads to a well-proportioned bag.
Cut the two fabric pieces using sharp fabric scissors or a rotary cutter. Cut along the grain of the fabric for best results.
These two pieces will form the front and back of your bag.
Step 3: Hem the Top Edges
The top edge of each fabric piece needs a clean finish, which will also form part of the drawstring casing. This hem prevents fraying and provides a neat opening.
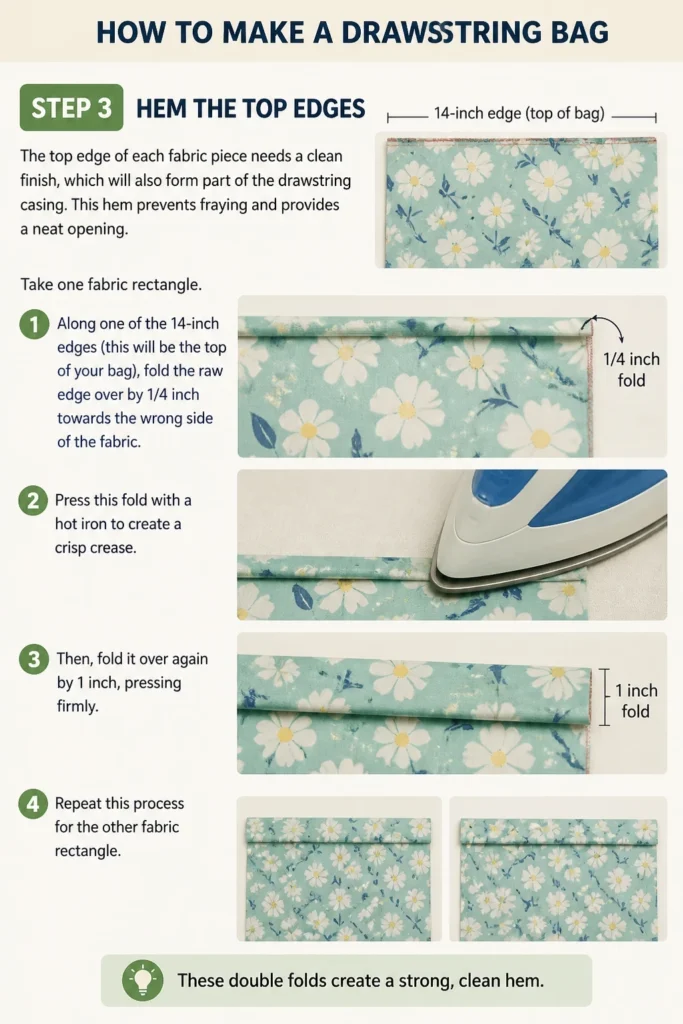
Take one fabric rectangle. Along one of the 14-inch edges (this will be the top of your bag), fold the raw edge over by 1/4 inch towards the wrong side of the fabric.
Press this fold with a hot iron to create a crisp crease. Then, fold it over again by 1 inch, pressing firmly.
Repeat this process for the other fabric rectangle. These double folds create a strong, clean hem.
Step 4: Create the Drawstring Casing
Now you will stitch those hems you just pressed. This forms the channel for your drawstring cord.
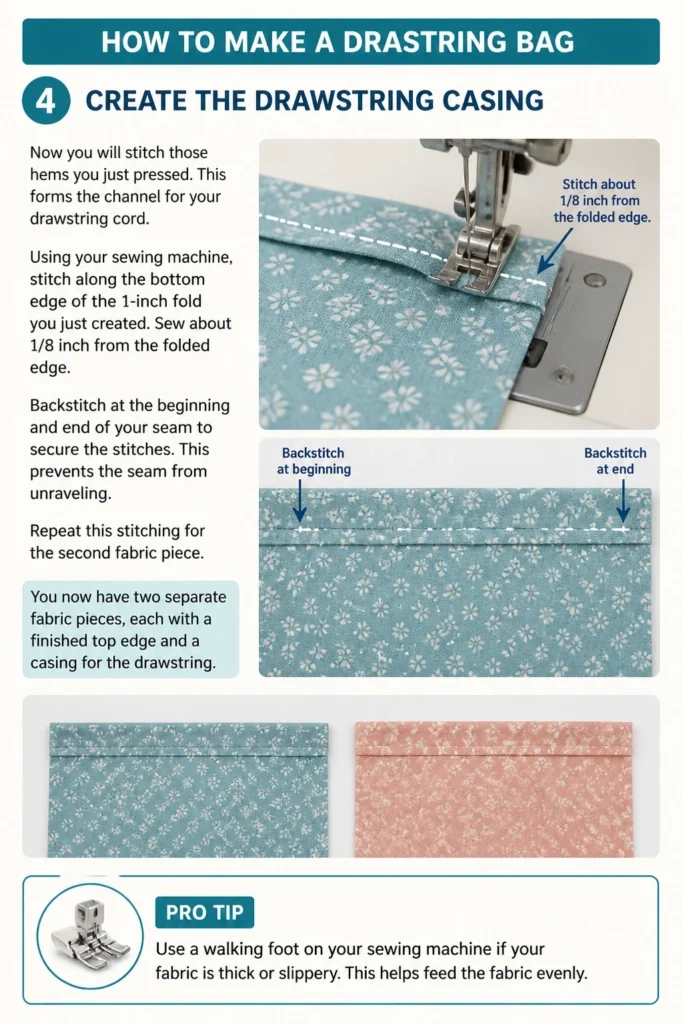
Using your sewing machine, stitch along the bottom edge of the 1-inch fold you just created. Sew about 1/8 inch from the folded edge.
Backstitch at the beginning and end of your seam to secure the stitches. This prevents the seam from unraveling.
Repeat this stitching for the second fabric piece. You now have two separate fabric pieces, each with a finished top edge and a casing for the drawstring.
Pro Tip: Use a walking foot on your sewing machine if your fabric is thick or slippery. This helps feed the fabric evenly.
Step 5: Sew the Side Seams
With the top hems finished, it’s time to join the two fabric pieces to form the bag shape. This step creates the body of your bag.
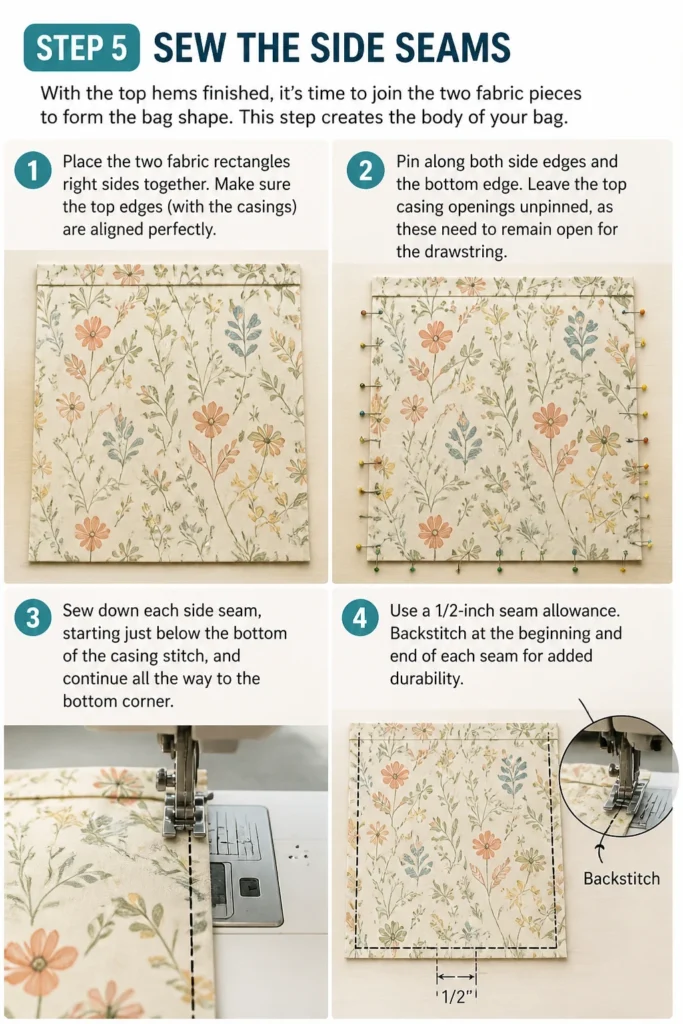
Place the two fabric rectangles right sides together. Make sure the top edges (with the casings) are aligned perfectly.
Pin along both side edges and the bottom edge. Leave the top casing openings unpinned, as these need to remain open for the drawstring.
Sew down each side seam, starting just below the bottom of the casing stitch, and continue all the way to the bottom corner. Use a 1/2-inch seam allowance.
Backstitch at the beginning and end of each seam for added durability.
Step 6: Finish the Bottom Edge
After sewing the side seams, the raw bottom edge needs to be finished. This prevents fraying and gives your bag a professional look.
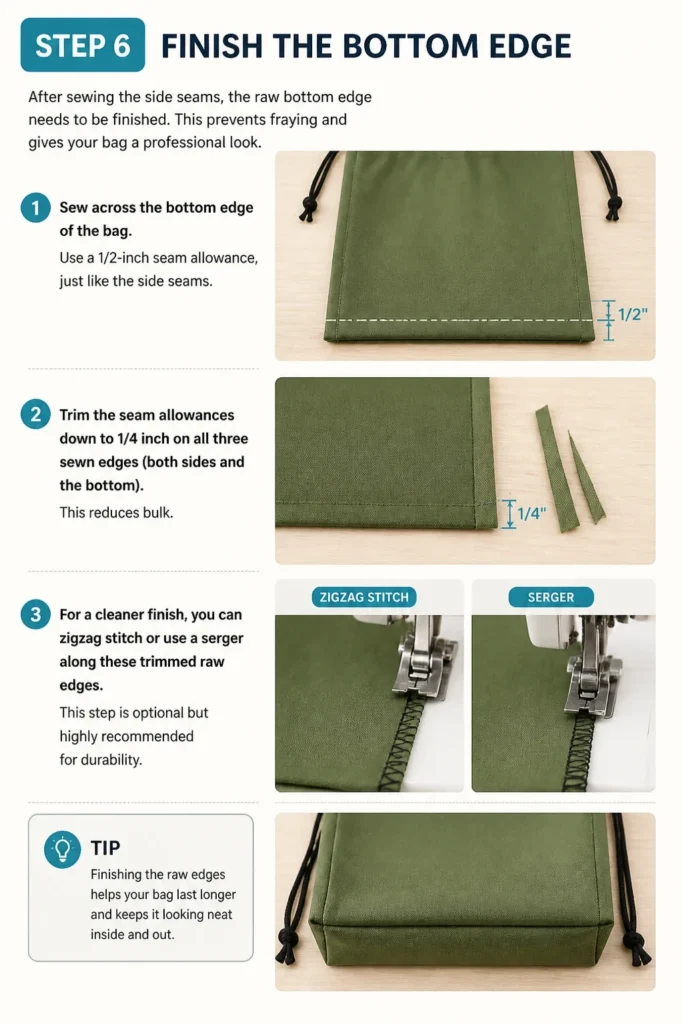
Sew across the bottom edge of the bag. Use a 1/2-inch seam allowance, just like the side seams.
Trim the seam allowances down to 1/4 inch on all three sewn edges (both sides and the bottom). This reduces bulk.
For a cleaner finish, you can zigzag stitch or use a serger along these trimmed raw edges. This step is optional but highly recommended for durability.
Step 7: Insert the Drawstring
The bag is almost complete. Now you need to thread the drawstring through the casings you created earlier.
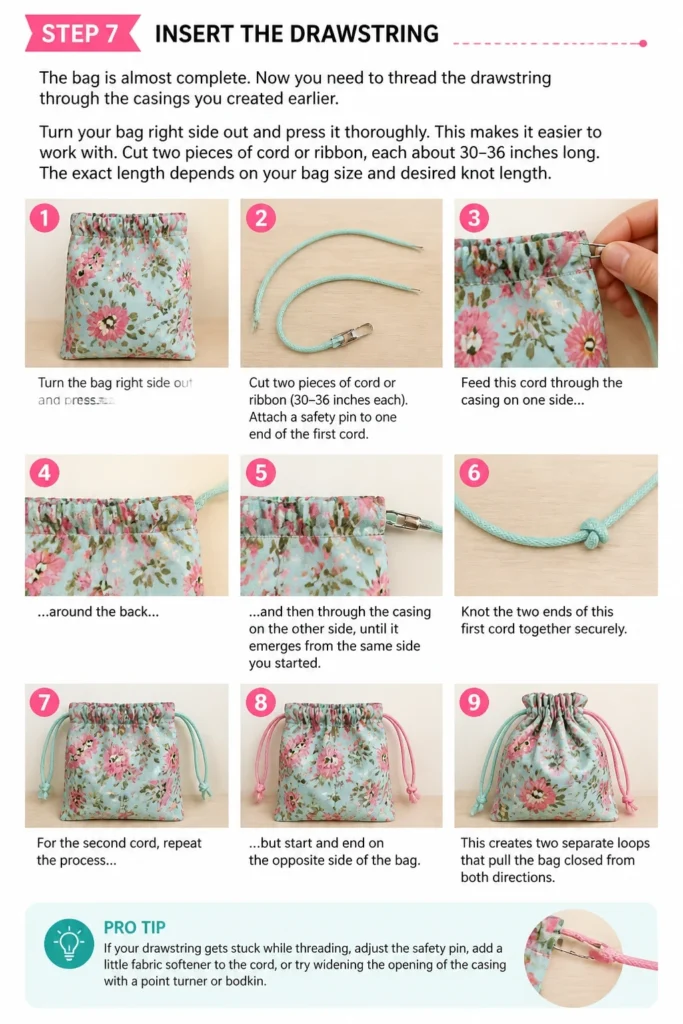
Turn your bag right side out and press it thoroughly. This makes it easier to work with.
Cut two pieces of cord or ribbon, each about 30-36 inches long. The exact length depends on your bag size and desired knot length.
Attach a safety pin to one end of the first cord. Feed this cord through the casing on one side, around the back, and then through the casing on the other side, until it emerges from the same side you started.
Knot the two ends of this first cord together securely.
For the second cord, repeat the process, but start and end on the opposite side of the bag. This creates two separate loops that pull the bag closed from both directions.
Pro Tip: If your drawstring gets stuck, gently push the fabric along the safety pin as you feed it through. Don’t pull too hard on the cord itself.
Step 8: Final Touches
Your drawstring bag is now complete! Take a moment to admire your handiwork.
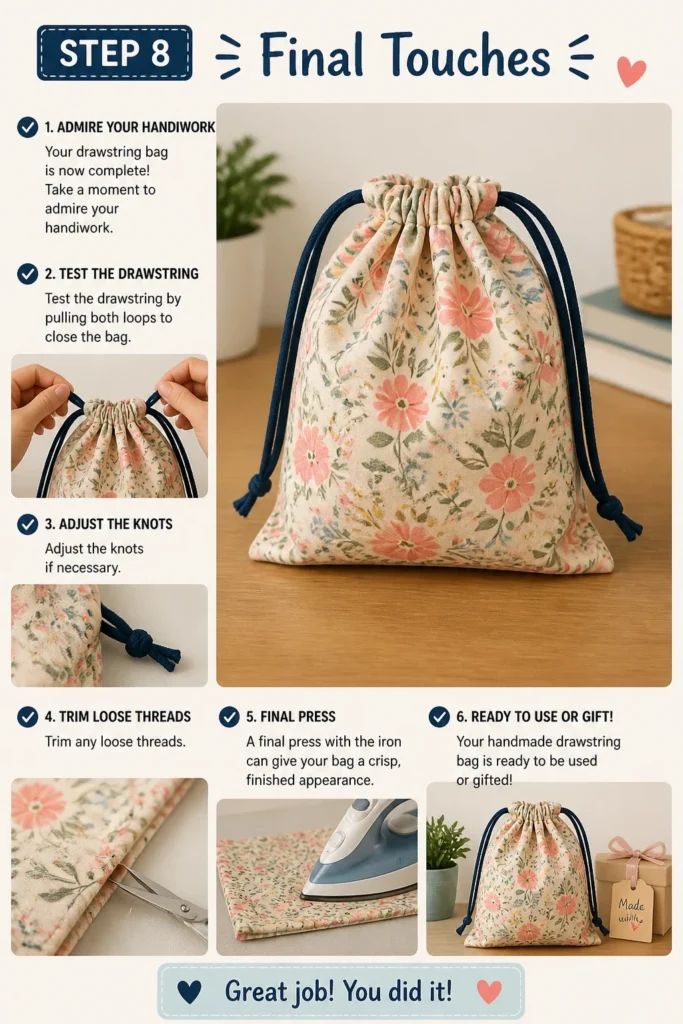
Test the drawstring by pulling both loops to close the bag. Adjust the knots if necessary.
Trim any loose threads. A final press with the iron can give your bag a crisp, finished appearance.
Your handmade drawstring bag is ready to be used or gifted!
Common Mistakes to Avoid
Uneven Seams
One common issue for beginners is sewing uneven seams. This can result in a crooked bag or one that doesn’t hang properly. Always use a seam guide on your sewing machine or mark your seam allowance with a fabric marker before sewing. Keep your eyes on the guide, not just the needle, as you stitch.
Incorrect Casing Size
Making the drawstring casing too narrow or too wide can cause problems. If it’s too narrow, you won’t be able to thread your cord through. If it’s too wide, the cord might not gather the fabric effectively. Always measure your drawstring material and ensure your casing is at least 1/4 inch wider than your cord for easy threading.
Forgetting to Backstitch
Skipping the backstitch at the beginning and end of your seams is a common oversight. Without backstitching, your seams are prone to unraveling, especially in areas of stress like the top of the side seams. Always take a few stitches backward and then forward at the start and end of each seam to lock it in place.
Choosing the Wrong Fabric
While adventurous, using very thick, slippery, or stretchy fabrics for your first project can be frustrating. Thick fabrics are hard to maneuver under the machine, slippery fabrics shift, and stretchy ones distort. Stick to stable, medium-weight cottons or canvas for an easier and more successful learning experience.
Troubleshooting
Drawstring Gets Stuck
If your drawstring cord gets stuck halfway through the casing, don’t panic. Gently pull the fabric back around the safety pin and try to ease it through. You can also try wiggling the safety pin to loosen any bunched-up fabric inside the casing. Sometimes, a slightly larger safety pin can make threading easier.
Bag Doesn’t Close Properly
If your bag doesn’t close all the way, check a few things. First, ensure your drawstring cords are long enough to gather the fabric completely. Second, examine your casing seams to make sure they aren’t accidentally sewn shut at any point. Lastly, confirm that you have two separate cords, each starting and ending on opposite sides of the bag, allowing for proper cinching.
Fabric Frays Excessively
Excessive fraying after cutting can be annoying and make sewing difficult. This often happens with loosely woven fabrics. To mitigate this, consider finishing all raw edges with a zigzag stitch or a serger immediately after cutting, before you begin assembling the bag. This encapsulates the raw edges and prevents further fraying during handling.
Key Takeaways
- Pre-wash and iron your fabric for accurate cuts and to prevent post-sewing shrinkage.
- Measure and cut your fabric precisely; accuracy is key to a well-shaped bag.
- Always backstitch at the beginning and end of your seams for durability.
- Ensure your drawstring casing is wide enough for your chosen cord.
- Finish raw edges, especially the bottom seam, to prevent fraying and prolong bag life.
- Use a safety pin to easily thread your drawstring through the casing.
Frequently Asked Questions
What type of fabric is best for a drawstring bag?
For beginners, medium-weight cotton fabrics like quilting cotton, canvas, or duck cloth are excellent choices. They are easy to cut, sew, and press, and they hold their shape well. Avoid very thin, slippery, or stretchy fabrics for your first project.
Can I make this without a sewing machine?
Yes, you can absolutely hand-sew a drawstring bag. It will take significantly longer, but the process is similar. Use a strong backstitch for all seams to ensure durability. Hand-sewing is a great way to learn basic stitches and fabric handling.
How do I calculate fabric size for a specific bag size?
To determine your fabric size, decide on your desired finished bag height and width. Add 2 inches to the width for seam allowances (1 inch per side). For the height, add 4 inches: 1 inch for the bottom seam allowance and 3 inches for the top casing (which includes a double fold). So, for a 10″ W x 12″ H bag, you’d cut two pieces of fabric 12″ W x 16″ H.
How long should the drawstring be?
A good rule of thumb is to cut two pieces of cord, each about 1.5 to 2 times the width of your bag. For a 14-inch wide bag, two 30-36 inch cords are usually sufficient. This allows for gathering and knotting. You can always trim excess later.
Our Top Recommended Finds
- Rotary Cutter and Mat: This combination makes cutting fabric incredibly fast and precise, especially for straight lines.
- Fabric Clips: These are fantastic alternatives to pins, especially for thicker fabrics, as they hold layers securely without piercing the material.
- Good Quality Polyester Thread: A strong, all-purpose polyester thread in a neutral color will serve you well for many projects and ensure durable seams.
Your Creative Journey Starts Now
You’ve just completed a fantastic project, mastering fundamental sewing skills along the way. Making a drawstring bag opens up a world of possibilities for customization and utility.
Consider making more bags in different sizes, experimenting with various fabrics, or adding embellishments like appliqué or embroidery. This project builds confidence and provides a practical item you can use every day.
Don’t stop here. Explore other simple sewing projects like pillow covers or tote bags, and keep honing your craft. Your next handmade creation is just a stitch away!
Beginner-friendly templates, step-by-step guides,
and weekly project ideas in your inbox.