How To Crochet A Flat Circle

Beginner-friendly templates, step-by-step guides,
and weekly project ideas in your inbox.
Learning to crochet a perfect flat circle opens up a world of creative possibilities.
I remember the frustration of my first wobbly attempts, but with a few key techniques, you’ll soon be crafting beautiful, even pieces.
This guide shares the exact methods I use, ensuring your circles lay perfectly flat every time.
Quick Overview
You’re about to learn the fundamental technique for crocheting a flat, even circle, a skill essential for countless projects.
From coasters and placemats to hats and amigurumi bases, this foundation is invaluable.
- Time needed: 30-60 minutes for your first practice circle
- Difficulty: Beginner
- What you’ll need: Yarn, crochet hook, scissors, yarn needle
Step-by-Step Instructions
Step 1: Gather Your Materials
Before you begin, make sure you have everything ready.
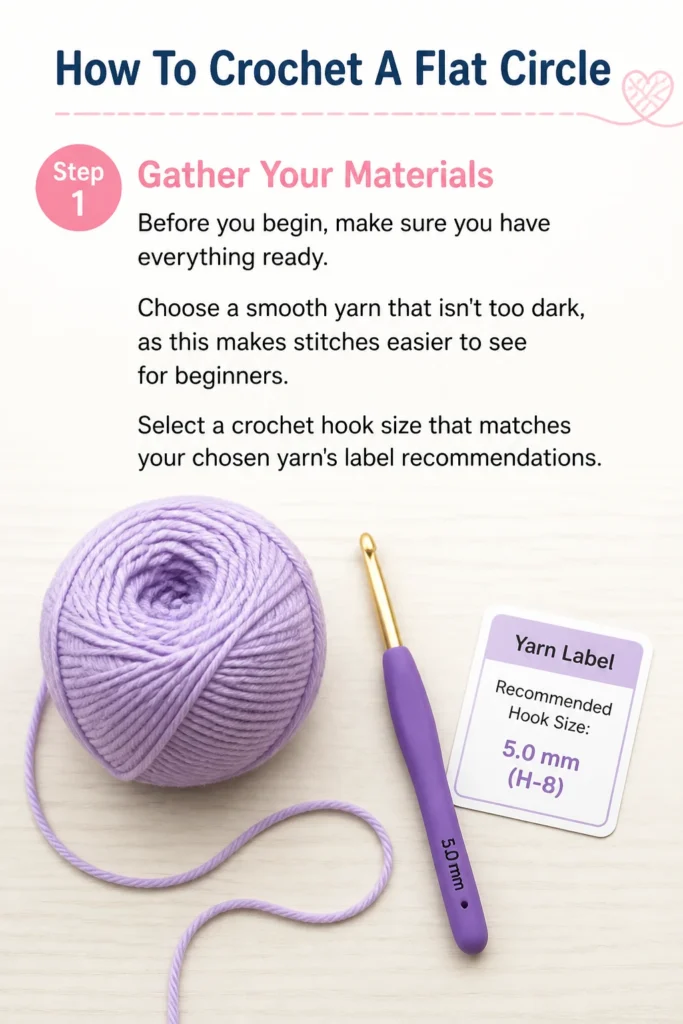
Choose a smooth yarn that isn’t too dark, as this makes stitches easier to see for beginners.
Select a crochet hook size that matches your chosen yarn’s label recommendations.
Step 2: Create a Magic Ring (or Chain 2 Method)
The magic ring provides a tight, closed center for your circle, preventing a hole.
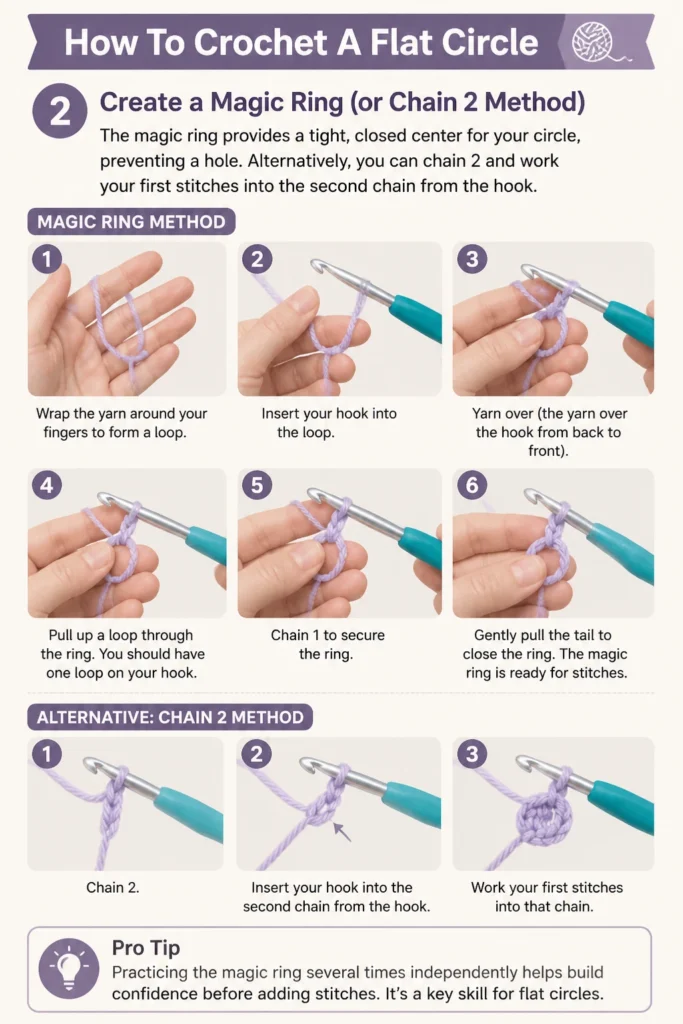
Alternatively, you can chain 2 and work your first stitches into the second chain from the hook.
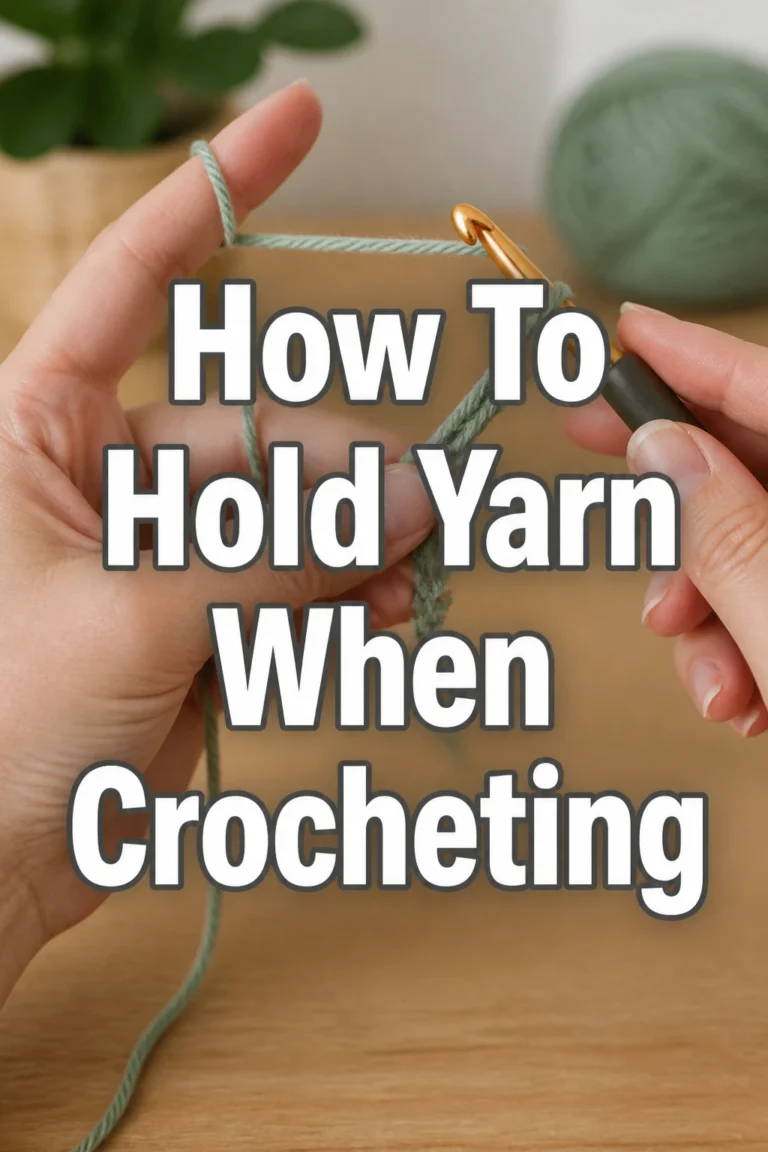
For a magic ring, wrap the yarn around your fingers to form a loop, then insert your hook into the loop.
Yarn over and pull up a loop, then chain 1 to secure the ring.
Pro Tip: Practicing the magic ring several times independently helps build confidence before adding stitches. It’s a key skill for flat circles.
Step 3: Work Your First Round of Stitches
This round sets the foundation for your circle’s size and stitch count.
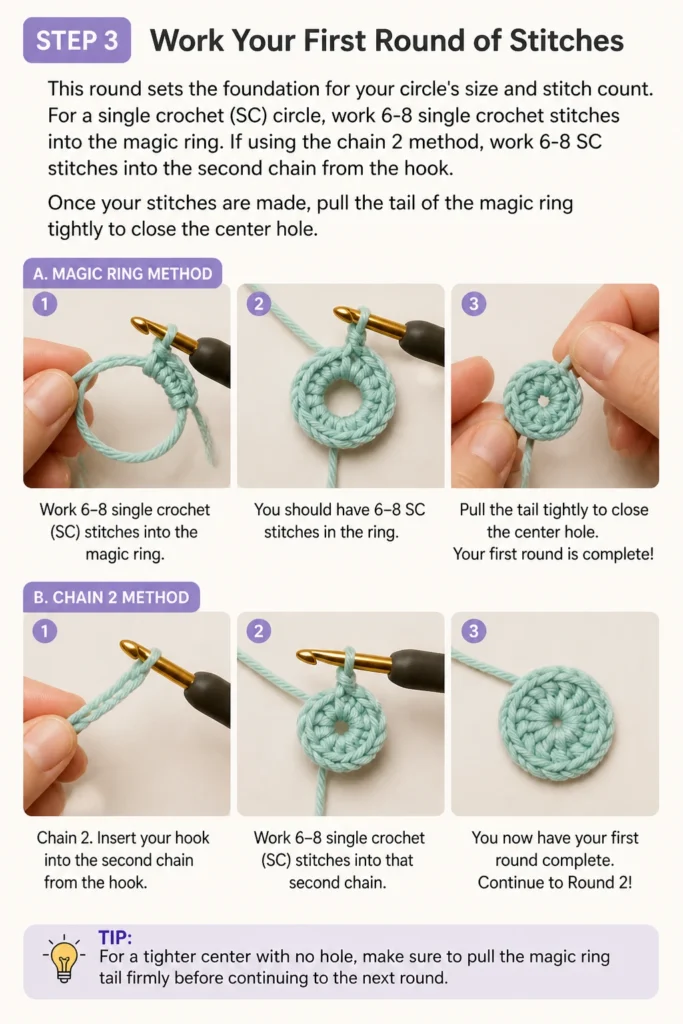
For a single crochet (SC) circle, work 6-8 single crochet stitches into the magic ring.
If using the chain 2 method, work 6-8 SC stitches into the second chain from the hook.
Once your stitches are made, pull the tail of the magic ring tightly to close the center hole.
Step 4: Join the Round and Chain Up
To keep your circle flat and continuous, you need to join each round.
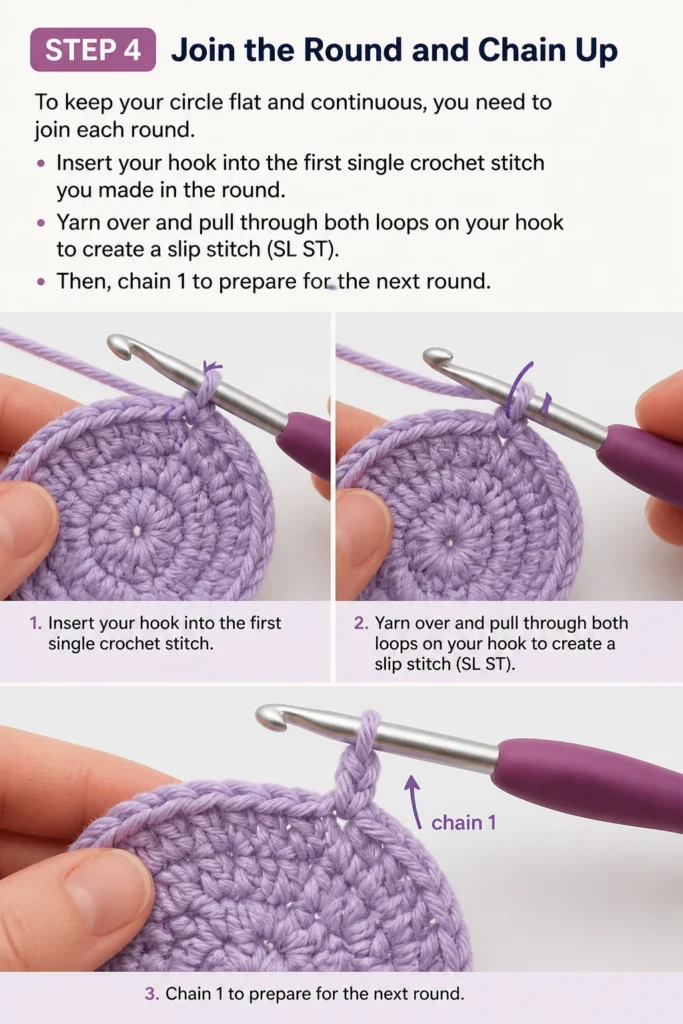
Insert your hook into the first single crochet stitch you made in the round.
Yarn over and pull through both loops on your hook to create a slip stitch (SL ST).
Then, chain 1 to prepare for the next round.
Step 5: Increase Stitches for Round 2
Increases are crucial for making your circle expand outwards without curling.
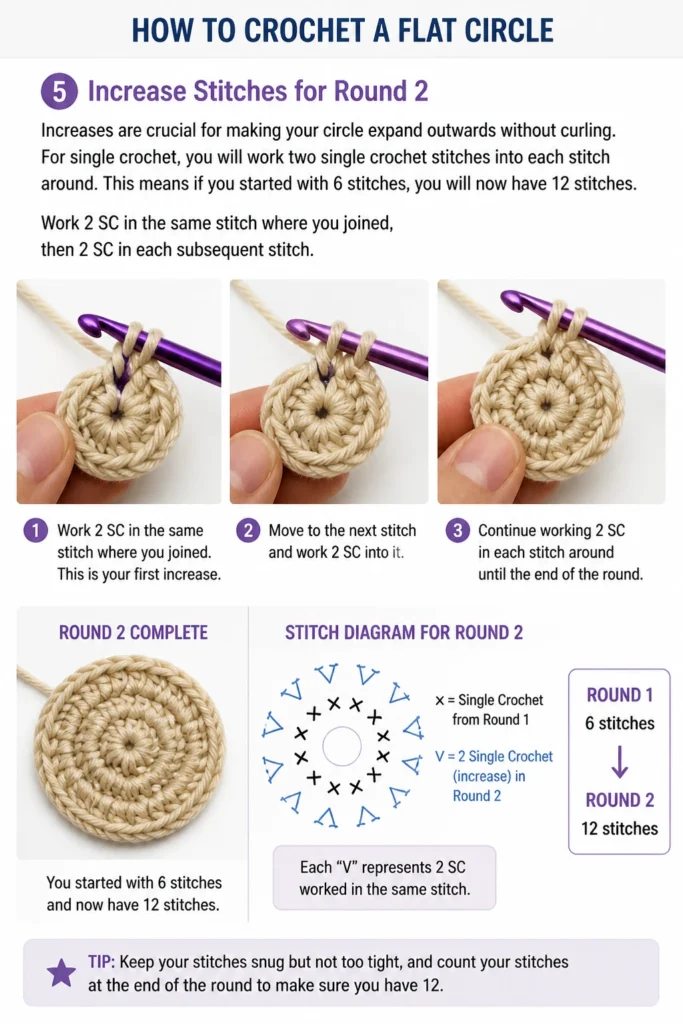
For single crochet, you will work two single crochet stitches into each stitch around.
This means if you started with 6 stitches, you will now have 12 stitches.
Work 2 SC in the same stitch where you joined, then 2 SC in each subsequent stitch.
Step 6: Join Round 2 and Chain Up
Just like before, join the round with a slip stitch into the first single crochet of Round 2.
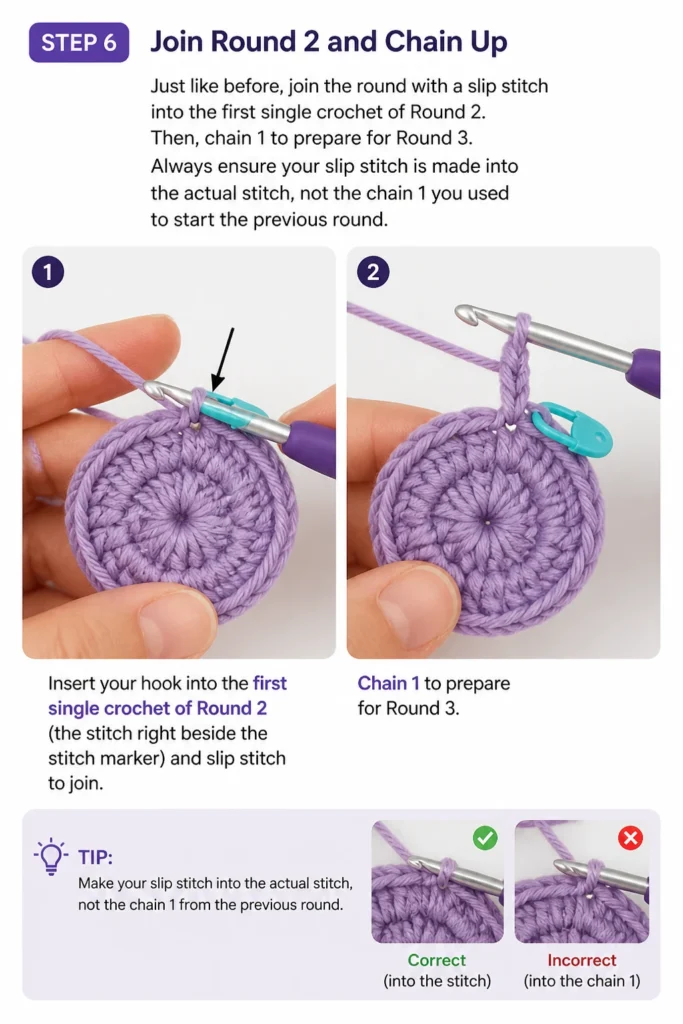
Then, chain 1 to prepare for Round 3.
Always ensure your slip stitch is made into the actual stitch, not the chain 1 you used to start the previous round.
Step 7: Increase Stitches for Round 3
Each round requires a specific increase pattern to maintain flatness.
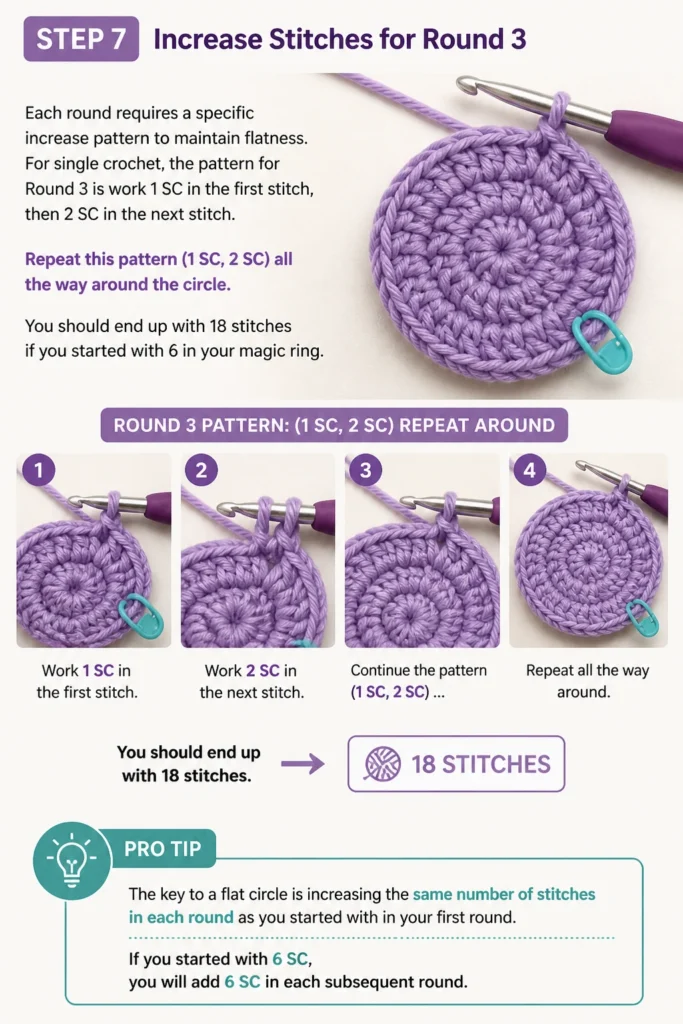
For single crochet, the pattern for Round 3 is: work 1 SC in the first stitch, then 2 SC in the next stitch.
Repeat this pattern (1 SC, 2 SC) all the way around the circle.
You should end up with 18 stitches if you started with 6 in your magic ring.
Pro Tip: The key to a flat circle is increasing the same number of stitches in each round as you started with in your first round. If you started with 6 SC, you will add 6 SC in each subsequent round.
Step 8: Continue the Increase Pattern
The increase pattern follows a logical progression.
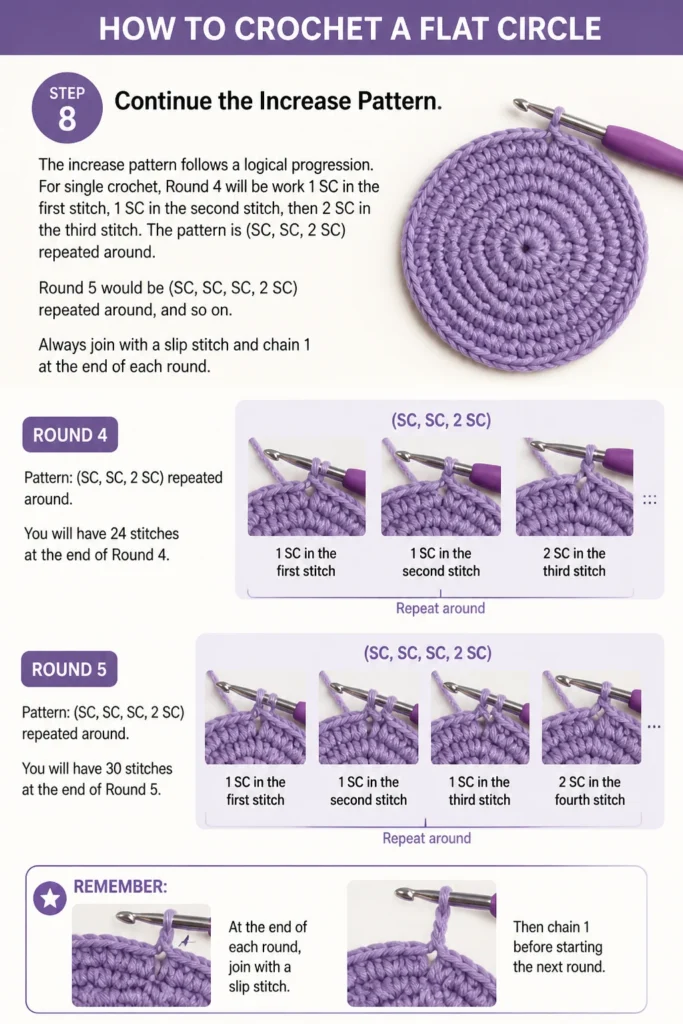
For single crochet, Round 4 will be: work 1 SC in the first stitch, 1 SC in the second stitch, then 2 SC in the third stitch.
The pattern is (SC, SC, 2 SC) repeated around.
Round 5 would be (SC, SC, SC, 2 SC) repeated around, and so on.
Always join with a slip stitch and chain 1 at the end of each round.
Step 9: Finish Your Circle
Once your circle reaches the desired size, you can finish it off.
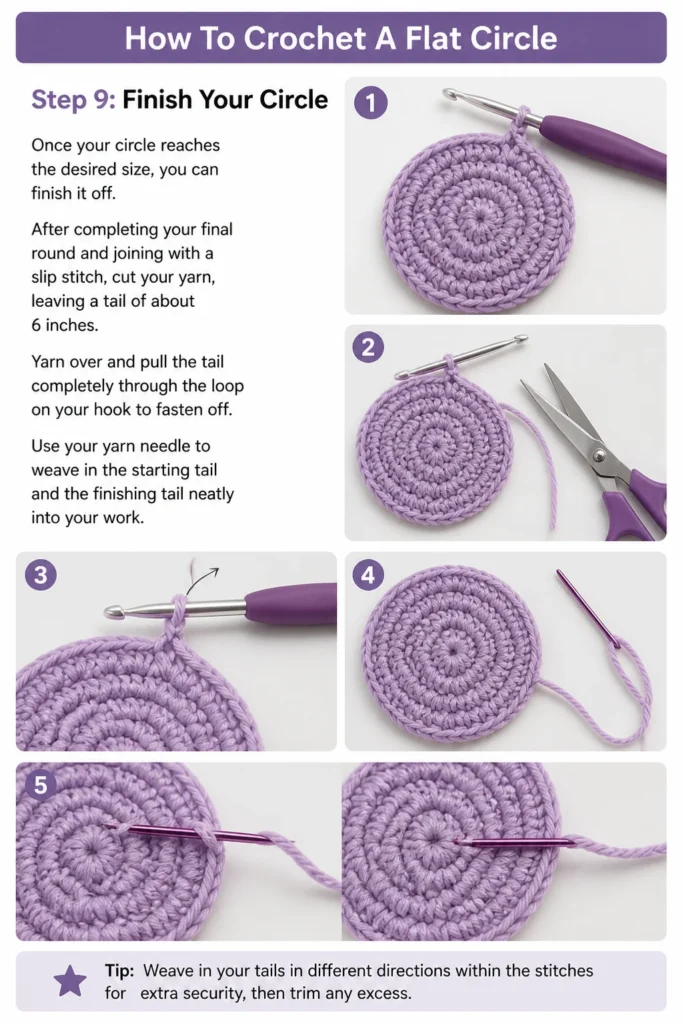
After completing your final round and joining with a slip stitch, cut your yarn, leaving a tail of about 6 inches.
Yarn over and pull the tail completely through the loop on your hook to fasten off.
Use your yarn needle to weave in the starting tail and the finishing tail neatly into your work.
Common Mistakes to Avoid
Not Enough Increases
If your circle starts to curl up like a bowl, it means you haven’t added enough stitches.
Each round needs a consistent number of increases to expand properly.
Go back and count your stitches; ensure you’re adding the correct amount for each round.
Too Many Increases
Conversely, if your circle looks wavy or ruffled, you’ve added too many stitches.
This causes the fabric to expand too quickly, creating excess material.
Double-check your increase pattern and stitch count for each round to ensure you’re not over-increasing.
Joining in the Wrong Spot
Accidentally joining into the starting chain 1 instead of the first actual stitch can create a visible seam or distort your circle.
Always make sure your slip stitch connects to the very first single crochet you made in the round.
This keeps the seam neat and less noticeable.
Tight Tension
Crocheting too tightly can make your stitches stiff and difficult to work into.
It can also cause the circle to pull in and curl, even with correct increases.
Try to relax your grip on the yarn and hook, allowing for more even and flexible stitches.
Troubleshooting
My Circle is Cupping (Like a Bowl)
This is the most common issue and almost always means you need more increases.
Each round should add the same number of stitches as your initial magic ring (e.g., if you started with 6 SC, add 6 SC in each subsequent round).
Carefully recount your stitches per round, ensuring the increase pattern is followed precisely.
My Circle is Ruffling (Wavy Edges)
Ruffling indicates you are adding too many stitches in your rounds.
The fabric is growing too fast, causing it to buckle.
Review your increase pattern for the round where the ruffling began, and reduce the number of increases to match the standard progression.
My Seam is Very Obvious or Crooked
An obvious seam often comes from inconsistent tension or joining in the wrong stitch.
Ensure you are always slip stitching into the top of the first stitch of the round, not the chain-up stitch.
Consistent tension throughout your project will also help to blend the seam more smoothly.
Key Takeaways
- The magic ring provides a neat, tight center for your flat circle.
- Consistent increases are essential for a flat, even circle; follow the pattern carefully.
- Always join each round with a slip stitch into the first stitch, then chain up for the next round.
- Not enough increases cause cupping, while too many lead to ruffling.
- Practice is key to developing even tension and precise stitch placement.
Frequently Asked Questions
What is the basic increase pattern for single crochet flat circles?
The basic pattern starts with a certain number of stitches (e.g., 6) in Round 1. Round 2 doubles them (2 SC in each stitch). Round 3 alternates (1 SC, 2 SC). Round 4 increases the single stitches between the doubles (1 SC, 1 SC, 2 SC), and so on, adding one more single crochet between increases in each subsequent round.
Can I make a flat circle using other stitches, like double crochet?
Yes, you can! The principle of increasing stitches remains the same. For double crochet, you typically start with more stitches (e.g., 10-12 DC in the magic ring) and chain 2 or 3 to begin each round. The increase pattern adjusts to the height of the stitch, but the goal of adding the initial stitch count in each round stays consistent.
How do I know what size hook to use?
The yarn label usually recommends a hook size, which is a great starting point. You might adjust up or down by one size depending on your personal tension. If your work feels too stiff, go up a hook size; if it’s too loose, go down.
What if my circle isn’t perfectly round?
Slight imperfections are normal, especially when starting out. Ensure your stitch count is correct for each round and your tension is as even as possible. Sometimes, blocking (wetting and shaping your finished piece) can help improve its roundness.
Our Top Recommended Finds
- Ergonomic Crochet Hook Set: Comfortable handles reduce hand fatigue during longer crafting sessions.
- Stitch Markers: Essential for marking the first stitch of each round, especially helpful for beginners.
- Yarn Winder and Swift: Great for organizing your yarn supply and preventing tangles as you work.
Unleash Your Circular Creativity
You now have the fundamental knowledge to crochet beautiful, flat circles.
This skill is a launchpad for so many exciting projects, from simple coasters to complex wearables.
Don’t hesitate to experiment with different yarn weights and hook sizes to see how they affect your circles.
Grab your hook and yarn today, and start creating your first perfectly flat crochet circle!
Beginner-friendly templates, step-by-step guides,
and weekly project ideas in your inbox.