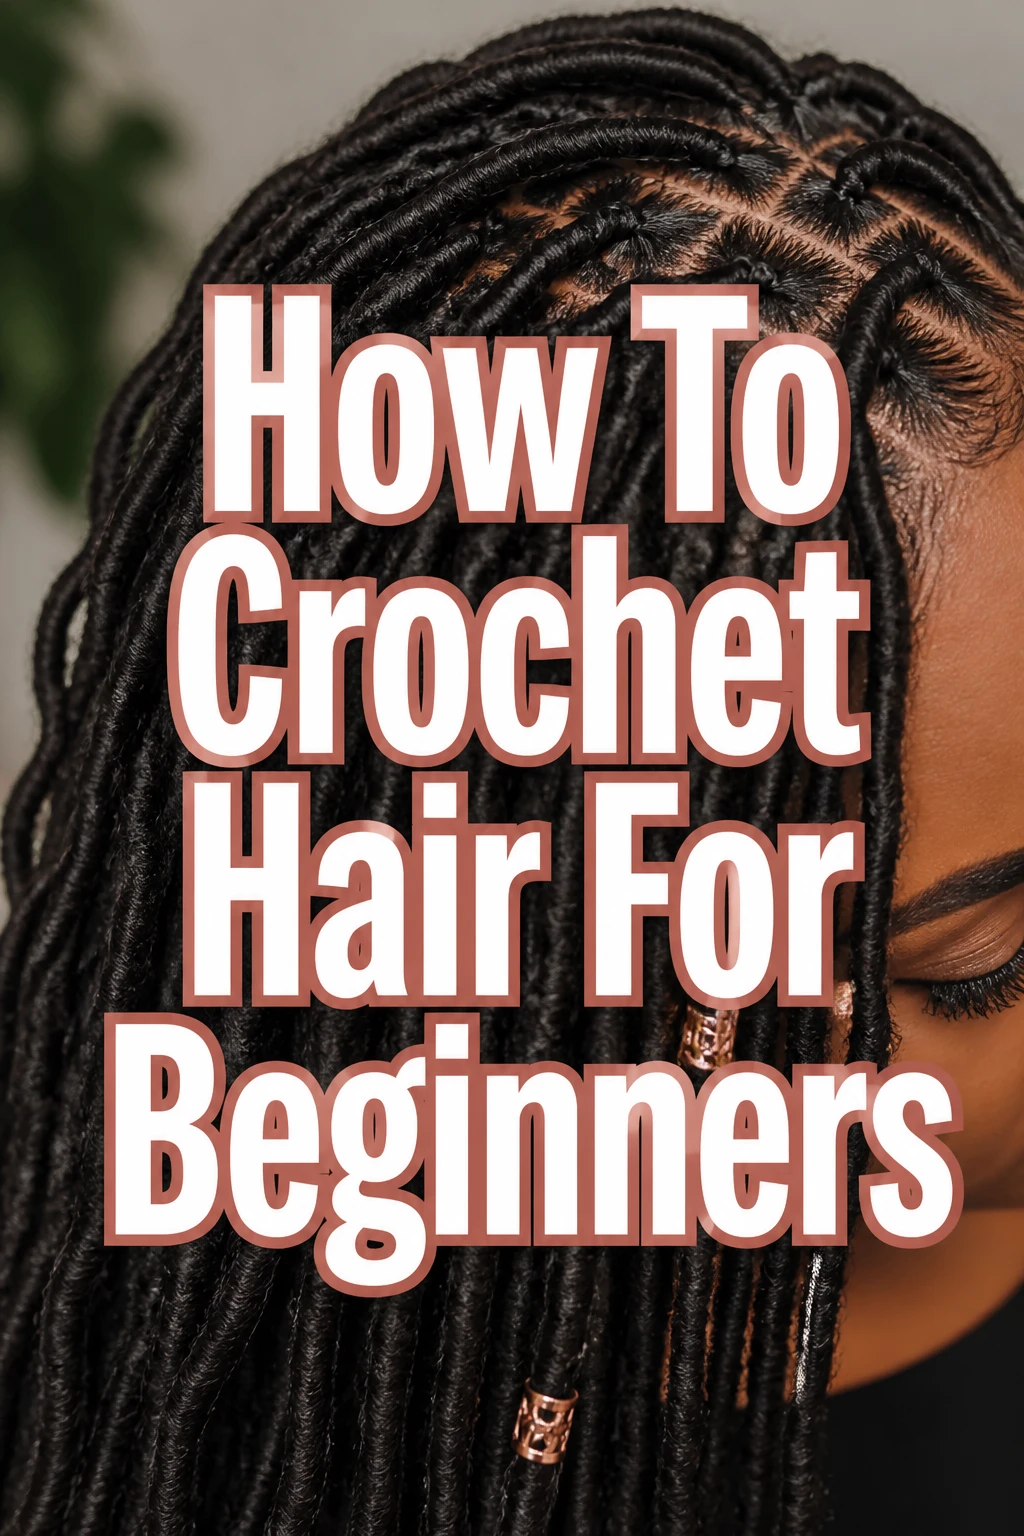
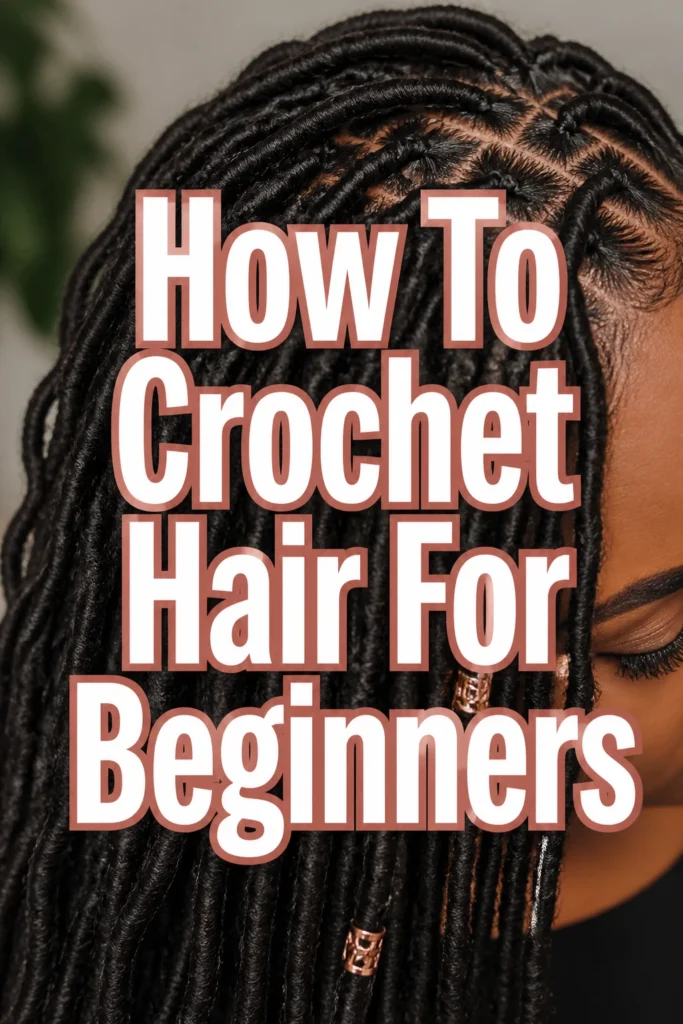
How To Crochet Hair For Beginners

Beginner-friendly templates, step-by-step guides,
and weekly project ideas in your inbox.
Crochet hair is one of the most versatile and protective styles you can master at home.
I remember the first time I tried it, I felt overwhelmed by the latch hook, but now it is my go-to time-saver for a fresh look.
This guide breaks down the process so you can achieve a professional result without the salon price tag.
Quick Overview
Before you start, it is helpful to understand the basic scope of the project.
- Time needed: 2 to 4 hours depending on the style
- Difficulty: Beginner
- What you’ll need: Crochet latch hook, packs of crochet hair, wide-tooth comb, spray bottle with water, and hair oil.
Step 1: Prepare Your Natural Hair
The foundation of a great crochet style starts with clean, healthy natural hair.
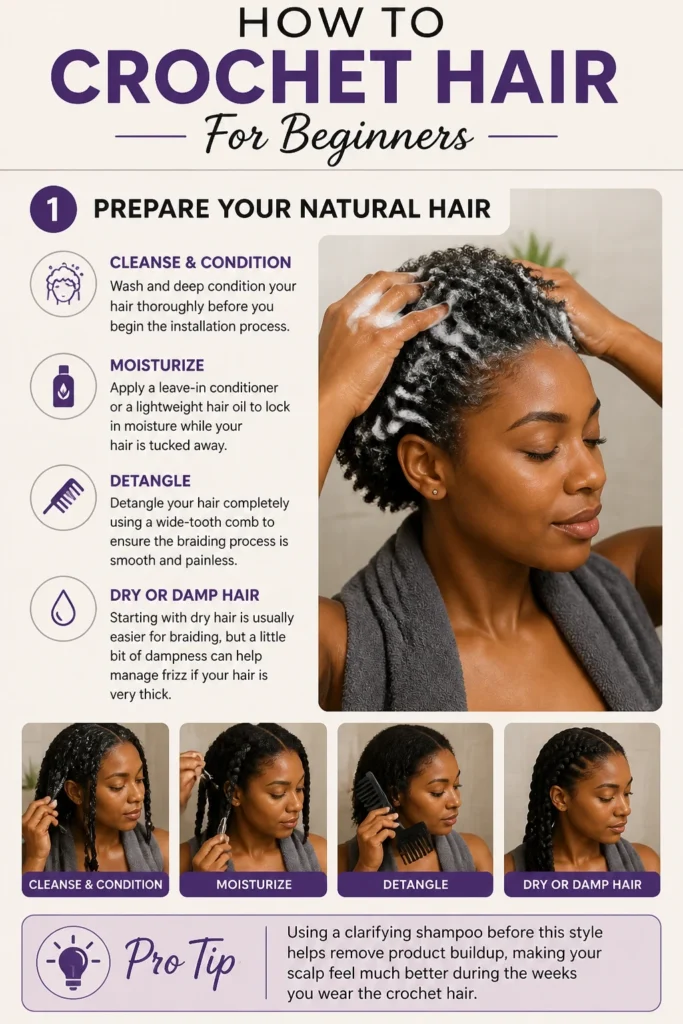
Wash and deep condition your hair thoroughly before you begin the installation process.
Apply a leave-in conditioner or a lightweight hair oil to lock in moisture while your hair is tucked away.
Detangle your hair completely using a wide-tooth comb to ensure the braiding process is smooth and painless.
Starting with dry hair is usually easier for braiding, but a little bit of dampness can help manage frizz if your hair is very thick.
Pro Tip: Using a clarifying shampoo before this style helps remove product buildup, making your scalp feel much better during the weeks you wear the crochet hair.
Step 2: Choose Your Braid Pattern
Your braid pattern determines how the crochet hair will fall and how natural the final result looks.
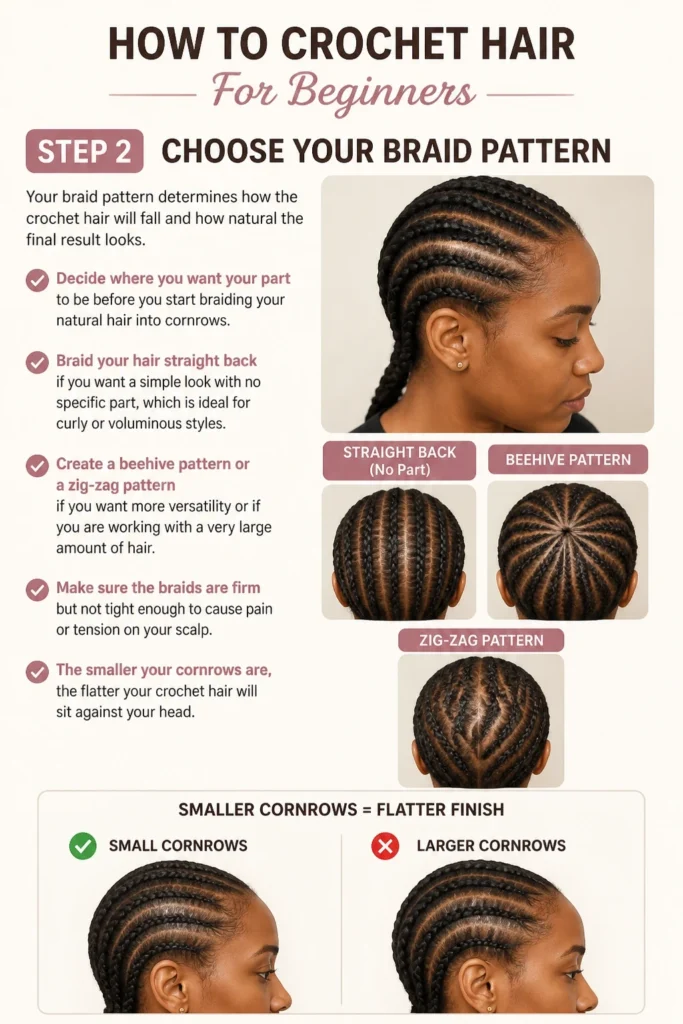
Decide where you want your part to be before you start braiding your natural hair into cornrows.
Braid your hair straight back if you want a simple look with no specific part, which is ideal for curly or voluminous styles.
Create a beehive pattern or a zig-zag pattern if you want more versatility or if you are working with a very large amount of hair.
Make sure the braids are firm but not tight enough to cause pain or tension on your scalp.
The smaller your cornrows are, the flatter your crochet hair will sit against your head.
Step 3: Secure The Braid Ends
Once your cornrows are finished, you need to make sure the ends do not create lumps under your crochet hair.
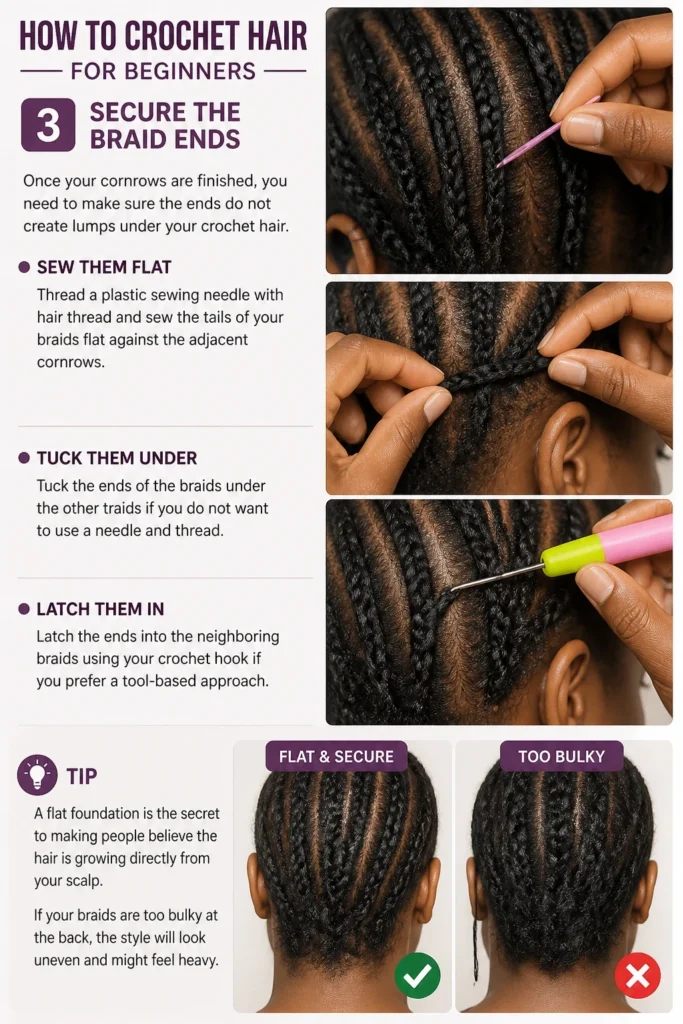
Thread a plastic sewing needle with hair thread and sew the tails of your braids flat against the adjacent cornrows.
Tuck the ends of the braids under the other braids if you do not want to use a needle and thread.
Latch the ends into the neighboring braids using your crochet hook if you prefer a tool-based approach.
A flat foundation is the secret to making people believe the hair is growing directly from your scalp.
If your braids are too bulky at the back, the style will look uneven and might feel heavy.
Step 4: Prepare The Crochet Hair
Crochet hair comes in many forms, including pre-looped braids, twists, or loose bulk hair.
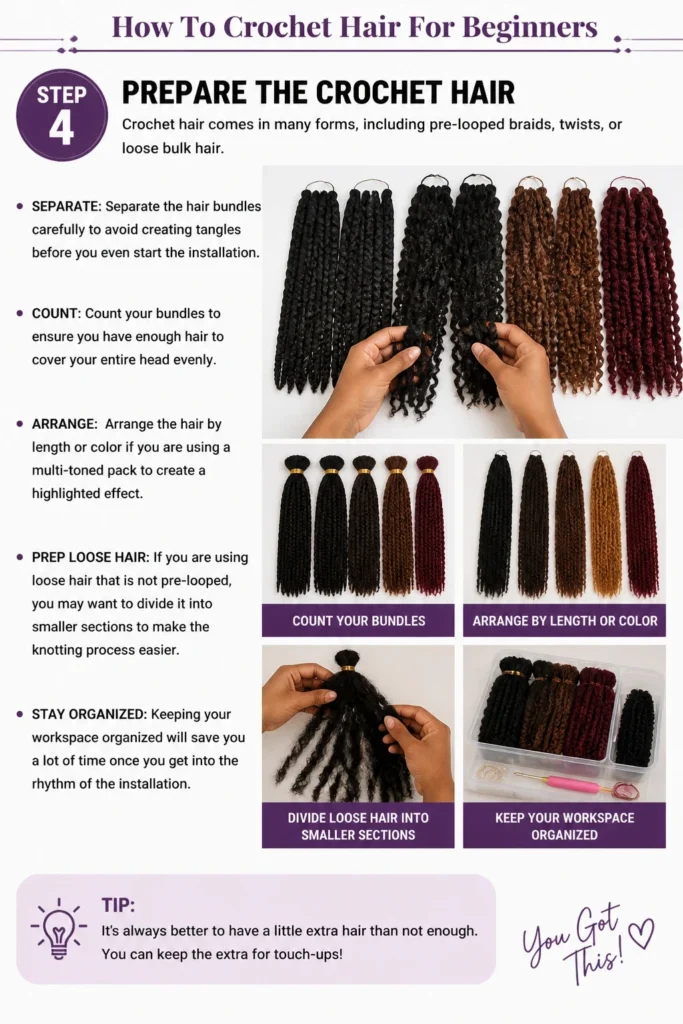
Separate the hair bundles carefully to avoid creating tangles before you even start the installation.
Count your bundles to ensure you have enough hair to cover your entire head evenly.
Arrange the hair by length or color if you are using a multi-toned pack to create a highlighted effect.
If you are using loose hair that is not pre-looped, you may want to divide it into smaller sections to make the knotting process easier.
Keeping your workspace organized will save you a lot of time once you get into the rhythm of the installation.
Step 5: Insert The Latch Hook
This is where the actual crochet magic happens using the latch hook tool.
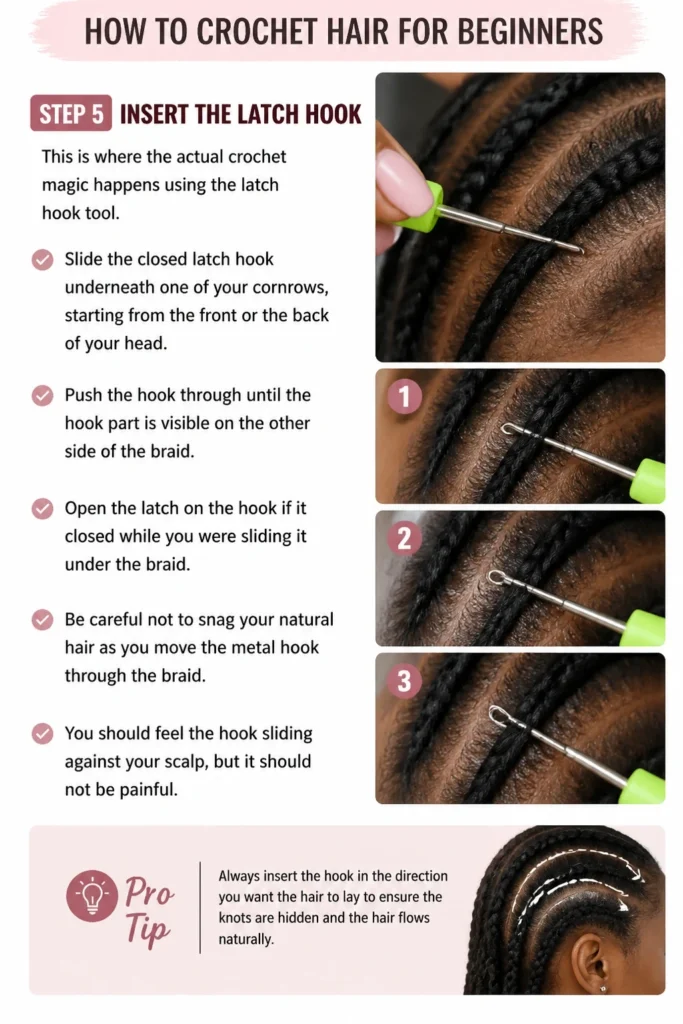
Slide the closed latch hook underneath one of your cornrows, starting from the front or the back of your head.
Push the hook through until the hook part is visible on the other side of the braid.
Open the latch on the hook if it closed while you were sliding it under the braid.
Be careful not to snag your natural hair as you move the metal hook through the braid.
You should feel the hook sliding against your scalp, but it should not be painful.
Pro Tip: Always insert the hook in the direction you want the hair to lay to ensure the knots are hidden and the hair flows naturally.
Step 6: Loop And Pull The Hair
Now you will attach the synthetic hair to your natural braid foundation.
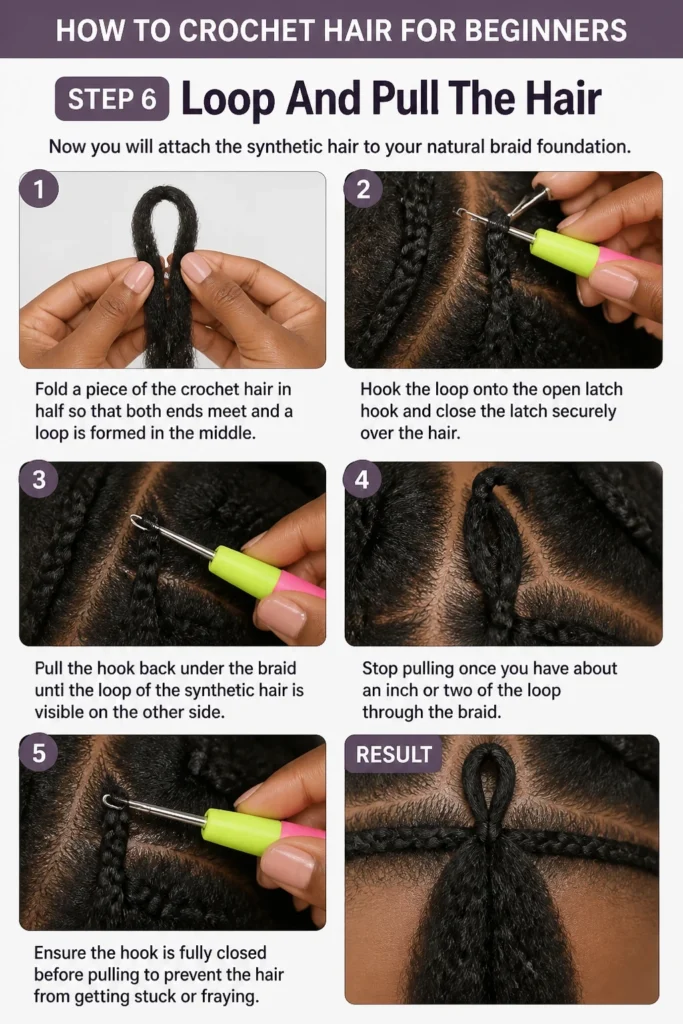
Fold a piece of the crochet hair in half so that both ends meet and a loop is formed in the middle.
Hook the loop onto the open latch hook and close the latch securely over the hair.
Pull the hook back under the braid until the loop of the synthetic hair is visible on the other side.
Stop pulling once you have about an inch or two of the loop through the braid.
Ensure the hook is fully closed before pulling to prevent the hair from getting stuck or fraying.
Step 7: Secure The Knot
The knot is what keeps the hair from sliding out during daily wear.
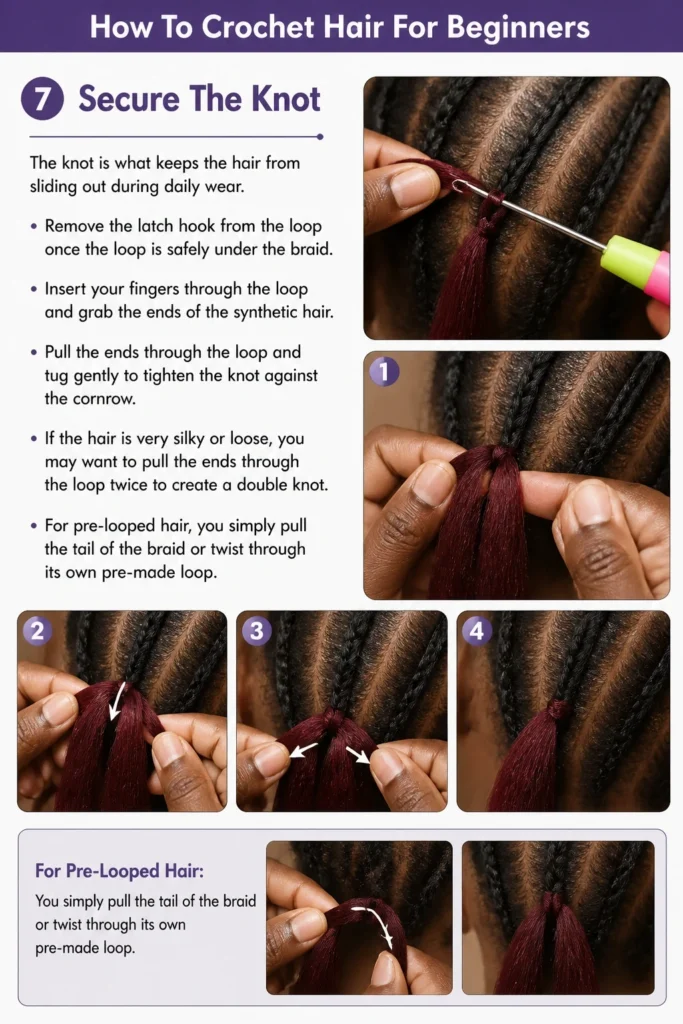
Remove the latch hook from the loop once the loop is safely under the braid.
Insert your fingers through the loop and grab the ends of the synthetic hair.
Pull the ends through the loop and tug gently to tighten the knot against the cornrow.
If the hair is very silky or loose, you may want to pull the ends through the loop twice to create a double knot.
For pre-looped hair, you simply pull the tail of the braid or twist through its own pre-made loop.
Step 8: Fill In The Rest Of The Head
Consistency is key when you are filling in the rest of your braids.
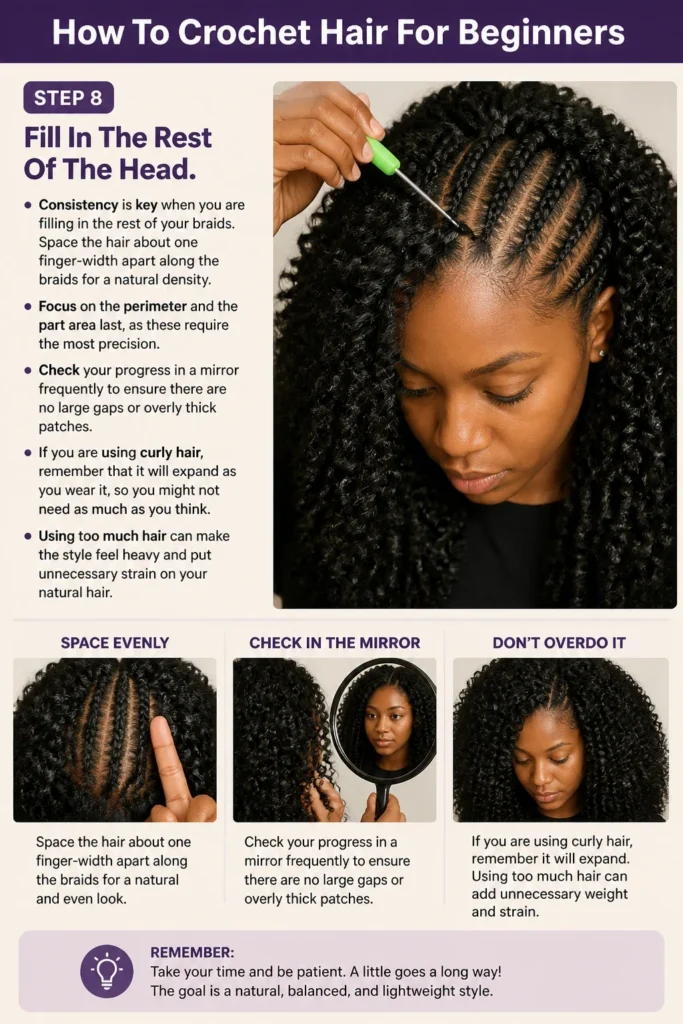
Space the hair about one finger-width apart along the braids for a natural density.
Focus on the perimeter and the part area last, as these require the most precision.
Check your progress in a mirror frequently to ensure there are no large gaps or overly thick patches.
If you are using curly hair, remember that it will expand as you wear it, so you might not need as much as you think.
Using too much hair can make the style feel heavy and put unnecessary strain on your natural hair.
Step 9: Create The Invisible Part
The “invisible knot” method is used for the area where you want your hair to part.
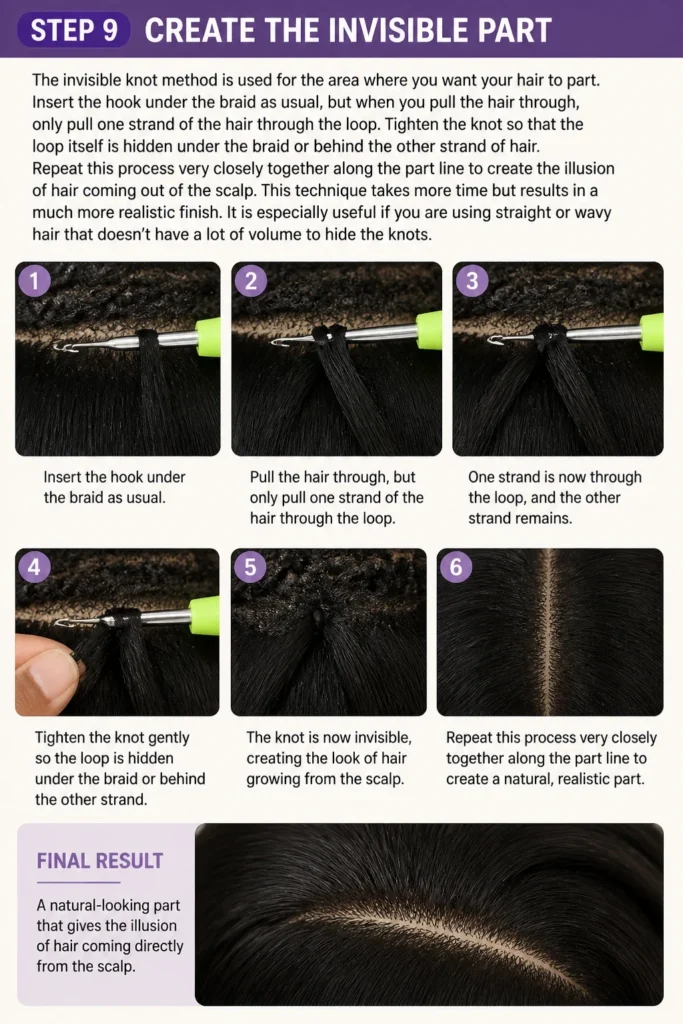
Insert the hook under the braid as usual, but when you pull the hair through, only pull one strand of the hair through the loop.
Tighten the knot so that the loop itself is hidden under the braid or behind the other strand of hair.
Repeat this process very closely together along the part line to create the illusion of hair coming out of the scalp.
This technique takes more time but results in a much more realistic finish.
It is especially useful if you are using straight or wavy hair that doesn’t have a lot of volume to hide the knots.
Step 10: Trim And Style
The final step is making the hair look polished and ready for the world.
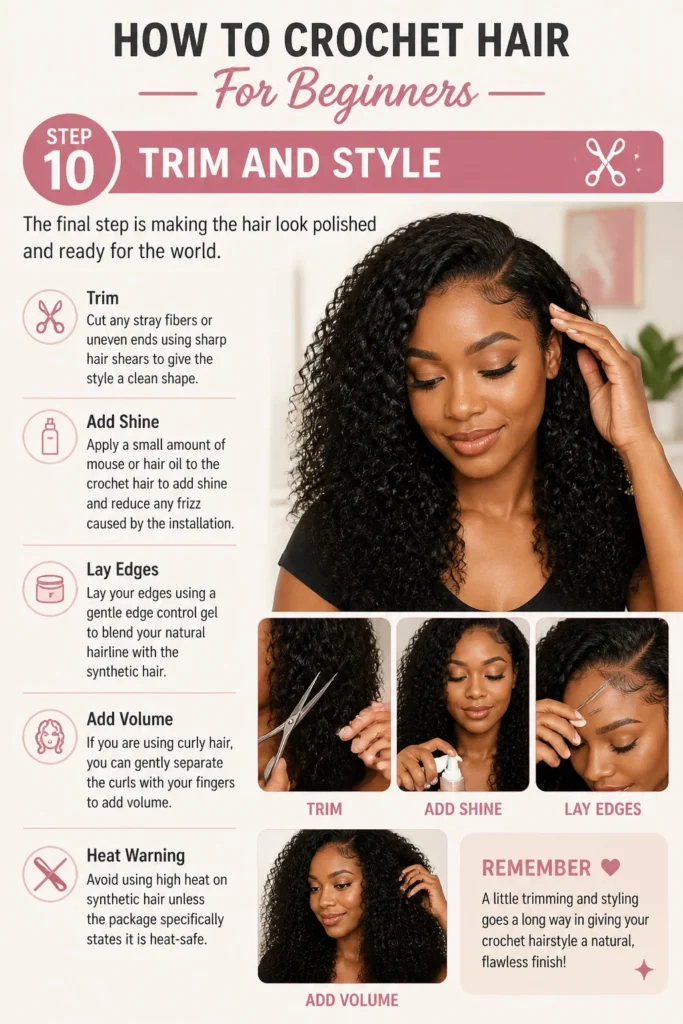
Cut any stray fibers or uneven ends using sharp hair shears to give the style a clean shape.
Apply a small amount of mouse or hair oil to the crochet hair to add shine and reduce any frizz caused by the installation.
Lay your edges using a gentle edge control gel to blend your natural hairline with the synthetic hair.
If you are using curly hair, you can gently separate the curls with your fingers to add volume.
Avoid using high heat on synthetic hair unless the package specifically states it is heat-safe.
Common Mistakes to Avoid
Braiding the Foundation Too Tight
Many beginners believe that tighter braids will make the style last longer. In reality, braids that are too tight can lead to tension headaches and even hair loss around the edges. Your braids should feel secure but comfortable enough that you can move your facial expressions without feeling a pull.
If you feel extreme discomfort after braiding, it is better to redo the braids than to risk damaging your scalp. A healthy scalp is the most important part of any protective style.
Overcrowding the Hair
It is tempting to add as much hair as possible to achieve a full look. However, adding too many strands makes the style incredibly heavy and difficult to wash. It also makes the knots more visible because they are pushed against each other.
Try to space the hair out and only add more if you see a visible gap. You can always add more hair later, but taking it out is much more difficult once the knots are tight.
Using Large Knots at the Front
Using the same knotting technique for the back of the head as you do for the front is a common error. Large knots at the hairline are a dead giveaway that the hair is crochet. This makes the transition from your skin to the hair look harsh and unnatural.
Always use the invisible knot method or smaller sections of hair when you get close to your face. This ensures the style looks soft and blends well with your natural features.
Troubleshooting
The Hair Is Slipping Out
If you notice the crochet strands are sliding off your braids, the knot is likely too loose. This often happens with silky textures or straight hair types. To fix this, you can go back and re-knot the loose sections by pulling the hair through the loop a second time.
Another cause for slipping is braids that are too thick for the amount of hair you are attaching. Ensure your foundation braids are consistent in size to provide a steady anchor for the knots.
The Scalp Is Itchy
An itchy scalp often happens because of the alkaline coating found on many synthetic hair brands. This coating can cause a mild allergic reaction for some people. If your scalp starts to itch immediately after installation, you might need to treat the hair.
Next time, you can soak the synthetic hair in a mixture of water and apple cider vinegar before installing it. For an immediate fix, use a scalp spray containing tea tree oil or peppermint to soothe the irritation.
Key Takeaways
- Always start with a clean and moisturized foundation of natural hair to prevent breakage.
- Choose a braid pattern that matches your desired final look and part placement.
- Use the latch hook tool carefully to avoid snagging your natural hair during the loop process.
- Apply the invisible knot technique at the hairline for a more realistic and professional appearance.
- Avoid over-installing hair to keep the style lightweight and comfortable for daily wear.
- Maintain the style by wearing a silk or satin scarf at night to prevent frizz and tangling.
Frequently Asked Questions
How long does crochet hair typically last?
Most crochet styles can last anywhere from four to eight weeks. The longevity depends on how well you maintain the hair at night and the quality of the synthetic hair used. Curly styles may frizz faster than braided or twisted styles, requiring more frequent maintenance.
Can I wash my hair while it is in a crochet style?
Yes, you can wash your scalp while wearing crochet hair. Focus on applying a diluted shampoo directly to your scalp between the braids and rinsing thoroughly. It is important to make sure your natural braids underneath are completely dry to prevent mildew or odors.
Does crochet hair damage your natural hair?
When installed and removed correctly, crochet hair is a protective style that promotes hair growth. Damage only occurs if the foundation braids are too tight or if the hair is left in for too long without proper scalp care. Always be gentle during the removal process to avoid cutting your own hair.
How many packs of hair do I need for a full head?
Most people need between four and six packs of hair for a standard installation. If the hair is very thick or you are going for a very voluminous look, you might need seven or eight packs. It is always better to have an extra pack on hand than to run out halfway through the process.
Our Top Recommended Finds
- Ergonomic Latch Hook Tool: A hook with a comfortable rubber grip makes the repetitive motion much easier on your hands and prevents cramping.
- Satin Bonnet or Scarf: This is essential for keeping the synthetic hair smooth and preventing your natural edges from drying out while you sleep.
- Scalp Applicator Bottle: These bottles have pointed tips that allow you to apply oils or cleansers directly to your scalp between the cornrows without messing up the style.
Elevating Your Hair Game Today
Now that you have the knowledge to install your own crochet hair, you can experiment with different colors, lengths, and textures.
Start with a simple curly style for your first attempt, as the volume of the curls is very forgiving for beginners.
Once you feel confident, try more advanced looks like faux locs or straight hair with a defined invisible part.
Take your time with the braiding foundation today, and you will enjoy a beautiful, low-maintenance style for weeks to come.
Beginner-friendly templates, step-by-step guides,
and weekly project ideas in your inbox.