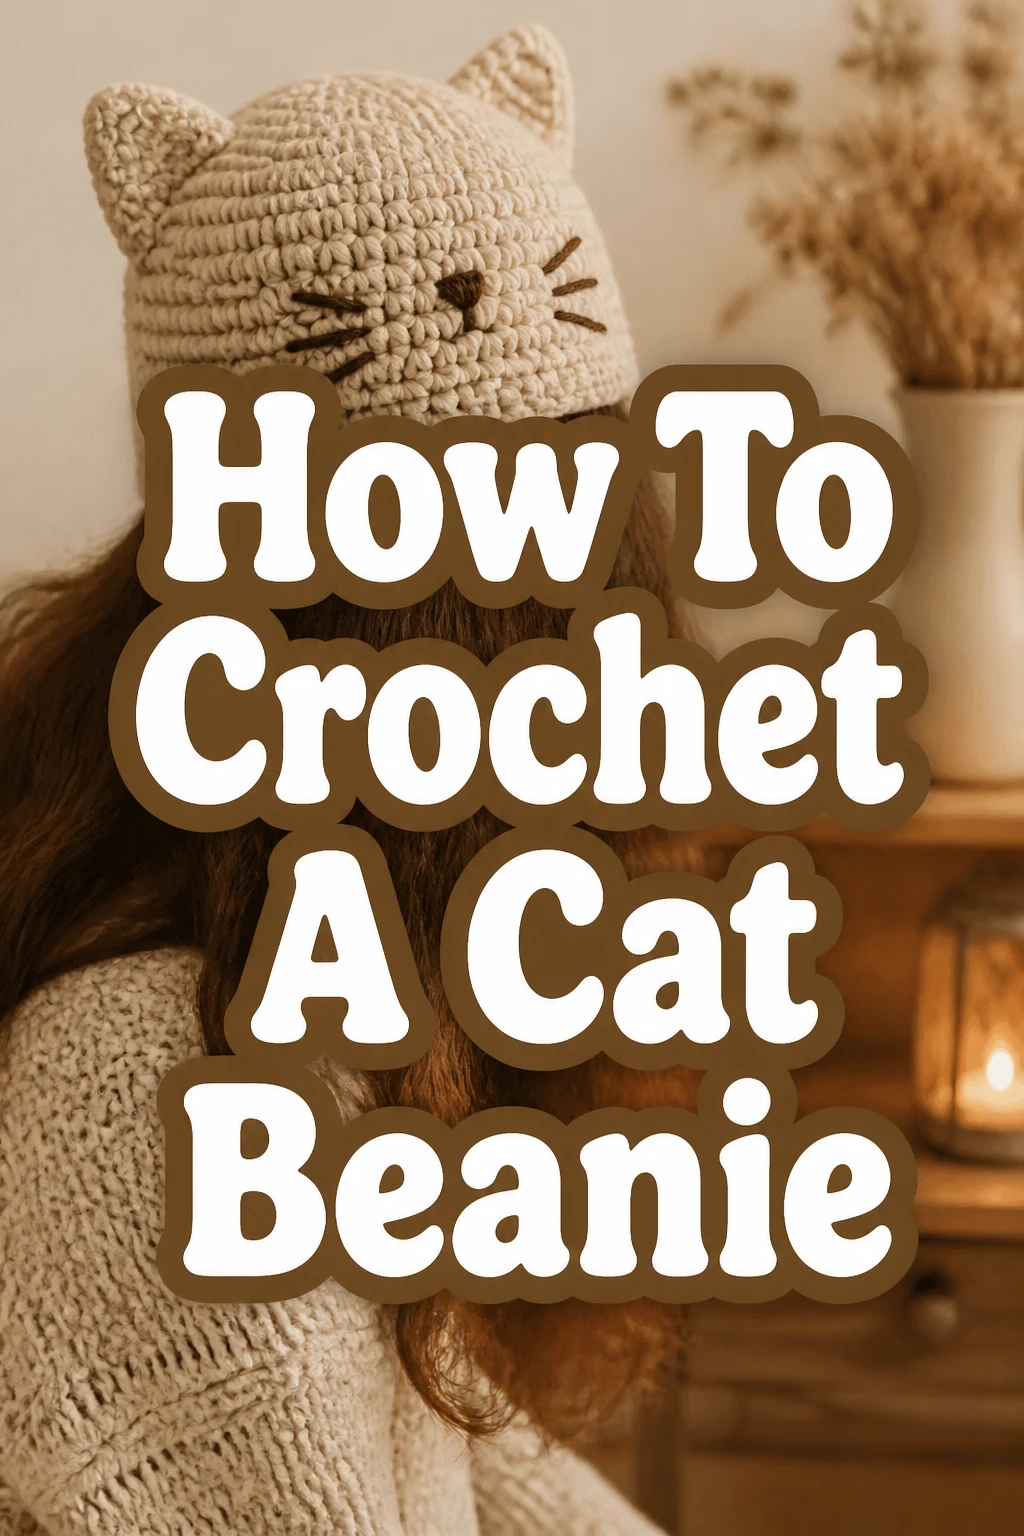
How To Crochet A Cat Beanie

Beginner-friendly templates, step-by-step guides,
and weekly project ideas in your inbox.
I still remember the first time I tried to crochet a beanie. It was a bit of a tangled mess, but the joy of creating something with my own hands was unforgettable. Over the years, I’ve refined my skills and learned countless tricks, and now I’m excited to share my favorite cat beanie pattern with you.
This guide will walk you through each stitch, helping you create a charming cat beanie that’s perfect for gifts or keeping yourself cozy. You’ll gain confidence in your crochet abilities and finish with a delightful, wearable piece.
Quick Overview
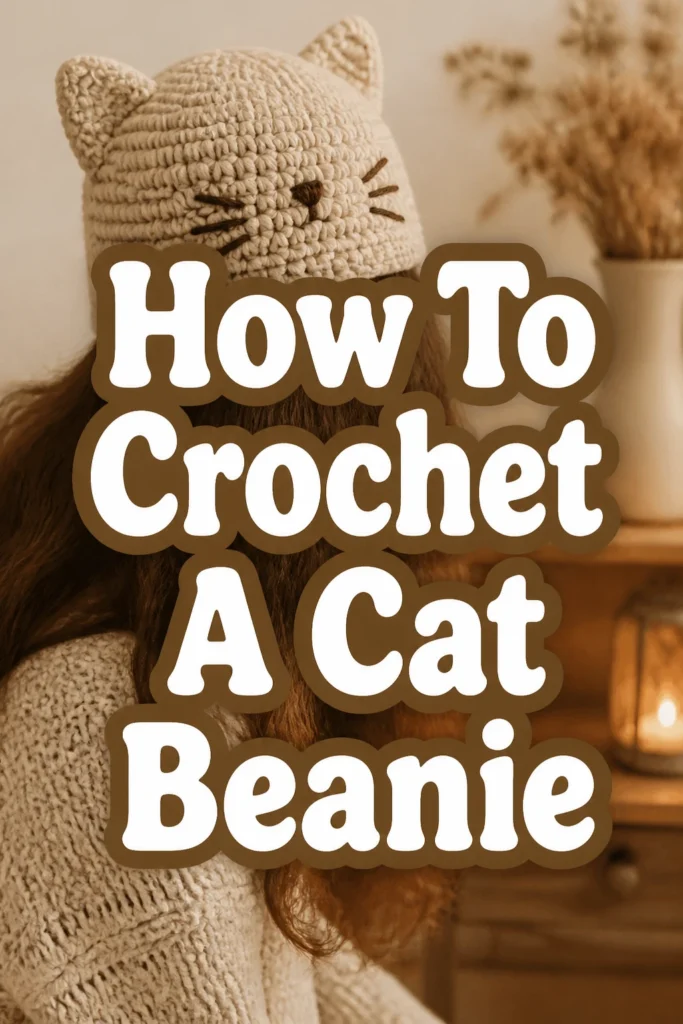
This project will guide you through crafting a cozy, adorable cat beanie from start to finish. You’ll learn how to create the beanie base, shape the iconic cat ears, and assemble everything into a finished product.
- Time needed: 3-6 hours (depending on experience level)
- Difficulty: Intermediate
- What you’ll need: Yarn, crochet hook, scissors, tapestry needle, stitch markers
Step-by-Step Instructions
Step 1: Gather Your Materials
Before you begin, ensure you have all the necessary supplies within reach. Having everything organized will make your crocheting process smoother and more enjoyable.
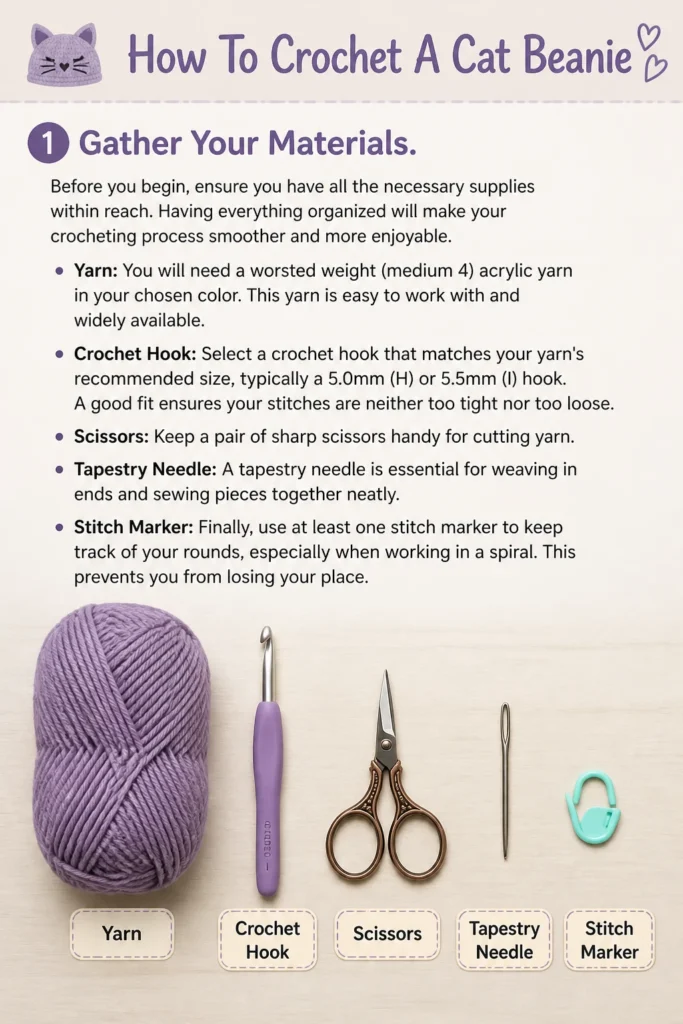
You will need a worsted weight (medium 4) acrylic yarn in your chosen color. This yarn is easy to work with and widely available.
Select a crochet hook that matches your yarn’s recommended size, typically a 5.0mm (H) or 5.5mm (I) hook. A good fit ensures your stitches are neither too tight nor too loose.
Keep a pair of sharp scissors handy for cutting yarn. A tapestry needle is essential for weaving in ends and sewing pieces together neatly.
Finally, use at least one stitch marker to keep track of your rounds, especially when working in a spiral. This prevents you from losing your place.
Step 2: Start the Beanie Base (Magic Ring)
The magic ring, also known as a magic circle or adjustable ring, creates a tight, closed center for your beanie. This method avoids a hole at the top of the hat.
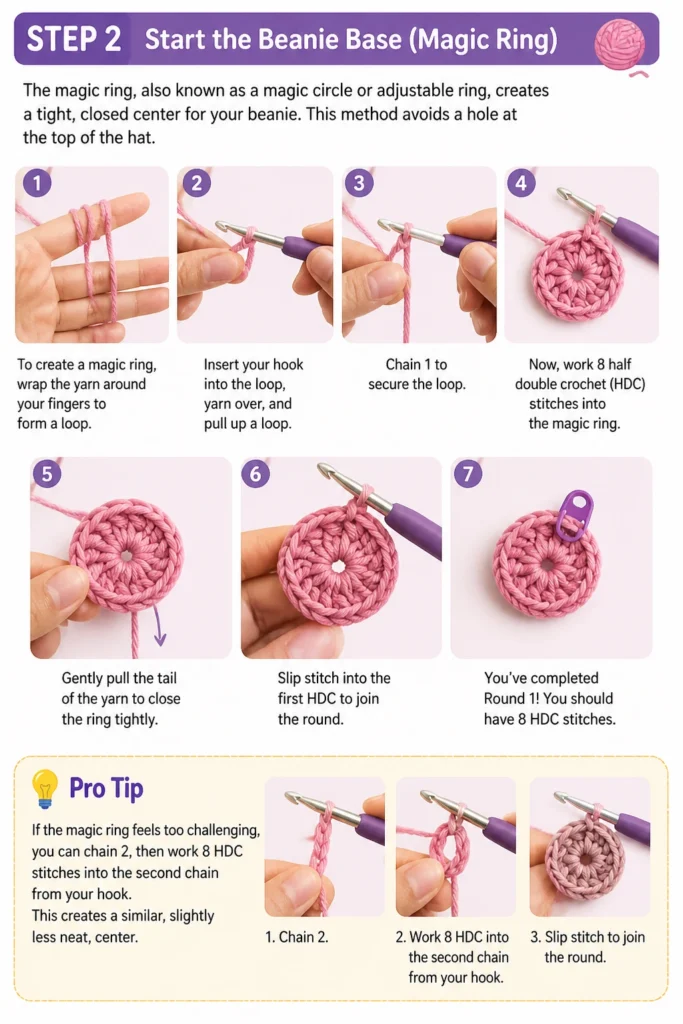
To create a magic ring, wrap the yarn around your fingers to form a loop. Insert your hook into the loop, yarn over, and pull up a loop.
Chain 1 to secure the loop. Now, work 8 half double crochet (HDC) stitches into the magic ring.
Gently pull the tail of the yarn to close the ring tightly. Slip stitch into the first HDC to join the round.
Pro Tip: If the magic ring feels too challenging, you can chain 2, then work 8 HDC stitches into the second chain from your hook. This creates a similar, slightly less neat, center.
Step 3: Build the Crown (Increasing Rounds)
Now you will begin to increase your stitches to form the flat circular top of your beanie. Consistent increases are key for a smooth, even crown.
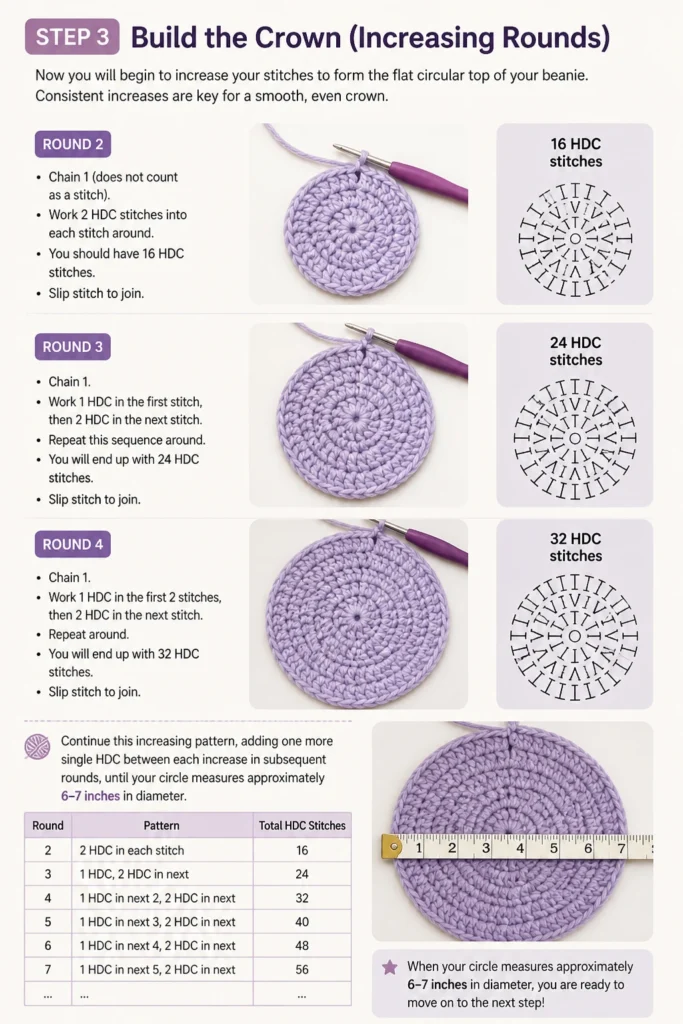
For Round 2, chain 1 (does not count as a stitch). Work 2 HDC stitches into each stitch around. You should have 16 HDC stitches. Slip stitch to join.
Round 3 begins with chain 1. Work 1 HDC in the first stitch, then 2 HDC in the next stitch. Repeat this sequence around. You will end up with 24 HDC stitches. Slip stitch to join.
For Round 4, chain 1. Work 1 HDC in the first 2 stitches, then 2 HDC in the next stitch. Repeat around for a total of 32 HDC stitches. Slip stitch to join.
Continue this increasing pattern, adding one more single HDC between each increase in subsequent rounds, until your circle measures approximately 6-7 inches in diameter. This measurement will vary slightly based on the head size you are aiming for. For example, Round 5 would be 1 HDC in the first 3 stitches, 2 HDC in the next.
Always slip stitch to join at the end of each increasing round. Use a stitch marker to mark your first stitch of the round to stay on track.
Step 4: Form the Beanie Body (Straight Rounds)
Once your crown reaches the desired diameter, you will stop increasing stitches. This creates the straight sides of the beanie.
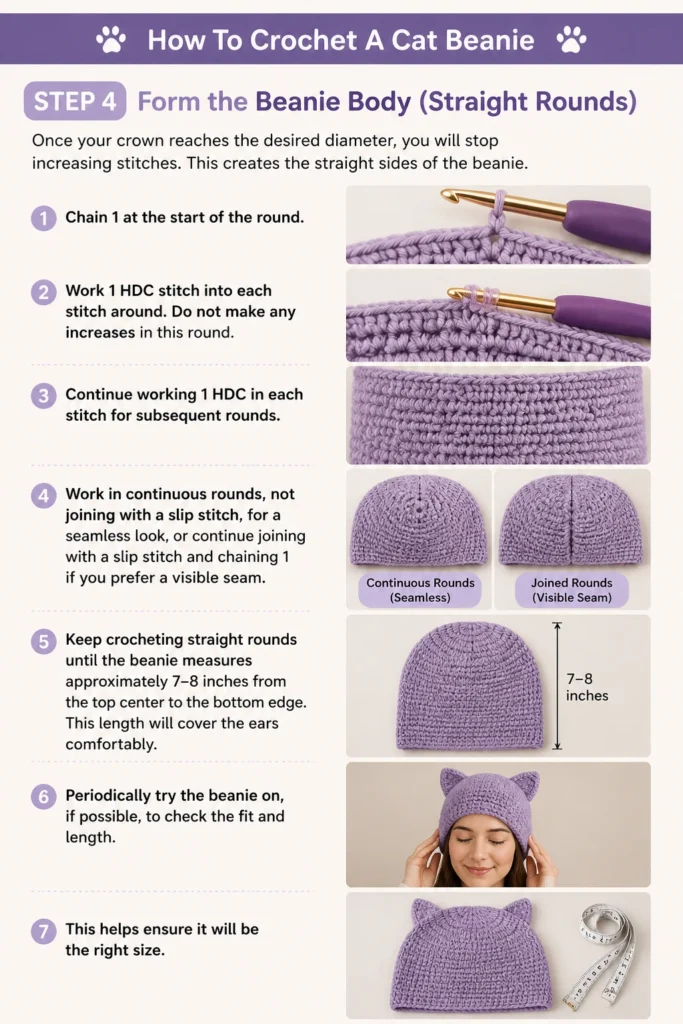
Chain 1 at the start of the round. Work 1 HDC stitch into each stitch around. Do not make any increases in this round.
Continue working 1 HDC in each stitch for subsequent rounds. Work in continuous rounds, not joining with a slip stitch, for a seamless look, or continue joining with a slip stitch and chaining 1 if you prefer a visible seam.
Keep crocheting straight rounds until the beanie measures approximately 7-8 inches from the top center to the bottom edge. This length will cover the ears comfortably.
Periodically try the beanie on, if possible, to check the fit and length. This helps ensure it will be the right size.
Step 5: Finish the Beanie Base
Once your beanie reaches the desired length, it’s time to secure your work and prepare for adding the ears. A neat finish makes a big difference.
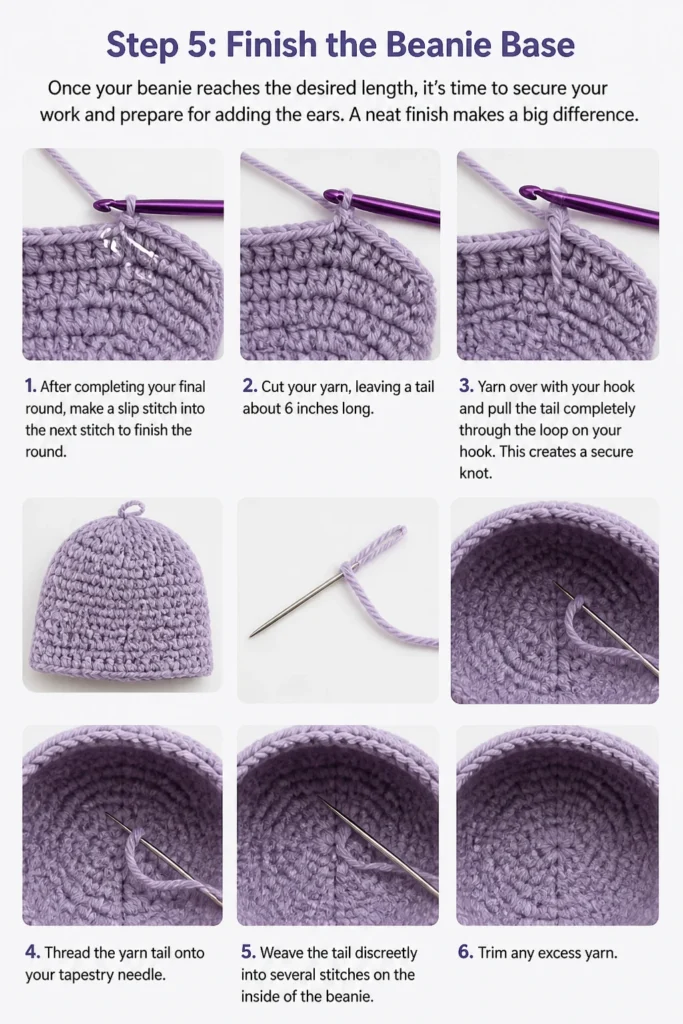
After completing your final round, make a slip stitch into the next stitch to finish the round. Cut your yarn, leaving a tail about 6 inches long.
Yarn over with your hook and pull the tail completely through the loop on your hook. This creates a secure knot.
Thread the yarn tail onto your tapestry needle. Weave the tail discreetly into several stitches on the inside of the beanie. Trim any excess yarn.
Step 6: Crochet the Cat Ears (Make Two)
The ears are what transform your beanie into an adorable cat hat. You’ll make two identical ears.
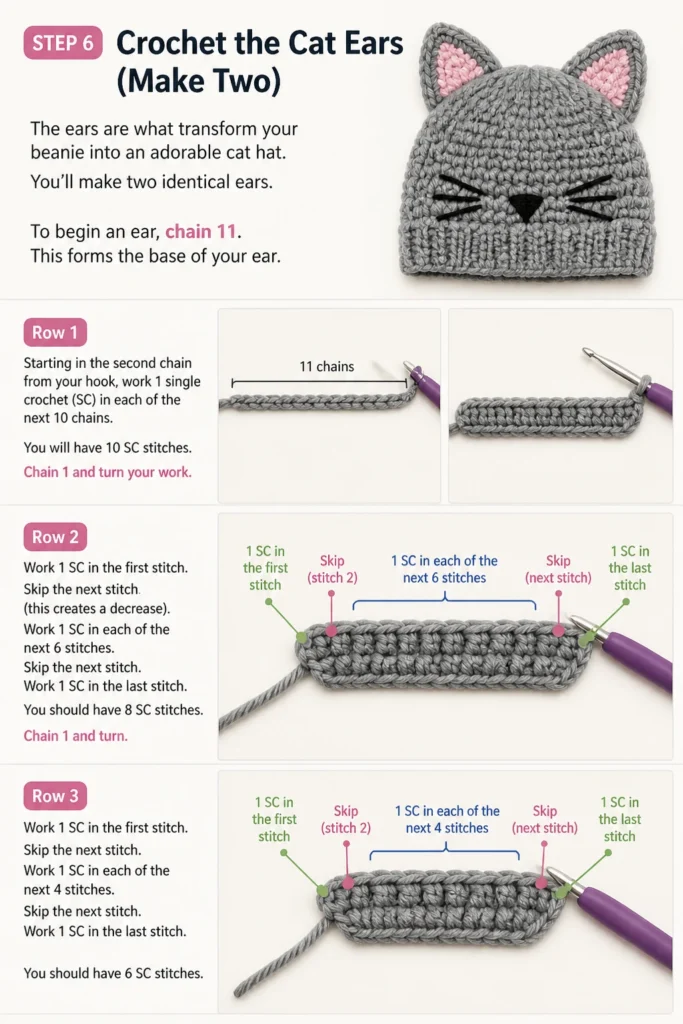
To begin an ear, chain 11. This forms the base of your ear.
Row 1: Starting in the second chain from your hook, work 1 single crochet (SC) in each of the next 10 chains. You will have 10 SC stitches. Chain 1 and turn your work.
Row 2: Work 1 SC in the first stitch. Skip the next stitch (this creates a decrease). Work 1 SC in each of the next 6 stitches. Skip the next stitch. Work 1 SC in the last stitch. You should have 8 SC stitches. Chain 1 and turn.
Row 3: Work 1 SC in the first stitch. Skip the next stitch. Work 1 SC in each of the next 4 stitches. Skip the next stitch. Work 1 SC in the last stitch. You should have 6 SC stitches. Chain 1 and turn.
Row 4: Work 1 SC in the first stitch. Skip the next stitch. Work 1 SC in each of the next 2 stitches. Skip the next stitch. Work 1 SC in the last stitch. You should have 4 SC stitches. Chain 1 and turn.
Row 5: Work 1 SC in the first stitch. Skip the next stitch. Work 1 SC in the next stitch. Skip the next stitch. Work 1 SC in the last stitch. You should have 2 SC stitches. Chain 1 and turn.
Row 6: Work 1 SC in the first stitch. Skip the next stitch. Work 1 SC in the last stitch. You should have 1 SC stitch. Fasten off, leaving a long tail for sewing.
Repeat these steps to create a second identical ear.
Pro Tip: For slightly rounder ears, you can use half double crochet (HDC) stitches instead of SC for the ear rows, adjusting the decrease pattern slightly to maintain the triangular shape.
Step 7: Attach the Ears Securely
Proper placement and secure attachment of the ears are crucial for the final look of your cat beanie. Take your time with this step.
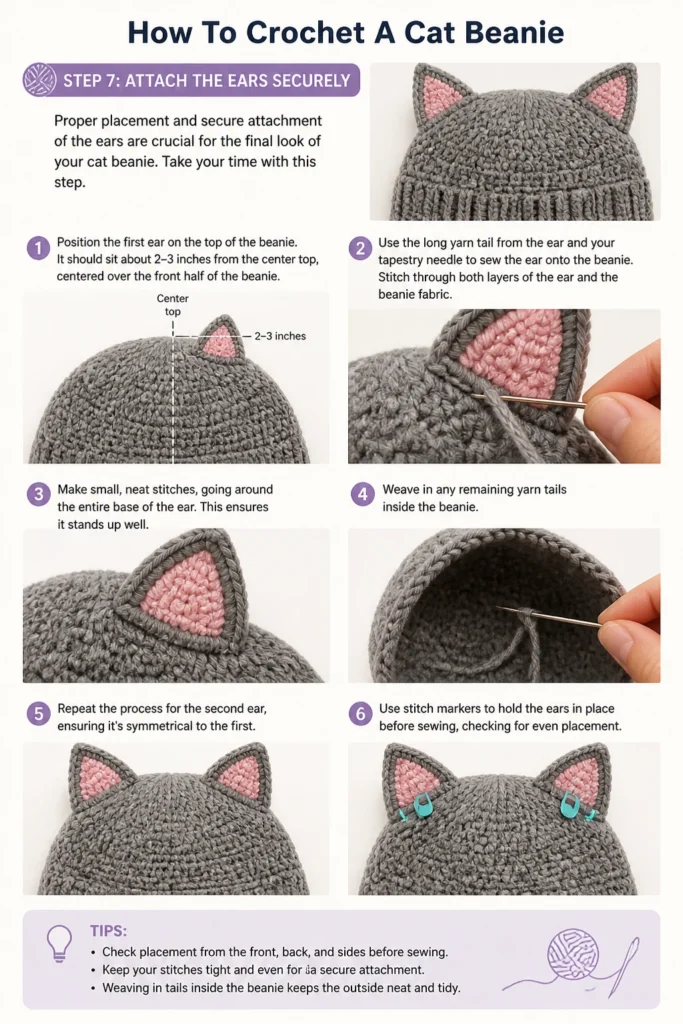
Position the first ear on the top of the beanie. It should sit about 2-3 inches from the center top, centered over the front half of the beanie.
Use the long yarn tail from the ear and your tapestry needle to sew the ear onto the beanie. Stitch through both layers of the ear and the beanie fabric.
Make small, neat stitches, going around the entire base of the ear. This ensures it stands up well. Weave in any remaining yarn tails inside the beanie.
Repeat the process for the second ear, ensuring it’s symmetrical to the first. Use stitch markers to hold the ears in place before sewing, checking for even placement.
Step 8: Add Personal Touches
Now that your beanie is assembled, you can add extra details to make it uniquely yours. This is where your creativity shines.
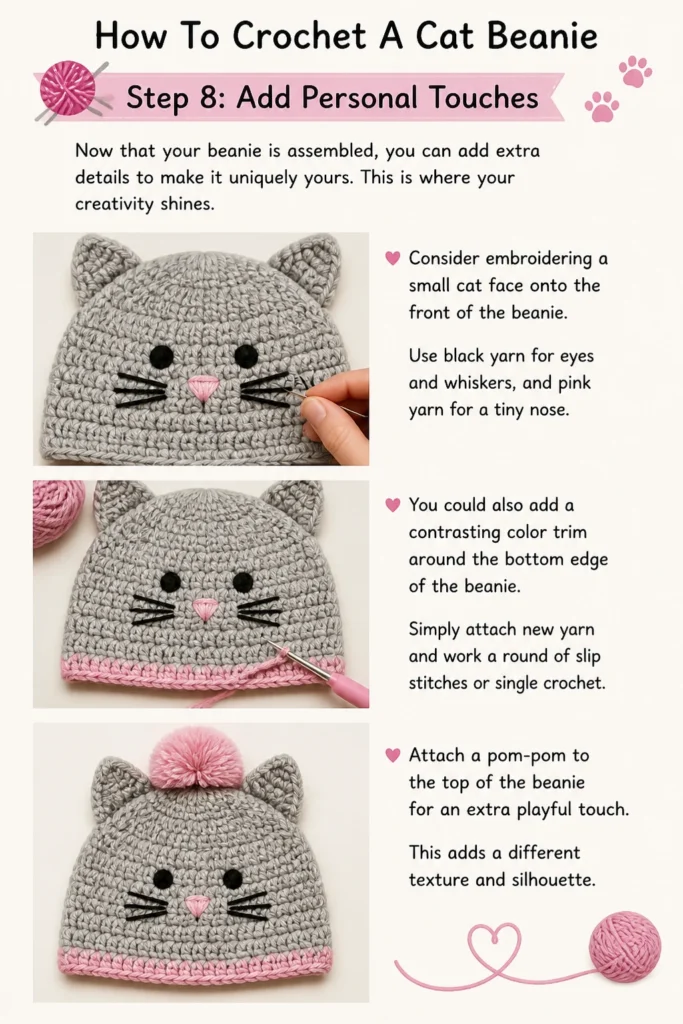
Consider embroidering a small cat face onto the front of the beanie. Use black yarn for eyes and whiskers, and pink yarn for a tiny nose.
You could also add a contrasting color trim around the bottom edge of the beanie. Simply attach new yarn and work a round of slip stitches or single crochet.
Attach a pom-pom to the top of the beanie for an extra playful touch. This adds a different texture and silhouette.
Common Mistakes to Avoid
Incorrect Tension
Crocheting too tightly can make your fabric stiff and difficult to work through, leading to a smaller beanie than intended. Conversely, too loose tension results in a floppy fabric with visible gaps, making your beanie larger and less structured. Practice maintaining a consistent, relaxed grip on your yarn and hook to achieve even stitches.
Missing Stitches or Incorrect Stitch Count
Forgetting to count your stitches or accidentally skipping one can distort the shape of your beanie, especially during the increasing rounds. This can lead to an uneven crown or a lopsided hat. Always count your stitches at the end of each round and use stitch markers to keep track of your first stitch.
Not Weaving in Ends Properly
Leaving yarn tails untidily or weaving them in too loosely can cause your project to unravel over time. It also gives your finished beanie an unfinished appearance. Take the time to thread your tails through several stitches on the inside of your work, changing direction a few times for extra security, before trimming.
Attaching Ears Unevenly
Placing the cat ears too far apart, too close together, or at different angles can make the beanie look unbalanced. This is a common pitfall that affects the overall aesthetic. Before sewing, pin both ears in place with stitch markers and step back to assess their symmetry and position from multiple angles.
Troubleshooting
Beanie Too Small/Large
If your beanie turns out smaller or larger than expected, your gauge (the number of stitches and rows per inch) is likely off. If it’s too small, try using a larger hook size or a slightly thicker yarn. If it’s too large, switch to a smaller hook size or a thinner yarn. Always make a small swatch to check your gauge before starting.
Gaps in the Fabric
Noticeable holes or gaps in your crochet fabric usually indicate loose tension or skipped stitches. Focus on maintaining a consistent, firm tension as you crochet. Ensure you are inserting your hook into the correct part of each stitch, and not missing any stitches in a round. Practice will naturally improve your consistency.
Ears Flop Over
If your cat ears are not standing up straight and tend to flop, they might lack sufficient stiffness or were not attached firmly enough. You can try crocheting the ears with a slightly smaller hook to make them denser. When attaching, ensure you sew through both layers of the ear and deeply into the beanie fabric, creating a strong, supportive seam around the entire base of the ear.
Key Takeaways
- Maintaining consistent tension is vital for an even fabric and correct sizing.
- The magic ring provides a neat, closed center for your beanie, avoiding a hole at the top.
- Careful and consistent increases in the crown rounds ensure a flat, well-shaped top.
- Measuring your beanie as you go helps achieve the correct length for a comfortable fit.
- Securely attaching the ears with strong, neat stitches is crucial for the final cat-like appearance.
- Properly weaving in all yarn ends creates a professional, durable finish.
Frequently Asked Questions
Can I use different yarn weights?
Yes, you can use different yarn weights, but you will need to adjust your hook size and stitch counts accordingly. A bulkier yarn will require fewer stitches and rounds, while a finer yarn will require more. Always check the yarn label for recommended hook sizes.
How do I make it bigger or smaller?
To make the beanie bigger, continue adding increase rounds in the crown until it reaches a larger diameter before crocheting straight rounds. To make it smaller, stop increasing earlier. You can also adjust the number of straight rounds for overall length.
What if my magic ring has a hole?
If your magic ring still has a small hole, you might not have pulled the tail tight enough, or you might have too many stitches for the ring to close completely. Try reducing the initial number of stitches in the ring slightly, or ensure you pull the tail very firmly after working your stitches.
Can I machine wash it?
Most acrylic yarns are machine washable and dryable, making them ideal for beanies. Always check your specific yarn label for care instructions. For best results and to maintain shape, wash on a gentle cycle with cold water and lay flat to dry.
Our Top Recommended Finds
- Ergonomic Crochet Hook Set: These hooks reduce hand fatigue, allowing you to crochet for longer periods comfortably.
- Premium Acrylic Yarn Bundle: A good quality acrylic yarn is soft, durable, and comes in a wide range of colors for your next project.
- Set of Tapestry Needles and Stitch Markers: These essential tools make weaving in ends easy and help you keep track of your stitches.
Your Next Crochet Creation Awaits!
You’ve just completed a wonderful cat beanie, a testament to your growing crochet skills. This project is just the beginning of what you can create with a hook and some yarn.
Consider making another beanie in a different color, or try adding stripes or color blocks. You could even experiment with different ear shapes or sizes for a unique look.
Don’t stop here. The world of crochet is vast and full of exciting possibilities. Pick up your hook again and start your next project today!
Beginner-friendly templates, step-by-step guides,
and weekly project ideas in your inbox.