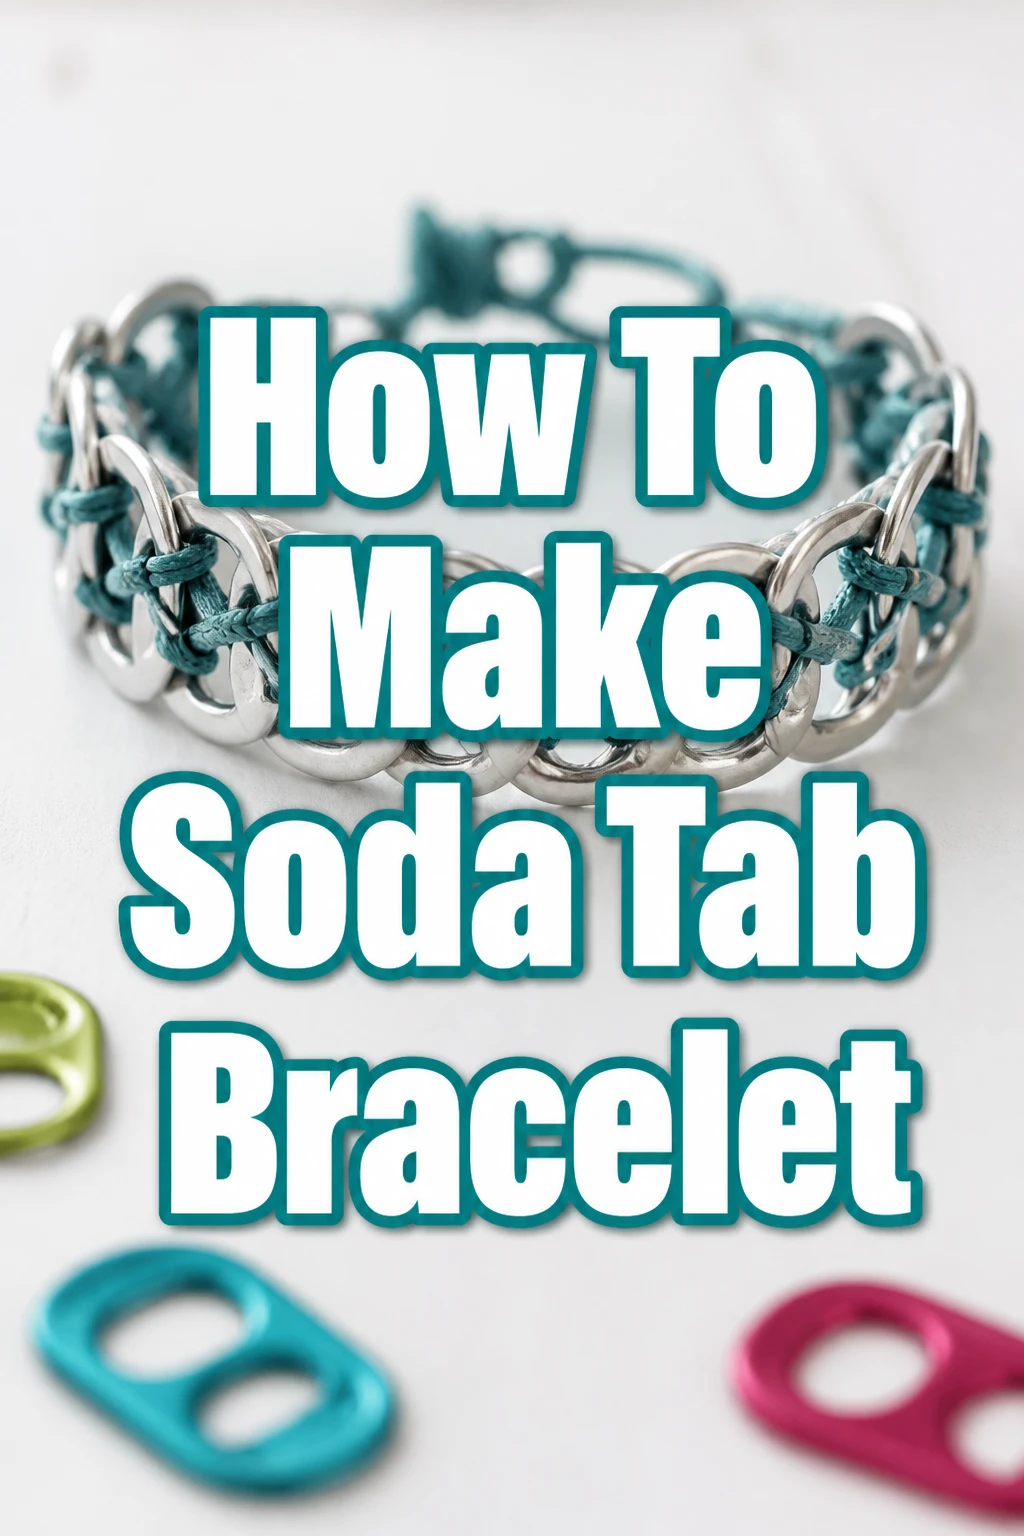
How To Make Soda Tab Bracelet

Beginner-friendly templates, step-by-step guides,
and weekly project ideas in your inbox.
There is a unique satisfaction in transforming everyday items into something beautiful and wearable.
I remember making my first soda tab bracelet years ago, a simple project that sparked a lifelong love for upcycling crafts.
This guide shares that hands-on experience, ensuring you can create your own stylish accessory with ease.
Quick Overview
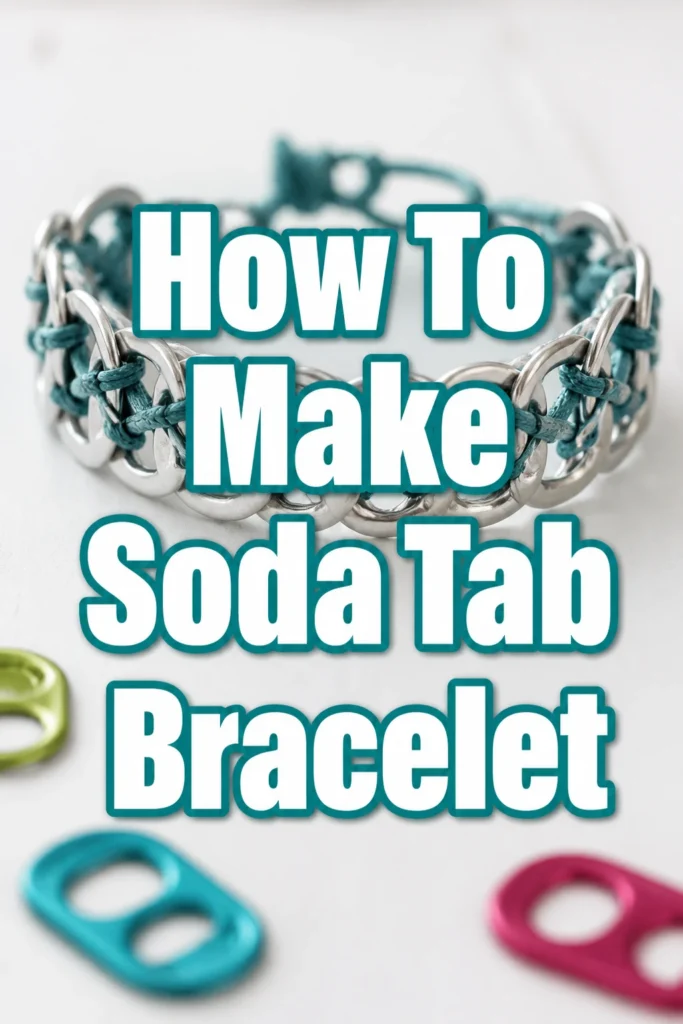
You are about to embark on a fun, creative journey to craft a unique bracelet from recycled soda tabs.
This project is perfect for anyone looking to make a personalized accessory or a thoughtful gift.
- Time needed: 1-2 hours (depending on desired length and skill)
- Difficulty: Beginner
- What you’ll need: Soda tabs, ribbon or cord, scissors, optional pliers
Step-by-Step Instructions
Step 1: Gather Your Soda Tabs
Collect a good number of clean soda tabs. You will need approximately 20-30 tabs for an average bracelet length, but it’s always wise to have extra.
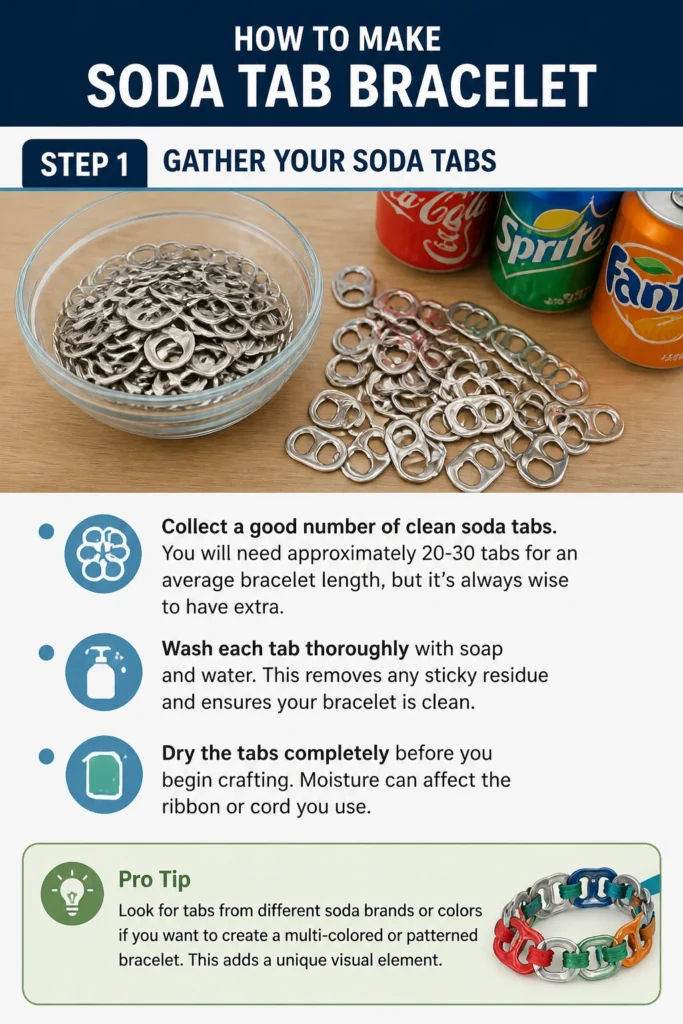
Wash each tab thoroughly with soap and water. This removes any sticky residue and ensures your bracelet is clean.
Dry the tabs completely before you begin crafting. Moisture can affect the ribbon or cord you use.
Pro Tip: Look for tabs from different soda brands or colors if you want to create a multi-colored or patterned bracelet. This adds a unique visual element.
Step 2: Prepare Your Ribbon or Cord
Choose a ribbon, cord, or yarn that complements your style. Waxed cotton cord, satin ribbon, or even thin paracord works well.
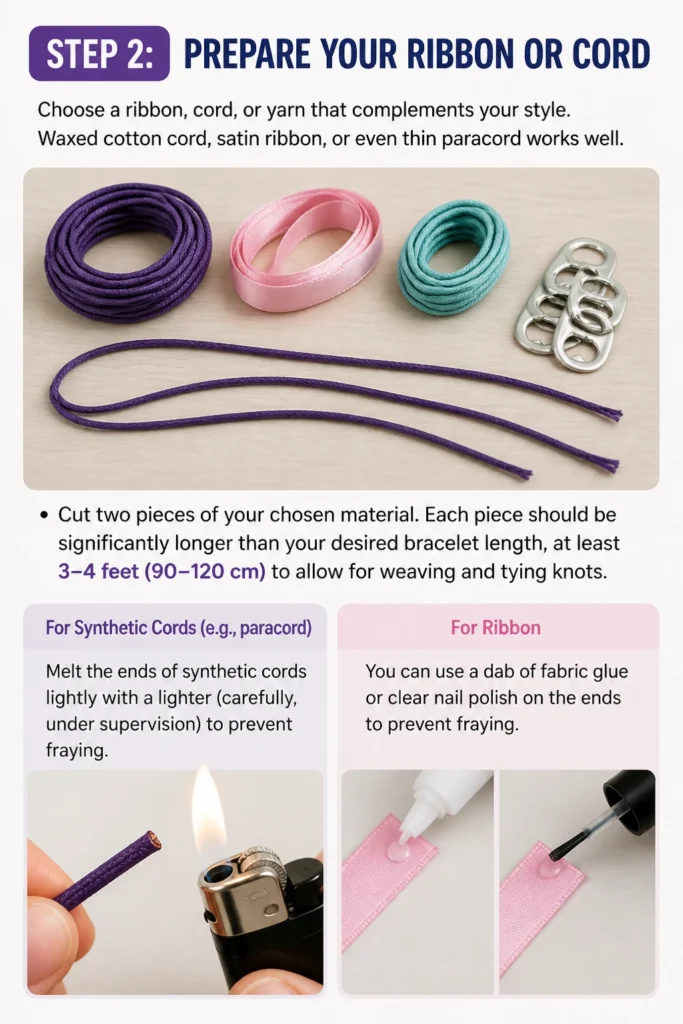
Cut two pieces of your chosen material. Each piece should be significantly longer than your desired bracelet length, at least 3-4 feet (90-120 cm) to allow for weaving and tying knots.
Melt the ends of synthetic cords lightly with a lighter (carefully, under supervision) to prevent fraying. If using ribbon, you can use a dab of fabric glue or clear nail polish on the ends.
Step 3: Begin the Weaving Process
Take your first soda tab and orient it so the flatter side with the smaller hole is facing up. The larger, more rounded hole should be at the bottom.
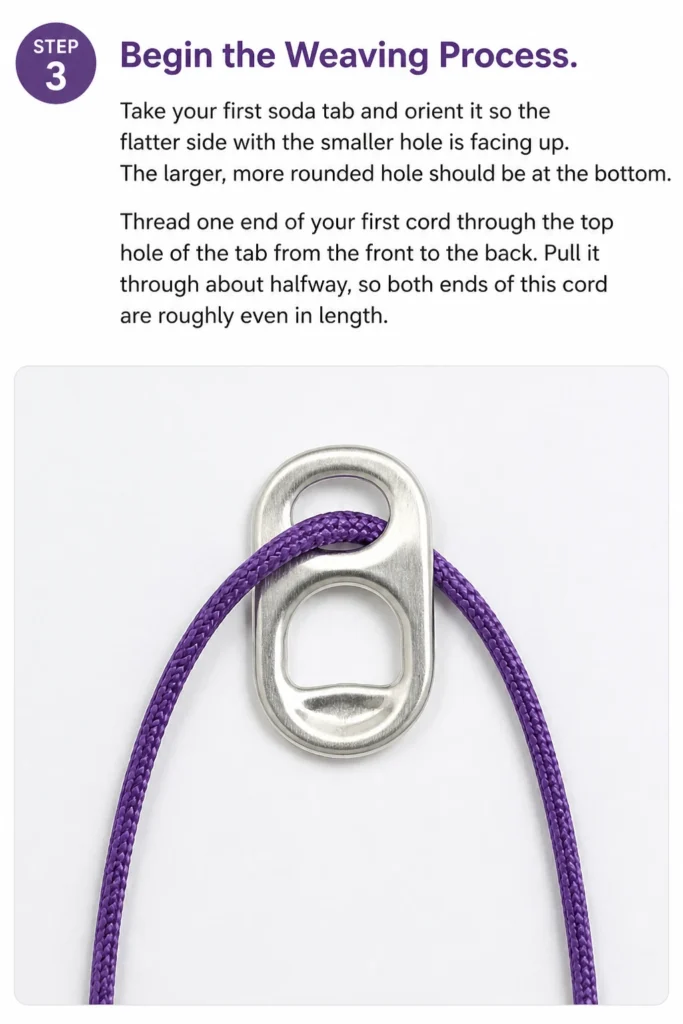
Thread one end of your first cord through the top hole of the tab from the front to the back.
Pull it through about halfway, so both ends of this cord are roughly even in length.
Step 4: Add the Second Cord
Take your second piece of cord. You will now integrate it with the first tab and cord.
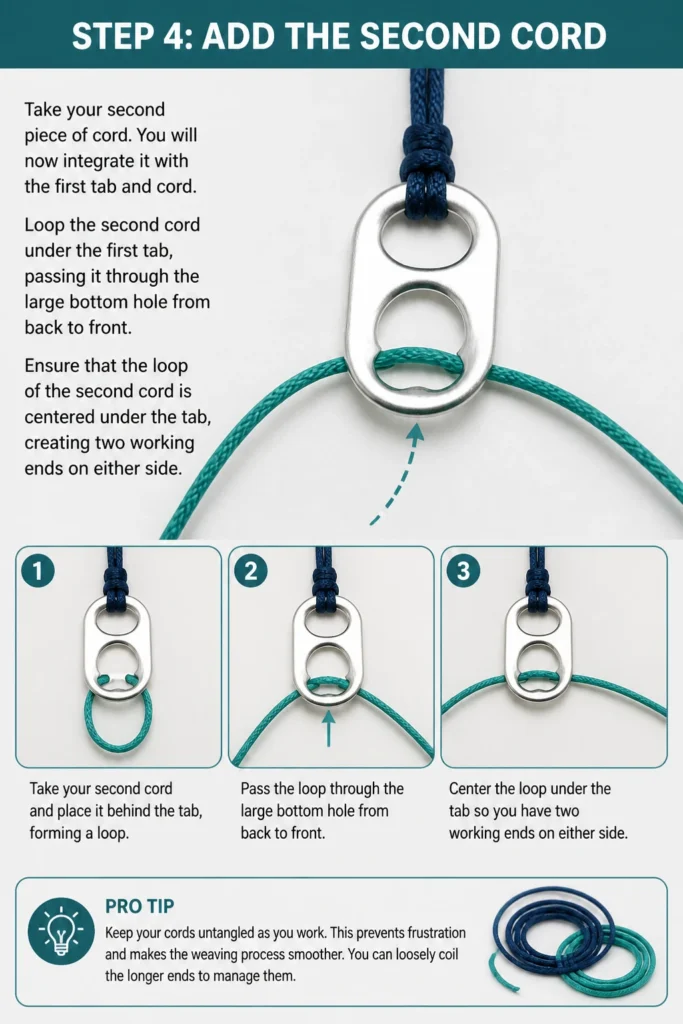
Loop the second cord under the first tab, passing it through the large bottom hole from back to front.
Ensure that the loop of the second cord is centered under the tab, creating two working ends on either side.
Pro Tip: Keep your cords untangled as you work. This prevents frustration and makes the weaving process smoother. You can loosely coil the longer ends to manage them.
Step 5: Attach the Second Tab
Position your second soda tab. This tab should be oriented with its bottom (larger) hole facing the top (smaller) hole of the first tab.
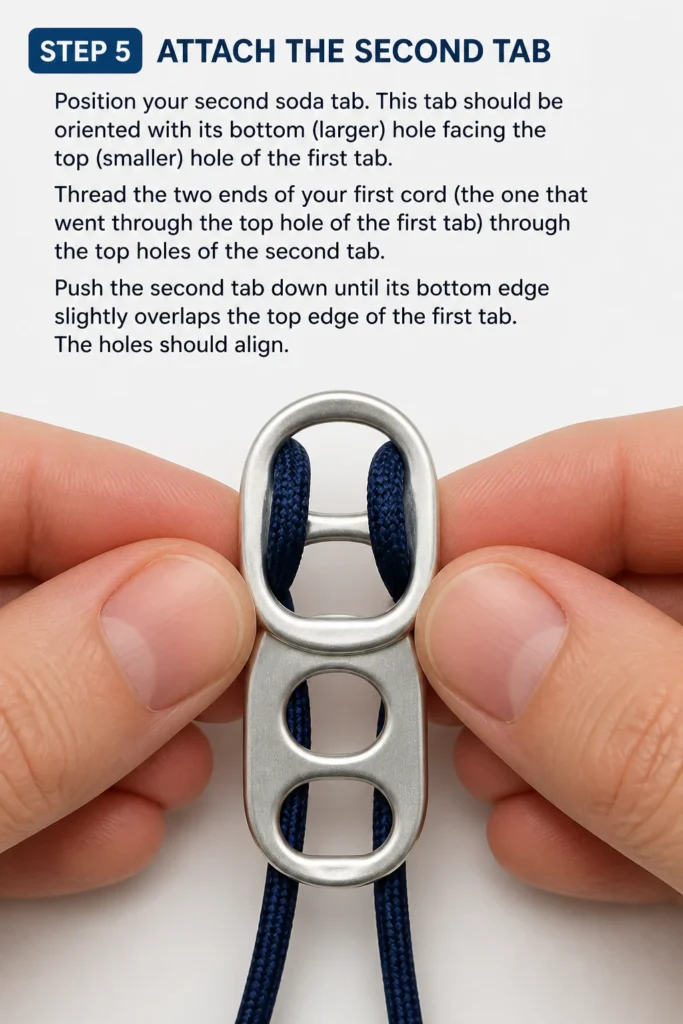
Thread the two ends of your first cord (the one that went through the top hole of the first tab) through the top holes of the second tab.
Push the second tab down until its bottom edge slightly overlaps the top edge of the first tab. The holes should align.
Step 6: Weave the Cords Through the Second Tab
Take the two ends of your second cord (the one that looped under the first tab).
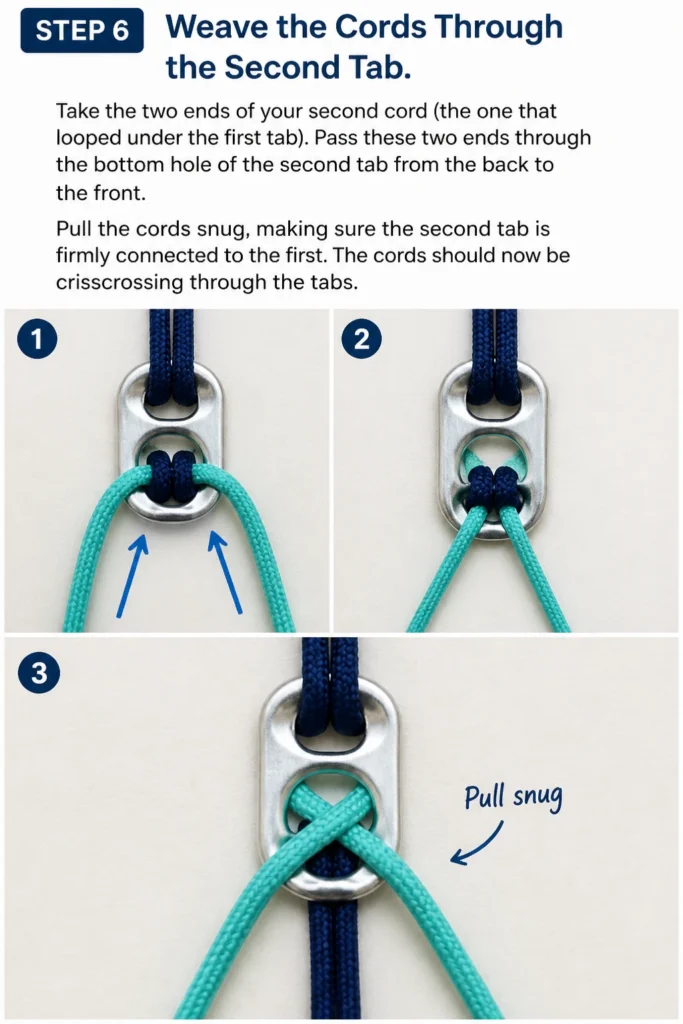
Pass these two ends through the bottom hole of the second tab from the back to the front.
Pull the cords snug, making sure the second tab is firmly connected to the first. The cords should now be crisscrossing through the tabs.
Step 7: Continue Adding Tabs
Repeat the process from Step 5 and Step 6 for each subsequent tab.
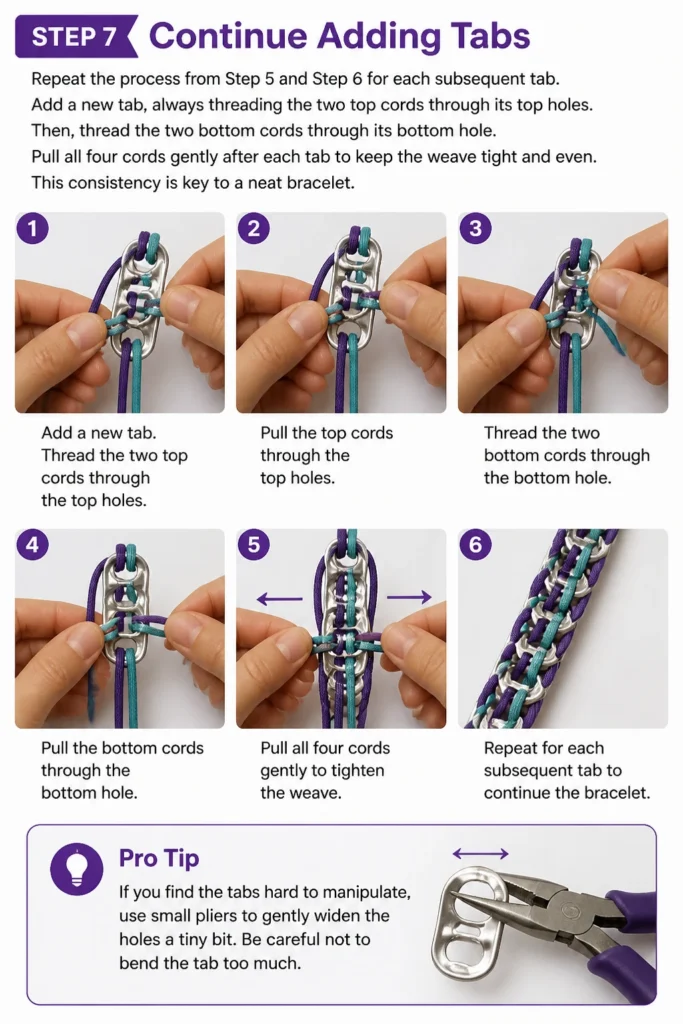
Add a new tab, always threading the two top cords through its top holes.
Then, thread the two bottom cords through its bottom hole.
Pull all four cords gently after each tab to keep the weave tight and even. This consistency is key to a neat bracelet.
Pro Tip: If you find the tabs hard to manipulate, use small pliers to gently widen the holes a tiny bit. Be careful not to bend the tab too much.
Step 8: Determine Bracelet Length
Measure the bracelet against your wrist as you go. Stop adding tabs when it reaches your desired length, allowing for a clasp or tie-off.
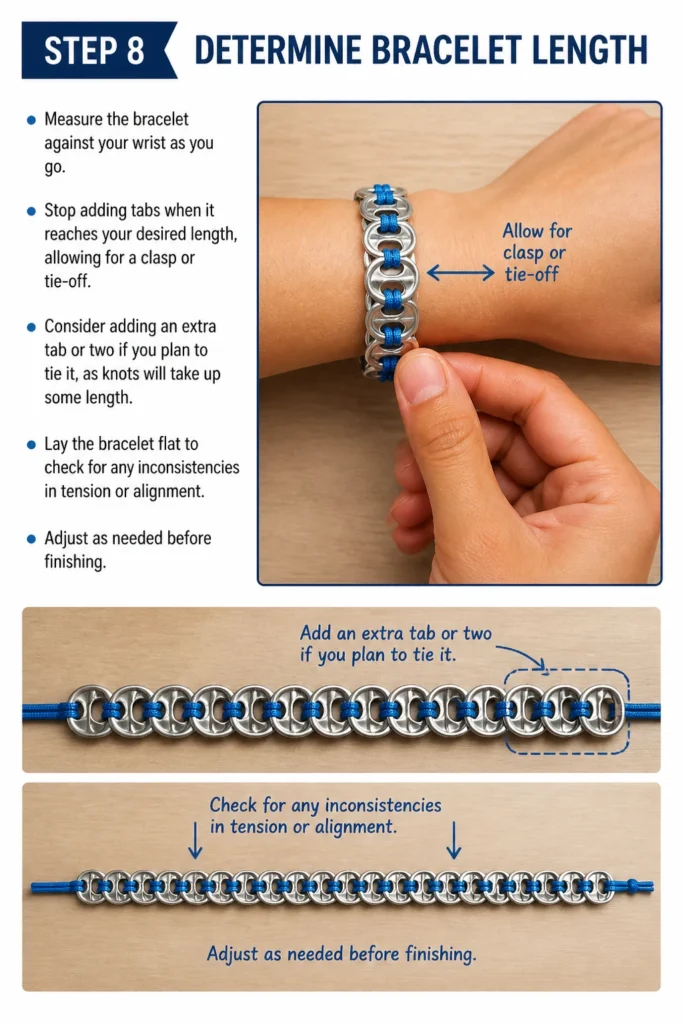
Consider adding an extra tab or two if you plan to tie it, as knots will take up some length.
Lay the bracelet flat to check for any inconsistencies in tension or alignment. Adjust as needed before finishing.
Step 9: Finish the Ends
Tie a secure knot at each end of the bracelet, just after the last tab.
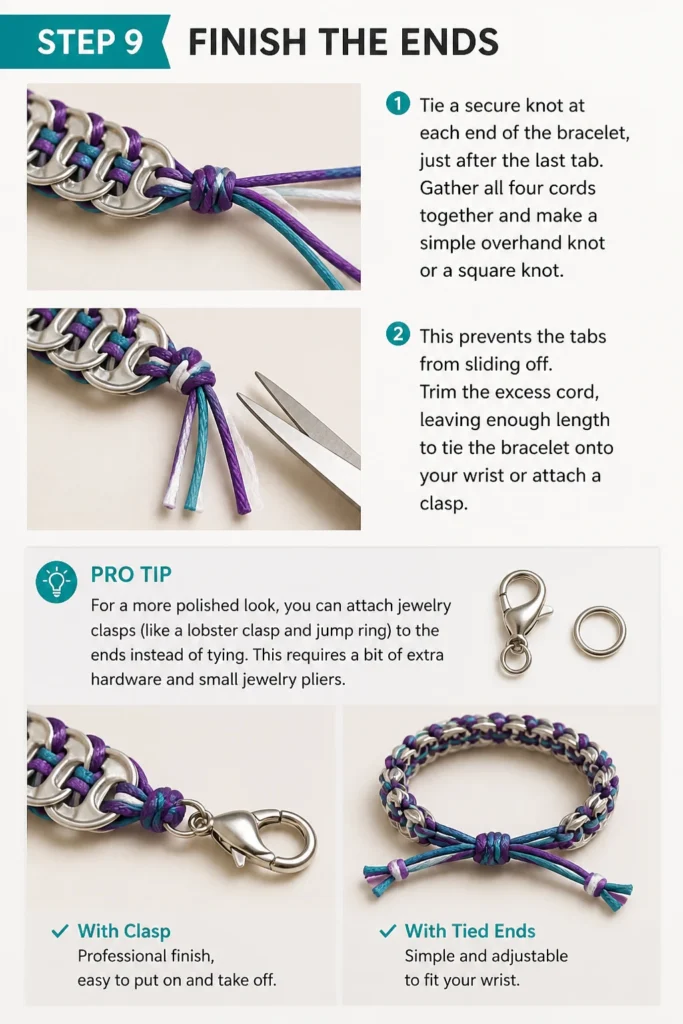
Gather all four cords together and make a simple overhand knot or a square knot. This prevents the tabs from sliding off.
Trim the excess cord, leaving enough length to tie the bracelet onto your wrist or attach a clasp.
Pro Tip: For a more polished look, you can attach jewelry clasps (like a lobster clasp and jump ring) to the ends instead of tying. This requires a bit of extra hardware and small jewelry pliers.
Step 10: Secure and Wear
Double-knot the ends if you are not using a clasp, creating a secure closure.
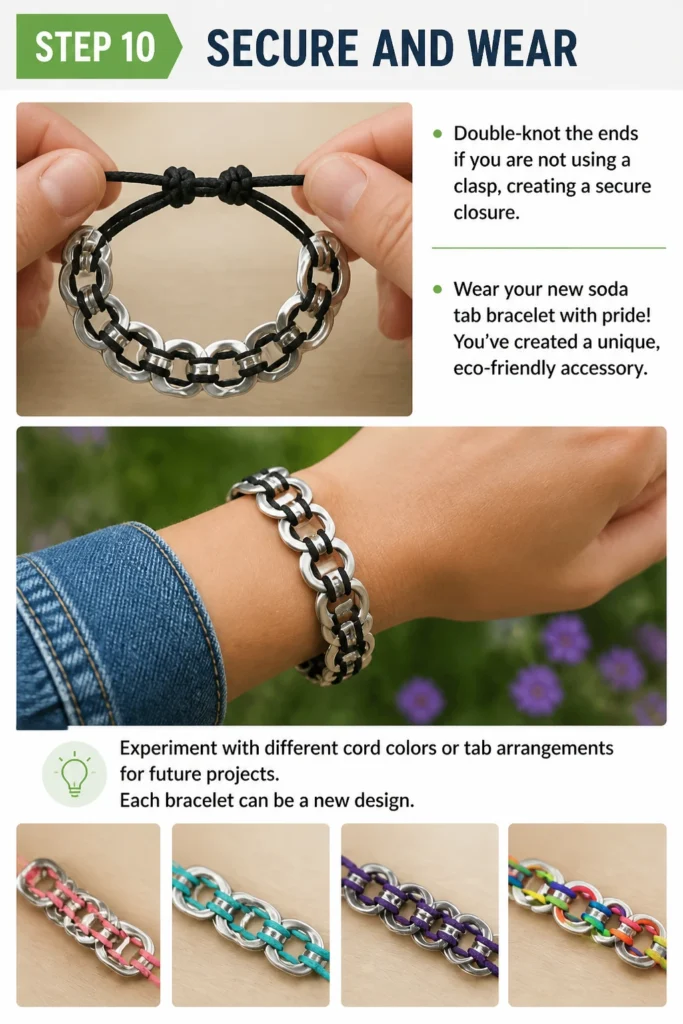
Wear your new soda tab bracelet with pride! You’ve created a unique, eco-friendly accessory.
Experiment with different cord colors or tab arrangements for future projects. Each bracelet can be a new design.
Common Mistakes to Avoid
Using Dirty or Sticky Tabs
Starting with dirty tabs is a common oversight. Residue not only feels unpleasant but can also attract dirt and grime over time, making your bracelet look unkempt.
Always take the time to thoroughly wash and dry all tabs before you begin. A clean start ensures a clean finish and a more enjoyable wearing experience.
Uneven Cord Tension
If you pull some cords tighter than others, your bracelet will appear lopsided or wavy. This inconsistency can make the finished piece look less professional and feel uncomfortable.
Try to maintain an even tension on all four cords as you weave each tab. Gently pull all cords snug after adding each new tab to ensure a consistent, flat weave.
Cutting Cords Too Short
It’s frustrating to run out of cord halfway through your project, especially when you’re almost done. Underestimating the length needed for weaving and knotting is a frequent issue.
Always cut your initial cord pieces generously long, at least 3-4 feet each. You can always trim excess, but you cannot add length once you’ve started weaving.
Forgetting to Measure
Crafting a bracelet that doesn’t fit correctly is a waste of effort. Some makers get so engrossed in the weaving that they forget to check the length against their wrist.
Regularly measure the growing bracelet against your wrist or the wrist of the intended wearer. This ensures a comfortable and appropriate fit when completed.
Troubleshooting
Tabs Are Sliding Apart
If your tabs are not staying tightly together, it often means the cords aren’t pulled snug enough after each tab is added. Loose tension is the primary culprit here.
Go back to the last few tabs and gently pull all four cords individually, then together, to tighten the weave. Ensure each cord is equally taut before adding the next tab.
Bracelet Looks Crooked or Uneven
A crooked appearance usually indicates inconsistent placement of tabs or uneven cord tension during the weaving process. Some tabs might be angled differently.
Carefully inspect the last few tabs added. Adjust their alignment by gently pushing them into place. Re-evaluate your cord tension, ensuring you’re pulling all cords with similar force.
Difficulty Threading Cords Through Tabs
Sometimes, cords can be difficult to push through the small holes of the tabs, especially if they are frayed or thick. This can slow down your progress.
Try melting the ends of synthetic cords or using a tiny dab of super glue/nail polish to stiffen the ends. If the holes are too small, gently use needle-nose pliers to slightly widen them.
Key Takeaways
- Always start with clean, dry soda tabs for a professional finish.
- Cut your cords generously long to avoid running out during the project.
- Maintain consistent tension on all four cords for an even, straight bracelet.
- Regularly measure the bracelet against your wrist to ensure a perfect fit.
- Experiment with different cord colors and tab arrangements to personalize your design.
- Consider using jewelry clasps for a more refined and durable closure.
Frequently Asked Questions
Can I use any type of cord or ribbon?
You can use a variety of materials, but some work better than others. Waxed cotton cord, satin ribbon, or thin paracord are excellent choices because they are durable and easy to thread. Avoid very thick or very thin materials that might be difficult to work with or break easily.
How many soda tabs do I need for one bracelet?
The exact number depends on your wrist size and the length you desire. On average, an adult bracelet requires about 20-30 soda tabs. It’s always a good idea to collect a few extra, just in case, or if you want to make a longer piece.
How do I make the bracelet adjustable?
For an adjustable bracelet, instead of tying a fixed knot at the end, you can create a sliding knot closure. This involves tying a series of square knots around the two remaining cord ends, allowing the bracelet to expand and contract for different wrist sizes. There are many online tutorials for sliding knot closures.
Are soda tab bracelets durable?
Yes, soda tab bracelets are surprisingly durable, especially if you use strong cord and secure knots. The metal tabs themselves are quite resilient. Over time, the tabs might show some wear or minor scratches, adding to their unique character. The cord is usually the first component to show signs of aging.
Our Top Recommended Finds
- Waxed Cotton Cord: This material is strong, smooth, and holds knots well, making it ideal for a durable bracelet. It comes in many colors.
- Needle-Nose Pliers: These are invaluable for gently widening stubborn tab holes or securing small jewelry clasps if you choose to use them. They offer precise control.
- Fabric Scissors: Sharp scissors make clean cuts on your ribbon or cord, preventing fraying and ensuring a neat finish to your bracelet ends.
Craft Your Unique Story Today
You now possess the knowledge and practical steps to create your very own soda tab bracelet.
This project is more than just crafting; it’s about giving new life to discarded materials and expressing your personal style.
Why not gather your supplies and start transforming those tabs into a wearable piece of art right now?
Consider exploring other upcycling crafts next, like creating keychains or even belts from soda tabs. The possibilities are endless!
Beginner-friendly templates, step-by-step guides,
and weekly project ideas in your inbox.