How To Make Diwali Lanterns DIY

Beginner-friendly templates, step-by-step guides,
and weekly project ideas in your inbox.
Diwali, the festival of lights, is a time for joy, family, and beautiful decorations.
Every year, my home comes alive with the warm glow of handmade lanterns, a tradition I cherish deeply.
This guide shares my tried-and-true methods for crafting stunning Diwali lanterns, making your celebrations even brighter and more personal.
Quick Overview
You’re about to create vibrant, custom Diwali lanterns, adding a personal and heartfelt touch to your festive decor. These lanterns are more than just decorations; they are a symbol of light triumphing over darkness, crafted by your own hands.
- Time needed: 2-4 hours (depending on complexity and drying time)
- Difficulty: Beginner to Intermediate
- What you’ll need: Cardstock, butter paper or cellophane, craft glue, scissors, string, LED tea lights, and various decorative elements.
Step-by-Step Instructions
Step 1: Gather Your Materials
Before you begin, lay out all your supplies. This ensures a smooth crafting process and prevents interruptions.
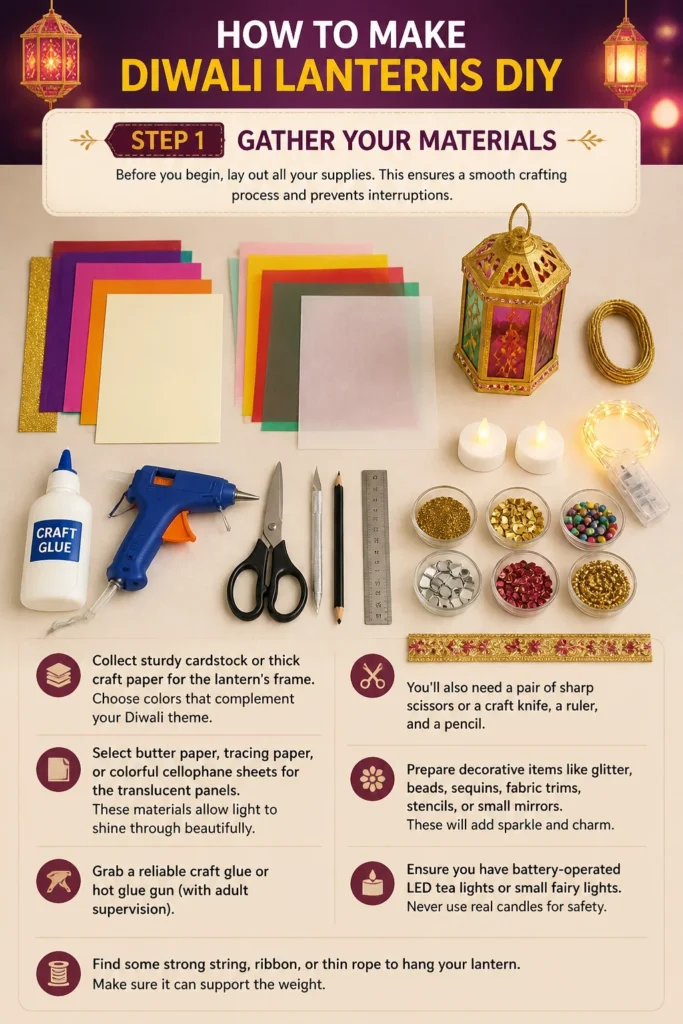
- Collect sturdy cardstock or thick craft paper for the lantern’s frame. Choose colors that complement your Diwali theme.
- Select butter paper, tracing paper, or colorful cellophane sheets for the translucent panels. These materials allow light to shine through beautifully.
- Grab a reliable craft glue or hot glue gun (with adult supervision). You’ll also need a pair of sharp scissors or a craft knife, a ruler, and a pencil.
- Prepare decorative items like glitter, beads, sequins, fabric trims, stencils, or small mirrors. These will add sparkle and charm.
- Ensure you have battery-operated LED tea lights or small fairy lights. Never use real candles for safety.
- Find some strong string, ribbon, or thin wire for hanging your finished lantern.
Pro Tip: Organize your workspace before starting. A clean, well-lit area makes crafting more enjoyable and efficient. Keep a waste bin nearby for scraps.
Step 2: Design Your Lantern Shape
Decide on the basic structure of your lantern. Simple shapes are often the most elegant and easiest to construct.
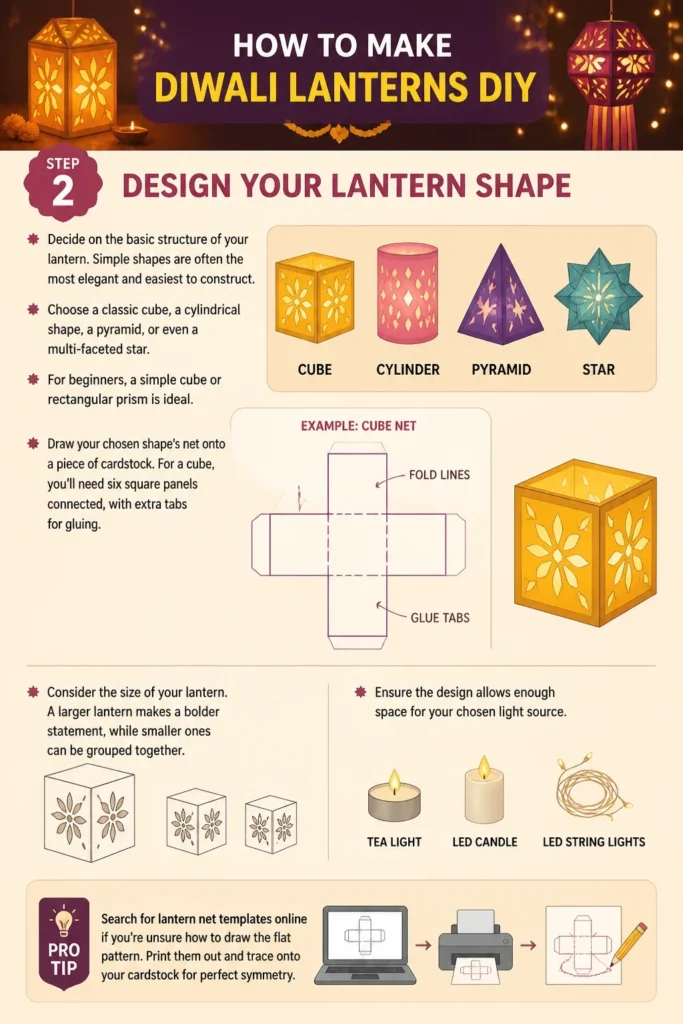
- Choose a classic cube, a cylindrical shape, a pyramid, or even a multi-faceted star. For beginners, a simple cube or rectangular prism is ideal.
- Draw your chosen shape’s net onto a piece of cardstock. For a cube, you’ll need six square panels connected, with extra tabs for gluing.
- Consider the size of your lantern. A larger lantern makes a bolder statement, while smaller ones can be grouped together. Ensure the design allows enough space for your chosen light source.
Pro Tip: Search for “lantern net templates” online if you’re unsure how to draw the flat pattern. Print them out and trace onto your cardstock for perfect symmetry.
Step 3: Cut Out the Base Structure
Precision in cutting and scoring is crucial for a neat and stable lantern.
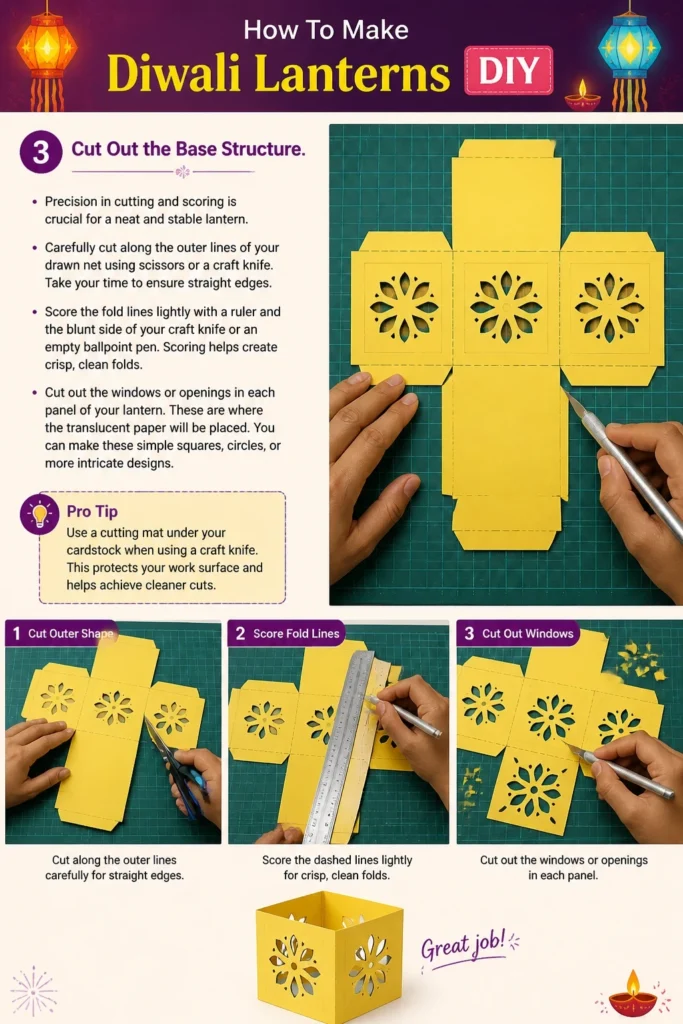
- Carefully cut along the outer lines of your drawn net using scissors or a craft knife. Take your time to ensure straight edges.
- Score the fold lines lightly with a ruler and the blunt side of your craft knife or an empty ballpoint pen. Scoring helps create crisp, clean folds.
- Cut out the “windows” or openings in each panel of your lantern. These are where the translucent paper will be placed. You can make these simple squares, circles, or more intricate designs.
Pro Tip: Use a cutting mat under your cardstock when using a craft knife. This protects your work surface and helps achieve cleaner cuts.
Step 4: Create Decorative Panels
This step adds the beautiful light-diffusing elements to your lantern.
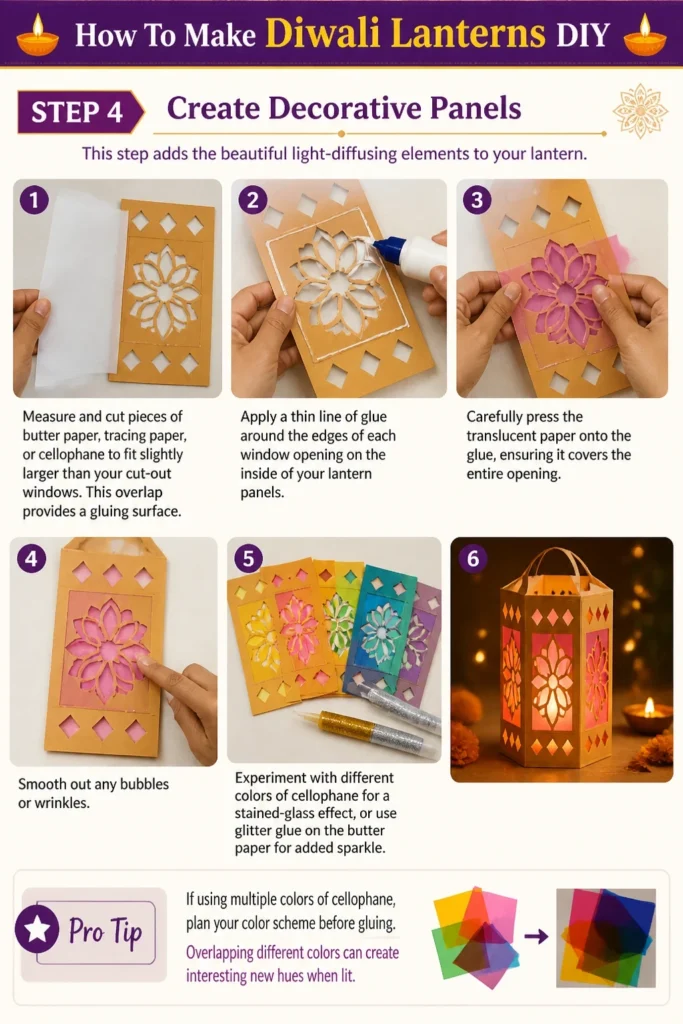
- Measure and cut pieces of butter paper, tracing paper, or cellophane to fit slightly larger than your cut-out windows. This overlap provides a gluing surface.
- Apply a thin line of glue around the edges of each window opening on the inside of your lantern panels.
- Carefully press the translucent paper onto the glue, ensuring it covers the entire opening. Smooth out any bubbles or wrinkles.
- Experiment with different colors of cellophane for a stained-glass effect, or use glitter glue on the butter paper for added sparkle.
Pro Tip: If using multiple colors of cellophane, plan your color scheme before gluing. Overlapping different colors can create interesting new hues when lit.
Step 5: Assemble the Lantern Body
Now, bring your flat pieces to life by forming the 3D structure.
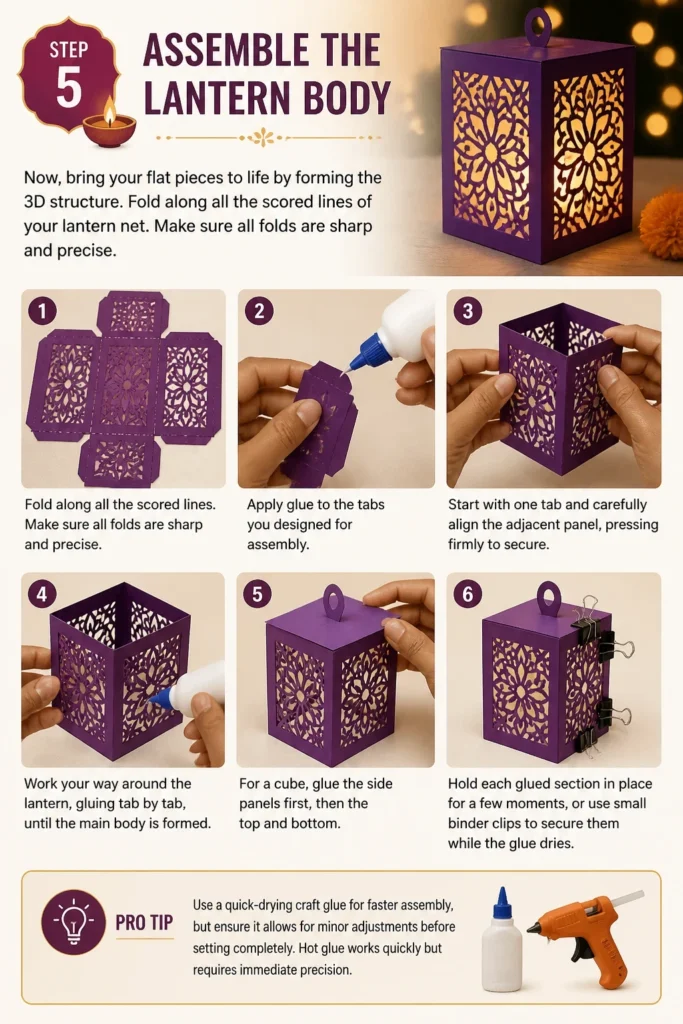
- Fold along all the scored lines of your lantern net. Make sure all folds are sharp and precise.
- Apply glue to the tabs you designed for assembly. Start with one tab and carefully align the adjacent panel, pressing firmly to secure.
- Work your way around the lantern, gluing tab by tab, until the main body is formed. For a cube, this usually involves gluing the side panels first, then the top and bottom.
- Hold each glued section in place for a few moments, or use small binder clips to secure them while the glue dries.
Pro Tip: Use a quick-drying craft glue for faster assembly, but ensure it allows for minor adjustments before setting completely. Hot glue works quickly but requires immediate precision.
Step 6: Add Hanging Mechanism
Ensure your lantern can be safely and securely displayed.
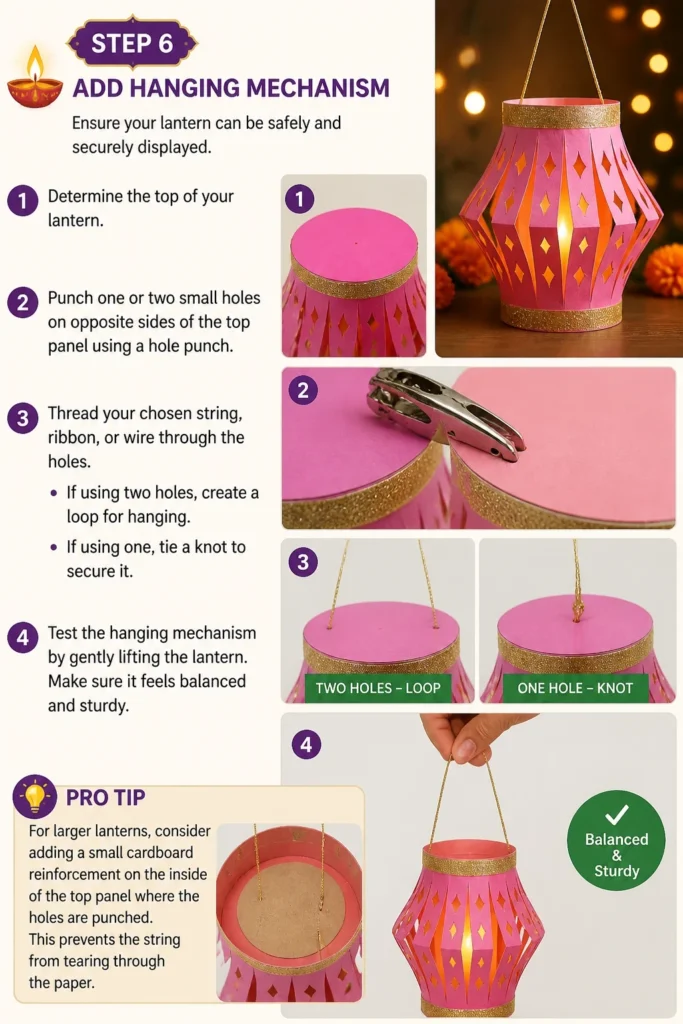
- Determine the top of your lantern. Punch one or two small holes on opposite sides of the top panel using a hole punch.
- Thread your chosen string, ribbon, or wire through the holes. If using two holes, create a loop for hanging. If using one, tie a knot to secure it.
- Test the hanging mechanism by gently lifting the lantern. Make sure it feels balanced and sturdy.
Pro Tip: For larger lanterns, consider adding a small cardboard reinforcement on the inside of the top panel where the holes are punched. This prevents the string from tearing through the paper.
Step 7: Decorate and Embellish
This is where your lantern truly becomes unique and festive.
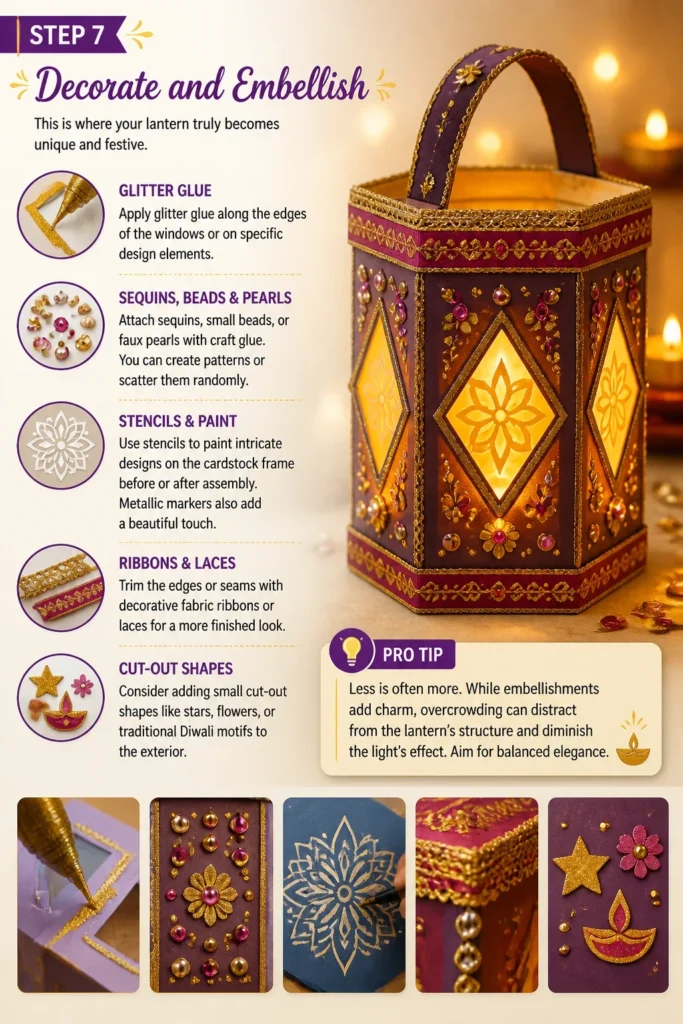
- Apply glitter glue along the edges of the windows or on specific design elements.
- Attach sequins, small beads, or faux pearls with craft glue. You can create patterns or scatter them randomly.
- Use stencils to paint intricate designs on the cardstock frame before or after assembly. Metallic markers also add a beautiful touch.
- Trim the edges or seams with decorative fabric ribbons or laces for a more finished look.
- Consider adding small cut-out shapes like stars, flowers, or traditional Diwali motifs to the exterior.
Pro Tip: Less is often more. While embellishments add charm, overcrowding can distract from the lantern’s structure and diminish the light’s effect. Aim for balanced elegance.
Step 8: Insert the Light Source
The final step brings your lantern to life with a warm, inviting glow.
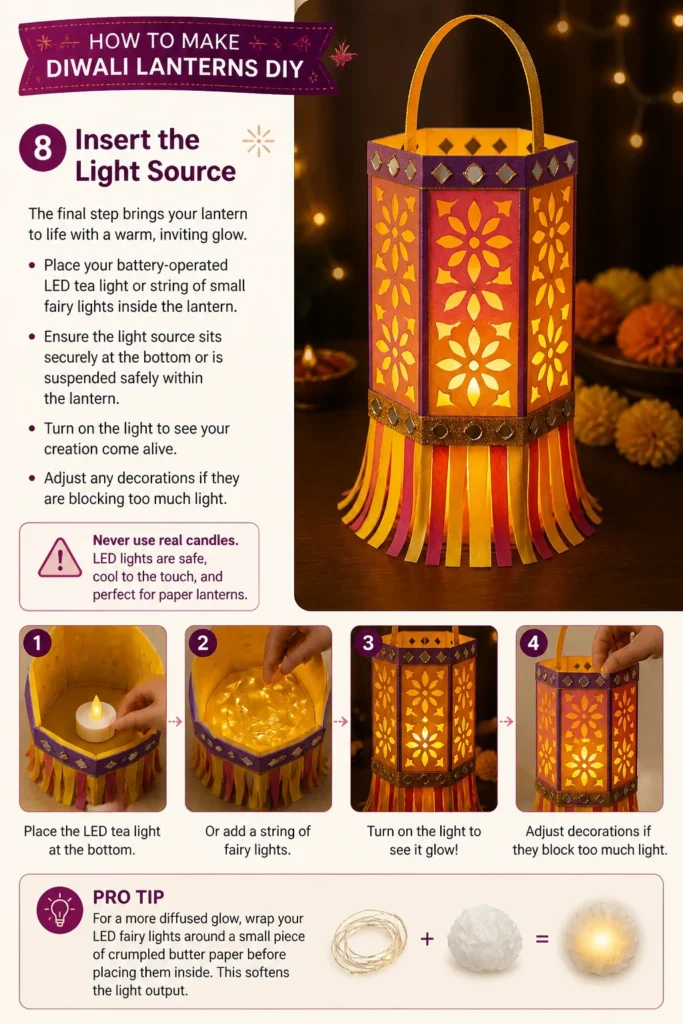
- Place your battery-operated LED tea light or string of small fairy lights inside the lantern.
- Ensure the light source sits securely at the bottom or is suspended safely within the lantern.
- Turn on the light to see your creation come alive. Adjust any decorations if they are blocking too much light.
- Never use real candles. LED lights are safe, cool to the touch, and perfect for paper lanterns.
Pro Tip: For a more diffused glow, wrap your LED fairy lights around a small piece of crumpled butter paper before placing them inside. This softens the light output.
Common Mistakes to Avoid
Using Flammable Materials
A significant risk when crafting lanterns is the potential for fire. It is crucial to always use non-flammable materials and light sources. Real candles generate heat and can easily ignite paper, leading to dangerous situations.
Always opt for battery-operated LED tea lights or small LED fairy lights. These emit no heat, making your beautiful creations safe for display indoors and out. Double-check all materials for fire safety ratings where applicable.
Rushing the Drying Process
Impatience with glue can compromise the structural integrity of your lantern. If you move or handle the lantern before the glue has fully cured, joints can weaken or come apart entirely. This results in a flimsy, unstable decoration.
Allow ample drying time for all glued sections, especially at critical structural points. Refer to your glue’s instructions for recommended drying times. Using clips or weights can help hold pieces together while they set properly.
Overloading with Decorations
While embellishments add charm, too many can make your lantern look cluttered and heavy. Excessive glitter, beads, or bulky adornments can detract from the clean lines of your design and block the light from shining through effectively.
Strive for balance and elegance. Choose a few key decorative elements and apply them thoughtfully. Let the interplay of light and shadow be the primary focus, enhancing the overall aesthetic rather than overwhelming it.
Ignoring Structural Integrity
A common oversight is neglecting the strength of the lantern’s framework. Using thin paper or insufficient glue at connection points can lead to a saggy or collapsing lantern, especially if it’s larger or has many embellishments.
Always use sturdy cardstock for the main structure. Reinforce critical joints with extra glue or small strips of paper on the inside. Ensure tabs are wide enough to provide a good gluing surface, guaranteeing your lantern stands tall and proud.
Troubleshooting
Lantern Sagging or Collapsing
If your lantern begins to sag or collapse, it often indicates weak structural points or insufficient material strength. This can happen if the cardstock is too thin for the size of the lantern or if the glue didn’t hold properly.
To fix this, identify the weak joints and reapply glue, holding the sections firmly until dry. For added support, consider gluing thin strips of cardboard or craft sticks along the inside edges of the frame to reinforce its structure. Next time, use thicker cardstock.
Light Source Not Bright Enough
Sometimes, the light emitted from inside the lantern appears dim, reducing its festive impact. This can be due to a low-powered LED, dark-colored translucent panels, or too many opaque decorations.
Try using brighter LED tea lights or a longer string of fairy lights with more bulbs. If your translucent paper is very dark, consider replacing it with lighter-colored butter paper or clear cellophane. Ensure decorations aren’t excessively blocking the light’s exit points.
Decorations Falling Off
It can be frustrating when glitter, beads, or other embellishments detach from your finished lantern. This usually happens if the wrong type of glue was used, surfaces weren’t clean, or insufficient drying time was allowed.
Reattach any fallen decorations using a strong-hold craft glue or a small dot from a hot glue gun. For future projects, ensure your surfaces are clean and dry before applying glue. Always use an adhesive specifically designed for the materials you are working with, and give it plenty of time to set.
Key Takeaways
- Always prioritize safety by using battery-operated LED lights, never real candles, to prevent fire hazards.
- Patience is essential throughout the crafting process, especially when cutting, folding, and allowing glue to dry, ensuring a strong and beautiful lantern.
- Personalize your lantern with unique colors, shapes, and embellishments to reflect your individual style and festive spirit.
- Gather all necessary materials and organize your workspace before starting to ensure a smooth and enjoyable crafting experience.
- Accurate measuring and precise cutting are fundamental for achieving clean lines and a structurally sound, well-proportioned lantern.
Frequently Asked Questions
What kind of paper is best for making Diwali lanterns?
For the main frame, sturdy cardstock (around 65-80 lb or 176-216 gsm) is ideal as it provides good structural support. For the translucent window panels, butter paper, tracing paper, or colorful cellophane sheets work wonderfully, allowing light to shine through while diffusing it softly.
Can children help make these lanterns?
Absolutely! Making Diwali lanterns is a fantastic family activity. Children can assist with tracing, gluing, and decorating. Adult supervision is recommended, especially when using scissors or craft knives, and always when handling hot glue guns to ensure safety.
How long do these handmade lanterns typically last?
With proper care and storage, a well-made paper Diwali lantern can last for several festive seasons. Store them in a dry, dust-free place, preferably in a box to protect them from getting crushed or damaged. Avoid exposure to moisture or direct sunlight for prolonged periods.
Can I use real candles inside my Diwali lantern?
No, it is critically important to never use real candles inside paper lanterns. Real candles produce heat and an open flame, posing a severe fire risk with paper materials. Always use battery-operated LED tea lights or small LED fairy lights, which are safe, cool, and provide a lovely glow.
Our Top Recommended Finds
- Craft Cardstock Assortment: Offers a wide variety of vibrant colors and suitable thickness, perfect for creating sturdy and eye-catching lantern frames.
- Battery-Operated LED Tea Lights: These provide a safe, warm, and long-lasting glow, ideal for illuminating your handmade lanterns without any fire risk.
- Precision Craft Knife Set with Cutting Mat: Essential for intricate cuts and achieving clean, professional-looking edges, making your lantern details truly stand out.
Illuminate Your Diwali with Handmade Charm
Crafting your own Diwali lanterns is more than just a DIY project; it’s an act of love and tradition. Each fold and every decoration you add imbues your home with a unique, personal glow.
Imagine the smiles as your family gathers around these radiant creations, knowing they were made with care. These lanterns carry stories, memories, and the true spirit of the festival of lights.
Don’t wait for the last minute. Gather your materials today and start building your own luminous Diwali magic. Your efforts will undoubtedly make this year’s celebrations shine brighter than ever.
Beginner-friendly templates, step-by-step guides,
and weekly project ideas in your inbox.