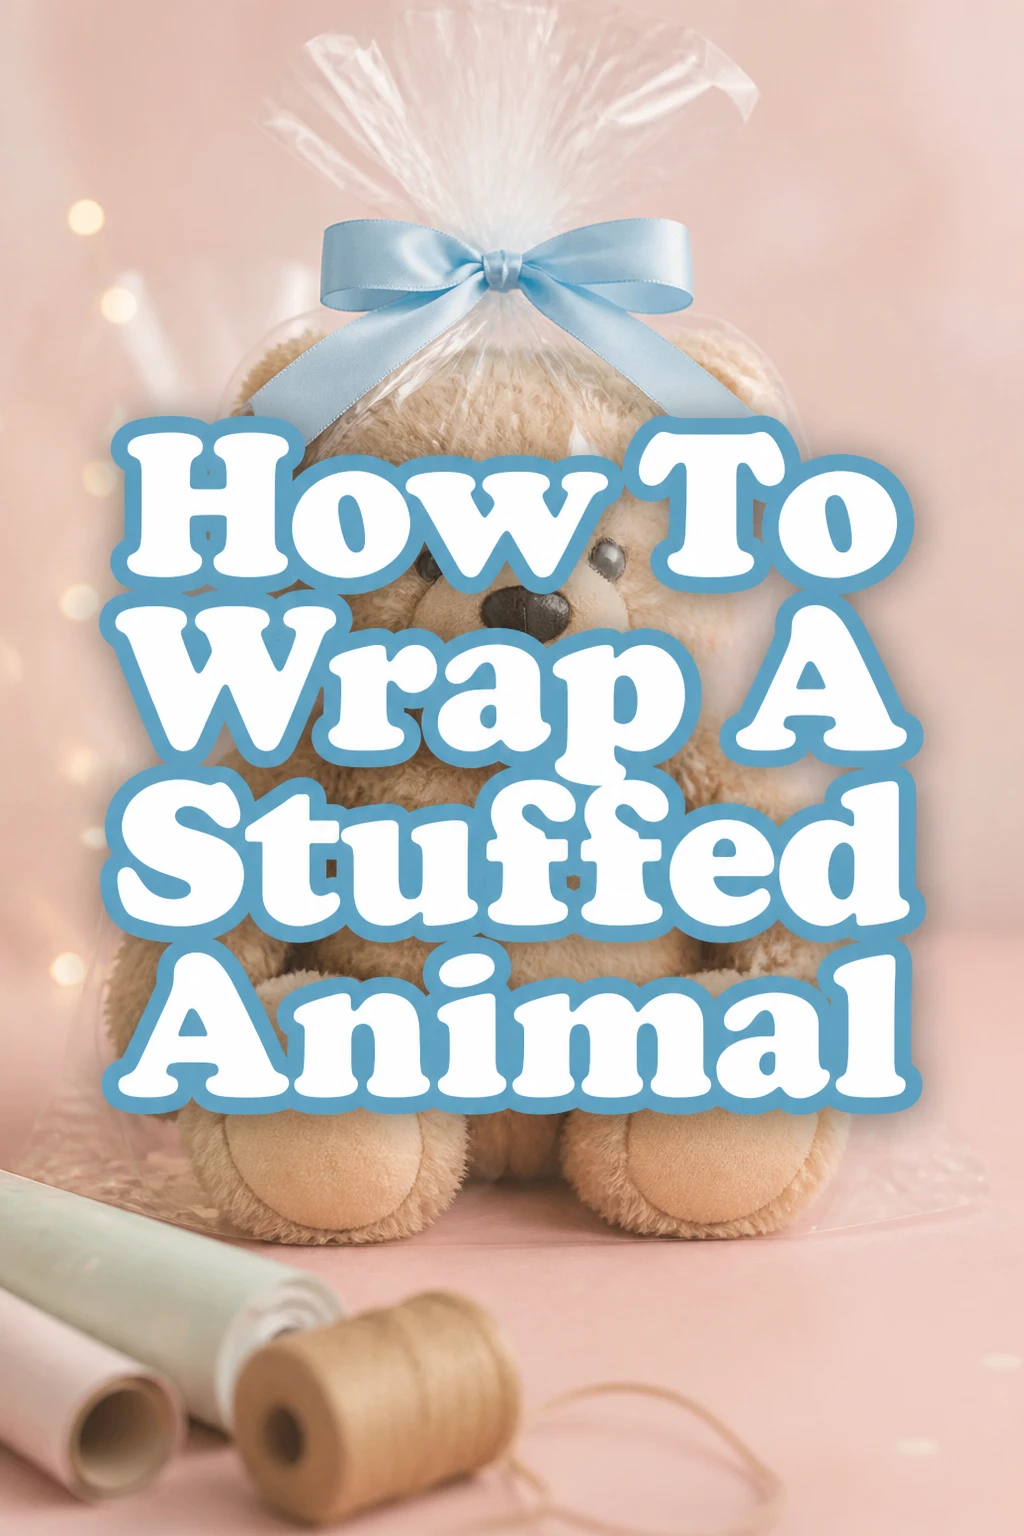
How To Wrap A Stuffed Animal

Beginner-friendly templates, step-by-step guides,
and weekly project ideas in your inbox.
Wrapping a gift that has no flat surfaces or straight edges can feel like a frustrating puzzle.
I have spent years working in a boutique toy store where I wrapped thousands of teddy bears, dinosaurs, and floppy bunnies for eager customers.
This guide will teach you the professional techniques I used to make every plush toy look like a masterpiece under the tree.
Quick Overview
You will learn how to master the candy-roll technique, which is the most reliable way to handle irregular shapes. This method hides the lumpy parts of the toy while creating a festive, symmetrical look.
- Time needed: 15-20 minutes
- Difficulty: Beginner
- What you’ll need: Heavyweight wrapping paper, double-sided tape, sharp scissors, ribbon, and tissue paper.
Step-by-Step Instructions
Step 1: Prepare the Plush Toy
Inspect the stuffed animal for any loose threads or price tags that need to be removed before you begin. If the toy has long, floppy limbs or a tail, gently tuck them toward the center of the body to create a more compact shape.
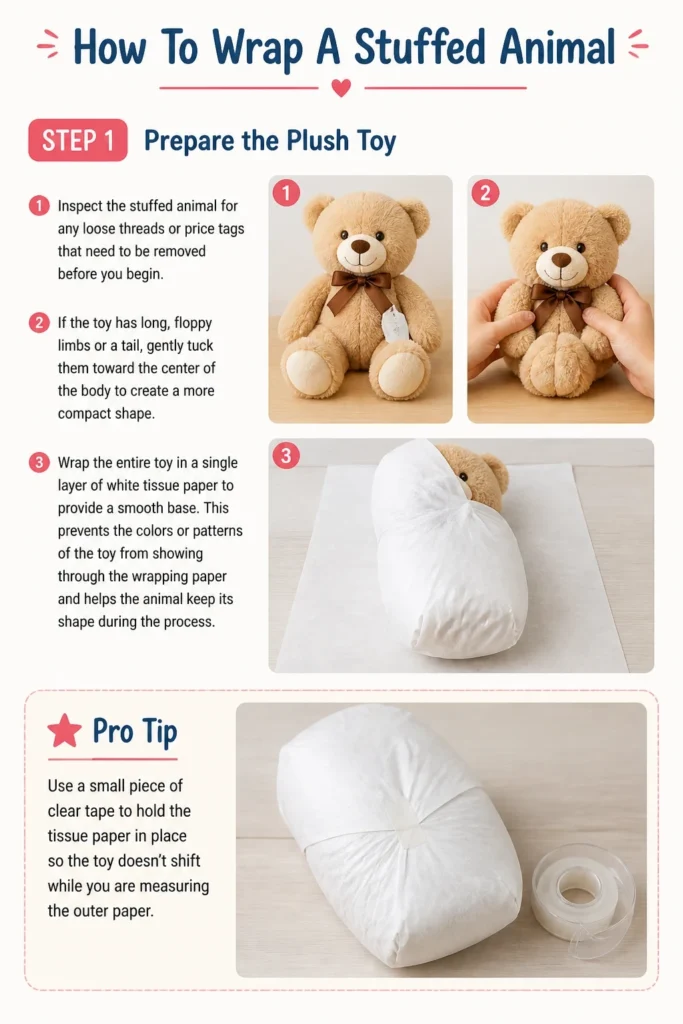
Wrap the entire toy in a single layer of white tissue paper to provide a smooth base. This prevents the colors or patterns of the toy from showing through the wrapping paper and helps the animal keep its shape during the process.
Pro Tip: Use a small piece of clear tape to hold the tissue paper in place so the toy doesn’t shift while you are measuring the outer paper.
Step 2: Measure the Wrapping Paper
Lay your wrapping paper out on a flat, hard surface like a kitchen table or a hardwood floor. Place the stuffed animal in the center of the paper to gauge how much material you will actually need.
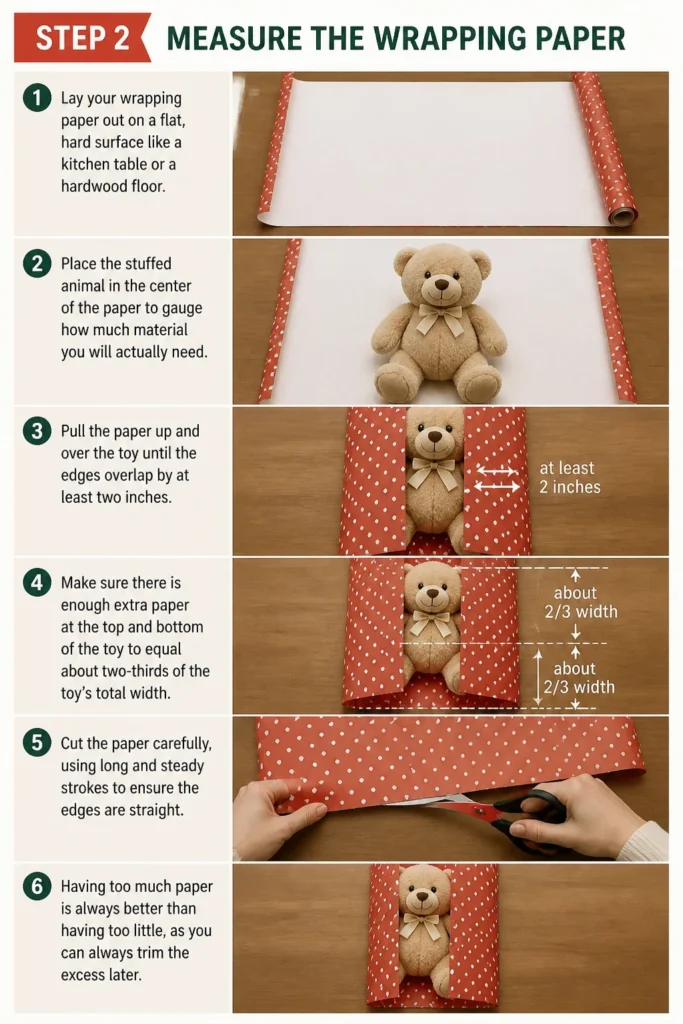
Pull the paper up and over the toy until the edges overlap by at least two inches. Make sure there is enough extra paper at the top and bottom of the toy to equal about two-thirds of the toy’s total width.
Cut the paper carefully, using long and steady strokes to ensure the edges are straight. Having too much paper is always better than having too little, as you can always trim the excess later.
Step 3: Create the Central Cylinder
Position the stuffed animal face down in the middle of the cut paper. Pull the left side of the paper over the toy, then fold the right side over to meet it in the center.
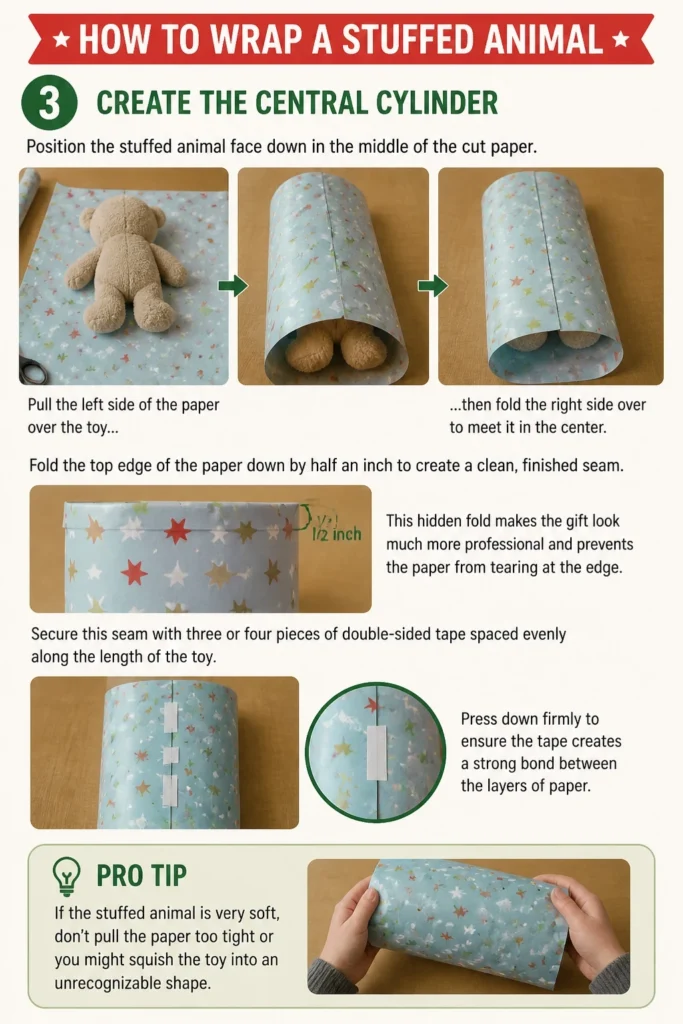
Fold the top edge of the paper down by half an inch to create a clean, finished seam. This hidden fold makes the gift look much more professional and prevents the paper from tearing at the edge.
Secure this seam with three or four pieces of double-sided tape spaced evenly along the length of the toy. Press down firmly to ensure the tape creates a strong bond between the layers of paper.
Pro Tip: If the stuffed animal is very soft, don’t pull the paper too tight or you might squish the toy into an unrecognizable shape.
Step 4: Crimp the Bottom End
Gather the excess paper at the bottom of the toy slowly with both hands. You want to pinch the paper toward the center point, creating accordion-style pleats as you go.
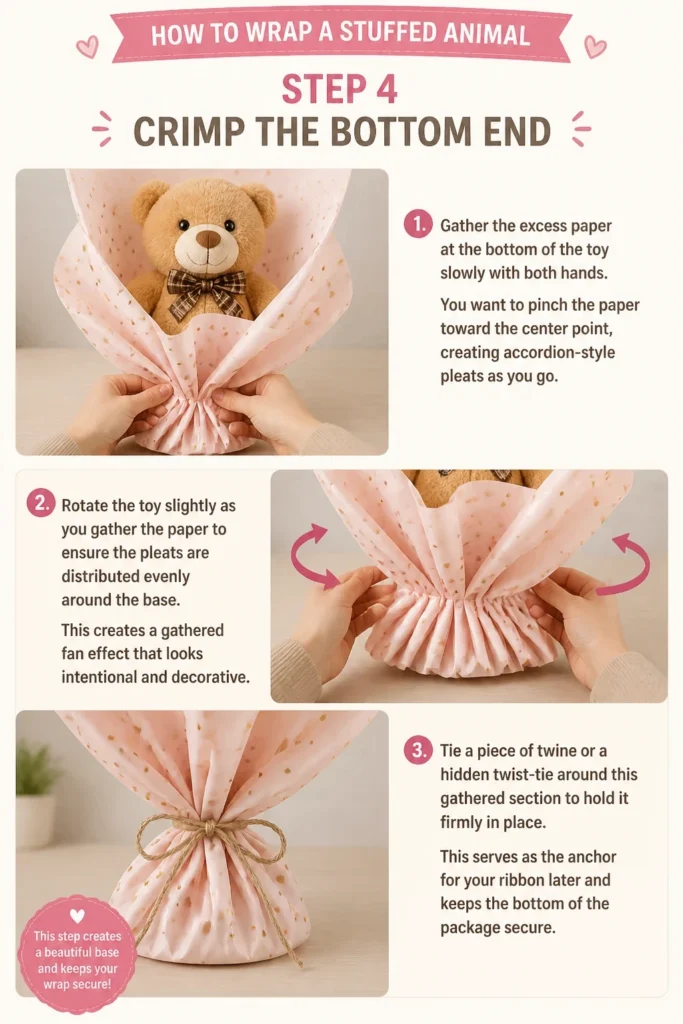
Rotate the toy slightly as you gather the paper to ensure the pleats are distributed evenly around the base. This creates a gathered “fan” effect that looks intentional and decorative.
Tie a piece of twine or a hidden twist-tie around this gathered section to hold it firmly in place. This serves as the anchor for your ribbon later and keeps the bottom of the package secure.
Step 5: Shape the Top End
Stand the package upright on its gathered base to allow gravity to help you settle the toy. Reach inside the open top end and gently adjust the stuffed animal so it sits straight within the paper cylinder.
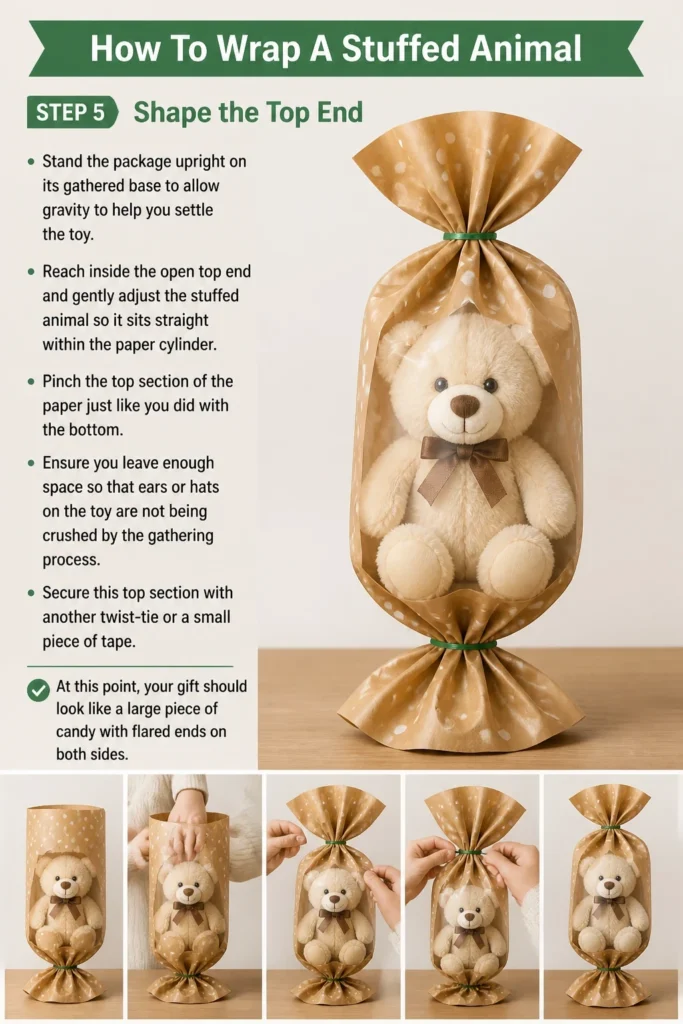
Pinch the top section of the paper just like you did with the bottom. Ensure you leave enough space so that ears or hats on the toy are not being crushed by the gathering process.
Secure this top section with another twist-tie or a small piece of tape. At this point, your gift should look like a large piece of candy with flared ends on both sides.
Step 6: Trim and Fluff the Ends
Examine the flared ends of the paper to see if they are the same length. Use your scissors to trim any uneven edges so the top and bottom flares look symmetrical.
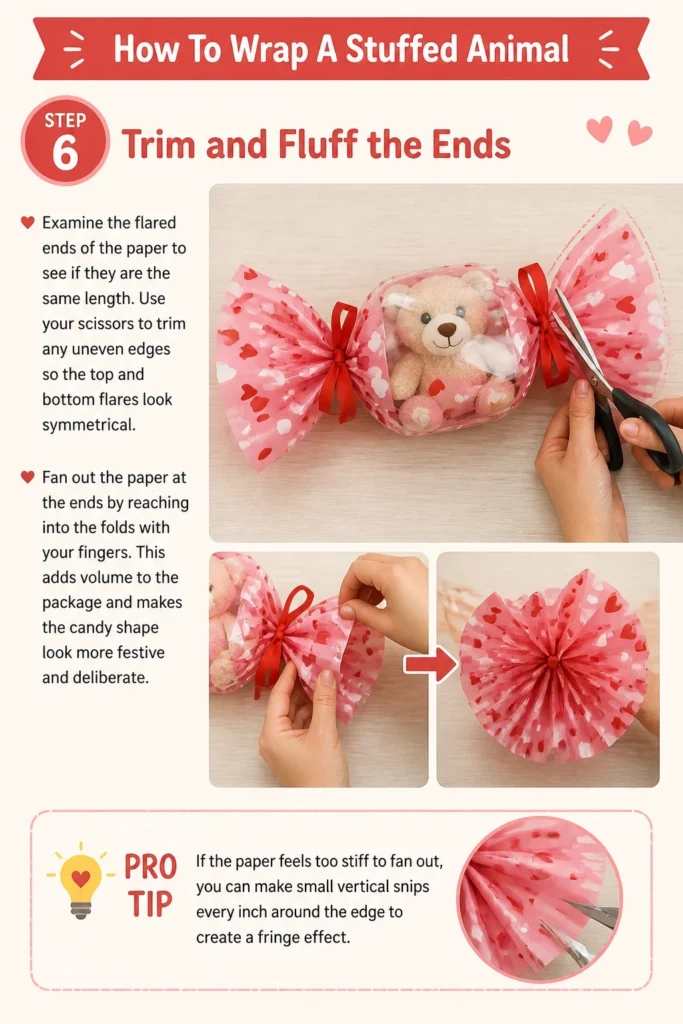
Fan out the paper at the ends by reaching into the folds with your fingers. This adds volume to the package and makes the “candy” shape look more festive and deliberate.
Pro Tip: If the paper feels too stiff to fan out, you can make small vertical snips every inch around the edge to create a fringe effect.
Step 7: Add Decorative Ribbons
Select a wide, wired ribbon that complements the colors of your wrapping paper. Wired ribbon is much easier to work with because it holds its shape and won’t go limp after you tie the bow.
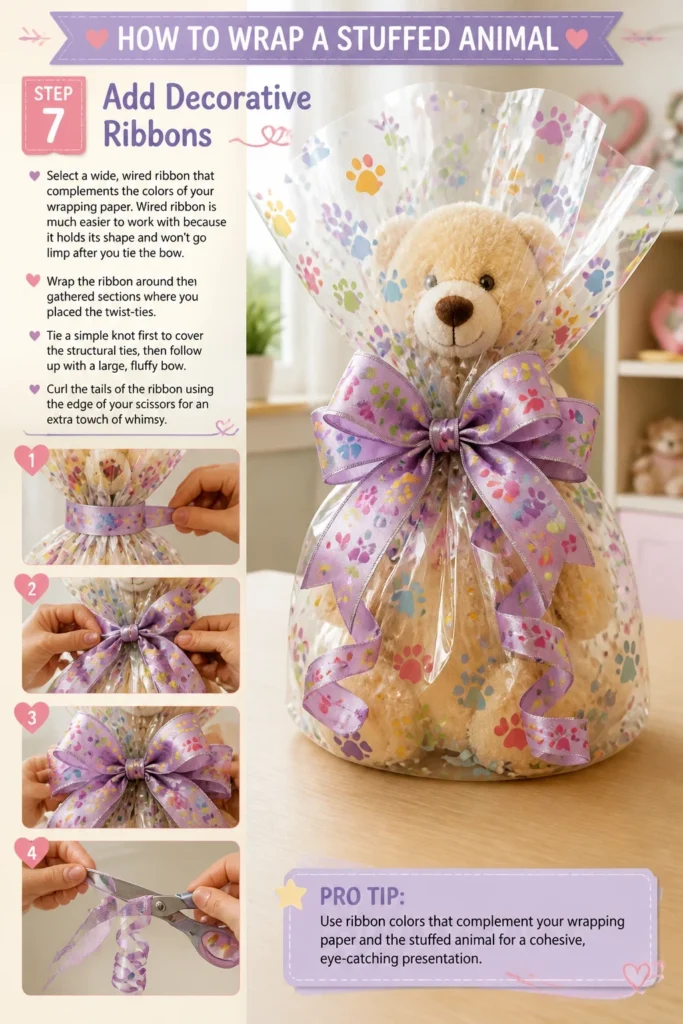
Wrap the ribbon around the gathered sections where you placed the twist-ties. Tie a simple knot first to cover the structural ties, then follow up with a large, fluffy bow.
Curl the tails of the ribbon using the edge of your scissors for an extra touch of whimsy. This draws the eye away from the lumpy center of the gift and toward the beautiful decorations.
Common Mistakes to Avoid
Using Thin or Cheap Paper
Inexpensive wrapping paper is often very thin and tears easily when you try to gather it around a soft object. The limbs or ears of a stuffed animal can easily poke holes through low-quality paper during the wrapping process. Invest in a heavy-duty, premium paper that can withstand the tension of being pleated and tied.
Applying Too Much Tape
Covering the entire gift in clear tape can make the package look messy and difficult to open. It also makes the paper rigid, which prevents it from conforming to the soft curves of the plush toy. Stick to double-sided tape hidden within the seams to maintain a clean and elegant appearance.
Ignoring the Orientation
If you wrap the toy upside down or sideways, the recipient might accidentally squeeze the head or eyes when they pick up the gift. Always mark which side is the “top” so that the gift is handled correctly. This also ensures that any patterns on the paper are facing the right direction when the gift is displayed.
Troubleshooting
The Paper is Tearing at the Corners
If the stuffed animal has hard plastic parts like eyes or a nose, these can create pressure points that tear the paper. To fix this, place a small square of cardstock or a thick layer of tissue paper over the hard part before wrapping. This creates a buffer that distributes the pressure and protects the outer wrapping paper.
The Toy is Too Floppy to Stand Up
Some stuffed animals are very understuffed and won’t hold the cylinder shape of the paper. You can solve this by placing a piece of cardboard at the bottom of the paper tube to act as a base. This gives the gift a flat bottom and helps the entire package maintain its structure while it sits under a tree.
The Ends Look Flat and Lifeless
If your flared ends look crushed, it usually means the paper is too long or too heavy. Trim an inch off the ends and use your fingers to gently pull the pleats outward. You can also tuck a few sheets of contrasting colored tissue paper into the ends to add volume and a pop of color.
Key Takeaways
- Always use a layer of tissue paper first to smooth out the bumps and protect the toy.
- The candy-roll method is the most effective way to wrap irregular shapes without a box.
- Heavyweight paper is essential for preventing tears and maintaining the structure of the gift.
- Double-sided tape provides a professional, “invisible” finish to your seams.
- Wired ribbons help maintain the festive look and hide the structural ties at the ends.
- Symmetry in the flared ends is the secret to making the gift look professionally wrapped.
Frequently Asked Questions
Can I wrap a very large stuffed animal this way?
Yes, but you may need to tape two sheets of wrapping paper together to get the necessary width. For giant plushies, the candy-roll method is often the only way to wrap them without using an expensive, oversized box. Make sure you use extra-thick ribbon to support the weight of the larger paper flares.
What if I don’t have any ribbon?
You can use strips of leftover wrapping paper or even colorful yarn to tie the ends. If you use paper strips, fold them into thirds to make them stronger and more durable. You can also use colorful rubber bands as a temporary hold while you find a decorative alternative.
Is it better to just use a gift bag?
Gift bags are faster, but they don’t provide the same sense of mystery and excitement as a wrapped gift. A wrapped stuffed animal allows the recipient to feel the soft texture through the paper without knowing exactly what is inside. However, if the toy is extremely fragile or has delicate accessories, a gift bag with plenty of tissue paper might be safer.
How do I wrap a stuffed animal with a long tail?
The best approach is to wrap the tail around the animal’s body and secure it with a small piece of painter’s tape. This turns the toy into a more manageable oval shape. Once the gift is opened, the tape can be removed easily without damaging the fur or fabric of the toy.
Our Top Recommended Finds
- Double-Sided Adhesive Tape: This is the secret weapon of professional gift wrappers because it disappears completely between layers of paper.
- Heavyweight Kraft Paper: This paper is thick enough to hold its shape around lumpy objects and comes in many festive patterns.
- Wired Satin Ribbon: This type of ribbon allows you to sculpt perfect bows that won’t flatten out under the weight of other gifts.
Mastering The Art Of The Gift
Now that you have the skills to wrap a stuffed animal perfectly, you can tackle any oddly shaped gift with confidence. The candy-roll technique is a versatile skill that works for everything from footballs to rolled-up sweaters.
Consider experimenting with different textures of paper, such as metallic foils or matte finishes, to see how they change the look of the gathered ends. You might also want to explore adding a small sprig of evergreen or a candy cane to the ribbon for a seasonal touch.
Take a moment today to practice on a plush toy you already have at home so you are ready for the next birthday or holiday. Your friends and family will be impressed by your professional-looking presents and the care you put into the presentation.
Beginner-friendly templates, step-by-step guides,
and weekly project ideas in your inbox.