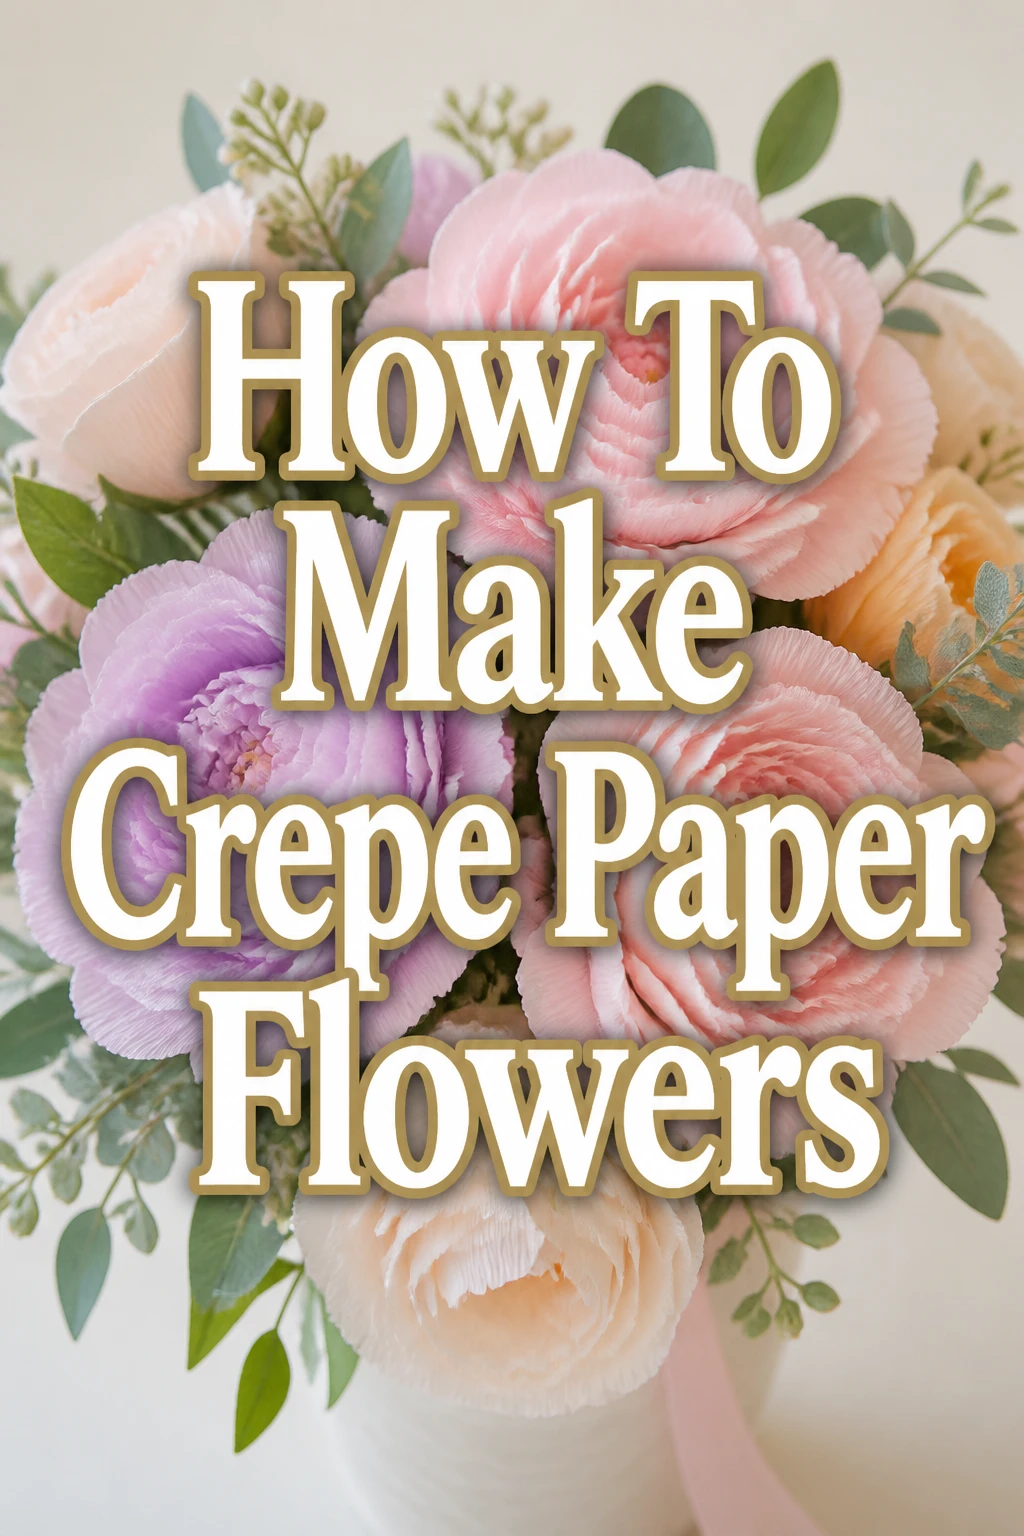
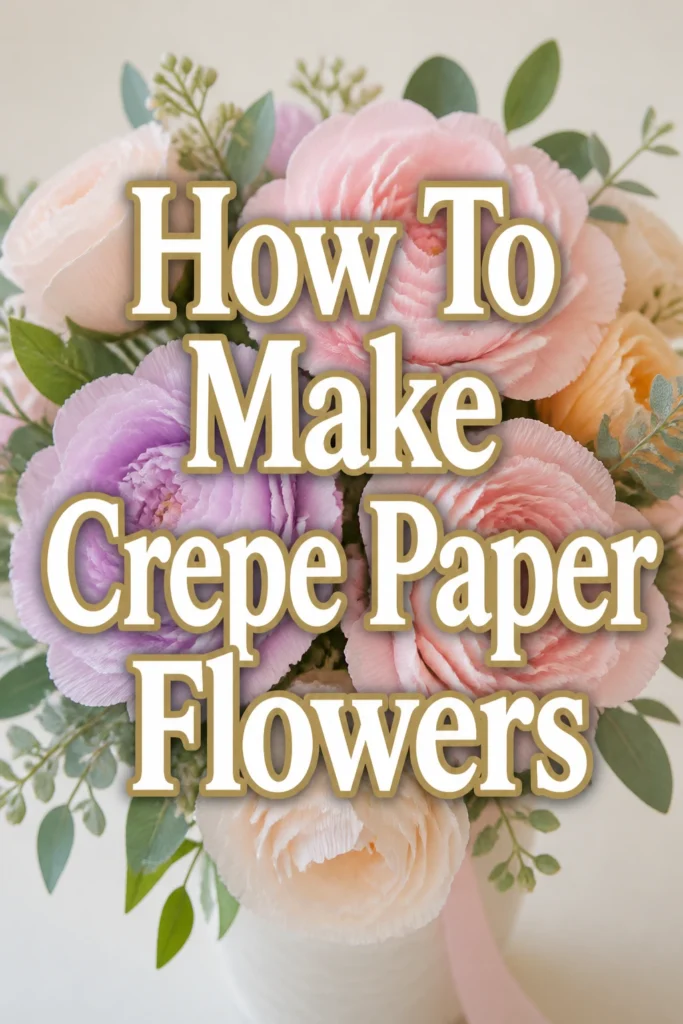
How To Make Crepe Paper Flowers

Beginner-friendly templates, step-by-step guides,
and weekly project ideas in your inbox.
There’s a unique magic in transforming simple sheets of paper into delicate, lifelike blossoms.
The satisfaction of holding a beautiful flower you crafted with your own hands is truly unmatched.
I’ve spent countless hours in my own craft space, perfecting these techniques, and I’m thrilled to share a straightforward path for you to create your own stunning blooms.
Quick Overview
This guide will lead you through the process of crafting exquisite crepe paper flowers, turning basic materials into lasting works of art.
You’ll learn to shape, assemble, and refine your creations, resulting in a beautiful, personalized floral display.
- Time needed: 1-3 hours per flower (depending on complexity and size)
- Difficulty: Beginner to Intermediate
- What you’ll need: Crepe paper, scissors, floral wire, glue, ruler, pencil
Step-by-Step Instructions
Step 1: Gather Your Essential Materials
Before beginning any creative project, it is crucial to collect all your necessary supplies. Having everything within reach will ensure a smooth and enjoyable crafting experience.
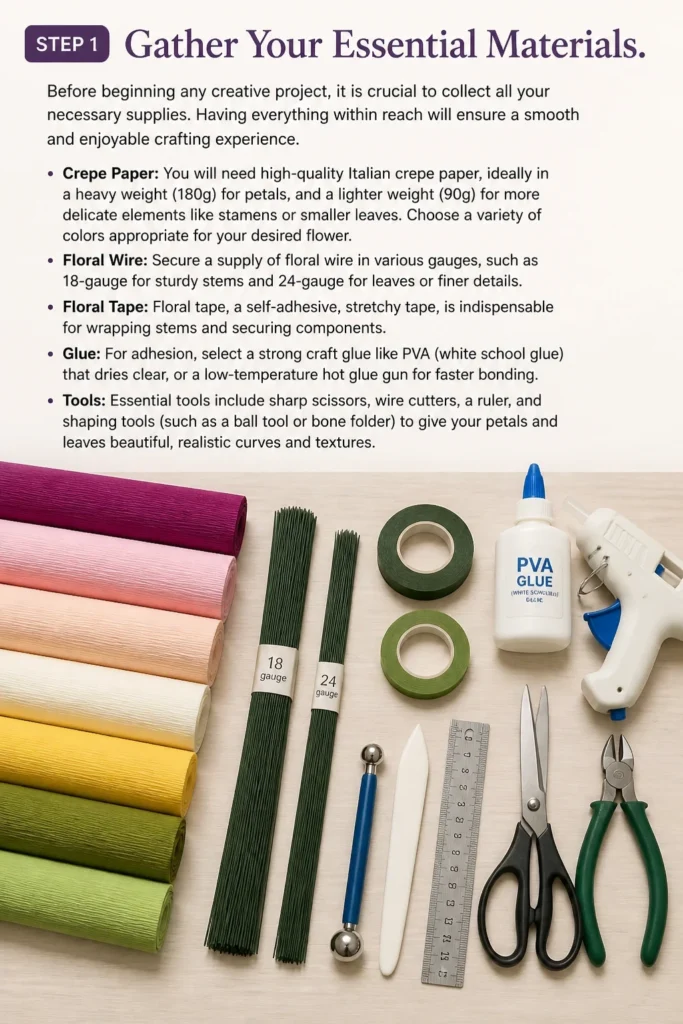
You will need high-quality Italian crepe paper, ideally in a heavy weight (180g) for petals, and a lighter weight (90g) for more delicate elements like stamens or smaller leaves. Choose a variety of colors appropriate for your desired flower.
Next, secure a supply of floral wire in various gauges, such as 18-gauge for sturdy stems and 24-gauge for leaves or finer details. Floral tape, a self-adhesive, stretchy tape, is indispensable for wrapping stems and securing components.
For adhesion, select a strong craft glue like PVA (white school glue) that dries clear, or a low-temperature hot glue gun for faster bonding. Ensure you have sharp scissors, a ruler, a pencil, and wire cutters ready.
Pro Tip: Investing in good quality Italian crepe paper makes a significant difference. Its superior stretch and vibrant colors will elevate the realism and durability of your finished flowers.
Step 2: Prepare Your Petal Templates
The foundation of a beautiful crepe paper flower lies in its petal shapes. First, decide on the type of flower you wish to create, such as a classic rose, a fluffy peony, or a delicate ranunculus.
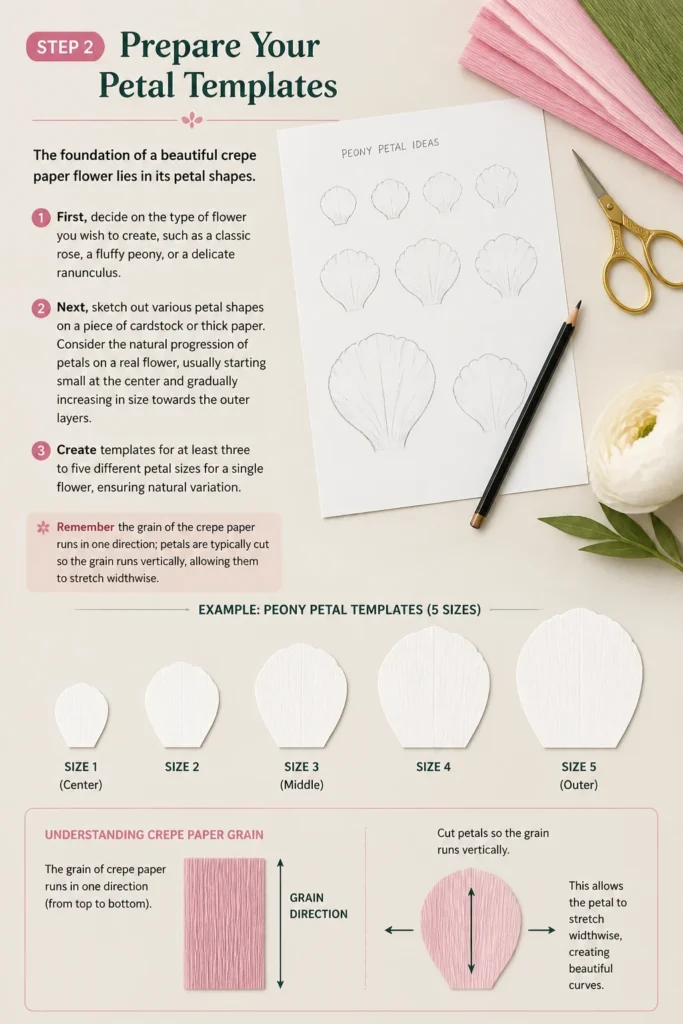
Next, sketch out various petal shapes on a piece of cardstock or thick paper. Consider the natural progression of petals on a real flower, usually starting small at the center and gradually increasing in size towards the outer layers.
Create templates for at least three to five different petal sizes for a single flower, ensuring natural variation. Remember the grain of the crepe paper runs in one direction; petals are typically cut so the grain runs vertically, allowing them to stretch widthwise.
Step 3: Cut Your Petals and Leaves
With your templates ready, it’s time to cut your crepe paper. Lay your chosen crepe paper flat, ensuring the grain runs in the direction you want the petals to stretch (usually across the width of the petal).
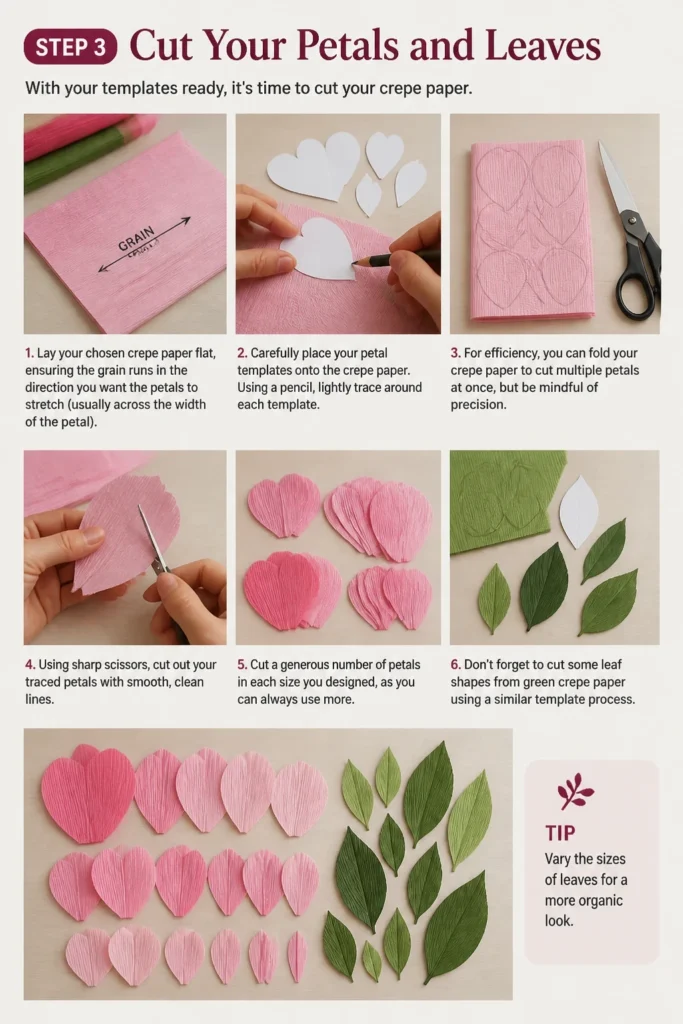
Carefully place your petal templates onto the crepe paper. Using a pencil, lightly trace around each template. For efficiency, you can fold your crepe paper to cut multiple petals at once, but be mindful of precision.
Using sharp scissors, cut out your traced petals with smooth, clean lines. Avoid jagged edges, as these will be noticeable in the final flower. Cut a generous number of petals in each size you designed, as you can always use more.
Don’t forget to cut some leaf shapes from green crepe paper using a similar template process. Vary the sizes of leaves for a more organic look.
Step 4: Shape the Petals for Realism
This step is where your flat paper pieces transform into lifelike petals. Gently stretch the center of each petal, using your thumbs, to create a subtle cup shape. This stretching action is crucial for giving the petals their natural curve and dimension.
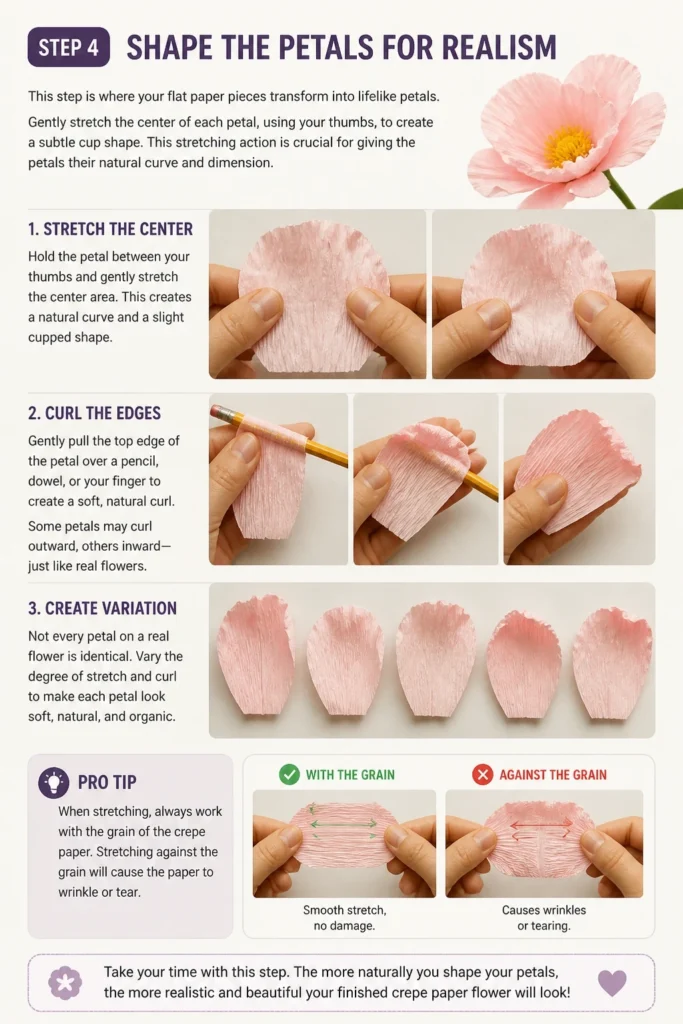
Next, curl the top edges of the petals. You can achieve this by gently pulling the edge over a pencil, a dowel, or even your finger. Some petals might need a slight outward curl, while others might curl inwards.
Experiment with different degrees of stretch and curl. Not every petal on a real flower is identical, so embrace slight variations in your shaping. The goal is to make each petal appear soft and organic, not stiff.
Pro Tip: When stretching, always work with the grain of the crepe paper. Stretching against the grain will cause the paper to tear rather than expand gracefully. Gentle pressure is key.
Step 5: Create the Flower Center
The core of your flower requires careful construction. For many flowers, you’ll begin by creating a small, bud-like center. This can be a small piece of crepe paper rolled tightly, or a cotton ball wrapped in a small square of crepe paper.
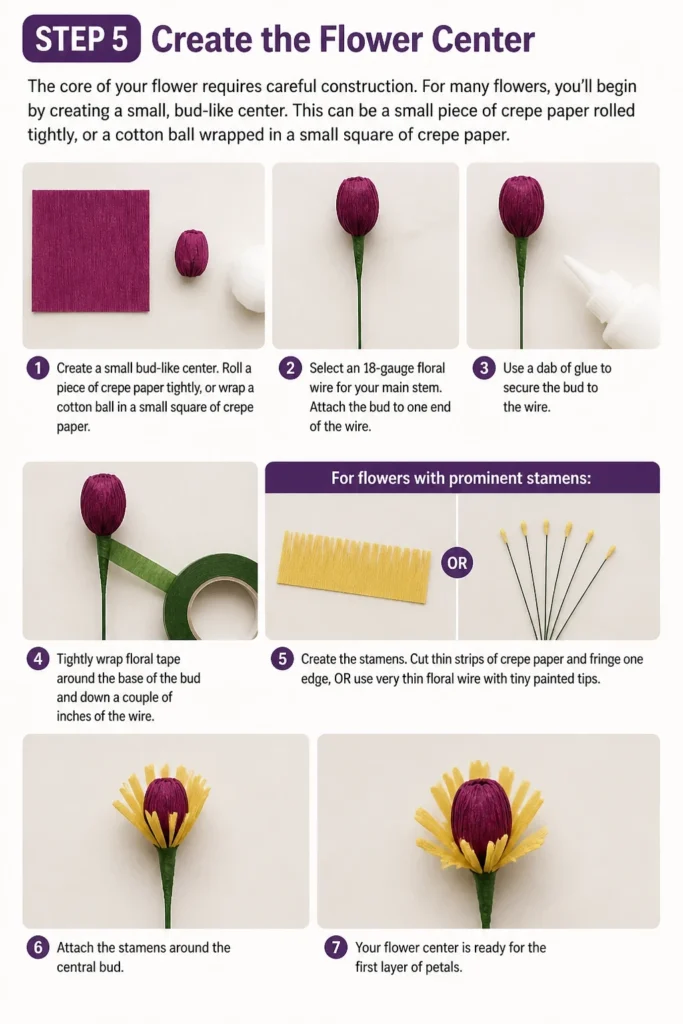
Next, select a length of floral wire, typically an 18-gauge, for your main stem. Attach your prepared bud to one end of this wire. You can use a dab of glue to secure it, then tightly wrap floral tape around the base of the bud and down a couple of inches of the wire.
For flowers with prominent stamens, create them by cutting thin strips of crepe paper, fringing one edge, or using very thin floral wire with tiny painted tips. Attach these stamens around your central bud before adding the first layer of petals.
Step 6: Assemble the Petals Layer by Layer
Now, the magic of assembly begins. Start with your smallest petals. Apply a tiny dab of craft glue to the very base of the first petal. Attach it securely around your prepared flower center or stamens.
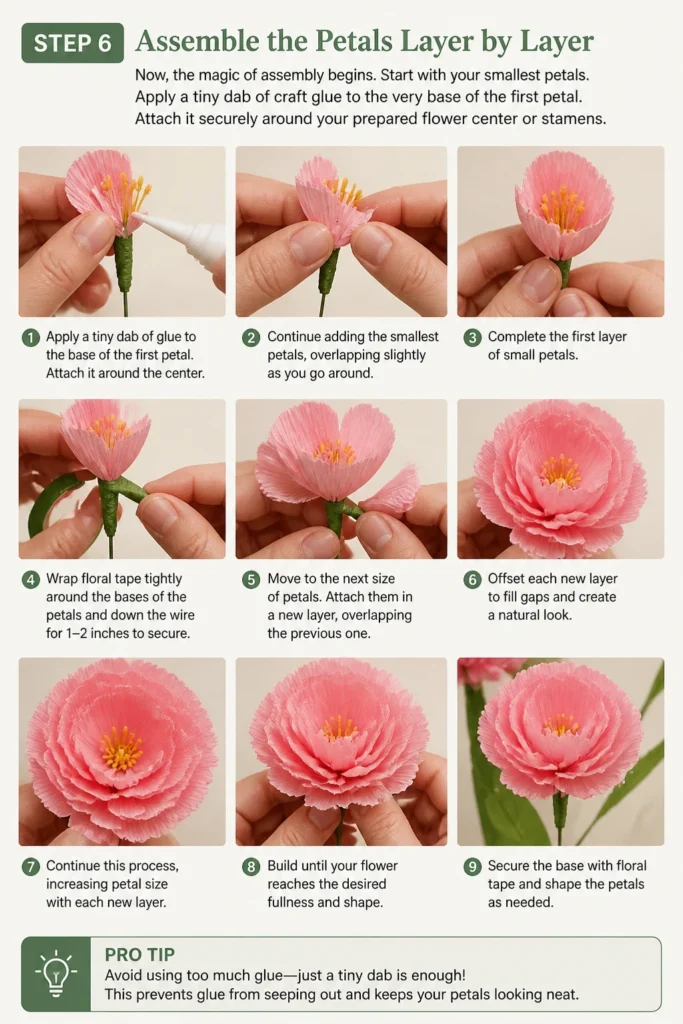
Continue to add the smallest petals, overlapping them slightly as you work your way around the center. Maintain a natural, organic spacing. Once a full layer is complete, wrap floral tape tightly around the bases of these petals and down the wire for an inch or two to secure them firmly.
Gradually move to the next size of petals. Attach these in subsequent layers, ensuring each new layer slightly overlaps the previous one and is offset to fill any gaps. Continue this process, increasing petal size with each new layer, until your flower reaches the desired fullness.
Pro Tip: Avoid using too much glue. Excess glue can make the paper stiff and visible. A small, precise dab is usually sufficient for a strong bond. Work quickly if using hot glue.
Step 7: Add Leaves and Finish the STEM
To give your flower a natural and complete appearance, it’s time to incorporate leaves. Cut out various leaf shapes from green crepe paper, remembering to consider the paper’s grain for a natural stretch.
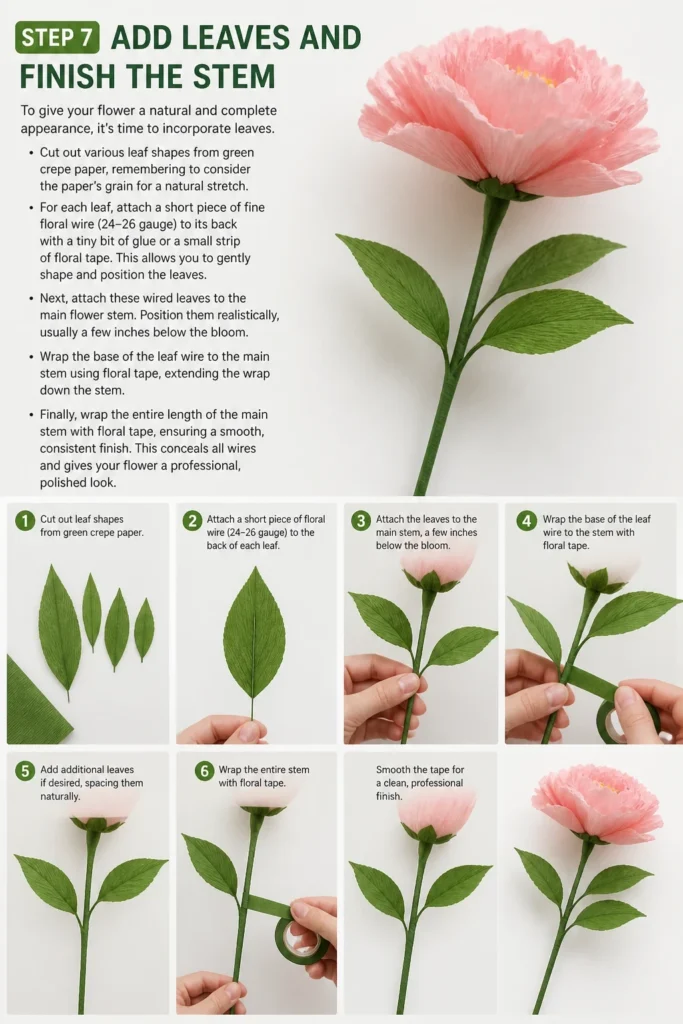
For each leaf, attach a short piece of fine floral wire (24-26 gauge) to its back with a tiny bit of glue or a small strip of floral tape. This allows you to gently shape and position the leaves.
Next, attach these wired leaves to the main flower stem. Position them realistically, usually a few inches below the bloom. Wrap the base of the leaf wire to the main stem using floral tape, extending the wrap down the stem.
Finally, wrap the entire length of the main stem with floral tape, ensuring a smooth, consistent finish. This conceals all wires and gives your flower a professional, polished look.
Step 8: Final Adjustments and Flourishes
Your flower is almost complete, but a few final touches can make all the difference. Gently coax and open the petals, adjusting their angles and curves to achieve a natural, blossoming appearance.
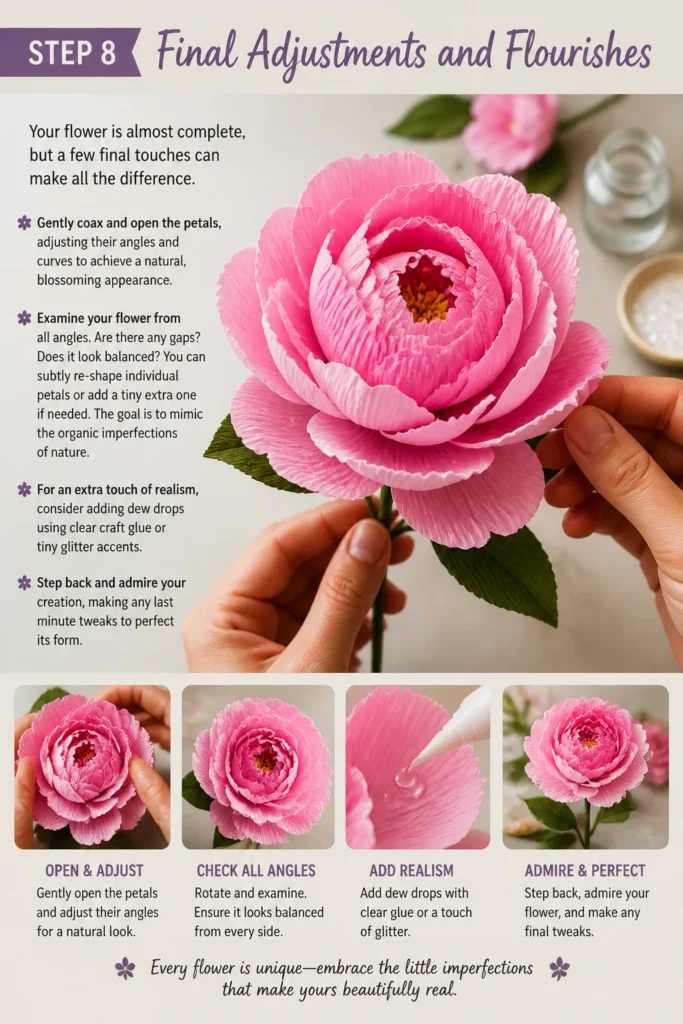
Examine your flower from all angles. Are there any gaps? Does it look balanced? You can subtly re-shape individual petals or add a tiny extra one if needed. The goal is to mimic the organic imperfections of nature.
For an extra touch of realism, consider adding dew drops using clear craft glue or tiny glitter accents. Step back and admire your creation, making any last minute tweaks to perfect its form.
Common Mistakes to Avoid
Ignoring the Grain of the Paper
One of the most frequent errors beginners make is not paying attention to the grain of the crepe paper. Crepe paper has a distinct grain that runs in one direction, determining how it stretches. If you cut petals with the grain running horizontally, they won’t stretch properly and will likely tear when you try to shape them.
Always ensure your petal templates are aligned so that the crepe paper’s grain runs vertically down the petal. This allows the petal to stretch widthwise, creating the beautiful, organic cup shape essential for realistic flowers.
Using Too Much Glue
Applying an excessive amount of glue is another common pitfall. Too much glue can seep through the crepe paper, creating hard, visible spots that detract from the delicate appearance of the petals. It also adds unnecessary bulk and can make the flower feel stiff and unnatural.
Instead, use tiny, precise dabs of glue. If using PVA glue, allow a moment for it to become tacky before pressing petals together. For hot glue, a very small bead applied quickly is sufficient. Less is definitely more when it comes to adhesives in crepe paper crafting.
Cutting Identical Petals
While templates provide a guide, cutting every single petal to be exactly the same size and shape will result in a flower that looks artificial and manufactured. Real flowers exhibit natural variation in their petals, even within the same bloom.
Embrace slight differences. Use templates of varying sizes and don’t be afraid to make minor adjustments as you cut. This natural irregularity will add depth, realism, and charm to your finished crepe paper flowers.
Rushing the Shaping Process
The shaping of petals is arguably the most artistic part of making crepe paper flowers, and rushing it can lead to flat or torn petals. Aggressive stretching or curling can damage the delicate paper, ruining the petal.
Take your time with each petal. Apply gentle, even pressure when stretching the center. Use a slow, controlled motion when curling edges. Practice on scrap pieces of crepe paper to get a feel for its elasticity and limits before working on your actual petals.
Troubleshooting
Petals Tearing When Stretched
If your petals are consistently tearing when you try to stretch them, the most likely culprit is incorrect grain alignment. The crepe paper must be stretched perpendicular to its grain, not along it. Double-check how you cut your petals relative to the paper’s natural stretch.
Another reason could be applying too much force too quickly. Crepe paper, especially lighter weights, requires a gentle touch. Try stretching smaller sections at a time with lighter pressure. If issues persist, consider using a heavier weight crepe paper (like 180g) which offers more resilience.
Flower Looks Flat or Unnatural
A flat-looking flower often indicates insufficient shaping or too few layers of petals. Ensure each petal has a distinct cup shape and gently curled edges. If the flower still lacks dimension, you might need to add more petals, especially in the outer layers, to create more fullness.
Also, check that your petals are varied in size and shape, as identical petals contribute to an artificial appearance. Adjust the angles of your existing petals, gently pulling them open or pushing them closer together to create a more dynamic and organic form.
Stem Feels Flimsy or Unstable
A wobbly or weak stem can detract from an otherwise beautiful flower. This usually happens if the floral wire gauge is too thin for the size and weight of your flower, or if the floral tape isn’t wrapped tightly enough.
For larger or heavier blooms, opt for a thicker gauge floral wire, such as 18-gauge or even 16-gauge. You can also double up thinner wires by twisting them together before wrapping. Ensure your floral tape is wrapped firmly and consistently down the entire length of the stem, securing all components tightly.
Key Takeaways
- Quality Italian crepe paper is essential for realistic, durable blooms.
- Always respect the crepe paper’s grain for proper stretching and shaping.
- Vary petal sizes and shapes to create a natural, organic appearance.
- Gentle, controlled shaping techniques are key to achieving realistic petal curves.
- Floral tape is indispensable for secure assembly and a polished stem finish.
- Practice is crucial; each flower you make will improve your skills and confidence.
Frequently Asked Questions
What’s the best type of crepe paper to use?
For most crepe paper flowers, heavyweight Italian crepe paper (around 180g) is highly recommended. It offers excellent stretch, vibrant colors, and good durability, making it ideal for petals. Lighter weights (90g) can be used for delicate details like stamens or small, airy petals.
How can I make my flowers last longer?
Crepe paper flowers are relatively delicate. To extend their lifespan, keep them out of direct sunlight, which can fade colors, and away from high humidity, which can cause them to sag or distort. A light, even spray of clear matte or satin acrylic sealant can offer some protection from dust and minor moisture, but test on a scrap piece first.
Can I use a hot glue gun?
Yes, a low-temperature hot glue gun can be used for crepe paper flowers, especially for quick adhesion. However, use it sparingly and with caution. Hot glue can be bulky, create visible bumps, and can sometimes melt or warp very delicate crepe paper. Craft glue (PVA) offers more working time and a flatter finish, though it takes longer to dry.
Where can I find templates for different flowers?
There are numerous resources for flower templates. Many craft blogs and websites offer free printable templates. Craft books specifically on paper flowers often include a wide variety. Alternatively, you can take inspiration from real flowers, dissecting them (gently!) to understand their petal structure and sketching your own templates.
Our Top Recommended Finds
- Heavyweight Italian Crepe Paper Assortment: This provides a wide array of vibrant colors with excellent stretch and durability, perfect for crafting realistic petals.
- Fine-Tip Craft Glue (PVA): An essential, fast-drying, and clear-setting glue that allows for precise application without adding bulk or stiffness to your delicate paper creations.
- Floral Wire and Tape Kit: A comprehensive kit offering various gauges of floral wire and a selection of floral tape colors, ensuring you have the right materials for sturdy stems and seamless finishes.
Cultivate Your Creativity
You now possess the knowledge and steps to bring stunning crepe paper flowers to life. This craft is a beautiful blend of patience, precision, and artistic expression.
Don’t stop at just one flower. Consider creating a vibrant bouquet for your home, designing a unique garland, or crafting personalized gifts for loved ones.
Each new bloom is an opportunity to explore different flower types, experiment with color palettes, and refine your techniques. Don’t just admire, create. Your next beautiful bloom is just a few steps away.
Beginner-friendly templates, step-by-step guides,
and weekly project ideas in your inbox.