How To Make Bowl Covers DIY

Beginner-friendly templates, step-by-step guides,
and weekly project ideas in your inbox.
Are you tired of plastic wrap clinging to everything but your bowl, or constantly running out of aluminum foil?
I certainly was, and discovering the joy of DIY bowl covers transformed my kitchen habits.
This guide comes from countless hours at my sewing machine, perfecting these handy kitchen essentials, and I’m excited to share my easy method with you.
Quick Overview
By following these steps, you will create durable, reusable fabric bowl covers that are perfect for storing leftovers, taking dishes to potlucks, or simply keeping pests away from outdoor food.
- Time needed: 1-2 hours per cover (less with practice)
- Difficulty: Beginner
- What you’ll need: Fabric, elastic, thread, sewing machine (or needle), scissors, pins, measuring tape.
Step-by-Step Instructions
Step 1: Gather Your Materials
Collect all your necessary supplies before you begin. For fabric, consider cotton for general use, or a laminated cotton/PUL (polyurethane laminate) for water resistance, especially for items like salads or dough.
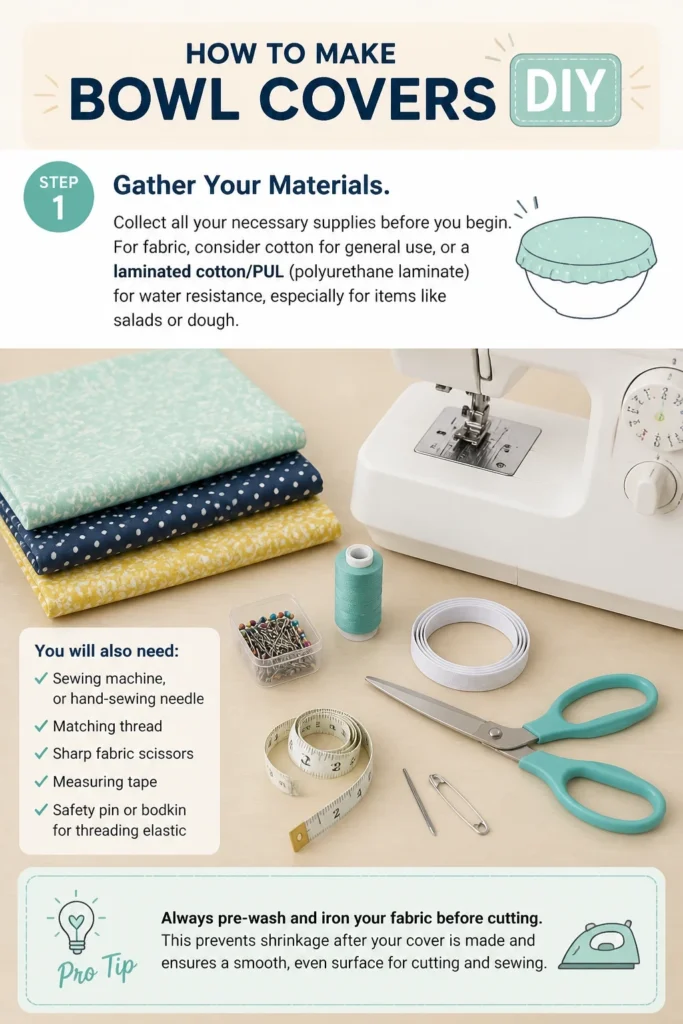
You will also need a sewing machine, or a hand-sewing needle, matching thread, sharp fabric scissors, a measuring tape, and a safety pin or bodkin for threading elastic.
Pro Tip: Always pre-wash and iron your fabric before cutting. This prevents shrinkage after your cover is made and ensures a smooth, even surface for cutting and sewing.
Step 2: Measure Your Bowls
Select the bowls you want to cover. Measure the diameter across the top rim of each bowl. Add 4 to 6 inches to this measurement to allow for the drape and the elastic casing.
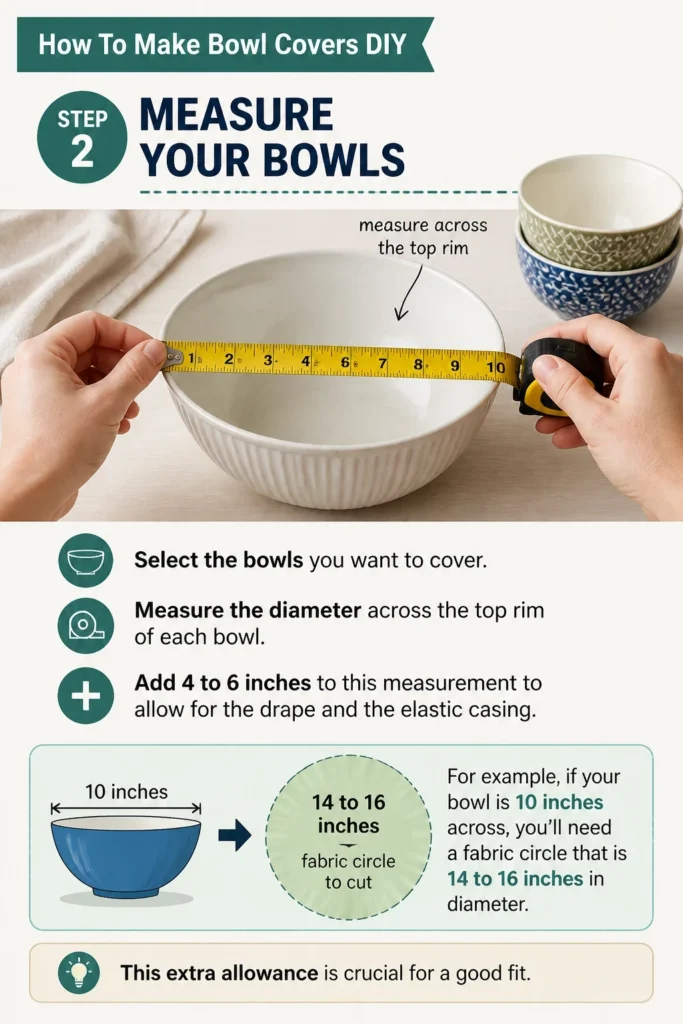
For example, if your bowl is 10 inches across, you’ll need a fabric circle that is 14 to 16 inches in diameter. This extra allowance is crucial for a good fit.
Step 3: Cut Your Fabric Circles
Fold your fabric in half, then in half again, creating a quarter fold. This makes cutting a perfect circle much easier. Using your calculated diameter, measure from the folded corner out to the desired radius and mark it with a fabric pen or chalk.
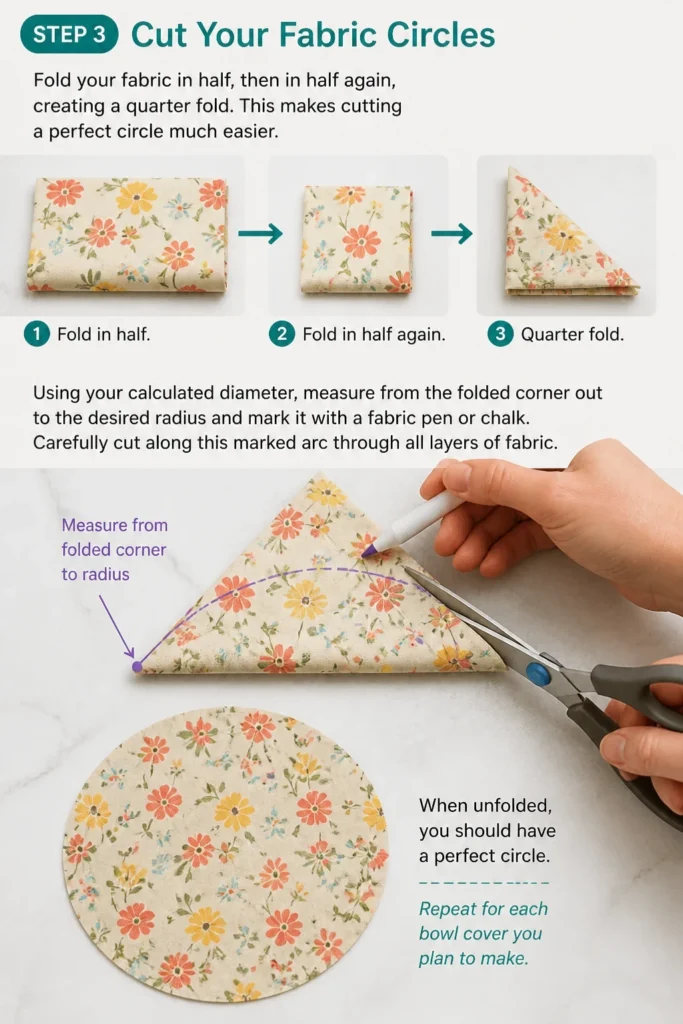
Carefully cut along this marked arc through all layers of fabric. When unfolded, you should have a perfect circle. Repeat for each bowl cover you plan to make.
Step 4: Prepare the Edge for Hemming
Press the raw edge of your fabric circle towards the wrong side by about 1/4 inch. Use an iron to create a crisp fold all the way around the circle. This first fold encloses the raw edge, preventing fraying.
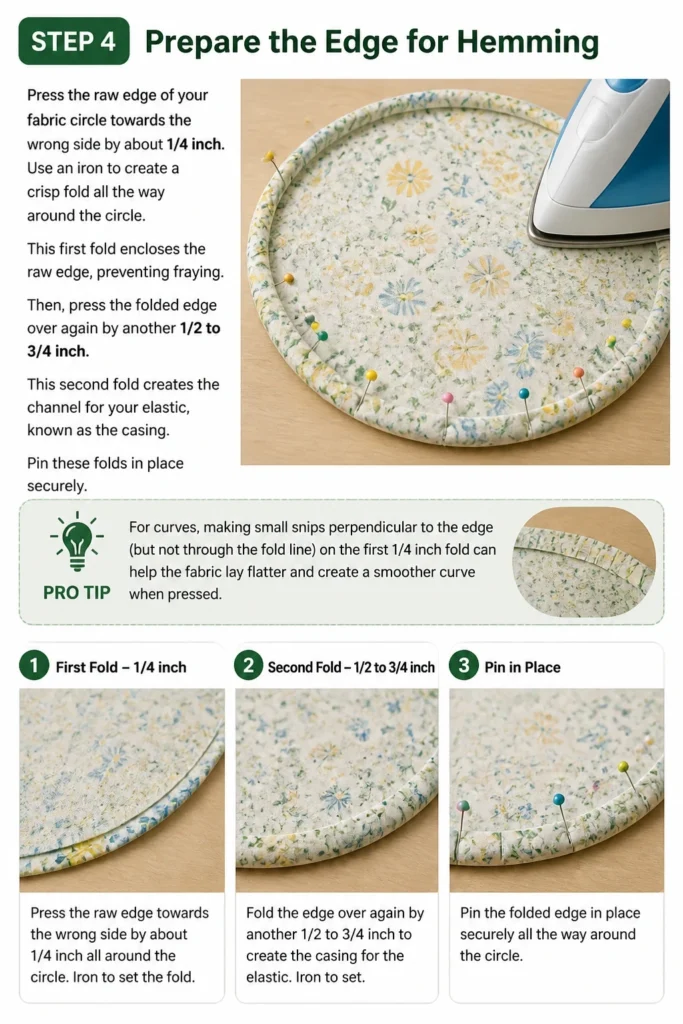
Then, press the folded edge over again by another 1/2 to 3/4 inch. This second fold creates the channel for your elastic, known as the casing. Pin these folds in place securely.
Pro Tip: For curves, making small snips perpendicular to the edge (but not through the fold line) on the first 1/4 inch fold can help the fabric lay flatter and create a smoother curve when pressed.
Step 5: Stitch the Elastic Casing
Stitch the casing you just created. Using your sewing machine (or hand-sewing needle), sew close to the inner folded edge, securing the hem in place. Remember to backstitch at the beginning and end of your seam.
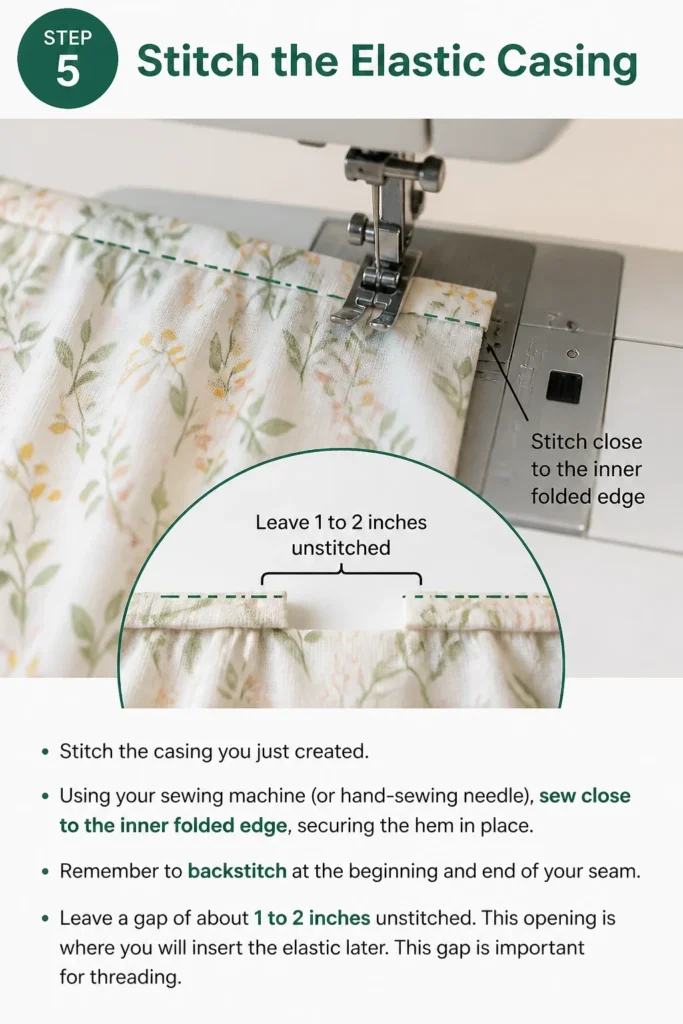
Leave a gap of about 1 to 2 inches unstitched. This opening is where you will insert the elastic later. This gap is important for threading.
Step 6: Cut and Insert the Elastic
Determine the length of your elastic. A good starting point is to measure the circumference of your bowl and subtract 2-4 inches. This will provide enough tension to hold the cover securely.
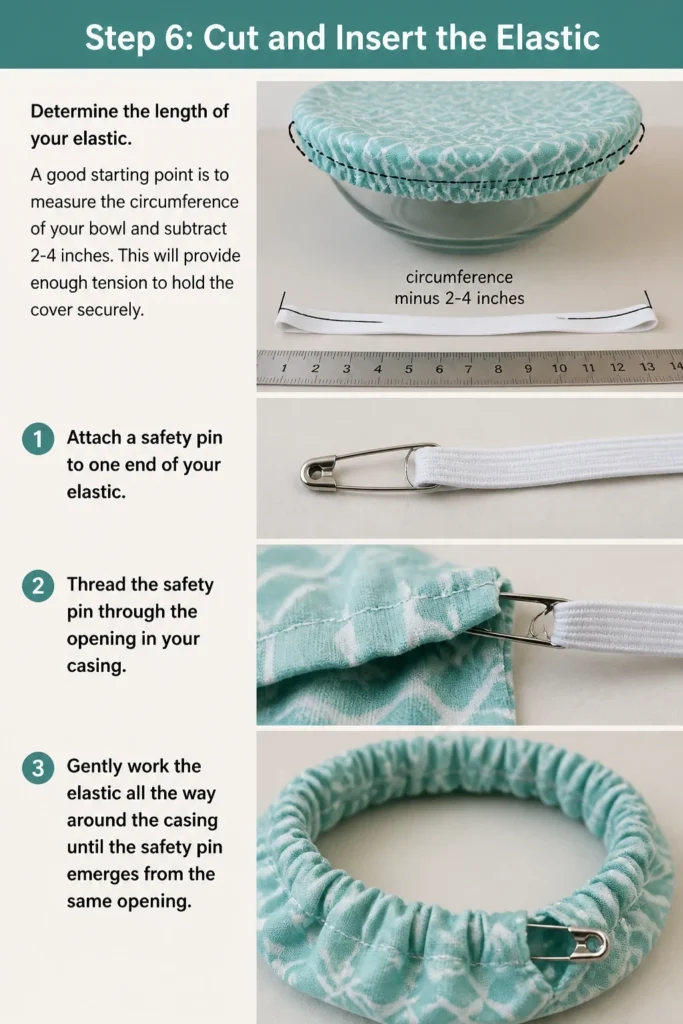
Attach a safety pin to one end of your elastic. Thread the safety pin through the opening in your casing. Gently work the elastic all the way around the casing until the safety pin emerges from the same opening.
Step 7: Secure the Elastic Ends
Overlap the two ends of the elastic by about 1/2 inch. Stitch them together securely using your sewing machine, going back and forth a few times to reinforce the seam. A zigzag stitch works well here for flexibility.
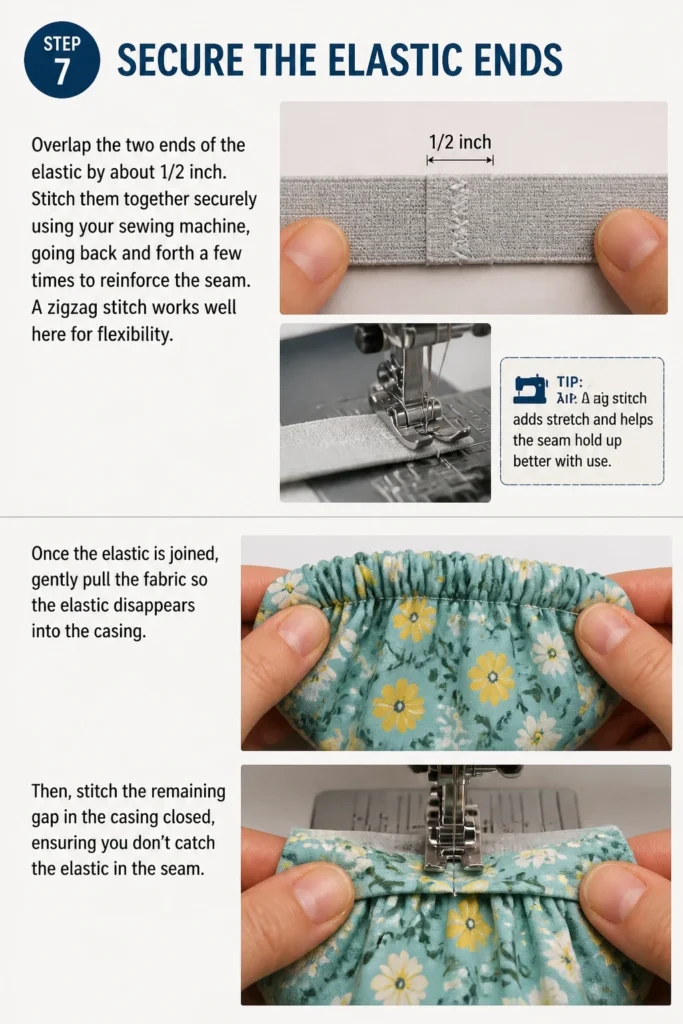
Once the elastic is joined, gently pull the fabric so the elastic disappears into the casing. Then, stitch the remaining gap in the casing closed, ensuring you don’t catch the elastic in the seam.
Step 8: Finish and Test Your Bowl Cover
Trim any loose threads for a neat finish. Give your new bowl cover a final press with an iron to smooth out any wrinkles.
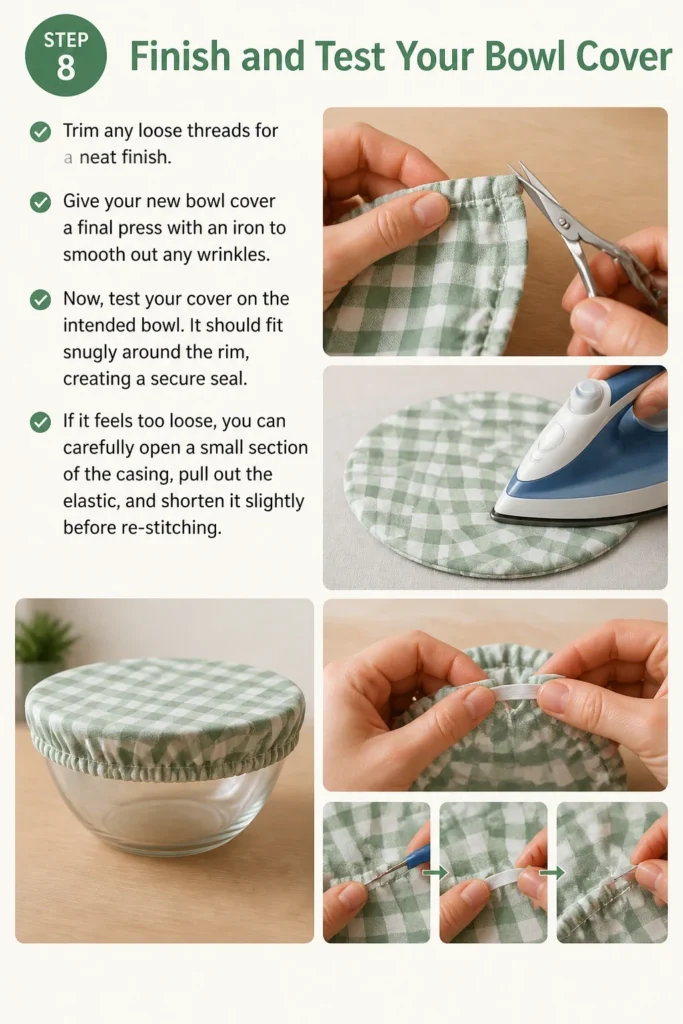
Now, test your cover on the intended bowl. It should fit snugly around the rim, creating a secure seal. If it feels too loose, you can carefully open a small section of the casing, pull out the elastic, and shorten it slightly before re-stitching.
Common Mistakes to Avoid
Incorrect Fabric Choice
Using the wrong fabric can significantly impact the cover’s function and durability. A flimsy fabric might not hold its shape, while a non-water-resistant fabric won’t protect against spills. Always consider the intended use for the cover when selecting your material.
Measuring Errors
One of the most common pitfalls is inaccurate measuring. If your fabric circle is too small, the cover won’t fit over the bowl. If it’s too large, it will be baggy and ineffective. Double-check your bowl’s diameter and your added allowance before cutting.
Elastic Too Tight or Loose
The elastic is what gives the bowl cover its grip. If it’s too tight, it will be difficult to get on and off the bowl. If it’s too loose, the cover will slip off easily. Adjusting the elastic length by a small amount can make a big difference in fit.
Skipping Pre-Washing Fabric
Failing to pre-wash your fabric can lead to disappointment after the first wash. Many fabrics shrink when first laundered, which could make your perfectly fitted bowl cover too small. Always wash and dry your fabric before you start cutting and sewing.
Troubleshooting
The Cover Doesn’t Fit My Bowl
If your cover is too small, it likely means your initial fabric circle was not large enough, or your elastic is too short. You might need to make a new, larger cover. If it’s too loose, you can open a small section of the casing, pull out the elastic, shorten it by an inch or two, and re-stitch it.
My Elastic Broke or Lost Its Stretch
Elastic can degrade over time, especially with frequent washing and drying on high heat. If your elastic breaks or loses its stretch, carefully unpick a small section of the casing seam. Remove the old elastic, insert new elastic of the correct length, secure the ends, and stitch the casing closed again.
The Fabric Edges Are Fraying
Fraying usually indicates that the initial 1/4-inch fold to enclose the raw edge was not wide enough, or the stitching was too close to the edge. Ensure your initial fold is generous enough to fully tuck in the raw fabric, and stitch a consistent seam closer to the inner fold to secure it properly.
Key Takeaways
- Always pre-wash and iron your fabric to prevent shrinkage and ease sewing.
- Accurate measurement of your bowl and proper allowance for the casing are crucial for a good fit.
- Leaving a gap in the casing for elastic insertion is essential for easy threading.
- Adjust the elastic length to achieve a snug, but not overly tight, fit.
- Choose the right fabric for the cover’s intended use, considering durability and water resistance.
- Practice makes perfect; don’t be discouraged if your first cover isn’t flawless.
Frequently Asked Questions
Can I hand sew these bowl covers?
Yes, absolutely! While a sewing machine speeds up the process, these bowl covers can be entirely hand-sewn. Use a strong running stitch or backstitch for durability, especially around the elastic casing. It might take a bit longer, but the result will be just as functional.
What fabric is best for covering wet food or dough?
For wet food, salads, or rising dough, a water-resistant fabric like laminated cotton or PUL (polyurethane laminate) is ideal. These fabrics prevent moisture from seeping through, keeping your food fresh and your counters clean. For dry goods or bread, regular cotton works perfectly.
How do I wash my DIY bowl covers?
Most fabric bowl covers can be washed in a washing machine on a gentle cycle with cold or warm water. Avoid high heat in the dryer, as it can degrade the elastic over time. Air drying or tumble drying on low heat will help prolong their life. For laminated fabrics, hand washing and air drying are often recommended.
Can I make these for square or rectangular dishes?
Yes, you can adapt the concept for non-round dishes, though it requires a slightly different approach. Instead of a circle, you’d cut a square or rectangle of fabric larger than your dish. You would then create rounded corners on the fabric and follow a similar hemming and elastic insertion process, adjusting for the different shape.
Our Top Recommended Finds
- Good Quality Fabric Shears: Sharp scissors make cutting fabric much easier and more precise, leading to better results.
- Fabric Clips: These are fantastic alternatives to pins, especially for thicker fabrics or when working with laminated materials where pinholes are undesirable.
- Basic Sewing Machine: A simple, reliable sewing machine can open up a world of DIY projects beyond just bowl covers, making crafting efficient and enjoyable.
Embrace Your Inner Maker
Creating your own bowl covers is more than just a craft; it’s a step towards a more sustainable and personalized kitchen.
You’ve gained the skills to make practical, beautiful items that reduce waste and add a touch of handmade charm to your home.
Why not explore other kitchen textile projects, like reusable produce bags or cloth napkins? The possibilities are endless once you start sewing!
Beginner-friendly templates, step-by-step guides,
and weekly project ideas in your inbox.