How To Bind A Book DIY

Beginner-friendly templates, step-by-step guides,
and weekly project ideas in your inbox.
There’s a unique satisfaction in holding a book you’ve crafted yourself, from blank pages to a finished cover.
I still remember the pride of binding my first journal, a collection of travel notes that felt so much more personal in a handmade cover.
This guide will walk you through the process, making bookbinding accessible and rewarding for anyone.
Quick Overview
You’re about to embark on a creative journey, transforming loose papers into a cohesive, durable book. This process involves careful preparation, precise stitching, and thoughtful assembly, resulting in a beautiful, hand-bound volume.
- Time needed: 4-6 hours (depending on drying time and experience)
- Difficulty: Intermediate
- What you’ll need: Paper, book board, binding thread, awl, craft knife, ruler, cutting mat, glue, brush, clamps.
Step-by-Step Instructions
Step 1: Gather and Prepare Your Materials
Before beginning, ensure all your materials are ready and organized. This proactive step saves time and prevents interruptions later on.
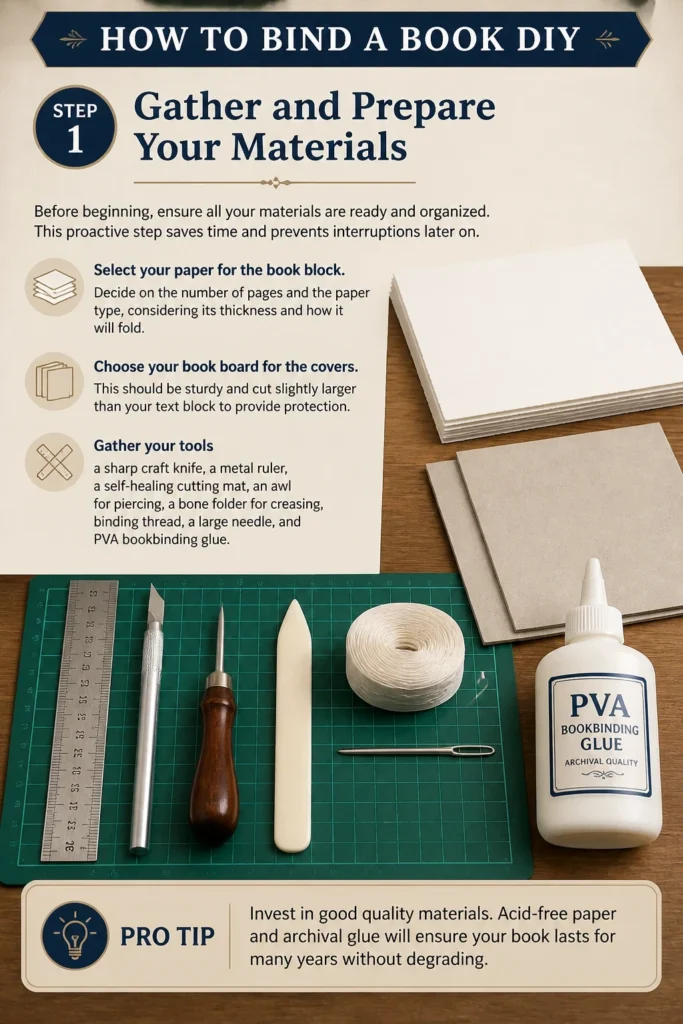
Select your paper for the book block. Decide on the number of pages and the paper type, considering its thickness and how it will fold.
Choose your book board for the covers. This should be sturdy and cut slightly larger than your text block to provide protection.
Gather your tools: a sharp craft knife, a metal ruler, a self-healing cutting mat, an awl for piercing, a bone folder for creasing, binding thread, a large needle, and PVA bookbinding glue.
Pro Tip: Invest in good quality materials. Acid-free paper and archival glue will ensure your book lasts for many years without degrading.
Step 2: Create Your Text Block Signatures
The text block is the heart of your book, made up of folded sheets called signatures. This step requires precision.
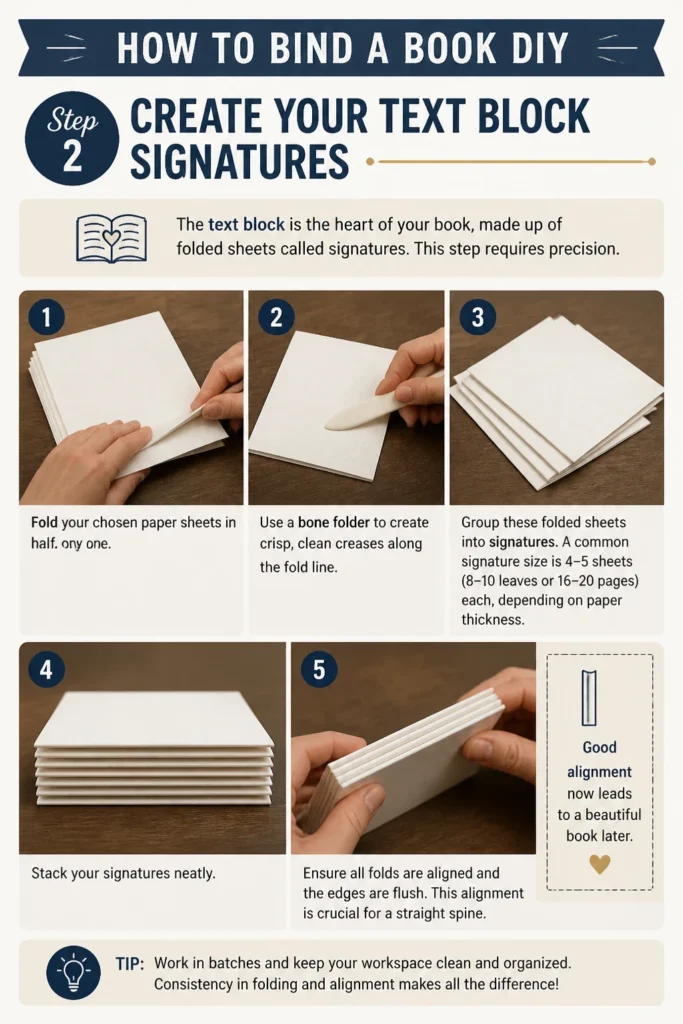
Fold your chosen paper sheets in half, one by one. Use a bone folder to create crisp, clean creases along the fold line.
Group these folded sheets into signatures. A common signature size is 4-5 sheets (8-10 leaves or 16-20 pages) each, depending on paper thickness.
Stack your signatures neatly. Ensure all folds are aligned and the edges are flush. This alignment is crucial for a straight spine.
Step 3: Mark and Pierce Your Signatures
Accurate marking and piercing are vital for consistent stitching and a strong bind. Take your time with this stage.
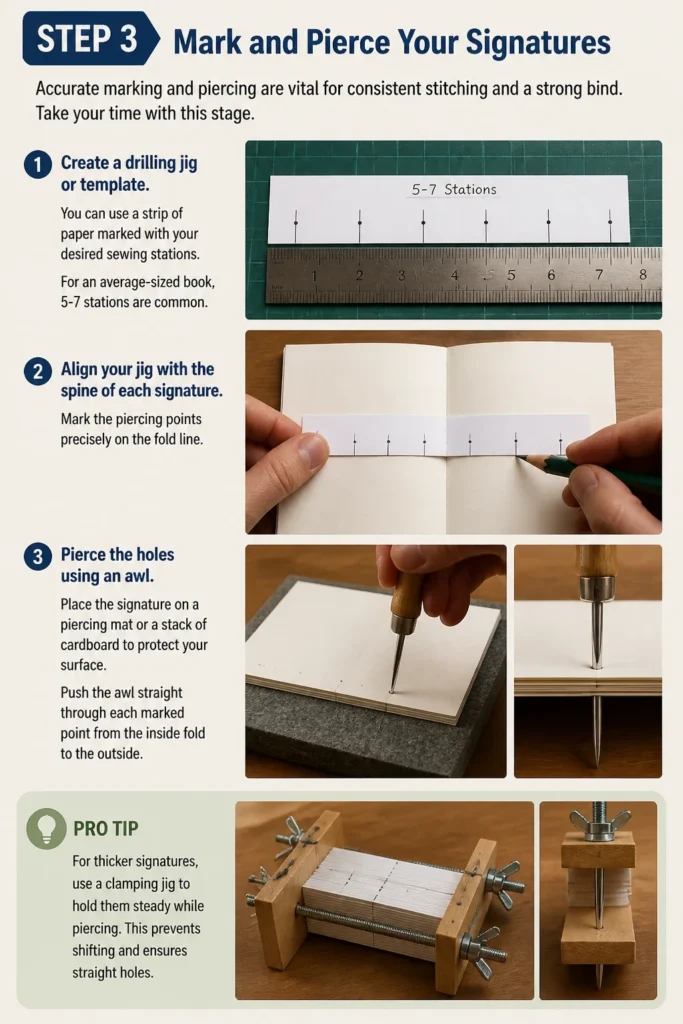
Create a drilling jig or template. You can use a strip of paper marked with your desired sewing stations. For an average-sized book, 5-7 stations are common.
Align your jig with the spine of each signature. Mark the piercing points precisely on the fold line.
Pierce the holes using an awl. Place the signature on a piercing mat or a stack of cardboard to protect your surface. Push the awl straight through each marked point from the inside fold to the outside.
Pro Tip: For thicker signatures, use a clamping jig to hold them steady while piercing. This prevents shifting and ensures straight holes.
Step 4: Sew the Signatures Together
This is where your book truly begins to take shape. The sewing technique creates the core structure of your book.
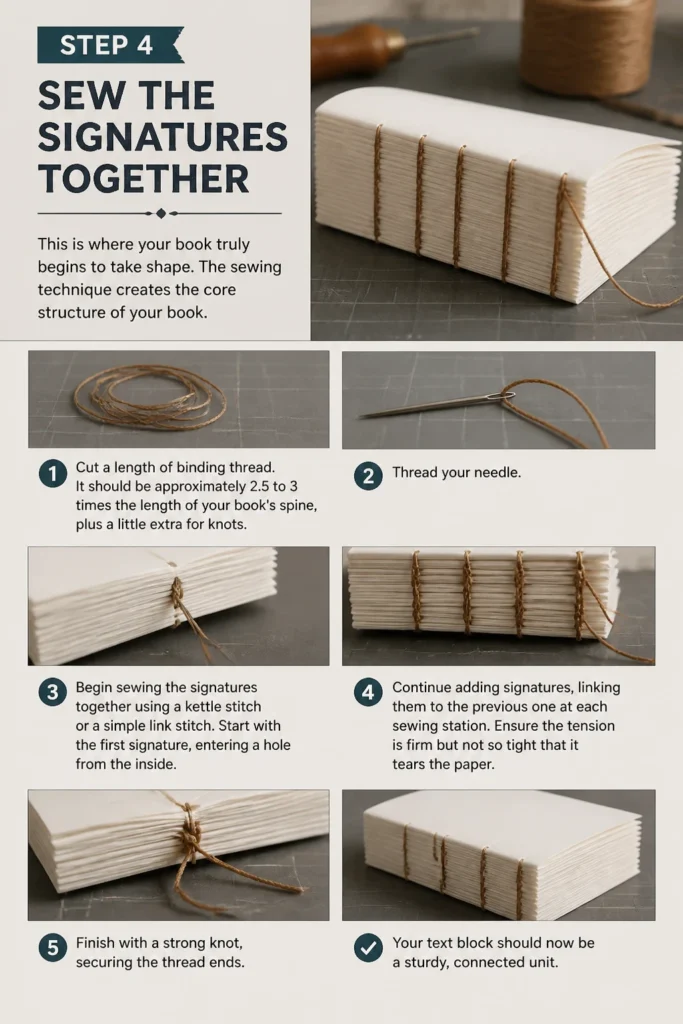
Cut a length of binding thread. It should be approximately 2.5 to 3 times the length of your book’s spine, plus a little extra for knots.
Thread your needle. Begin sewing the signatures together using a kettle stitch or a simple link stitch. Start with the first signature, entering a hole from the inside.
Continue adding signatures, linking them to the previous one at each sewing station. Ensure the tension is firm but not so tight that it tears the paper.
Finish with a strong knot, securing the thread ends. Your text block should now be a sturdy, connected unit.
Step 5: Prepare the Book Block for Casing In
After sewing, the text block needs some finishing touches before it can be attached to the covers.
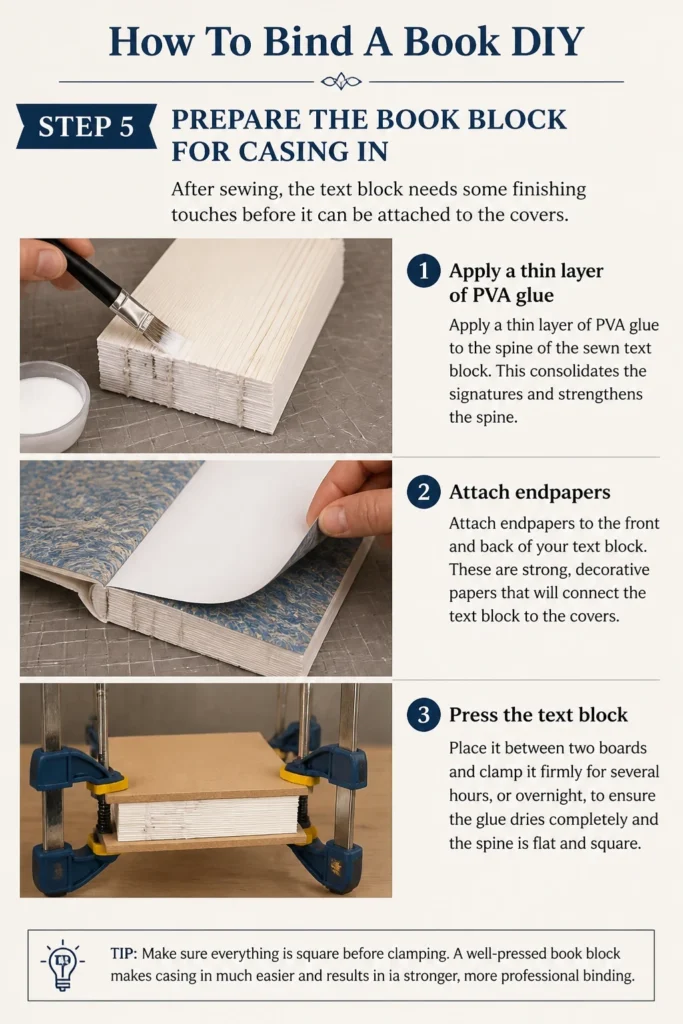
Apply a thin layer of PVA glue to the spine of the sewn text block. This consolidates the signatures and strengthens the spine.
Attach endpapers to the front and back of your text block. These are strong, decorative papers that will connect the text block to the covers.
Press the text block. Place it between two boards and clamp it firmly for several hours, or overnight, to ensure the glue dries completely and the spine is flat and square.
Step 6: Prepare Your Book Covers
The covers protect your book and define its aesthetic. This step involves cutting and covering the book board.
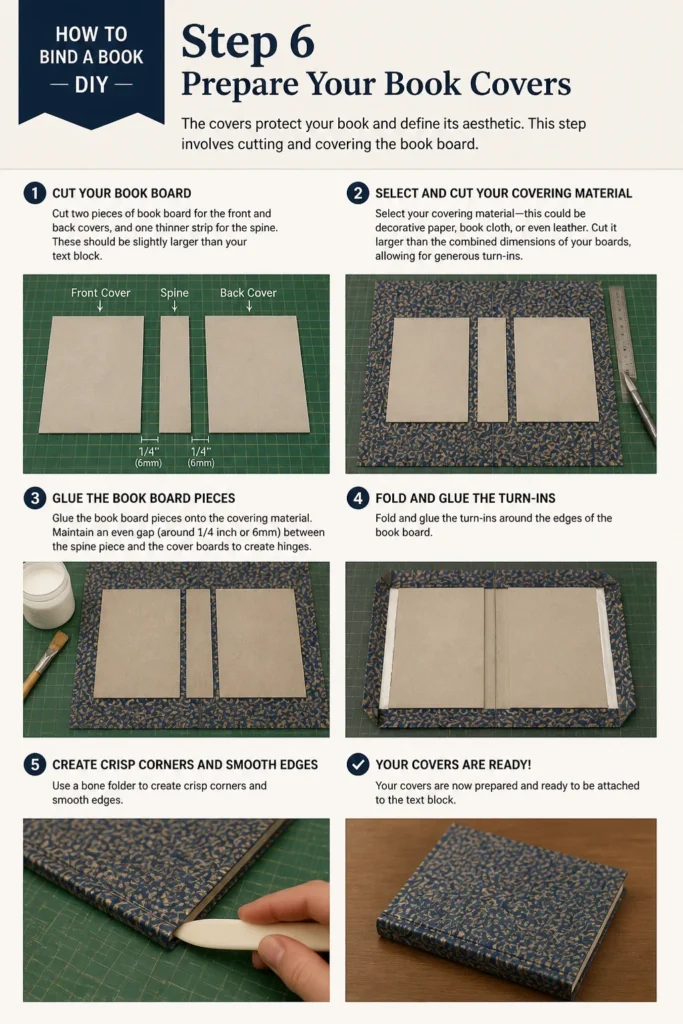
Cut two pieces of book board for the front and back covers, and one thinner strip for the spine. These should be slightly larger than your text block.
Select your covering material—this could be decorative paper, book cloth, or even leather. Cut it larger than the combined dimensions of your boards, allowing for generous turn-ins.
Glue the book board pieces onto the covering material. Maintain an even gap (around 1/4 inch or 6mm) between the spine piece and the cover boards to create hinges.
Fold and glue the turn-ins around the edges of the book board. Use a bone folder to create crisp corners and smooth edges.
Step 7: Casing In the Text Block
This is the final assembly step, where the text block is joined with its covers. It requires careful alignment.
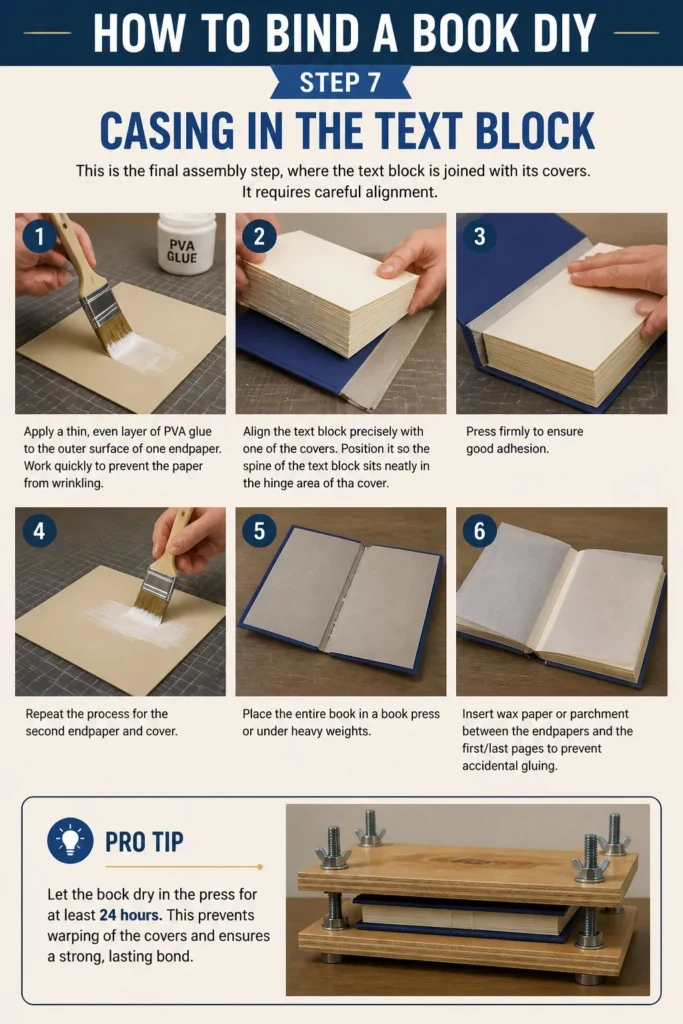
Apply a thin, even layer of PVA glue to the outer surface of one endpaper. Work quickly to prevent the paper from wrinkling.
Align the text block precisely with one of the covers. Position it so the spine of the text block sits neatly in the hinge area of the cover.
Press firmly to ensure good adhesion. Repeat the process for the second endpaper and cover.
Place the entire book in a book press or under heavy weights. Insert wax paper or parchment between the endpapers and the first/last pages to prevent accidental gluing.
Pro Tip: Let the book dry in the press for at least 24 hours. This prevents warping of the covers and ensures a strong, lasting bond.
Common Mistakes to Avoid
Inconsistent Piercing
When your holes are not evenly spaced or straight, your sewing will be uneven. This leads to a weak spine and pages that don’t lie flat. Always use a jig and pierce straight through to maintain consistency.
Too Much or Too Little Glue
Using too much glue can cause pages to wrinkle or stick together, and it can ooze out, creating a messy finish. Too little glue results in weak adhesion, causing the book to fall apart. Apply thin, even layers, spreading it edge to edge with a brush.
Rushing the Drying Process
Impatience is a bookbinder’s enemy. Removing a book from the press too soon can lead to warped covers, poor adhesion, and a less durable bind. Always allow sufficient drying time, ideally 24 hours or more, under consistent pressure.
Incorrect Grain Direction
Paper has a grain direction, and cutting or folding against it can cause warping or cracking. Always identify the grain direction (it runs parallel to the longest edge of the paper as it comes from the mill) and align it with the spine for both text block and cover materials.
Troubleshooting
Book Covers Are Warping
This often happens when glue dries unevenly or too quickly, pulling the board. Ensure you apply glue evenly across the entire surface of the covering material. More importantly, always press the book under heavy weight for an extended period after casing in, allowing it to dry slowly and flat.
Pages Don’t Lie Flat
If your pages don’t open smoothly, it could be due to overly tight sewing or insufficient creasing. When sewing, maintain firm but not excessive tension. Use a bone folder to thoroughly crease each signature fold before sewing, ensuring they are pliable.
Spine Is Not Square
A skewed spine indicates that the signatures were not aligned perfectly before sewing or pressing. Before sewing, tap the text block gently on a flat surface to align all edges. When pressing, use press boards that are perfectly square and apply even pressure.
Key Takeaways
- Preparation is paramount; organize all materials and tools before you begin.
- Precision in marking and piercing holes ensures a strong, even bind.
- Use a bone folder to create crisp folds and smooth out air bubbles.
- Apply bookbinding glue sparingly and evenly for clean, secure adhesion.
- Allow ample drying time under pressure to prevent warping and ensure durability.
- Practice patience and attention to detail throughout each stage of the process.
Frequently Asked Questions
Can I use any type of paper for the text block?
While you can use various papers, it’s best to choose a paper that isn’t too thick or too thin. Standard printer paper (70-90 gsm) works well for practice. For a more durable book, consider acid-free archival paper to prevent yellowing over time.
What kind of thread should I use for binding?
Waxed linen thread is ideal for bookbinding. The wax helps the thread glide through the holes and prevents tangling. It’s also strong and durable, ensuring your signatures stay securely sewn together. You can purchase it pre-waxed or wax cotton thread yourself.
How do I make sure my cover boards are cut to the right size?
Measure your text block after it’s been pressed. Your cover boards should be slightly taller and wider than the text block, typically by about 1/8 inch (3mm) on each edge. This creates a small overhang, protecting the pages.
Is a book press essential for DIY bookbinding?
While a dedicated book press is excellent, you can improvise with heavy weights. Stack books, bricks, or even use C-clamps with sturdy wooden boards. The key is consistent, even pressure over a flat surface for the entire drying period.
Our Top Recommended Finds
- Bone Folder: Essential for crisp folds and smoothing paper, a good quality bone folder makes a significant difference in your finish.
- PVA Bookbinding Glue: This acid-free, flexible glue is specifically formulated for bookbinding, offering strong adhesion without causing paper to warp or degrade.
- Self-Healing Cutting Mat: Protects your workspace and extends the life of your craft knife blades, making precise cuts safer and easier.
Your Next Chapter Awaits
Binding your own book is a rewarding skill, blending artistry with practical craftsmanship. Each step, from folding paper to casing in the covers, brings you closer to a unique creation.
Don’t be afraid to experiment with different papers or cover materials as you gain confidence. The world of bookbinding offers endless possibilities for personal expression.
Gather your tools and start your first bookbinding project today. The satisfaction of holding your handmade volume is truly unparalleled.
Beginner-friendly templates, step-by-step guides,
and weekly project ideas in your inbox.