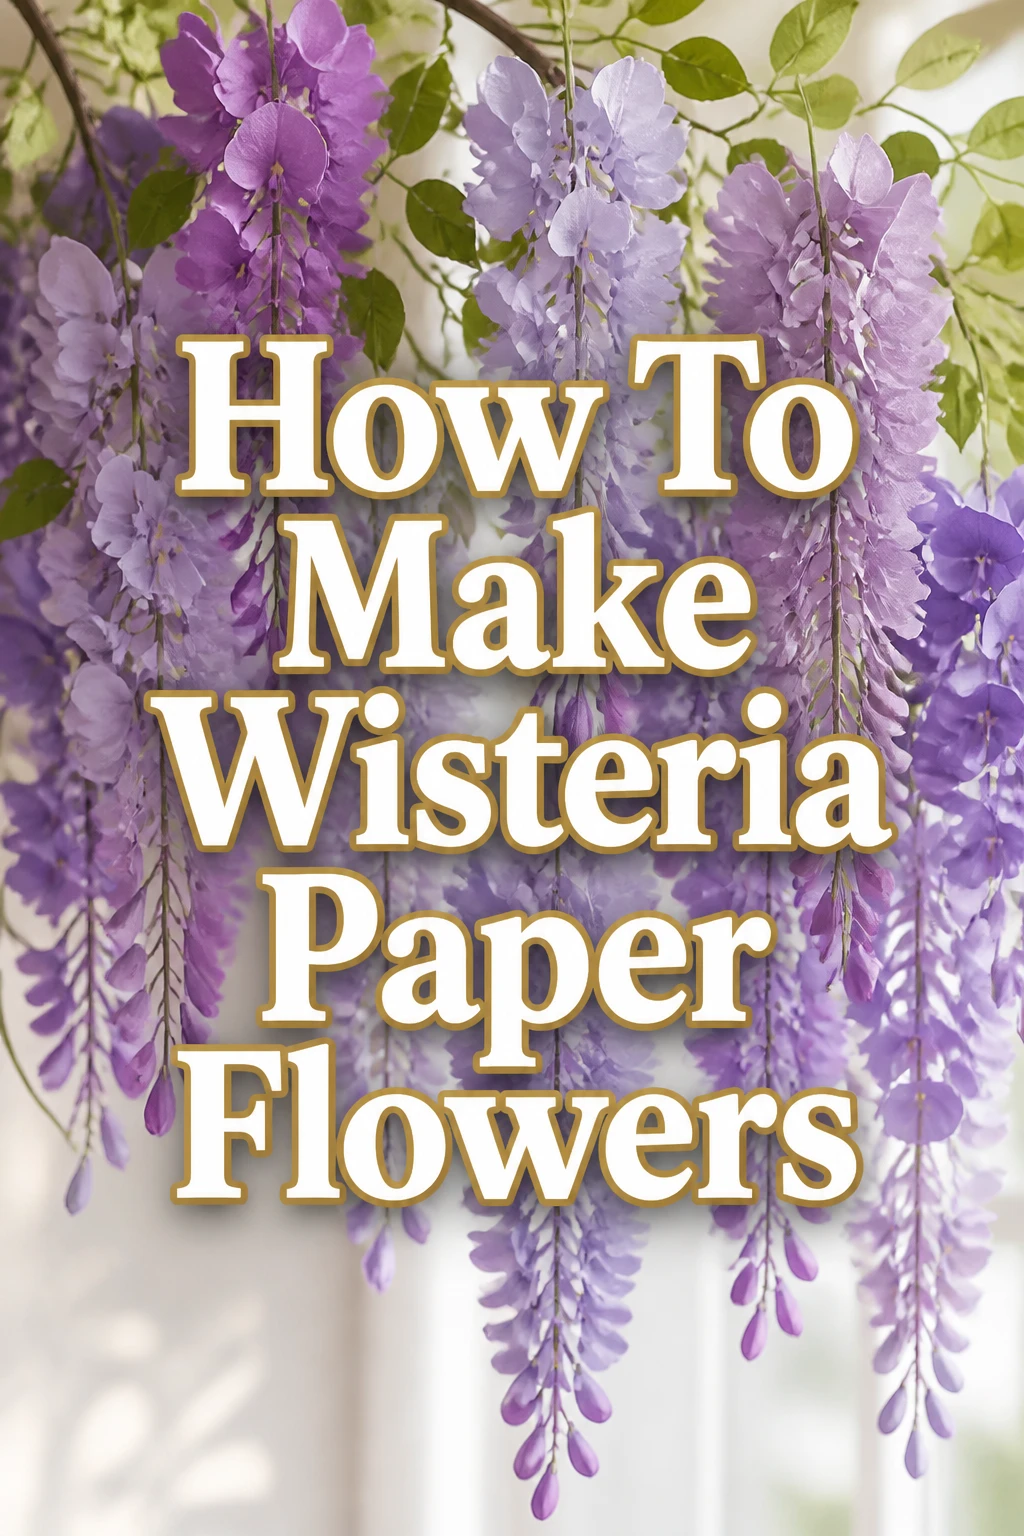
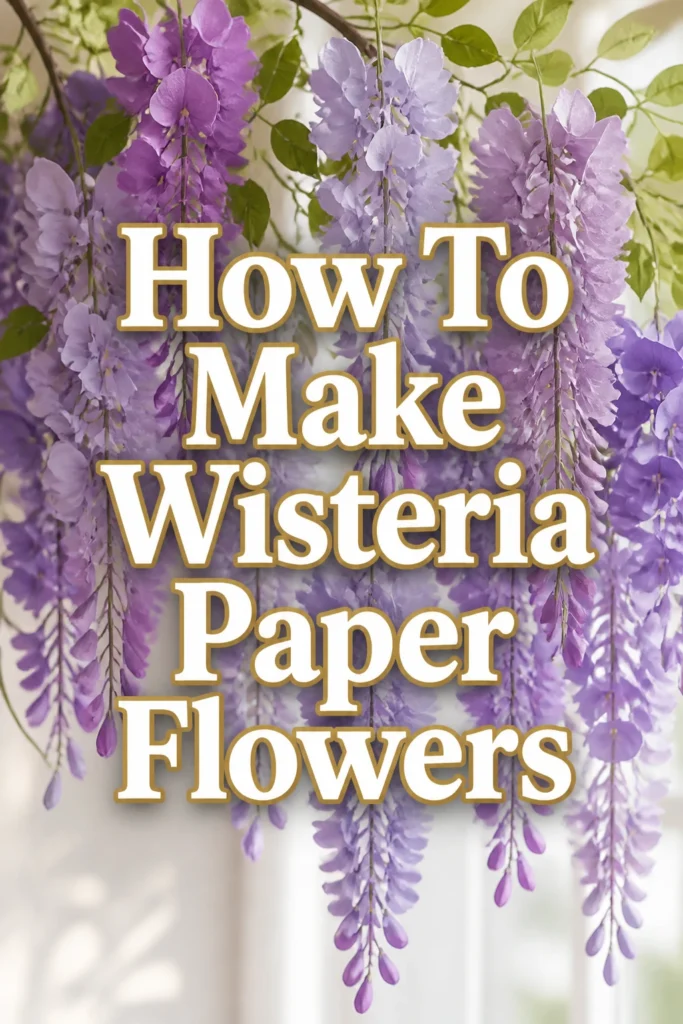
How To Make Wisteria Paper Flowers

Beginner-friendly templates, step-by-step guides,
and weekly project ideas in your inbox.
There’s a special magic in crafting something beautiful with your own hands.
I remember the first time I saw wisteria blooming, its elegant cascades instantly captured my imagination.
This guide shares my tried-and-true method for recreating that delicate beauty in paper form, drawing from years of paper flower making experience.
Quick Overview
You’re about to embark on a delightful crafting journey that will result in stunning, lifelike wisteria blooms.
These paper flowers offer lasting beauty without the need for water or sunlight, perfect for any decor.
- Time needed: 4-6 hours (depending on desired fullness)
- Difficulty: Intermediate
- What you’ll need: Crepe paper, floral wire, glue, scissors, ruler
Step-by-Step Instructions
Step 1: Gather Your Materials
Before you begin, ensure you have all necessary items laid out and ready.
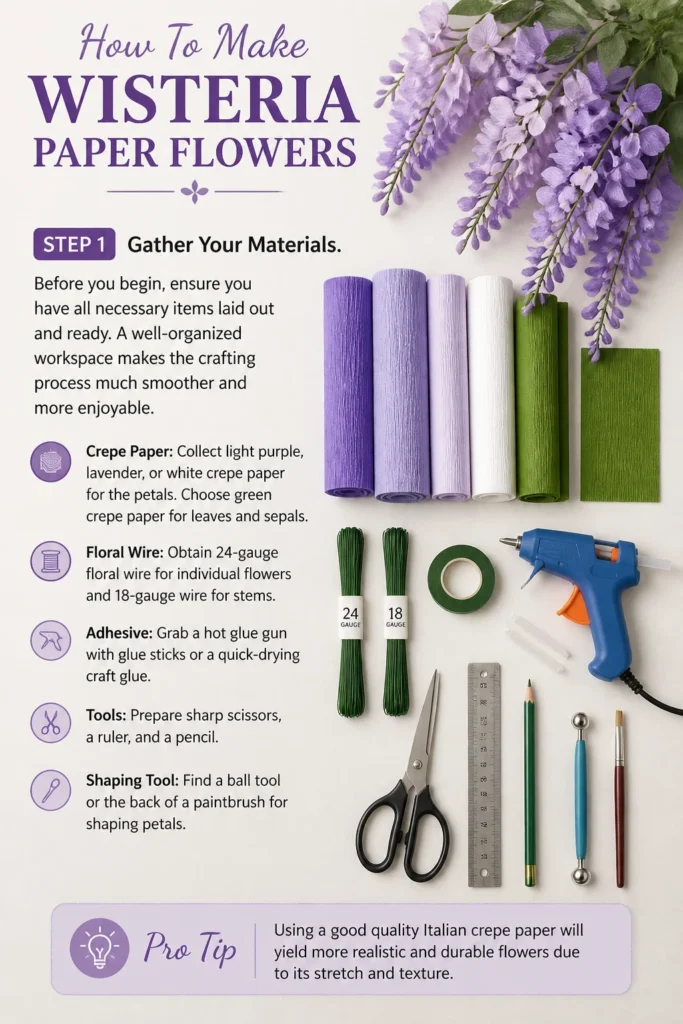
A well-organized workspace makes the crafting process much smoother and more enjoyable.
- Collect light purple, lavender, or white crepe paper for the petals.
- Choose green crepe paper for leaves and sepals.
- Obtain 24-gauge floral wire for individual flowers and 18-gauge wire for stems.
- Grab a hot glue gun with glue sticks or a quick-drying craft glue.
- Prepare sharp scissors, a ruler, and a pencil.
- Find a ball tool or the back of a paintbrush for shaping petals.
Pro Tip: Using a good quality Italian crepe paper will yield more realistic and durable flowers due to its stretch and texture.
Step 2: Prepare the Petals and Sepals
Wisteria flowers are composed of several small, distinct petals that give them their characteristic shape.
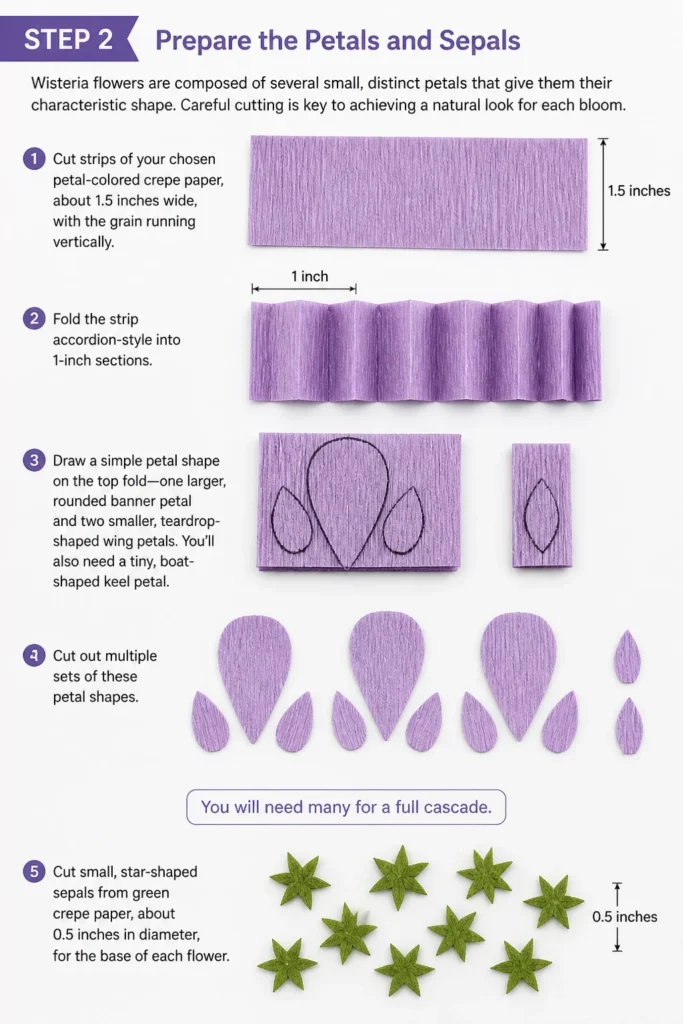
Careful cutting is key to achieving a natural look for each bloom.
- Cut strips of your chosen petal-colored crepe paper, about 1.5 inches wide, with the grain running vertically.
- Fold the strip accordion-style into 1-inch sections.
- Draw a simple petal shape on the top fold: one larger, rounded “banner” petal and two smaller, teardrop-shaped “wing” petals. You’ll also need a tiny, boat-shaped “keel” petal.
- Cut out multiple sets of these petal shapes. You will need many for a full cascade.
- Cut small, star-shaped sepals from green crepe paper, about 0.5 inches in diameter, for the base of each flower.
Step 3: Shape the Petals
Shaping adds dimension and realism, transforming flat paper into delicate floral forms.
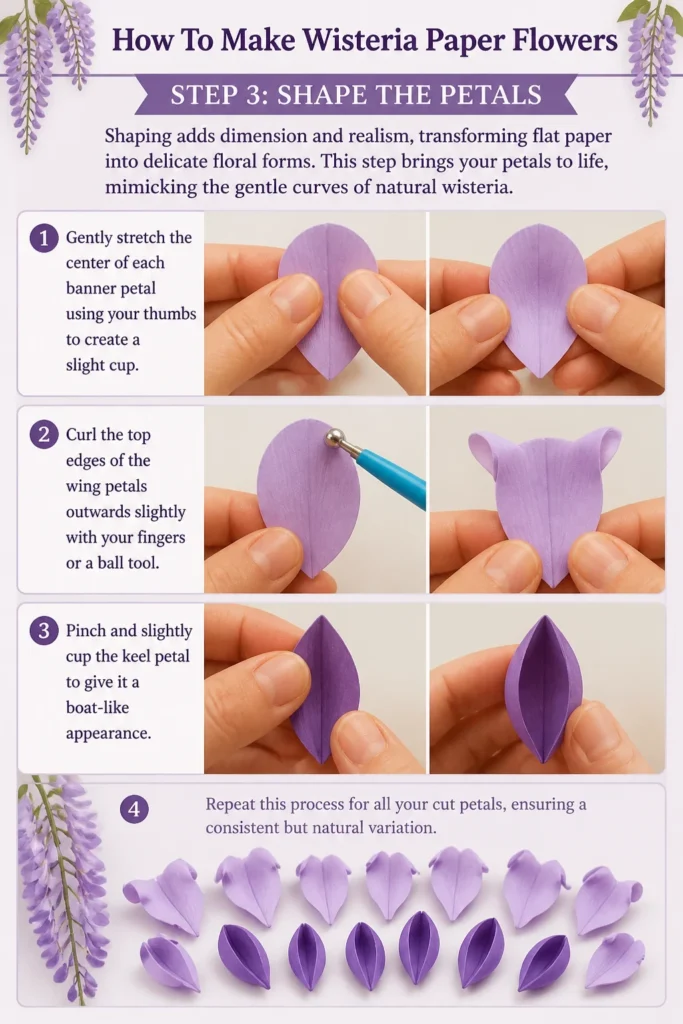
This step brings your petals to life, mimicking the gentle curves of natural wisteria.
- Gently stretch the center of each banner petal using your thumbs to create a slight cup.
- Curl the top edges of the wing petals outwards slightly with your fingers or a ball tool.
- Pinch and slightly cup the keel petal to give it a boat-like appearance.
- Repeat this process for all your cut petals, ensuring a consistent but natural variation.
Step 4: Assemble Individual Flowers
Each small flower is a miniature work of art, and their careful assembly builds the foundation of your wisteria cascade.
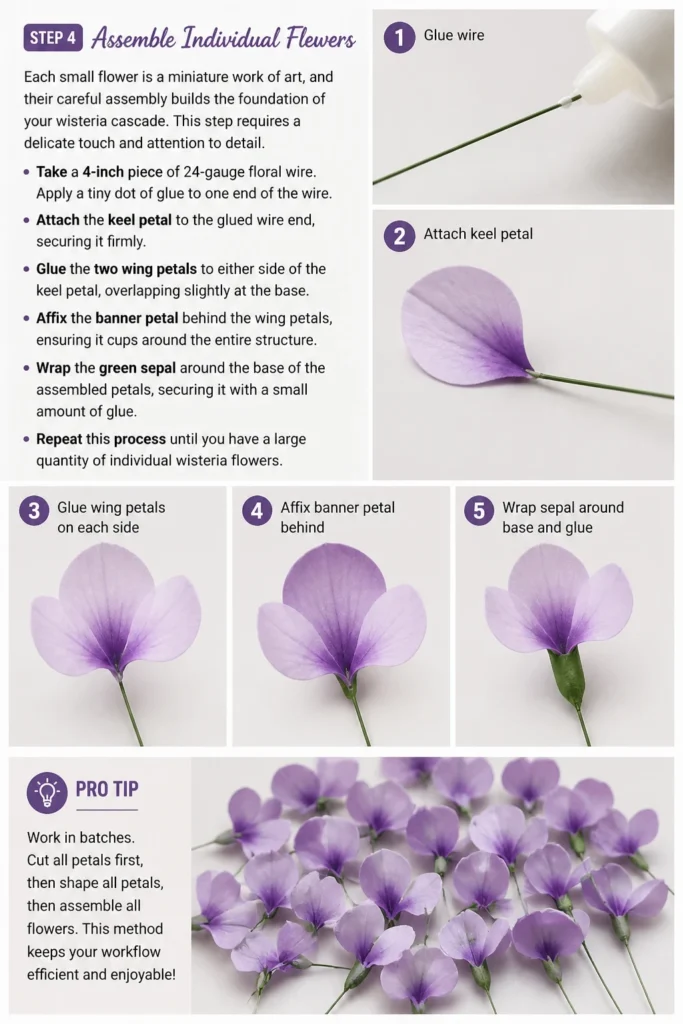
This step requires a delicate touch and attention to detail.
- Take a 4-inch piece of 24-gauge floral wire.
- Apply a tiny dot of glue to one end of the wire.
- Attach the keel petal to the glued wire end, securing it firmly.
- Glue the two wing petals to either side of the keel petal, overlapping slightly at the base.
- Affix the banner petal behind the wing petals, ensuring it cups around the entire structure.
- Wrap the green sepal around the base of the assembled petals, securing it with a small amount of glue.
- Repeat this process until you have a large quantity of individual wisteria flowers.
Pro Tip: Work in batches. Cut all petals first, then shape all petals, then assemble all flowers. This improves efficiency.
Step 5: Create the Flower Clusters
Wisteria blooms hang in beautiful, elongated clusters, and replicating this natural arrangement is crucial.
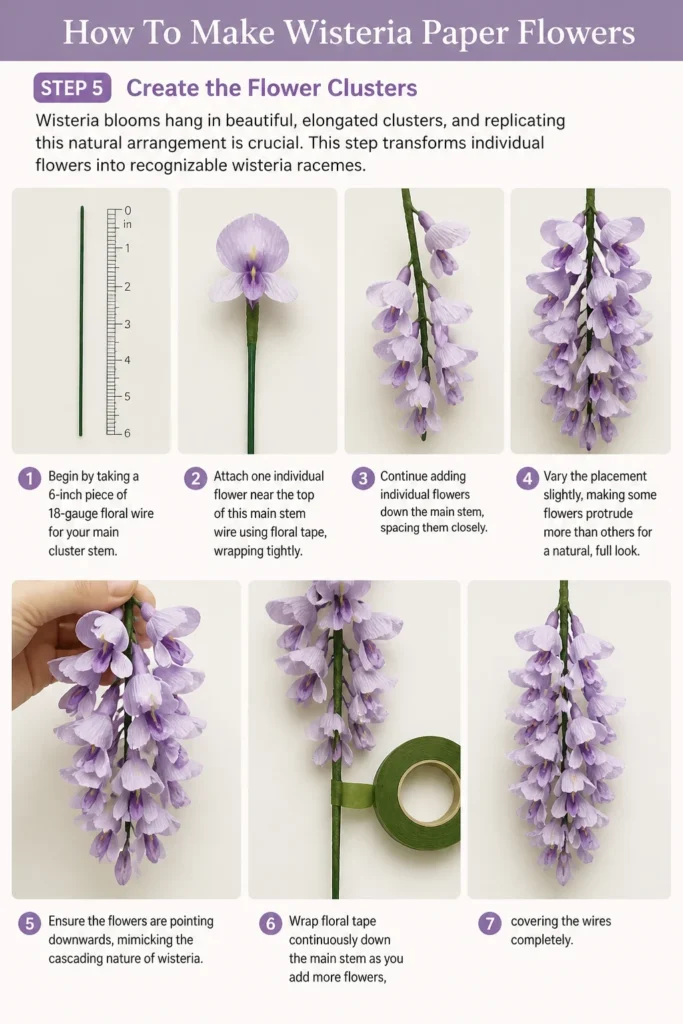
This step transforms individual flowers into recognizable wisteria racemes.
- Begin by taking a 6-inch piece of 18-gauge floral wire for your main cluster stem.
- Attach one individual flower near the top of this main stem wire using floral tape, wrapping tightly.
- Continue adding individual flowers down the main stem, spacing them closely.
- Vary the placement slightly, making some flowers protrude more than others for a natural, full look.
- Ensure the flowers are pointing downwards, mimicking the cascading nature of wisteria.
- Wrap floral tape continuously down the main stem as you add more flowers, covering the wires completely.
Step 6: Add Leaves to Your Wisteria
Leaves provide a necessary contrast and complete the realistic appearance of your paper wisteria.
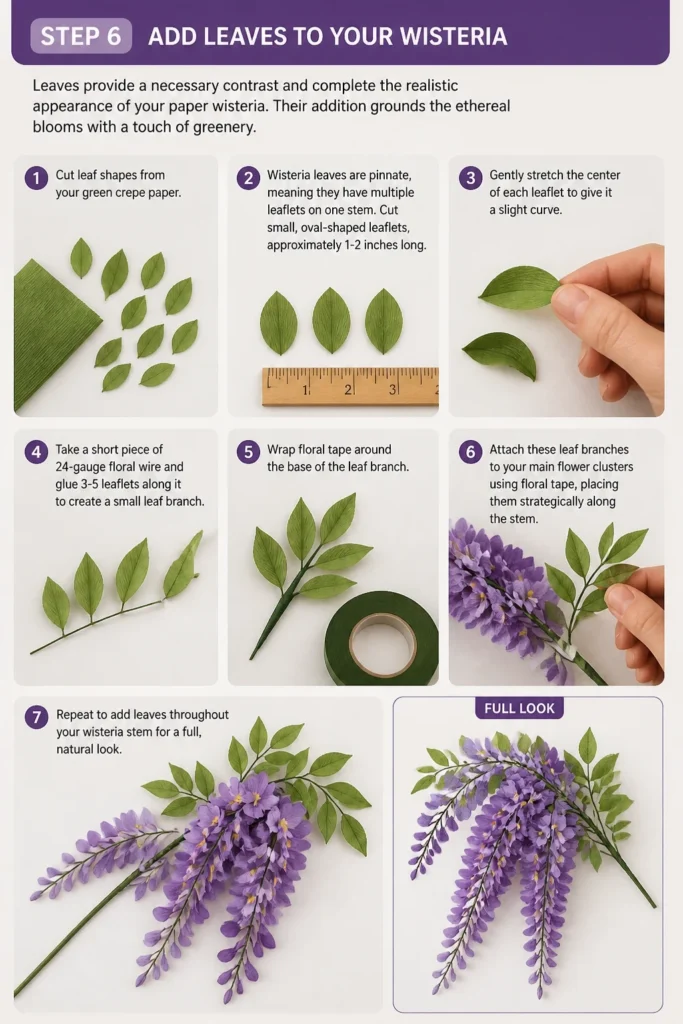
Their addition grounds the ethereal blooms with a touch of greenery.
- Cut leaf shapes from your green crepe paper. Wisteria leaves are pinnate, meaning they have multiple leaflets on one stem.
- Cut small, oval-shaped leaflets, approximately 1-2 inches long.
- Gently stretch the center of each leaflet to give it a slight curve.
- Take a short piece of 24-gauge floral wire and glue 3-5 leaflets along it to create a small leaf branch.
- Wrap floral tape around the base of the leaf branch.
- Attach these leaf branches to your main flower clusters using floral tape, placing them strategically along the stem.
Step 7: Arrange Your Wisteria Cascade
The final step is to bring all your individual clusters together to form a magnificent wisteria cascade.
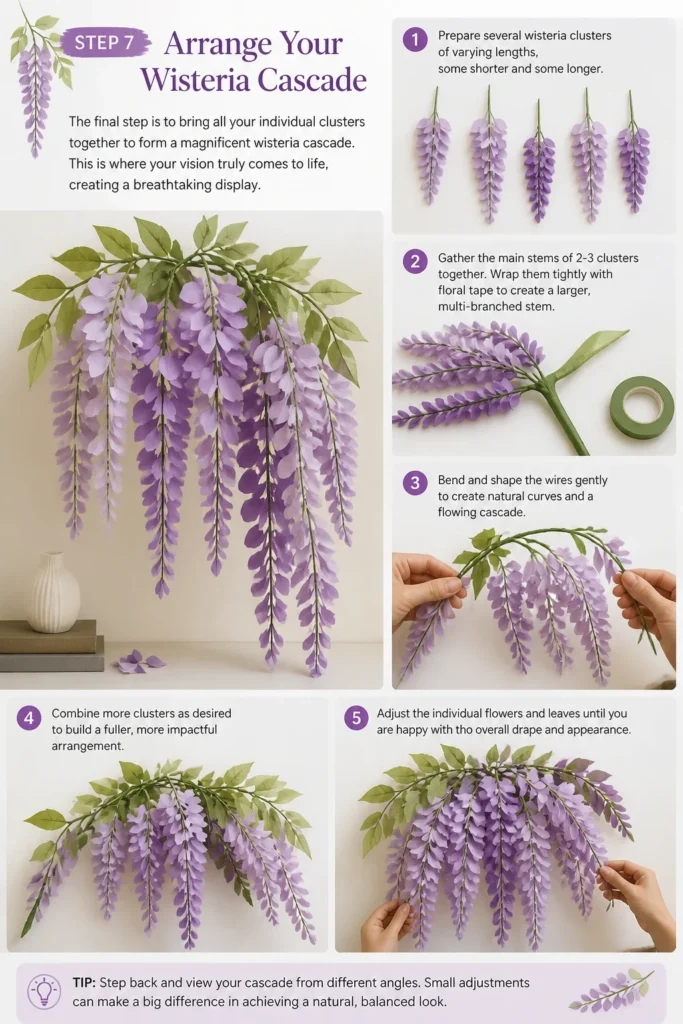
This is where your vision truly comes to life, creating a breathtaking display.
- Prepare several wisteria clusters of varying lengths, some shorter and some longer.
- Gather the main stems of 2-3 clusters together.
- Wrap them tightly with floral tape to create a larger, multi-branched stem.
- Bend and shape the wires gently to create natural curves and a flowing cascade.
- Combine more clusters as desired to build a fuller, more impactful arrangement.
- Adjust the individual flowers and leaves until you are happy with the overall drape and appearance.
Common Mistakes to Avoid
Using the Wrong Paper Weight
Trying to use standard construction paper or very thin tissue paper can be frustrating. These papers lack the necessary stretch and body that crepe paper provides, making it difficult to shape petals realistically and achieve a durable flower.
Always opt for good quality crepe paper, preferably 90gsm or heavier, as it offers excellent elasticity and holds its shape beautifully after manipulation.
Forgetting to Stretch Petals
Simply cutting out petal shapes and gluing them will result in flat, unrealistic flowers. The magic of crepe paper lies in its ability to be stretched and sculpted.
Always take the time to gently stretch and cup each petal. This simple step adds crucial dimension and mimics the natural curves of real wisteria blooms.
Inconsistent Flower Sizing
While natural flowers have some variation, making individual flowers wildly different in size within one cluster can look messy. Aim for a general consistency in your petal sizes for each type (banner, wing, keel).
This ensures that your overall wisteria cluster appears cohesive and professionally made, even with slight organic variations.
Using Too Much Glue
Excessive glue can make your paper flowers look clumpy, stiff, and less delicate. It can also seep through the paper, leaving visible, shiny spots.
Use a very small amount of glue for each attachment. A tiny dot or a thin line is usually sufficient to secure the crepe paper without oversaturating it.
Troubleshooting
Flowers Look Flat and Lifeless
If your wisteria flowers lack dimension, it’s likely due to insufficient shaping. Crepe paper needs to be stretched and cupped to give it volume.
Go back to your petals and gently stretch the center of each one. Use a ball tool or the back of a paintbrush to create curves and cups, adding the natural depth that real wisteria possesses.
Petals Tearing During Shaping
Tearing often happens if the crepe paper is stretched too aggressively or if it’s a lower quality paper. It can also occur if the grain of the paper isn’t oriented correctly (it should stretch more easily across the grain).
Be very gentle when stretching. If tears persist, try a higher quality crepe paper, which is designed to withstand more manipulation. Always stretch across the grain, not along it.
Clusters Don’t Hang Naturally
If your finished wisteria clusters appear stiff or don’t cascade gracefully, the wire might be too rigid or not sufficiently manipulated. The goal is a gentle, flowing drape.
Gently bend and shape the main floral wire stems of your clusters. You can also slightly curve the wires of individual flowers within the cluster to encourage a more organic, downward flow. Don’t be afraid to adjust the wires until the cascade looks natural.
Key Takeaways
- Quality Crepe Paper: Invest in good quality crepe paper for the best results and ease of shaping.
- Petal Shaping is Key: Don’t skip the step of stretching and cupping petals; it’s essential for realism.
- Work in Batches: Streamline your process by cutting, shaping, then assembling in stages.
- Mindful Gluing: Use minimal glue to keep your flowers delicate and clean.
- Practice Patience: Wisteria involves many small pieces; enjoy the process and don’t rush.
- Embrace Variation: While consistency is good, slight natural variations make your flowers look more organic.
Frequently Asked Questions
Can I use different types of paper?
While crepe paper is highly recommended for its stretch and texture, you can experiment with other papers like tissue paper for a more translucent effect, or even cardstock for a stiffer, more stylized flower. Just be aware that shaping will be different, and the final look may vary significantly from natural wisteria.
How do I make my wisteria last longer?
Paper flowers are quite durable, but to maximize their lifespan, keep them out of direct sunlight to prevent fading. Avoid humid environments, which can cause the paper to warp or sag. A light dusting with a soft brush or compressed air can keep them clean over time.
Can I make different colored wisteria?
Absolutely! Wisteria naturally comes in shades of purple, white, and pink. Feel free to use any color crepe paper you desire to match your decor or personal preference. You can even create ombre effects by blending different shades of paper within a single cluster.
Is it possible to make smaller or larger wisteria flowers?
Yes, the size is entirely scalable. Simply adjust the dimensions of your petal cuts and the length of your floral wires. For smaller flowers, use finer gauge wire (e.g., 26-gauge), and for larger flowers, you might need slightly thicker wire (e.g., 20-gauge) to maintain stability.
Our Top Recommended Finds
- Italian Crepe Paper: Superior stretch and vibrant colors make this paper ideal for realistic blooms.
- Fine-Tipped Scissors: Essential for precise, clean cuts on delicate petal shapes.
- Floral Tape (Stretchable): Provides a seamless, natural finish for stems and branch assemblies.
Craft Your Own Evergreen Garden
Creating paper wisteria is a truly rewarding experience, allowing you to bring a touch of enduring spring beauty into any space.
Each delicate bloom you craft is a testament to your patience and creativity.
Why not gather your materials today and start building your own breathtaking cascade?
Beginner-friendly templates, step-by-step guides,
and weekly project ideas in your inbox.