
How To Make Christmas Gnomes DIY

Beginner-friendly templates, step-by-step guides,
and weekly project ideas in your inbox.
The holiday season is a perfect time for crafting unique decorations that add warmth to your home. Creating your own Christmas gnomes brings a touch of whimsical charm and festive spirit to any space. I’ve spent many evenings crafting these adorable figures, and I’m excited to share my tried-and-true methods with you.
This guide will walk you through each stage, ensuring your homemade gnomes are as delightful as any store-bought version. You’ll soon have a collection of charming, personalized gnomes ready to spread holiday cheer. Get ready to transform simple materials into magical Christmas decorations.

Quick Overview
This comprehensive guide will teach you how to craft charming Christmas gnomes from scratch. You’ll learn to assemble the base, add a plush body, create a flowing beard, sculpt a nose, and design a festive hat, complete with embellishments. By the end, you’ll have a unique, handmade decoration perfect for your holiday display or as a heartfelt gift.
- Time needed: 2-4 hours per gnome (depending on detail)
- Difficulty: Beginner
- What you’ll need: Fabric, faux fur, wooden beads, stuffing, hot glue, scissors, cone base, weighted filler
Step-by-Step Instructions
Step 1: Prepare Your Gnome Base
Gather your chosen material for the gnome’s body base. A sturdy cardboard cone, a heavy-duty styrofoam cone, or even a repurposed plastic bottle cut to size works perfectly. This foundation dictates your gnome’s final height and overall shape.
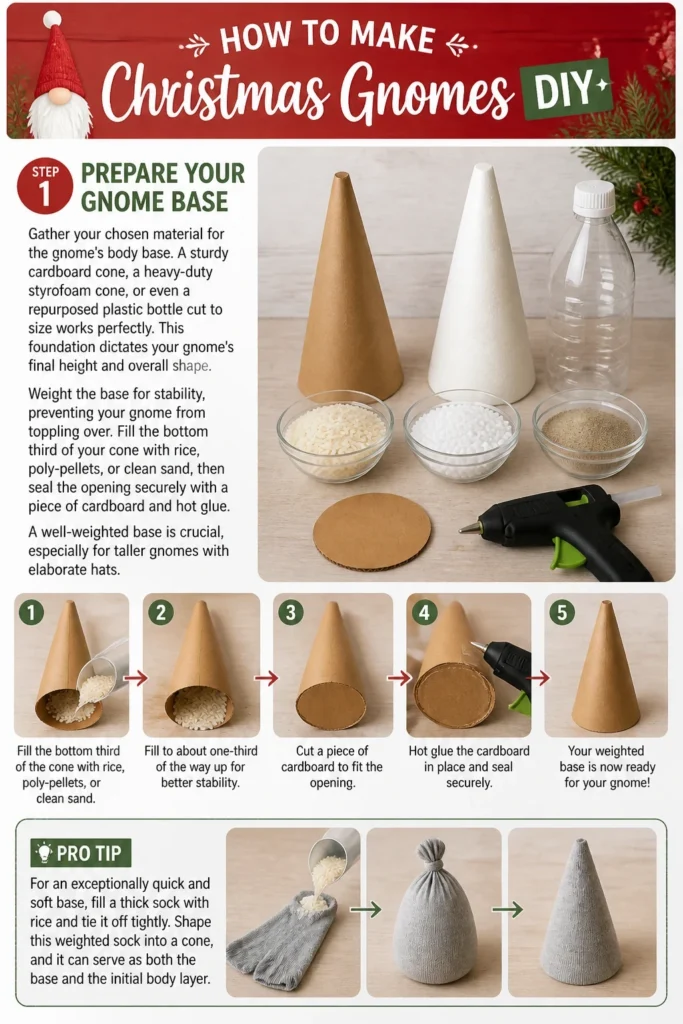
Weight the base for stability, preventing your gnome from toppling over. Fill the bottom third of your cone with rice, poly-pellets, or clean sand, then seal the opening securely with a piece of cardboard and hot glue. A well-weighted base is crucial, especially for taller gnomes with elaborate hats.
Pro Tip: For an exceptionally quick and soft base, fill a thick sock with rice and tie it off tightly. Shape this weighted sock into a cone, and it can serve as both the base and the initial body layer.
Step 2: Create the Gnome Body
Cover your weighted cone base with your chosen body fabric. Felt, fleece, or even an old sweater sleeve makes an excellent gnome body. Cut the fabric to fit around the cone, leaving extra length at the bottom to tuck under and at the top for gathering.
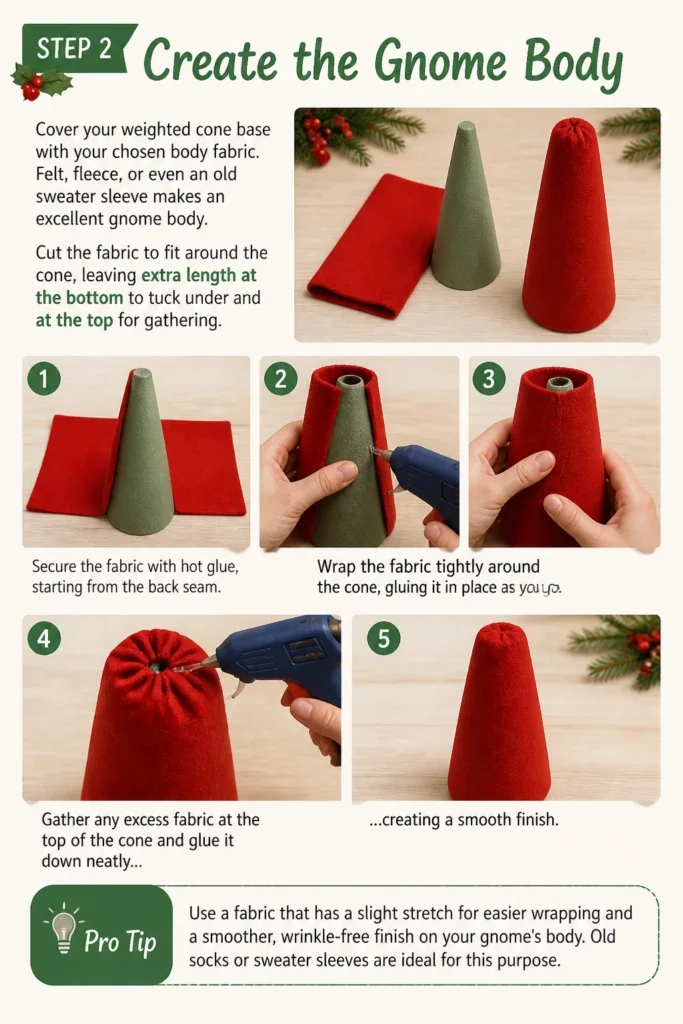
Secure the fabric with hot glue, starting from the back seam. Wrap the fabric tightly around the cone, gluing it in place as you go. Gather any excess fabric at the top of the cone and glue it down neatly, creating a smooth finish.
Pro Tip: Use a fabric that has a slight stretch for easier wrapping and a smoother, wrinkle-free finish on your gnome’s body. Old socks or sweater sleeves are ideal for this purpose.
Step 3: Attach the Faux Fur Beard
Select your faux fur for the gnome’s beard, choosing a color and texture that complements your body fabric. Turn the faux fur over to the backing and carefully draw a beard shape, often a wide V or U, ensuring it’s proportionate to your gnome’s body.
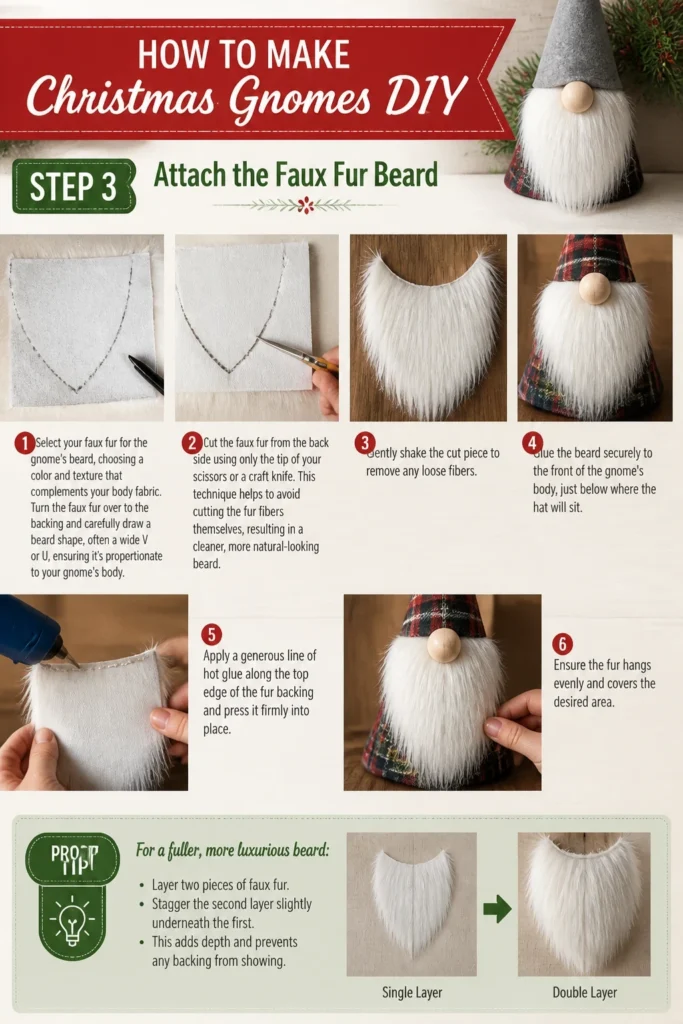
Cut the faux fur from the back side using only the tip of your scissors or a craft knife. This technique helps to avoid cutting the fur fibers themselves, resulting in a cleaner, more natural-looking beard. Gently shake the cut piece to remove any loose fibers.
Glue the beard securely to the front of the gnome’s body, just below where the hat will sit. Apply a generous line of hot glue along the top edge of the fur backing and press it firmly into place. Ensure the fur hangs evenly and covers the desired area.
Pro Tip: For a fuller, more luxurious beard, cut two beard pieces and layer them slightly, offsetting them before gluing. This adds depth and volume to your gnome’s facial hair.
Step 4: Add the Wooden Nose
Choose a wooden bead for your gnome’s nose. The size of the bead should be appropriate for your gnome’s scale; usually, a 1-inch or 1.5-inch bead works well for most medium-sized gnomes. Ensure it’s smooth and free of splinters.
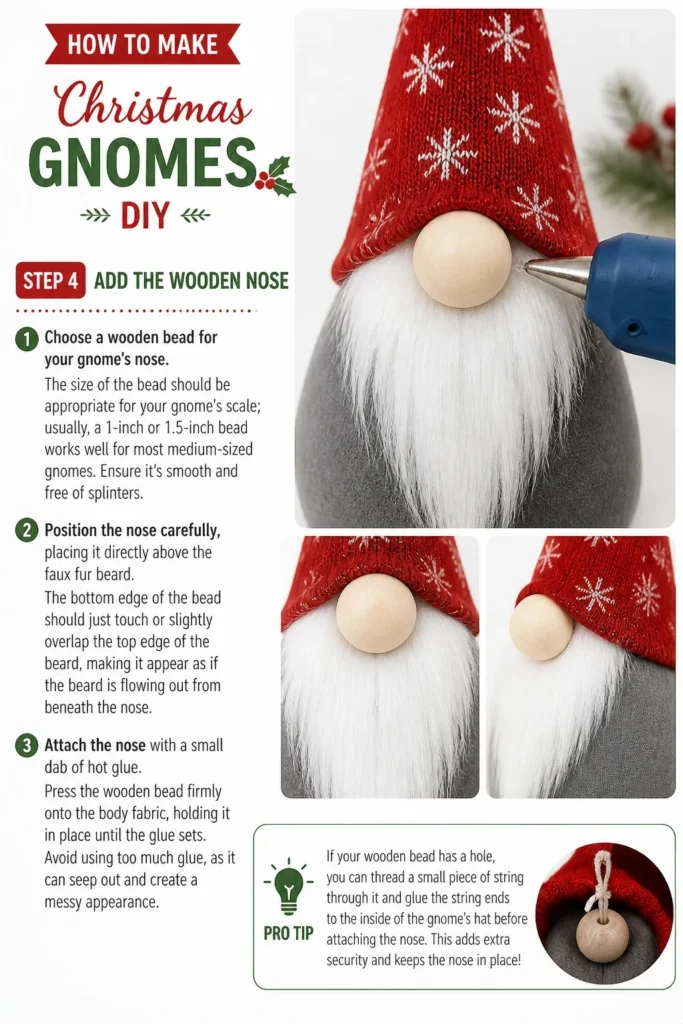
Position the nose carefully, placing it directly above the faux fur beard. The bottom edge of the bead should just touch or slightly overlap the top edge of the beard, making it appear as if the beard is flowing out from beneath the nose.
Attach the nose with a small dab of hot glue. Press the wooden bead firmly onto the body fabric, holding it in place until the glue sets. Avoid using too much glue, as it can seep out and create a messy appearance.
Pro Tip: If your wooden bead has a hole, you can thread a small piece of string through it and glue the string ends to the body for extra security, then cover with the hat. This provides a stronger attachment point.
Step 5: Craft the Gnome Hat
Cut out your hat fabric, which can be felt, fleece, or any festive patterned fabric. Measure the circumference of your gnome’s head where the hat will rest, and cut a triangular or conical shape that is slightly wider at the base and tapers to a point. Add a small seam allowance.
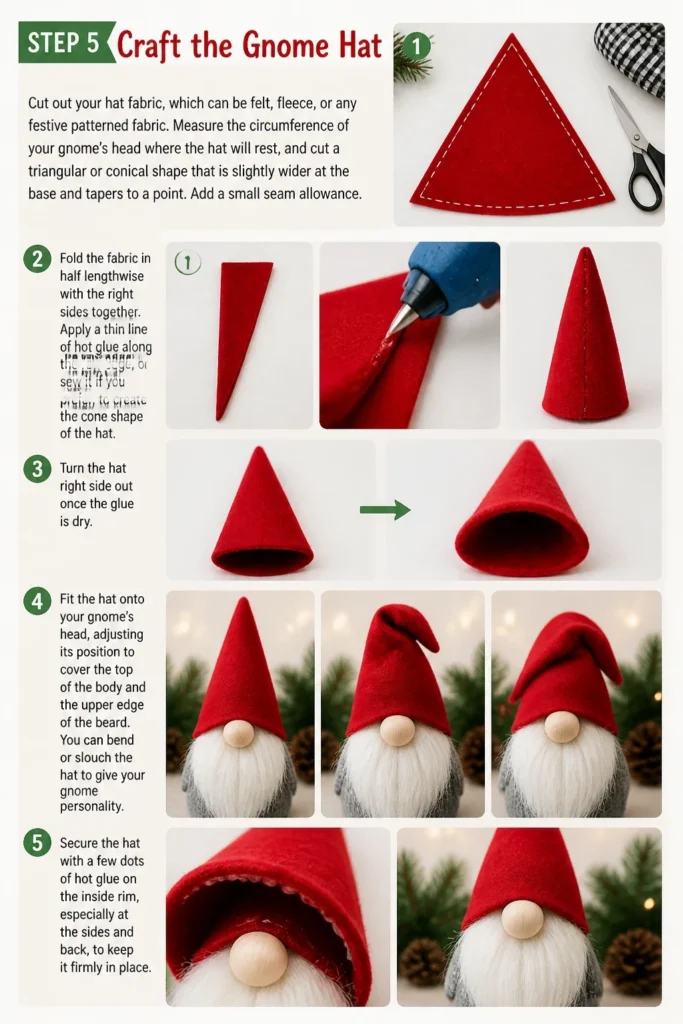
Fold the fabric in half lengthwise with the right sides together. Apply a thin line of hot glue along the raw edge, or sew it if you prefer, to create the cone shape of the hat. Turn the hat right side out once the glue is dry.
Fit the hat onto your gnome’s head, adjusting its position to cover the top of the body and the upper edge of the beard. You can bend or slouch the hat to give your gnome personality. Secure the hat with a few dots of hot glue on the inside rim, especially at the back.
Pro Tip: For a poseable hat, insert a pipe cleaner or floral wire along the seam or around the top edge before gluing. This allows you to bend and shape the hat into various fun positions.
Step 6: Embellish Your Gnome
Decorate your gnome’s hat and body with festive embellishments. Small bells, miniature pinecones, artificial berries, tiny ornaments, or even a sprig of faux greenery can add wonderful character. Consider the overall theme and color scheme of your gnome.
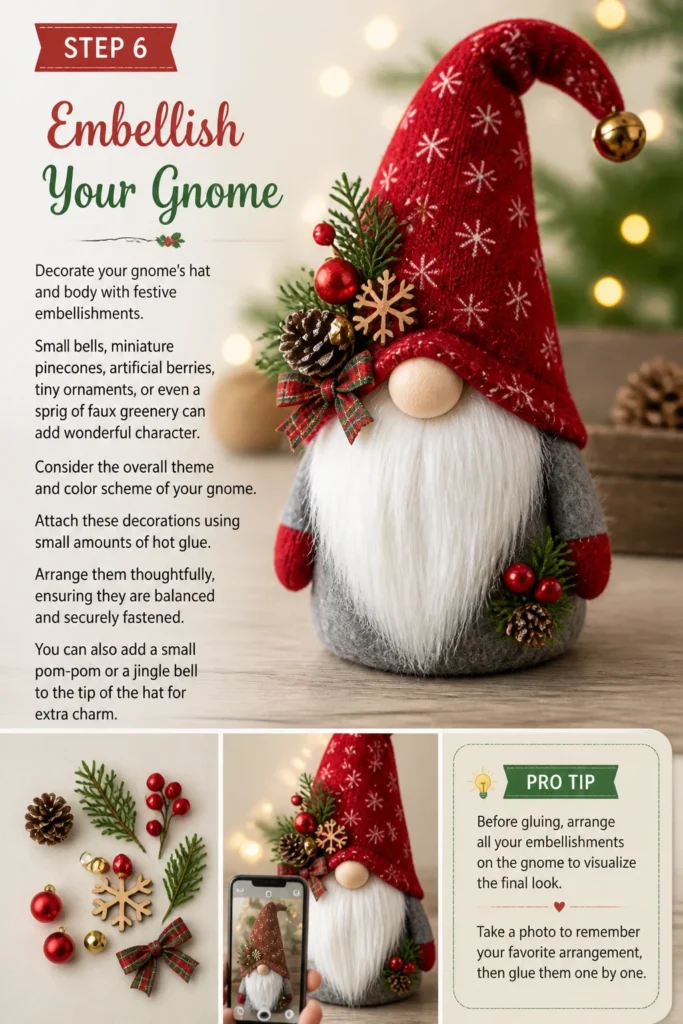
Attach these decorations using small amounts of hot glue. Arrange them thoughtfully, ensuring they are balanced and securely fastened. You can also add a small pom-pom or a jingle bell to the tip of the hat for extra charm.
Pro Tip: Before gluing, arrange all your embellishments on the gnome to visualize the final look. Take a photo to remember your favorite arrangement, then glue them one by one.
Step 7: Add Finishing Touches
Inspect your gnome for any visible glue strings or loose threads. Carefully trim away any excess material or stray fibers to give your gnome a polished, professional appearance. A clean finish makes a big difference.
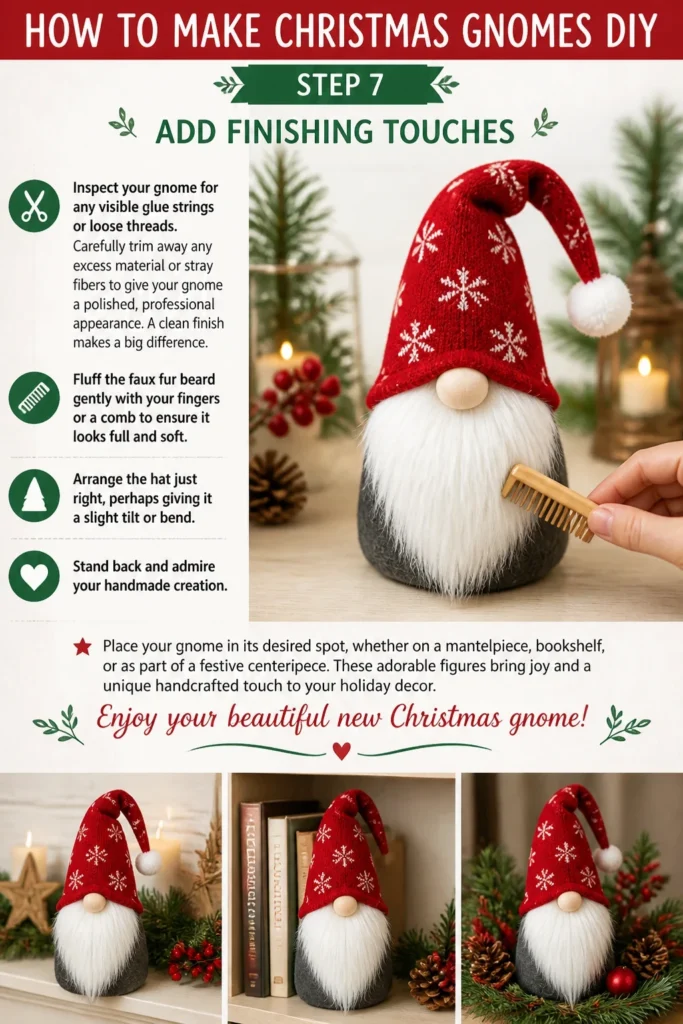
Fluff the faux fur beard gently with your fingers or a comb to ensure it looks full and soft. Arrange the hat just right, perhaps giving it a slight tilt or bend. Stand back and admire your handmade creation.
Place your gnome in its desired spot, whether on a mantelpiece, bookshelf, or as part of a festive centerpiece. These adorable figures bring joy and a unique handcrafted touch to your holiday decor. Enjoy your beautiful new Christmas gnome!
Common Mistakes to Avoid
Not Weighting the Base Sufficiently
A common oversight is neglecting to add enough weight to the gnome’s base. Without proper weighting, especially for taller gnomes, they become top-heavy and prone to falling over easily. This can be frustrating when you’ve just finished your detailed work.
Always fill the bottom third of your cone with a dense material like rice, sand, or poly-pellets. Seal it securely before adding any fabric. This simple step ensures your gnome stands proudly without toppling.
Improper Faux Fur Cutting
Cutting faux fur incorrectly can lead to a sparse, choppy beard that doesn’t look natural. Using regular scissors to cut straight through the fur fibers creates a harsh line and significantly reduces the beard’s volume. It can ruin the fluffy effect.
Always turn the faux fur over and cut only the fabric backing with the tip of your scissors or a craft knife. This preserves the length of the fur fibers, resulting in a beautifully soft and full beard for your gnome.
Over-Applying Hot Glue
While hot glue is a crafting essential, using too much can be detrimental. Excessive glue can seep through fabrics, create unsightly lumps, and leave visible, shiny residue. This detracts from the handmade charm of your gnome.
Apply hot glue in small, controlled dots or thin lines. Work in sections, pressing firmly to secure components. If glue seeps out, let it cool completely, then gently peel or rub it away, or trim it with a sharp craft knife.
Hat Not Fitting or Staying On
A hat that’s too loose, too tight, or constantly slipping off is a common issue. Incorrect measurements or insufficient attachment can lead to a wobbly hat that detracts from the gnome’s appearance and requires constant adjustment.
Measure your gnome’s head circumference carefully before cutting the hat fabric, allowing for a slight overlap. Once the hat is shaped and positioned, secure it with a few small dots of hot glue on the inside rim, especially at the back and sides, to keep it firmly in place.
Troubleshooting
My Gnome Keeps Falling Over
If your gnome is unstable and frequently topples, it’s likely due to an insufficient weight in its base. The top-heavy hat and body can easily unbalance a lightweight foundation. This is a very common problem, especially with taller designs.
To fix this, carefully separate the body fabric from the bottom of the cone. Add more weighted filler like rice or poly-pellets to the base until it feels substantial. Reseal the bottom securely with hot glue and reattach the fabric. For extra stability, you can glue a small, heavy washer or piece of cardboard to the very bottom exterior of the base.
The Beard Looks Sparse or Uneven
A thin or patchy beard can make your gnome look less charming than intended. This often happens if the faux fur was cut improperly, or if the piece itself was too small for the gnome’s scale. Sometimes, the fur simply needs a little help.
Gently comb or brush the faux fur with a fine-toothed comb or even your fingers to fluff it out and distribute the fibers evenly. If it’s still too sparse, consider cutting a second, slightly smaller beard piece and layering it over the first with a small amount of glue. This adds immediate volume and fullness.
The Hat Won’t Stay in Place
A hat that slides around or refuses to sit correctly can be frustrating. This usually indicates insufficient glue application or an ill-fitting hat. Gravity and movement can easily dislodge a loosely attached hat.
Carefully lift the hat and apply a few more dots of hot glue around the inside rim, focusing on the points where it meets the gnome’s body and the top of the beard. Press the hat firmly back into position and hold until the glue cools completely. Ensure the hat fits snugly but not so tightly that it puckers the fabric.
Key Takeaways
- Weighting the base is crucial: Always fill the bottom of your gnome’s cone with a heavy material like rice or poly-pellets for stability.
- Cut faux fur correctly: Trim only the backing of the faux fur with the tip of your scissors to maintain the natural fluffiness of the beard.
- Use hot glue sparingly: Apply small, controlled amounts of hot glue to avoid visible residue and messy finishes.
- Measure and fit the hat: Ensure the hat fabric is cut to the correct size and secured properly to prevent it from slipping.
- Personalize with embellishments: Add small festive decorations like bells, berries, or greens to give your gnome unique character.
- Inspect for a polished finish: Trim loose threads and glue strings, and fluff the beard for a professional, handmade look.
Frequently Asked Questions
Can I make these gnomes washable?
Generally, gnomes made with hot glue and faux fur are not fully machine washable. Hot glue can dissolve or weaken in water, and faux fur can become matted. For cleaning, gently spot clean with a damp cloth and mild soap, then air dry.
Are these gnomes safe for outdoor use?
These DIY gnomes are primarily designed for indoor decoration. Exposure to moisture, direct sunlight, or extreme temperatures can damage the fabrics, glue, and embellishments. If you wish to use them outdoors, consider applying a waterproof sealant to fabric parts and using weather-resistant materials.
How can I make different sized gnomes?
You can easily scale your gnomes by adjusting the size of your cone base and proportionate materials. For larger gnomes, use bigger cones, more fabric, and larger wooden beads for the nose. For miniature gnomes, reduce all material sizes accordingly, perhaps using smaller wooden beads or even felt balls for the nose.
What if I don’t have faux fur for the beard?
If faux fur isn’t available, you have several creative alternatives. You can use yarn, unraveling it for a shaggy look, or cutting felt strips and layering them. Cotton batting or even a feather boa can also create interesting beard textures for your gnome.
Our Top Recommended Finds
- Assorted Felt Fabric Sheets: Perfect for gnome bodies and hats, offering a wide range of colors and easy cutting.
- Premium Faux Fur Fabric Scraps: Ideal for beards, providing a luxurious, realistic texture without needing to buy a large bolt.
- Multi-Size Wooden Craft Beads: Essential for noses, ensuring you have the right size bead for any gnome project you undertake.
Craft Your Cozy Companions Today
Creating your own Christmas gnomes is a wonderfully rewarding project that adds a personal touch to your holiday season. Each gnome you craft will carry a piece of your creativity and festive spirit, making your home feel even more special. Imagine the joy of displaying these unique, handmade figures year after year.
Don’t let another holiday season pass without embracing the magic of DIY. Gather your materials, follow these steps, and start crafting your adorable gnome army today. You might even discover a new favorite holiday tradition.
Beginner-friendly templates, step-by-step guides,
and weekly project ideas in your inbox.