How To Make A Dog Bed

Beginner-friendly templates, step-by-step guides,
and weekly project ideas in your inbox.
There’s nothing quite like seeing your beloved pet curled up in a cozy spot, especially one you created with your own hands.
I remember the joy my dog, Max, showed when he first tried the bed I made for him – it quickly became his favorite napping spot.
This guide will walk you through making a comfortable, durable dog bed, ensuring your furry friend gets the best rest possible.
Quick Overview
Making a dog bed is a rewarding project that allows you to customize comfort and style for your pet. You’ll create a soft, supportive haven tailored to their size and needs.
- Time needed: 2-4 hours (depending on sewing experience)
- Difficulty: Beginner
- What you’ll need: Fabric, stuffing, sewing machine or needle and thread, scissors, measuring tape, pins.
Step-by-Step Instructions
Step 1: Plan and Measure Your Dog’s Perfect Bed
Before you cut any fabric, consider your dog’s size and sleeping habits. A bed that’s too small won’t offer proper support, while one that’s too large might feel less secure.
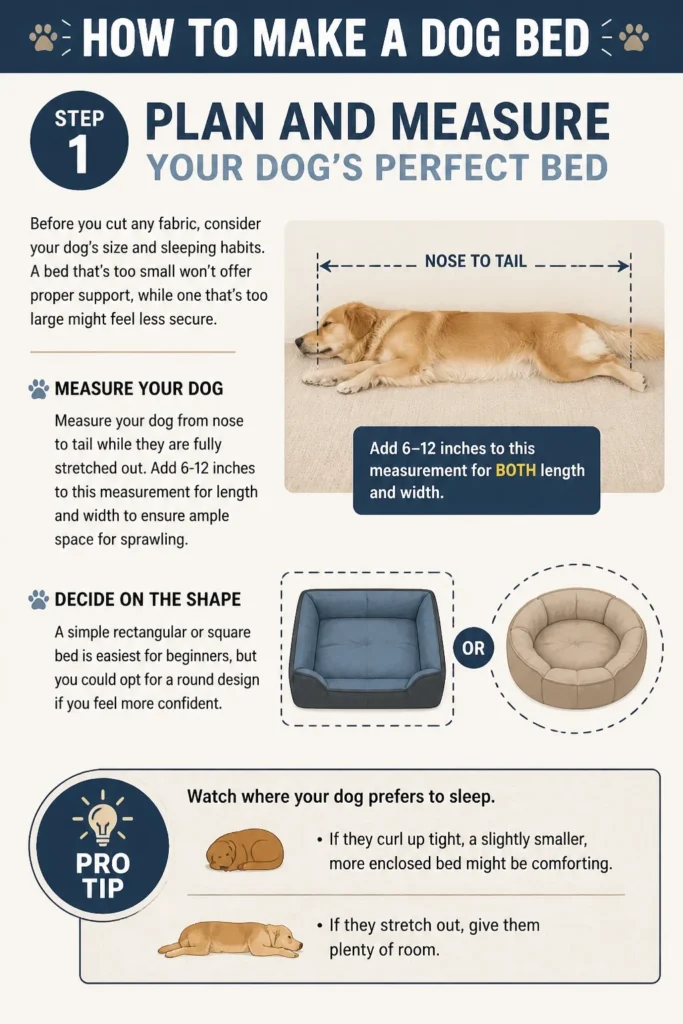
Measure your dog from nose to tail while they are fully stretched out. Add 6-12 inches to this measurement for length and width to ensure ample space for sprawling.
Decide on the shape. A simple rectangular or square bed is easiest for beginners, but you could opt for a round design if you feel more confident.
Pro Tip: Watch where your dog prefers to sleep. If they curl up tight, a slightly smaller, more enclosed bed might be comforting. If they stretch out, give them plenty of room.
Step 2: Gather Your Materials
Selecting the right materials is crucial for a durable and comfortable dog bed. Choose fabrics that are tough, washable, and comfortable for your pet.
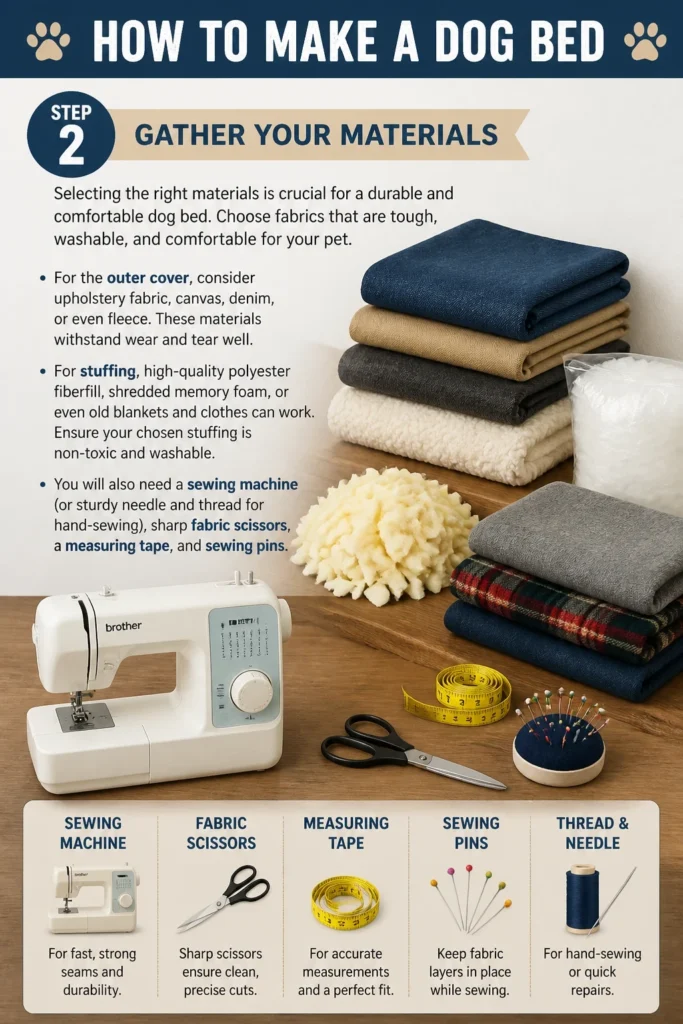
For the outer cover, consider upholstery fabric, canvas, denim, or even fleece. These materials withstand wear and tear well.
For stuffing, high-quality polyester fiberfill, shredded memory foam, or even old blankets and clothes can work. Ensure your chosen stuffing is non-toxic and washable.
You will also need a sewing machine (or sturdy needle and thread for hand-sewing), sharp fabric scissors, a measuring tape, and sewing pins.
Step 3: Cut Your Fabric Pieces
Based on your measurements, you’ll need two main pieces of fabric for the top and bottom of the bed. For a rectangular bed, cut two identical rectangles.
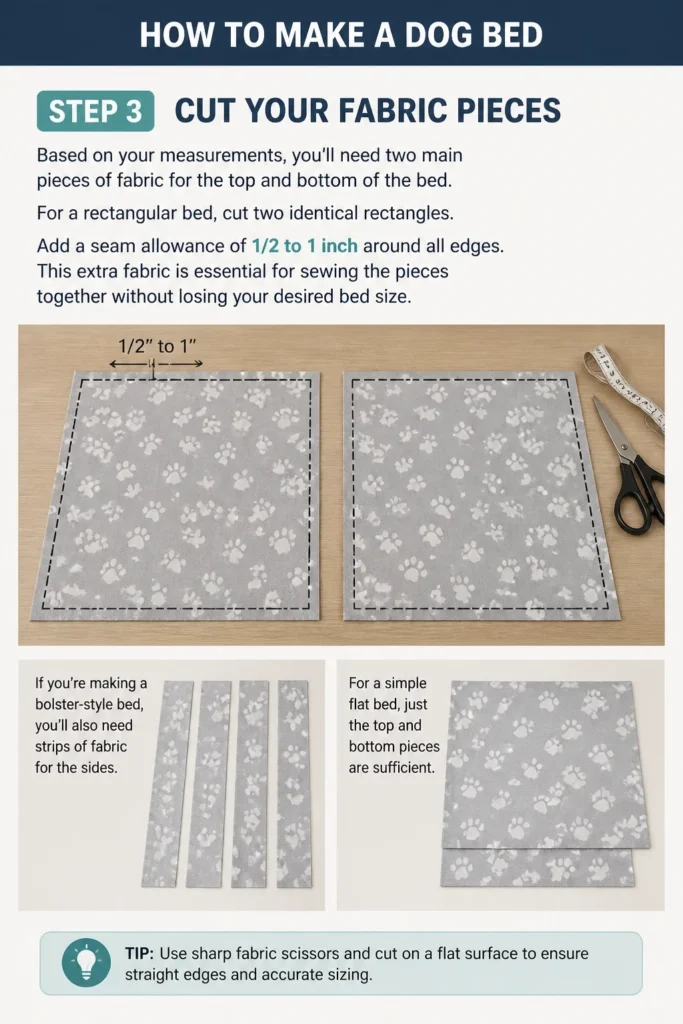
Add a seam allowance of 1/2 to 1 inch around all edges. This extra fabric is essential for sewing the pieces together without losing your desired bed size.
If you’re making a bolster-style bed, you’ll also need strips of fabric for the sides. For a simple flat bed, just the top and bottom pieces are sufficient.
Step 4: Sew the Main Seams
Place your two main fabric pieces right sides together, meaning the patterned or “good” sides of the fabric are facing each other. Pin the edges together securely.
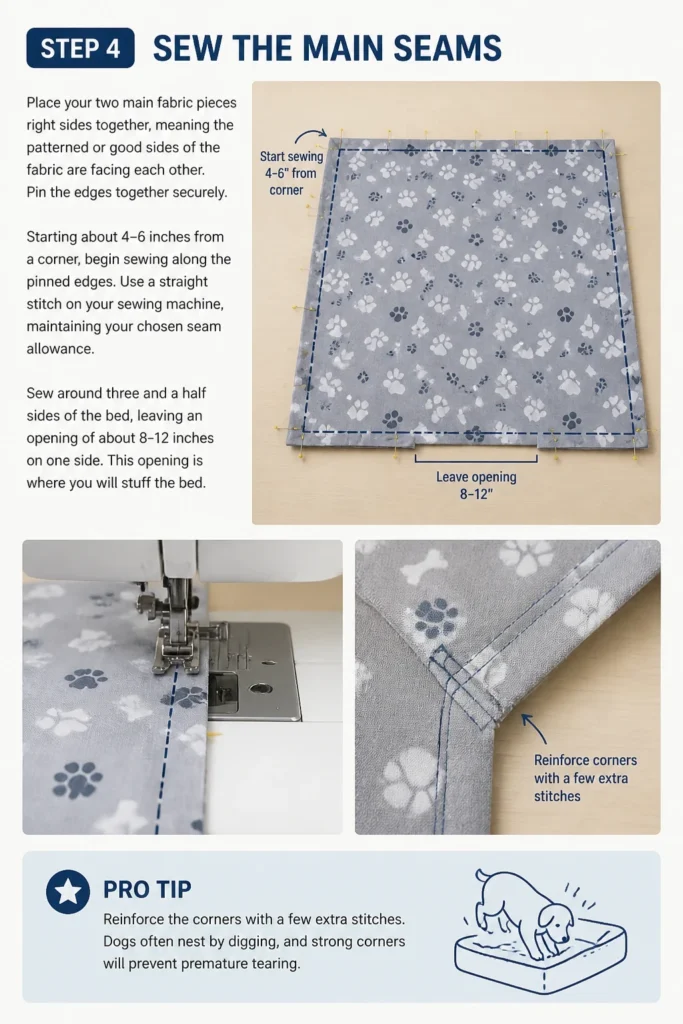
Starting about 4-6 inches from a corner, begin sewing along the pinned edges. Use a straight stitch on your sewing machine, maintaining your chosen seam allowance.
Sew around three and a half sides of the bed, leaving an opening of about 8-12 inches on one side. This opening is where you will stuff the bed.
Pro Tip: Reinforce the corners with a few extra stitches. Dogs often “nest” by digging, and strong corners will prevent premature tearing.
Step 5: Create Crisp Corners and Turn Right Side Out
Once you’ve sewn most of the way around, trim the seam allowance at the corners diagonally. Be careful not to cut through your stitches.
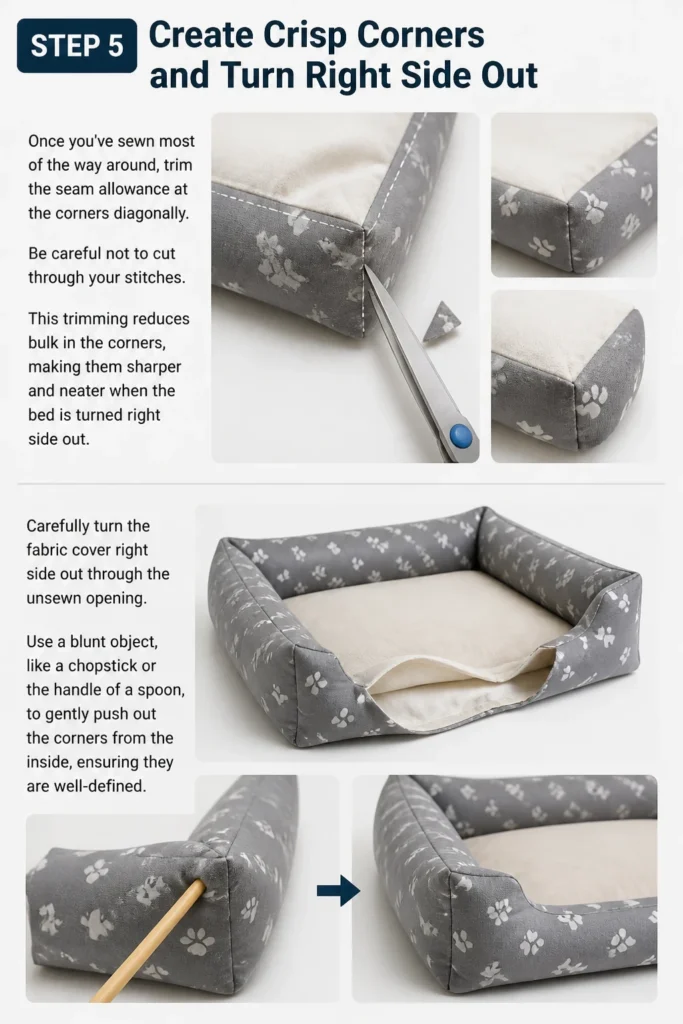
This trimming reduces bulk in the corners, making them sharper and neater when the bed is turned right side out.
Carefully turn the fabric cover right side out through the unsewn opening. Use a blunt object, like a chopstick or the handle of a spoon, to gently push out the corners from the inside, ensuring they are well-defined.
Step 6: Stuff the Bed
Now comes the fun part: filling your dog’s new bed. Begin by adding small handfuls of your chosen stuffing material into the corners first.
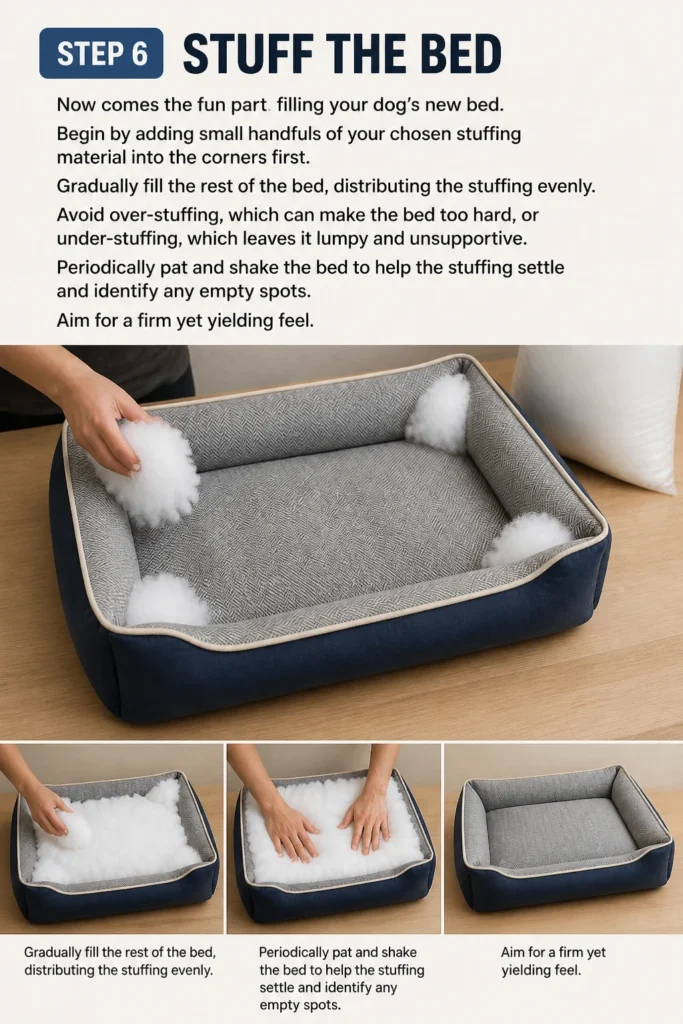
Gradually fill the rest of the bed, distributing the stuffing evenly. Avoid over-stuffing, which can make the bed too hard, or under-stuffing, which leaves it lumpy and unsupportive.
Periodically pat and shake the bed to help the stuffing settle and identify any empty spots. Aim for a firm yet yielding feel.
Step 7: Close the Opening
Once the bed is stuffed to your satisfaction, it’s time to close the opening. Fold the raw edges of the opening inwards by your seam allowance amount.
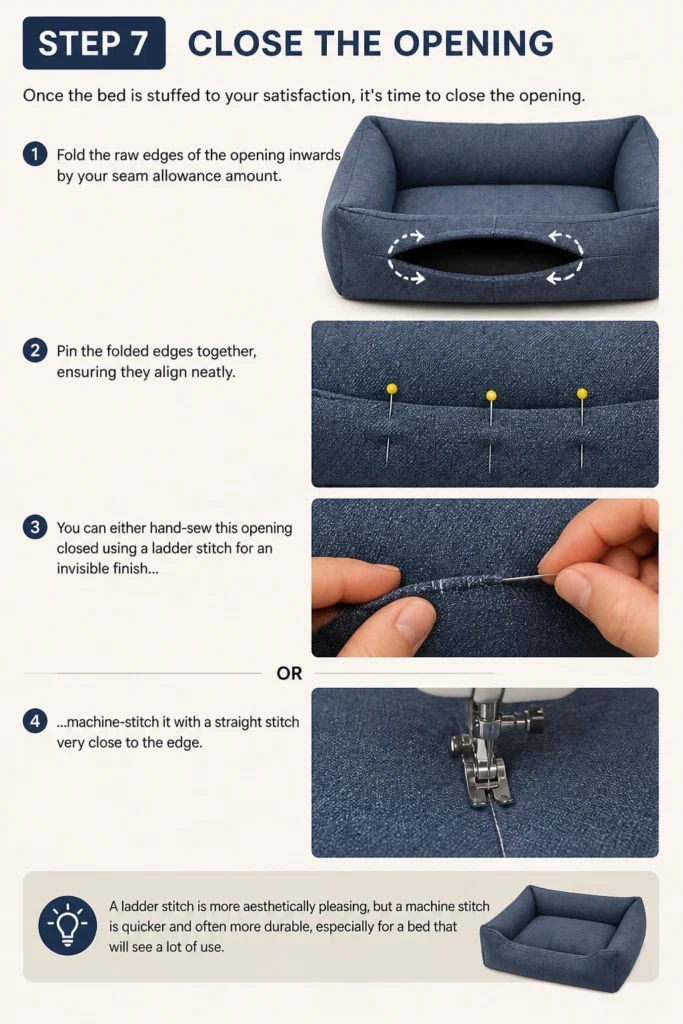
Pin the folded edges together, ensuring they align neatly. You can either hand-sew this opening closed using a ladder stitch for an invisible finish, or machine-stitch it with a straight stitch very close to the edge.
A ladder stitch is more aesthetically pleasing, but a machine stitch is quicker and often more durable, especially for a bed that will see a lot of use.
Step 8: Add Finishing Touches (Optional)
Consider adding a few finishing touches to enhance durability or comfort. You can quilt the bed by sewing lines or patterns across it.
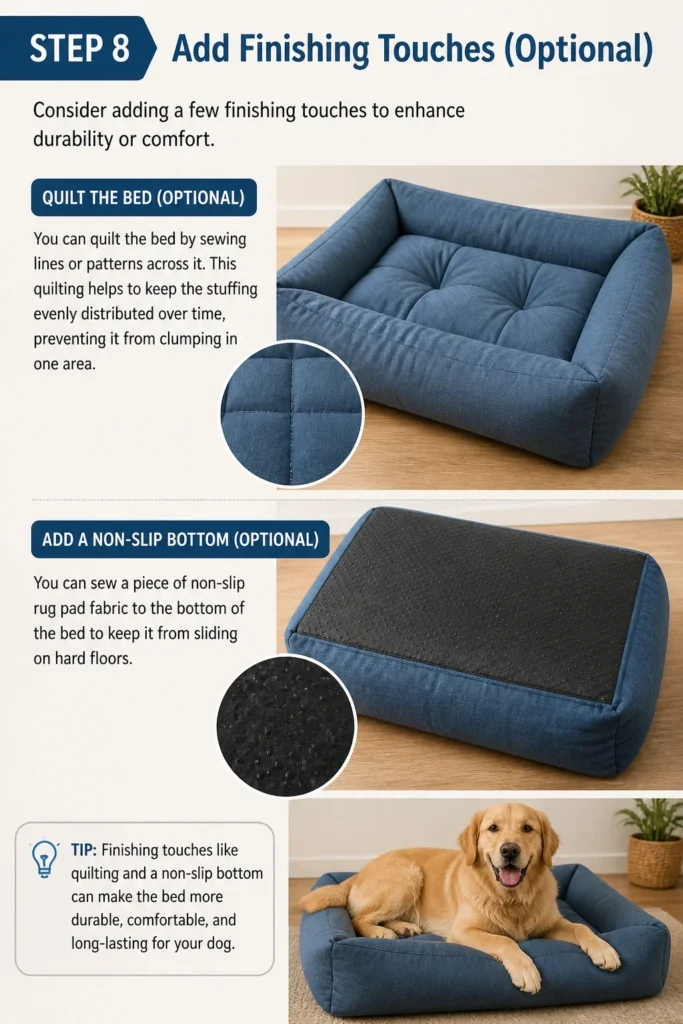
This quilting helps to keep the stuffing evenly distributed over time, preventing it from clumping in one area.
Another option is to add a non-slip bottom. You can sew a piece of non-slip rug pad fabric to the bottom of the bed to keep it from sliding on hard floors.
Common Mistakes to Avoid
Choosing the Wrong Fabric
Many first-time bed makers pick fabric based solely on appearance. However, thin cottons or delicate decorative fabrics will quickly tear or wear out under a dog’s weight and claws. Always prioritize durability and washability to ensure the bed lasts.
Under-stuffing or Over-stuffing
An under-stuffed bed offers no support and quickly flattens, becoming uncomfortable. Conversely, an over-stuffed bed can be too firm, making it difficult for your dog to sink into and get cozy. Aim for a density that feels supportive yet soft to the touch.
Skipping Seam Reinforcement
Dog beds endure significant stress, especially at the seams. Failing to backstitch at the start and end of seams, or not using a strong enough stitch, can lead to seams ripping open. Always reinforce critical points, particularly corners and the closure seam, for longevity.
Incorrect Sizing
A bed that’s too small forces your dog into uncomfortable positions, while one that’s excessively large might not offer the snug feeling some dogs prefer. Take precise measurements of your dog in their favorite sleeping positions to ensure the bed is just right for them.
Troubleshooting
Bed Lumps Up After Use
If your dog bed starts to feel lumpy, it’s often due to the stuffing shifting. This can happen with loose fiberfill over time. To fix this, open a small seam, redistribute the stuffing by hand, and then consider adding a few lines of machine quilting across the bed to compartmentalize the filling.
Seams Ripping
Seams ripping typically indicates insufficient reinforcement or a weak stitch. For a quick fix, hand-sew the ripped area with a strong thread, using a backstitch or whipstitch. For a more permanent solution, consider re-sewing the entire seam with a double stitch or a stronger thread, ensuring you backstitch at both ends.
Fabric Pilling or Wearing Out Quickly
Rapid pilling or wear usually points to a fabric choice that wasn’t durable enough for a dog bed. While you can’t reverse the pilling, you can extend the bed’s life by making a removable cover from a more robust fabric. This cover can then be easily washed and replaced.
Key Takeaways
- Accurate measuring is crucial for a comfortable and appropriately sized dog bed.
- Choose durable, washable fabrics that can withstand regular use and cleaning.
- Distribute stuffing evenly for optimal support and comfort, avoiding lumps.
- Reinforce all seams, especially corners and the closure, for long-lasting durability.
- Consider adding optional features like quilting or a non-slip bottom for enhanced functionality.
- A handmade dog bed offers personalized comfort and is a rewarding DIY project.
Frequently Asked Questions
What is the best type of stuffing for a dog bed?
High-quality polyester fiberfill is a popular choice for its softness, washability, and resilience. Shredded memory foam offers excellent orthopedic support, especially for older dogs. You can also repurpose old blankets or clothes, just ensure they are clean and free of sharp objects.
How often should I clean a handmade dog bed?
The frequency depends on your dog’s activity level and cleanliness. Generally, aim to wash the entire bed or its cover every 2-4 weeks. If your dog spends a lot of time outdoors or has allergies, you might need to clean it more often to keep it fresh and hygienic.
Can I make the dog bed waterproof?
Yes, you can make the bed more water-resistant. Use a waterproof fabric for the inner lining of the bed, or create a separate waterproof liner that goes under the main cover. There are also waterproof sprays you can apply to the outer fabric, though these may need reapplication after washing.
What if I don’t have a sewing machine?
You can absolutely hand-sew a dog bed! It will take more time and patience, but it’s very achievable. Use a strong needle and sturdy thread, and opt for stitches like a backstitch, which mimics a machine stitch’s strength, for all seams. A ladder stitch is perfect for closing the final opening.
Our Top Recommended Finds
- Heavy-Duty Upholstery Fabric: Choose a canvas, corduroy, or duck cloth that can withstand digging and washing without quickly showing wear.
- Premium Polyester Fiberfill: Look for hypoallergenic, machine-washable fiberfill that retains its loft and support over time, preventing quick flattening.
- Strong Upholstery Thread: Invest in a durable thread, such as a bonded nylon or heavy-duty polyester, to ensure your seams hold up to daily use and frequent washing.
Give Your Pet the Gift of Comfort
Crafting a dog bed is more than just a DIY project; it’s an act of love for your furry family member. You’ve now got the knowledge and steps to create a cozy, personalized haven.
Imagine the happy sighs and contented snoozes your dog will enjoy in their very own custom bed. Don’t wait to give them this special comfort.
Gather your materials today and start sewing. Your dog will thank you with endless tail wags and happy dreams.
Beginner-friendly templates, step-by-step guides,
and weekly project ideas in your inbox.